 Node.js
# Node.js基础
Node是一个基于Chrome V8引擎的JavaScript代码运行环境。
Node.js是一个javascript运行环境。它让javascript可以开发后端程序,实现几乎其他后端语言实现的所有功能,可以与PHP、Java、Python、.NET、Ruby等后端语言平起平坐。
Nodejs是基于V8引擎,V8是Google发布的开源JavaScript引擎,本身就是用于Chrome浏览器的js解释部分,但是Ryan Dahl 这哥们,鬼才般的,把这个V8搬到了服务器上,用于做服务器的软件。
# nodejs的特性
- Nodejs语法完全是js语法,只要你懂js基础就可以学会Nodejs后端开发
- NodeJs超强的高并发能力,实现高性能服务器
- 开发周期短、开发成本低、学习成本低

Node.js 可以解析JS代码(没有浏览器安全级别的限制)提供很多系统级别的API,如:
文件的读写 (File System)
const fs = require('fs')

fs.readFile('./ajax.png', 'utf-8', (err, content) => {
  console.log(content)
})
1
2
3
4
5进程的管理 (Process)
function main(argv) {
  console.log(argv)
}

main(process.argv.slice(2))
1
2
3
4
5
6网络通信 (HTTP/HTTPS)
const http = require("http")

http.createServer((req,res) => {
  res.writeHead(200, {
    "content-type": "text/plain"
  })
  res.write("hello nodejs")
  res.end()
}).listen(3000)
1
2
3
4
5
6
7
8
9
10
# 模块、包、commonJS

# CommonJS规范


# modules模块化规范
我们可以把公共的功能 抽离成为一个单独的 js 文件 作为一个模块,默认情况下面这个模块里面的方法或者属性,外面是没法访问的。如果要让外部可以访问模块里面的方法或者属性,就必须在模块里面通过 exports 或者 module.exports 暴露属性或者方法。
module.exports是模块的默认导出方式,它导出一个对象,该对象被视为模块的公开接口。如果一个模块只使用module.exports导出内容,那么在其他文件中可以使用require()函数来引入该模块,并使用该对象的方法和属性。exports是module.exports的一个别名,它们是等价的。在大多数情况下,exports被用于导出模块中的函数、对象或变量。
m1.js
const name = 'abc'
const sayName = () => {
    console.log(name)
}


// 接口暴露方法一:
module.exports = {
    say: sayName
}
// 接口暴露方法二:
// exports.say = sayName

// 这是错误的写法
// exports = {
//     abc: sayName
// }
2
3
4
5
6
7
8
9
10
11
12
13
14
15
16
17
main.js
const m1 = require('./m1')
m1.say()
2

# Npm&Yarn
# npm的使用
npm init
npm install 包名 –g  (uninstall,update)
npm install 包名 --save-dev (uninstall,update)
npm list -g (不加-g,列举当前目录下的安装包)
npm info 包名(详细信息) npm info 包名 version(获取最新版本)
npm install md5@1(安装指定版本)
npm outdated(  检查包是否已经过时)


	"dependencies": {    "md5": "^2.1.0"  }  ^ 表示 如果 直接npm install 将会 安md5
    2.*.*  	最新版本

	"dependencies": {    "md5": "~2.1.0"  }  ~ 表示 如果 直接npm install 将会 安装md5 2.1.*  最新版本

	"dependencies": {    "md5": "*"  }  * 表示 如果 直接npm install 将会 安装 md5  最新版本
2
3
4
5
6
7
8
9
10
11
12
13
14
15
# 全局安装 nrm
NRM (npm registry manager)是npm的镜像源管理工具,有时候国外资源太慢,使用这个就可以快速地在 npm 源间切换。
安装 nrm
在命令行执行命令,npm install -g nrm,全局安装nrm。
使用 nrm
执行命令 nrm ls 查看可选的源。 其中,带*的是当前使用的源,上面的输出表明当前源是官方源。
切换 nrm
如果要切换到taobao源,执行命令nrm use taobao。
测试速度
你还可以通过 nrm test 测试相应源的响应时间。
nrm test

npm install -g cnpm --registry=https://registry.npmmirror.com
# yarn使用
npm install -g yarn
对比npm:
	速度超快: Yarn 缓存了每个下载过的包,所以再次使用时无需重复下载。 同时利用并行下载以最大化资源利用率,因此安装速度更快。
    超级安全: 在执行代码之前,Yarn 会通过算法校验每个安装包的完整性。

开始新项目
	yarn init
添加依赖包
	yarn add [package]
	yarn add [package]@[version]
	yarn add [package] --dev
升级依赖包
	 yarn upgrade [package]@[version]
移除依赖包
	 yarn remove [package]

安装项目的全部依赖
	 yarn install
2
3
4
5
6
7
8
9
10
11
12
13
14
15
16
17
# 内置模块
# http模块
要使用 HTTP 服务器和客户端,则必须 require('http')。
http1.js
const http = require('http')

// 创建本地服务器来从其接收数据
const server = http.createServer((req,res) => {
    res.writeHead(200, {'Content-Type': 'application/json'});
    res.end(JSON.stringify({
        data: 'Hello World!!!'
    }));
});

server.listen(8000)
console.log('服务器启动成功')
2
3
4
5
6
7
8
9
10
11
12
启动:node http1.js

http2.js
const http = require('http')

// 创建本地服务器来从其接收数据
const server = http.createServer()

// 监听请求事件
server.on('request', (req, res) => {
    res.writeHead(200, {'Content-Type': 'application/json'});
    res.end(JSON.stringify({
        data: 'Hello World!!!'
    }));
})

server.listen(8000)
console.log('服务器启动成功')
2
3
4
5
6
7
8
9
10
11
12
13
14
15
http3.js
const http = require('http')

const server = http.createServer((req, res) => {
    // req 接收浏览器传递过来的参数
    // res 返回渲染的内容

    res.writeHead(200, {"Content-Type": "text/html;charset=utf-8;"})

    res.write('返回的内容一')
    res.write('返回的内容二')
    res.write(`
        <h1>在返回的Content-Type中指定text/html也可以识别标签</h1>
    `)
    // res.end() // end才会渲染结束
    res.end('end里面也可以返回内容')
});

server.listen(8000, ()=> {
    console.log('服务器启动成功')
})
2
3
4
5
6
7
8
9
10
11
12
13
14
15
16
17
18
19
20
http4.js
const http = require('http')
const url = require('url')

const server = http.createServer()

server.on("request", (req, res) => {
    console.log(url.parse(req.url))
    const path = req.url
    if(path === '/favicon.ico') return
    let html = ''
    switch(path) {
        case '/home': html = renderHtml(path); break;
        default: html = `<h1>not found</h1>`
    }
    res.writeHead(200, {"Content-Type": "text/html;charset=utf-8;"})
    res.end(html)
})

function renderHtml(path) {
    return `
        <h1>${path}</h1>
    `
}

server.listen(8000, () => {
    console.log("服务器启动成功")
})
2
3
4
5
6
7
8
9
10
11
12
13
14
15
16
17
18
19
20
21
22
23
24
25
26
27
# url模块
parse
url.js
const url = require('url')

const urlString = 'https://www.baidu.com:443/ad/index.html?id=8&name=mouse#tag=110'
const parsedStr = url.parse(urlString)
console.log(parsedStr)
1
2
3
4
5
format
const url = require('url')
const urlObject = {
    protocol: 'https:',
    slashes: true,
    auth: null,
    host: 'www.baidu.com:443',
    port: '443',
    hostname: 'www.baidu.com',
    hash: '#tag=110',
    search: '?id=8&name=mouse',
    query: { id: '8', name: 'mouse' },
    pathname: '/ad/index.html',
    path: '/ad/index.html?id=8&name=mouse'
  }
  const parsedObj = url.format(urlObject)
  console.log(parsedObj) // https://www.baidu.com:443/ad/index.html?id=8&name=mouse#tag=110
1
2
3
4
5
6
7
8
9
10
11
12
13
14
15
16resolve
// resolve
var a = url.resolve('/one/two/three', 'four')  // ( 注意最后加/ ,不加/的区别 )
var b = url.resolve('http://example.com/', '/one')
var c = url.resolve('http://example.com/one', '/two')
var d = url.resolve('http://example.com/one/', 'two')
console.log(a) // /one/two/four
console.log(b) // http://example.com/one
console.log(c) // http://example.com/two
console.log(d) // http://example.com/one/two
1
2
3
4
5
6
7
8
9
新版用法:
const { URL } = require('url');

const urlString = 'https://www.baidu.com:443/ad/index.html?id=8&name=mouse#tag=110'
const myURL = new URL(urlString, "https://www.baidu.com")
console.log(myURL)
2
3
4
5

# querystring模块
parse
 const querystring = require('querystring')
 var qs = 'x=3&y=4'
 var parsed = querystring.parse(qs)
 console.log(parsed) // { x: '3', y: '4' }
1
2
3
4stringify
 const querystring = require('querystring')
var qo = {
    x: 3,
    y: 4
}
var parsed2 = querystring.stringify(qo)
console.log(parsed2) // x=3&y=4
1
2
3
4
5
6
7escape/unescape


var str = 'id=3&city=北京&url=https://www.baidu.com'
var escaped = querystring.escape(str)
console.log(escaped) // id%3D3%26city%3D%E5%8C%97%E4%BA%AC%26url%3Dhttps%3A%2F%2Fwww.baidu.com
var str2 = "id%3D3%26city%3D%E5%8C%97%E4%BA%AC%26url%3Dhttps%3A%2F%2Fwww.baidu.com"
console.log(querystring.unescape(str2)) // id=3&city=北京&url=https://www.baidu.com
1
2
3
4
5
# http模块-jsonp
http-jsonp.js
const http = require('http')
const url = require('url')

const server = http.createServer()

server.on('request', (req, res) => {
    const urlObj = url.parse(req.url, true)
    console.log(urlObj.query.callback)
    res.writeHead(200, {"Content-Type": "text/html;charset=utf-8;"})
    if(urlObj.pathname == "/api") {
        res.end(`
            ${urlObj.query.callback} ( {"name": "jsonp"} )
        `
        )
    } else {
        res.end("响应成功")
    }
})

server.listen(3000, () => {
    console.log('服务器启动成功')
})
2
3
4
5
6
7
8
9
10
11
12
13
14
15
16
17
18
19
20
21
22
jsonp.html
<!DOCTYPE html>
<html lang="en">
<head>
    <meta charset="UTF-8">
    <meta http-equiv="X-UA-Compatible" content="IE=edge">
    <meta name="viewport" content="width=device-width, initial-scale=1.0">
    <title>Document</title>
</head>
<body>
    <script>
        const myScript = document.createElement('script')
        myScript.src = "http://localhost:3000/api?callback=jsonp"
        document.body.appendChild(myScript)

        // 实现定义好的函数
        function jsonp(obj) {
            console.log(obj)
        }
    </script>
</body>
</html>
2
3
4
5
6
7
8
9
10
11
12
13
14
15
16
17
18
19
20
21


http模块-CORS
http-cors.js
const http = require('http')
const url = require('url')

const server = http.createServer()

server.on('request', (req, res) => {
    res.writeHead(200, {
        "Content-Type": "application/json",
        "Access-Control-Allow-Origin": "*"
    })
    res.end(JSON.stringify({
        name: "zhangsan",
        age: 18
    }))
})

server.listen(3000, () => {
    console.log('服务器启动成功')
})
2
3
4
5
6
7
8
9
10
11
12
13
14
15
16
17
18
19
cors.html
<!DOCTYPE html>
<html lang="en">
<head>
    <meta charset="UTF-8">
    <meta http-equiv="X-UA-Compatible" content="IE=edge">
    <meta name="viewport" content="width=device-width, initial-scale=1.0">
    <title>Document</title>
</head>
<body>
    <script>
        fetch("http://localhost:3000/api")
        .then(res => res.json())
        .then(res => {
            console.log(res)
        })
    </script>
</body>
</html>
2
3
4
5
6
7
8
9
10
11
12
13
14
15
16
17
18

# http模块-get

http-get.js
const http = require('http')
const https = require('https')
const url = require("url")

const server = http.createServer()

server.on('request', (req, res) => {
    const urlObj = url.parse(req.url, true)
    res.writeHead(200, {
        "Content-Type": "application/json",
        "Access-Control-Allow-Origin": "*"
    })
    if(urlObj.pathname == "/api") {
        httpget((data) => {
            res.end(data)
        })
    } else {
        res.end("111")
    }

})

function httpget(cb) {
    let data = ""
    https.get(`https://i.maoyan.com/api/mmdb/movie/v3/list/hot.json?ct=%E5%8C%97%E4%BA%AC&ci=1&channelId=4` , (res)=>{
        res.on("data", (chunk) => {
            data += chunk
        })
        res.on("end", () => {
            console.log(data)
            cb(data) // 获取完毕之后执行回调函数,也可以把response传进来,抓取完毕之后response.end(data)
        })
    })
}

server.listen(3000, () => {
    console.log('服务器启动成功')
})
2
3
4
5
6
7
8
9
10
11
12
13
14
15
16
17
18
19
20
21
22
23
24
25
26
27
28
29
30
31
32
33
34
35
36
37
38
get.html
<!DOCTYPE html>
<html lang="en">
<head>
    <meta charset="UTF-8">
    <meta http-equiv="X-UA-Compatible" content="IE=edge">
    <meta name="viewport" content="width=device-width, initial-scale=1.0">
    <title>Document</title>
</head>
<body>
    <script>
        fetch("http://localhost:3000/api").then(
            res => res.json()
        ).then(res => {
            console.log(res)
        })
    </script>
</body>
</html>
2
3
4
5
6
7
8
9
10
11
12
13
14
15
16
17
18

# http模块-post
http-post.js
const http = require('http')
const https = require('https')
const url = require('url')

const server = http.createServer()

server.on("request", (req, res) => {
    const urlObj = url.parse(req.url, true)
    res.writeHead(200, {
        "Content-Type": "application/json",
        "Access-Control-Allow-Origin": "*"
    })
    if (urlObj.pathname == "/api") {
        httpPost((data) => {
            res.end(data)
        })
    } else {
        res.end("111")
    }

})

function httpPost(cb) {
    var data = ""
    const options = {
        protocol: 'https:',
        hostname: 'm.xiaomiyoupin.com',
        method: 'POST',
        port: 443,
        path: '/mtop/market/search/v2/doSearch',
        headers: {
            // 'Content-Type': 'application/x-www-form-urlencoded',
            // 'Content-Length': Buffer.byteLength(postData)
            'Content-Type': 'application/json'
        }
    }
    let req = https.request(options, (res) => {
        res.on("data", chunk => {
            data += chunk
        })
        res.on("end", () => {
            console.log(data)
            cb(data)
        })
    })
    const postData = JSON.stringify([{},{"query":[{"queryName":"1","queryType":0,"rule":[]}],"sortBy":0,"pageIdx":0,"strategyInfo":null,"filter":null,"baseParam":{"imei":"","clientVersion":"","ypClient":2},"source":"searchPage","outerFilter":null,"requestId":"2089748416170245_1002","clientPageId":"48716586171220433","recentAddress":null,"requestExtraInfo":{"entryType":"ENTER_KEY","touchSortButton":false,"userNotAgreePrivacy":false,"os":"web","osVersion":"Android0","customosVersion":"unknown","appVersion":0,"phone":0,"appstore":"unknown","network":"unknown","frontVersion":"unknown"}}])
    req.write(postData)
    req.end()
}

server.listen(3000, () => {
    console.log("服务器启动成功")
})
2
3
4
5
6
7
8
9
10
11
12
13
14
15
16
17
18
19
20
21
22
23
24
25
26
27
28
29
30
31
32
33
34
35
36
37
38
39
40
41
42
43
44
45
46
47
48
49
50
51
52
53
post.html
<!DOCTYPE html>
<html lang="en">
<head>
    <meta charset="UTF-8">
    <meta http-equiv="X-UA-Compatible" content="IE=edge">
    <meta name="viewport" content="width=device-width, initial-scale=1.0">
    <title>Document</title>
</head>
<body>
    <script>
        fetch("http://localhost:3000/api").then(
            res => res.json()
        ).then(res => {
            console.log(res)
        })
    </script>
</body>
</html>
2
3
4
5
6
7
8
9
10
11
12
13
14
15
16
17
18

# 爬虫
下载插件
npm init
npm i cheerio
2
spider.js
const http = require('http')
const https = require('https')
const url = require('url')
const cheerio = require('cheerio')

const server = http.createServer()

server.on("request", (req, res) => {
    const urlObj = url.parse(req.url, true)
    res.writeHead(200, {
        "Content-Type": "application/json",
        "Access-Control-Allow-Origin": "*"
    })
    if(urlObj.pathname === "/api") {
        spider((data) => {
            res.end(data)
        })
    } else {
        res.end('响应成功')
    }
})

function spider(cb) {
    const options = {
        protocol: 'https:',
        hostname: 'i.maoyan.com',
        port: 443,
        path: '/',
        method: 'GET'
    }
    let data = ''
    const req = https.request(options, (res) => {
        res.on("data", chunk => {
            data += chunk
        })
        res.on("end", () => {
            console.log(data)
            getData(data)
        })
    })
    function getData(data) {
        // console.log(data)
        let $ = cheerio.load(data)
        let $movelist = $(".column.content")
        let movies = []
        $movelist.each((index, value) => {
            movies.push({
                title: $(value).find('.movie-title .title').text(),
                grade: $(value).find('.detail .score .grade').text(),
                detail: $(value).find('.detail .actor').text()
            })
        })
        cb(JSON.stringify(movies))
    }
    req.end()
}

server.listen(3000, () => {
    console.log("服务器启动成功")
})
2
3
4
5
6
7
8
9
10
11
12
13
14
15
16
17
18
19
20
21
22
23
24
25
26
27
28
29
30
31
32
33
34
35
36
37
38
39
40
41
42
43
44
45
46
47
48
49
50
51
52
53
54
55
56
57
58
59
60


# event模块
在Node.js中,内置模块events是用于处理事件驱动编程的核心模块之一。它提供了一种用于创建事件驱动的程序的方法,允许你在程序中注册事件监听器和触发事件。
events模块提供了一个事件驱动的编程接口,可以用于创建事件驱动的程序,例如网络服务器、异步操作等。它提供了一些核心的函数和方法,用于处理事件的生命周期,包括创建事件、注册事件监听器、触发事件以及移除事件监听器等。
以下是events模块的一些常用方法和功能:
EventEmitter:events模块的核心类是EventEmitter。它用于创建事件驱动的对象,并定义了用于处理事件的方法和事件相关的常量。- 事件监听器:通过调用
EventEmitter对象的on方法,可以注册一个事件监听器来处理特定的事件。监听器是一个函数,当该事件被触发时,该函数将被调用。 - 触发事件:通过调用
EventEmitter对象的emit方法,可以触发一个已注册的事件。当事件被触发时,所有与该事件相关联的监听器都将被调用。 - 移除事件监听器:通过调用
EventEmitter对象的off方法,可以移除已注册的事件监听器。 - 错误处理:
EventEmitter还提供了一种特殊的错误处理机制。当一个事件的监听器抛出错误时,它将被传递给与该事件关联的错误处理函数(可以通过EventEmitter对象的on方法注册)。
这些功能使得使用events模块可以方便地创建和管理事件驱动的程序。通过使用事件和监听器,可以将程序的各个部分解耦,使得程序更加灵活和可维护。
const EventEmitter = require('events')

const events = new EventEmitter()

events.on("play", (data) => {
    console.log("play事件", data)
})

events.on("run", (data) => {
    console.log("run事件", data)
})

events.emit('play', 1111)
events.emit('run', 2222)
2
3
4
5
6
7
8
9
10
11
12
13
14
对之前写的http-get进行改进
http-get-event.js
const http = require('http')
const https = require('https')
const url = require("url")
const EventEmitter = require('events')

const server = http.createServer()

let event = null
server.on('request', (req, res) => {
    const urlObj = url.parse(req.url, true)
    res.writeHead(200, {
        "Content-Type": "application/json",
        "Access-Control-Allow-Origin": "*"
    })
    if(urlObj.pathname == "/api") {
        event = new EventEmitter()
        event.on("getData", (data) => {
            res.end(data)
        })
        httpget()
    } else {
        res.end("111")
    }

})

function httpget() {
    let data = ""
    https.get(`https://i.maoyan.com/api/mmdb/movie/v3/list/hot.json?ct=%E5%8C%97%E4%BA%AC&ci=1&channelId=4` , (res)=>{
        res.on("data", (chunk) => {
            data += chunk
        })
        res.on("end", () => {
            // 采用事件触发的方式
            event.emit("getData", data)
        })
    })
}

server.listen(3000, () => {
    console.log('服务器启动成功')
})
2
3
4
5
6
7
8
9
10
11
12
13
14
15
16
17
18
19
20
21
22
23
24
25
26
27
28
29
30
31
32
33
34
35
36
37
38
39
40
41
42

# fs文件操作模块
创建文件夹
const fs = require('fs')

// 创建文件夹
// 路径可以写相对路径,也可以写绝对路径
fs.mkdir("./avator", (err) => {
    // console.log(err)
    if(err && err.code == 'EEXIST') {
        console.log("目录已存在")
    }
})
1
2
3
4
5
6
7
8
9
10修改文件夹名
const fs = require('fs')

// 文件夹改名
fs.rename('./avator2', 'avator', (err) => {
    if(err && err.code == 'ENOENT') {
        console.log("文件不存在")
    }
})
1
2
3
4
5
6
7
8删除文件夹(只能删除空文件)
const fs = require('fs')

fs.rmdir('./avator', (err) => {
    if(err && err.code == 'ENOENT') {
        console.log("文件不存在")
    }
    if(err && err.code == 'ENOTEMPTY') {
        console.log('文件夹不为空')
    }
})
1
2
3
4
5
6
7
8
9
10往文件里面写内容(文件不存在会自动创建)
const fs = require('fs')

// 往文件里面写入内容, 文件不存在会自动创建文件
fs.writeFile('./avator/test.txt', 'hello, word\n 我是abc', (err) => {
    if (err) {
        console.log(err.message)
    } else {
        console.log('文件创建成功')
    }
})
1
2
3
4
5
6
7
8
9
10往文件追加内容
const fs = require('fs')

// 往文件里面追加内容
fs.appendFile('./avator/test.txt', "我是追加的内容", err => {
    if (err) {
        console.log(err)
    }
})
1
2
3
4
5
6
7
8读取文件内容
const fs = require('fs')

// 读取文件的内容
fs.readFile("./avator/test.txt",  'utf-8', (err, data) => {
    console.log(data)
})
1
2
3
4
5
6删除文件
const fs = require('fs')

// 删除文件
fs.unlink('./avator/test.txt', (err) => {
    console.log(err)
})
1
2
3
4
5
6读取文件/目录信息
const fs = require('fs')

// 读取文件/目录信息
fs.readdir("./avator", (err, data) => {
    data.forEach((value, index) => {
        fs.stat(`./avator/${value}`, (err, stats) => {
            // console.log(value + ':' + stats.size)
            console.log(value + ' is ' + (stats.isDirectory() ? 'directory' : 'file'))
        })
    })
})
1
2
3
4
5
6
7
8
9
10
11同步方法 (上述方法加上Sync就是同步的了)
const fs = require('fs')
// 同步读取文件
try {
    const content = fs.readFileSync('./avator/test.txt', 'utf-8')
    console.log(content)
} catch (e) {
    console.log(e.message)
}
1
2
3
4
5
6
7
8批量创建文件
const fs = require('fs')

// 批量创建文件
for(let i = 0; i < 10; i++) {
    fs.mkdirSync(`./avator/logs${i}`, err => {
        console.log(err)
    })
    fs.writeFileSync(`./avator/logs${i}/log${i}.txt`, `log${i}`, err => {
        console.log(err)
    })
}
1
2
3
4
5
6
7
8
9
10
11删除文件
const fs = require("fs").promises
const path = require('path')

// 删除文件(有bug但是不能)
function deleteFile(filename) {
    const fileDirs = fs.readdir(filename).then(data => {
        data.forEach(item => {
            fs.stat(path.join(filename, item)).then(stats => {
                if(stats.isDirectory()) {
                    deleteFile(path.join(filename, item))
                } else {
                    fs.unlink(path.join(filename, item))
                }
            })
        })
    }).catch(err => {
        console.log(err)
    })
}

deleteFile('./avator')
1
2
3
4
5
6
7
8
9
10
11
12
13
14
15
16
17
18
19
20
21
22
# fs.stat
在Node.js中,fs.stat是一个内置的模块,用于获取文件或目录的状态。
fs.stat(path, callback)是该模块的主要函数,其参数如下:
path:一个字符串,表示要获取其状态的路径。callback:一个回调函数,当获取到文件或目录的状态信息时会被调用。
这个回调函数具有以下形式:
function callback(err, stats) {
    if (err) {
        console.error('Error:', err);
    } else {
        // 处理 stats 对象
    }
}
2
3
4
5
6
7
其中,err 是一个错误对象,如果在获取状态时发生错误,它将包含错误信息;stats 是一个 fs.Stats 对象,包含了关于文件或目录的状态信息。
fs.Stats 对象具有以下属性和方法:
stats.dev:设备的标识符。stats.ino:文件的 inode 编号。stats.mode:文件的权限模式。stats.nlink:链接到文件的硬链接数量。stats.uid:文件所有者的用户 ID。stats.gid:文件所有者的组 ID。stats.rdev:如果是设备文件,则设备的类型标识符。stats.size:文件的大小(字节)。stats.atime:最后访问时间(毫秒)。stats.mtime:最后修改时间(毫秒)。stats.ctime:创建时间(毫秒)。stats.birthtime:文件的创建时间(毫秒)。在某些系统上可能不可用。stats.isFile():如果路径是一个常规文件,则返回 true。stats.isDirectory():如果路径是一个目录,则返回 true。stats.isBlockDevice():如果路径是一个块设备,则返回 true。stats.isCharacterDevice():如果路径是一个字符设备,则返回 true。stats.isSymbolicLink():如果路径是一个符号链接,则返回 true。在调用fs.stat()时,这个方法始终返回 false,因为符号链接自身并不存在。stats.isFIFO():如果路径是一个 FIFO(命名管道),则返回 true。stats.isSocket():如果路径是一个套接字,则返回 true。
注意,这些方法和属性提供了关于文件或目录的详细信息,例如它是否是一个文件、目录、设备文件等,以及它的创建、修改和访问时间等。
# stream流模块
stream是Node.js提供的又一个仅在服务区端可用的模块,目的是支持“流”这种数据结构。
什么是流?流是一种抽象的数据结构。想象水流,当在水管中流动时,就可以从某个地方(例如自来水厂)源源不断地到达另一个地方(比如你家的洗手池)。我们也可以把数据看成是数据流,比如你敲键盘的时候,就可以把每个字符依次连起来,看成字符流。这个流是从键盘输入到应用程序,实际上它还对应着一个名字:标准输入流(stdin)。

如果应用程序把字符一个一个输出到显示器上,这也可以看成是一个流,这个流也有名字:标准输出流(stdout)。流的特点是数据是有序的,而且必须依次读取,或者依次写入,不能像Array那样随机定位。
有些流用来读取数据,比如从文件读取数据时,可以打开一个文件流,然后从文件流中不断地读取数据。有些流用来写入数据,比如向文件写入数据时,只需要把数据不断地往文件流中写进去就可以了。
在Node.js中,流也是一个对象,我们只需要响应流的事件就可以了:data事件表示流的数据已经可以读取了,end事件表示这个流已经到末尾了,没有数据可以读取了,error事件表示出错了。
const fs = require('fs')

// 打开一个流
const fileStream = fs.createReadStream('./test.txt', 'utf-8')

let data = ""
fileStream.on("data", (chunk) => {
    data += chunk
    console.log(chunk)
})

fileStream.on("end", () => {
    console.log("end")
    console.log(data)
})

fileStream.on("error", (err) => {
    console.log('ERROR: ' + err)
})
2
3
4
5
6
7
8
9
10
11
12
13
14
15
16
17
18
19
要注意,data事件可能会有多次,每次传递的chunk是流的一部分数据。
要以流的形式写入文件,只需要不断调用write()方法,最后以end()结束:
const fs = require('fs')

const readStream = fs.createWriteStream('./output.txt', 'utf-8')

readStream.write("使用stream写入文本\n")
readStream.write("结束")

readStream.end()
2
3
4
5
6
7
8
pipe 就像可以把两个水管串成一个更长的水管一样,两个流也可以串起来。一个Readable流和一个Writable流串起来后,所有的数据自动从Readable流进入Writable流,这种操作叫pipe。
在Node.js中,Readable流有一个pipe()方法,就是用来干这件事的。
让我们用pipe()把一个文件流和另一个文件流串起来,这样源文件的所有数据就自动写入到目标文件里了,所以,这实际上是一个复制文件的程序:
pipe.js
const fs = require('fs')

const readStream = fs.createReadStream('./output.txt')
const writeStream = fs.createWriteStream('./input.txt')

readStream.pipe(writeStream)
2
3
4
5
6
# zlib

const http = require('http')
const fs = require('fs')
const zlib = require('zlib')

const gzip = zlib.createGzip()
http.createServer((req, res) => {
    // res本身也是流
    const readStream = fs.createReadStream('./index.html')
    res.writeHead(200, {
        "Content-Type": "application/x-javascript;charset=utf-8;",
        "Content-Encoding": "gzip"
    })
    readStream.pipe(gzip).pipe(res)
}).listen(3000, () => {
    console.log("服务器启动成功")
})
2
3
4
5
6
7
8
9
10
11
12
13
14
15
16
没压缩前

压缩后

# crypto
crypto模块的目的是为了提供通用的加密和哈希算法。用纯JavaScript代码实现这些功能不是不可能,但速度会非常慢。Nodejs用C/C++实现这些算法后,通过cypto这个模块暴露为JavaScript接口,这样用起来方便,运行速度也快。
MD5是一种常用的哈希算法,用于给任意数据一个“签名”。这个签名通常用一个十六进制的字符串表示:
const crypto = require('crypto')

const hash = crypto.createHash('md5')

hash.update('123456')
hash.update('1') // 会叠加,就相当于1234561加密后的结果

console.log(hash.digest('hex'))
2
3
4
5
6
7
8
update()方法默认字符串编码为UTF-8,也可以传入Buffer。
如果要计算SHA1,只需要把'md5'改成'sha1',就可以得到SHA1的结果1f32b9c9932c02227819a4151feed43e131aca40。
Hmac算法也是一种哈希算法,它可以利用MD5或SHA1等哈希算法。不同的是,Hmac还需要一个密钥:
const crypto = require('crypto')

const hmac = crypto.createHmac('sha256', 'secret-key');

hmac.update("hello world!")

console.log(hmac.digest('hex')) // 3840176c3d8923f59ac402b7550404b28ab11cb0ef1fa199130a5c37864b5497
2
3
4
5
6
7
只要密钥发生了变化,那么同样的输入数据也会得到不同的签名,因此,可以把Hmac理解为用随机数“增强”的哈希算法。
AES是一种常用的对称加密算法,加解密都用同一个密钥。crypto模块提供了AES支持,但是需要自己封装好函数,便于使用:
const crypto = require("crypto")

function encrypt(key, iv, data) {
    let decipher = crypto.createCipheriv('aes-128-cbc', key, iv);
    return decipher.update(data, 'binary', 'hex') + decipher.final('hex');
}

function decrypt (key, iv, crypted) {
    crypted = Buffer.from(crypted, 'hex').toString('binary');
    let decipher = crypto.createDecipheriv('aes-128-cbc', key, iv);
    return decipher.update(crypted, 'binary', 'utf8') + decipher.final('utf8');
}
// key, iv必须是16字节
// 16*8 = 128
let key="abcdef1234567890"
let iv="tbcdey1234567890"
let data = "dep"

let cryted = encrypt(key,iv,data)
console.log("加密结果-",cryted) // 加密结果- 7707ec8adfd4c15fddc8d25e7e8b7006

let decrypted = decrypt(key,iv,cryted)
console.log("解密结果-",decrypted) // 解密结果- dep
2
3
4
5
6
7
8
9
10
11
12
13
14
15
16
17
18
19
20
21
22
23
# 路由
routes.js
const fs = require('fs')
const path = require('path')
const mime = require('mime')


function render(res, path, type='') {
    res.writeHead(200, {
        'Content-Type': `${type?type:'text/html'};charset=utf-8;`
    })
    res.write(fs.readFileSync(path), 'utf-8')
    res.end()
}
const routes = {
    '/': (req, res) => {
        render(res, './static/index.html')
    },
    '/login': (req,res) => {
        render(res, './static/login.html')
    },
    '/home': (req,res) => {
        render(res, './static/home.html')
    },
    '/404': (req,res) => {
        // 先判断是不是静态资源
        if(readStaticFile(req, res)) {
            return
        }
        res.writeHead(404, {
            'Content-Type': 'text/html;charset=utf-8;'
        })
        res.write(fs.readFileSync('./static/404.html'), 'utf-8')
        res.end()
    }
}

// 静态资源管理(处理静态资源)
function readStaticFile(req, res) {
    // 获取路径
    const urlObj = new URL(req.url, "http://localhost:3000")
    const pathname = path.join(__dirname, '/static', urlObj.pathname)
    if(urlObj.pathname === '/') return false
    if(fs.existsSync(pathname)) {
        // 处理静态资源
        // mime.get(文件后缀名), 获取文件对应的Content-Type值
        render(res, pathname, mime.getType(urlObj.pathname.split('.')[1]))
        return true
    } else {
        return false
    }
}


module.exports = routes
2
3
4
5
6
7
8
9
10
11
12
13
14
15
16
17
18
19
20
21
22
23
24
25
26
27
28
29
30
31
32
33
34
35
36
37
38
39
40
41
42
43
44
45
46
47
48
49
50
51
52
53
54
api.js
function render(res,data,type=""){
    res.writeHead(200, { "Content-Type": `${type?type:"application/json"};charset=utf-8;` })
    res.write(data)
    res.end()
}

const api = {
    '/api/getlogin': (req, res) => {
        const urlObj = new URL(req.url, "http://localhost:3000")
        if(urlObj.searchParams.get('username') == 'dep' && urlObj.searchParams.get('password') == '123456') {
            render(res, JSON.stringify({
                code: 1,
                success: true
            }))
        } else {
            render(res, JSON.stringify({
                code: 0,
                success: false
            }))
        }
    },
    '/api/postlogin': (req, res) => {
        let post = ""
        req.on("data", chunk => {
            post += chunk
        })
        req.on("end", () => {
            post = JSON.parse(post)
            if(post.username == "dep" && post.password == '123456') {
                render(res,JSON.stringify({
                    code: 1,
                    success: true
                }))
            } else {
                render(res,JSON.stringify({
                    code: 0,
                    success: false
                }))
            }
        })
    }
}

module.exports = api
2
3
4
5
6
7
8
9
10
11
12
13
14
15
16
17
18
19
20
21
22
23
24
25
26
27
28
29
30
31
32
33
34
35
36
37
38
39
40
41
42
43
44
45
serevr.js
const http = require('http')

const Routes = {}
function use(obj) {
    Object.assign(Routes, obj)
}

function start() {
    http.createServer((req, res) => {
        const urlObj = new URL(req.url, "http://localhost:3000")
        try {
            Routes[urlObj.pathname](req, res)
        } catch (error) {
            Routes['/404'](req, res)
        }
    }).listen(3000, () => {
        console.log("server start")
    })
}

exports.start = start
exports.use = use
2
3
4
5
6
7
8
9
10
11
12
13
14
15
16
17
18
19
20
21
22
index.js
const server = require('./server')
const routes = require('./route')
const api  = require('./api')

// 注册路由
server.use(routes)
server.use(api)

server.start()
2
3
4
5
6
7
8
9
static/login.html
<!DOCTYPE html>
<html lang="en">
<head>
    <meta charset="UTF-8">
    <meta http-equiv="X-UA-Compatible" content="IE=edge">
    <meta name="viewport" content="width=device-width, initial-scale=1.0">
    <title>Document</title>
    <link rel="stylesheet" type="text/css" href="/css/login.css">
</head>
<body>
    <div method="post">
        <label name="username">账号:<input name="username" id ="username" type="text"></label><br/>
        <label name="password">密码:<input name="password" id ="password" type="password"></label><br/>
        <input id="getButton" type="submit" value="get登陆"></input>
        <input id="postButton" type="submit" value="post登陆"></input>
    </div>

    <script src="/js/login.js"></script>

</body>
</html>
2
3
4
5
6
7
8
9
10
11
12
13
14
15
16
17
18
19
20
21
static/js/login.js
const getButton = document.getElementById("getButton")
const postButton = document.getElementById("postButton")

const userInput = document.getElementById("username")
const pwdInput = document.getElementById("password")

getButton.onclick = function() {
    let username = userInput.value
    let password = pwdInput.value
    fetch(`/api/getlogin?username=${username}&password=${password}`)
    .then(res=>res.json())
    .then(res=>{
        console.log(res)
    })
}

postButton.onclick = function() {
    let username = userInput.value
    let password = pwdInput.value
    console.log(username, password)
    // post请求
    fetch(`/api/postlogin`, {
        method: 'post',
        body: JSON.stringify({
            username: username,
            password: password
        }),
        headers: {
            'Content-Type': 'application/json'
        }
    }).then(res => res.json())
    .then(data => {
        console.log(data)
    })
}
2
3
4
5
6
7
8
9
10
11
12
13
14
15
16
17
18
19
20
21
22
23
24
25
26
27
28
29
30
31
32
33
34
35
# Express
基于 Node.js 平台,快速、开放、极简的 web 开发框架。

安装
npm install express --save
# 路由
路由是指如何定义应用的端点(URIs)以及如何响应客户端的请求。
路由是由一个 URI、HTTP 请求(GET、POST等)和若干个句柄组成,它的结构如下: app.METHOD(path, [callback...], callback), app 是 express 对象的一个实例, METHOD 是一个 HTTP 请求方法, path 是服务器上的路径, callback 是当路由匹配时要执行的函数。
下面是一个基本的路由示例:
const express = require('express')

const app = express()

// 原来的res.write和end还是可以用的
// app.get('/', (req, res) => {
//     res.write('123')
//     res.end()
// })
app.get('/', (req, res) => {
    res.send('123')
})

app.listen(3000, () => {
    console.log('server start')
})
2
3
4
5
6
7
8
9
10
11
12
13
14
15
16
路由路径和请求方法一起定义了请求的端点,它可以是字符串、字符串模式或者正则表达式。
// 匹配根路径的请求
app.get('/', function (req, res) {
  res.send('root');
});

// 匹配 /about 路径的请求
app.get('/about', function (req, res) {
  res.send('about');
});

// 匹配 /random.text 路径的请求
app.get('/random.text', function (req, res) {
  res.send('random.text');
});
2
3
4
5
6
7
8
9
10
11
12
13
14
使用字符串模式的路由路径示例:
// 匹配 acd 和 abcd
app.get('/ab?cd', function(req, res) {
  res.send('ab?cd');
});

// 匹配 /ab/******
app.get('/ab/:id', function(req, res) {
  res.send('aaaaaaa');
});

// 匹配 abcd、abbcd、abbbcd等
app.get('/ab+cd', function(req, res) {
  res.send('ab+cd');
});

// 匹配 abcd、abxcd、abRABDOMcd、ab123cd等
app.get('/ab*cd', function(req, res) {
  res.send('ab*cd');
});

// 匹配 /abe 和 /abcde
app.get('/ab(cd)?e', function(req, res) {
 res.send('ab(cd)?e');
});
2
3
4
5
6
7
8
9
10
11
12
13
14
15
16
17
18
19
20
21
22
23
24
使用正则表达式的路由路径示例:
// 匹配任何路径中含有 a 的路径:
app.get(/a/, function(req, res) {
  res.send('/a/');
});

// 匹配 butterfly、dragonfly,不匹配 butterflyman、dragonfly man等
app.get(/.*fly$/, function(req, res) {
  res.send('/.*fly$/');
});
2
3
4
5
6
7
8
9
可以为请求处理提供多个回调函数,其行为类似 中间件。唯一的区别是这些回调函数有可能调用 next('route') 方法而略过其他路由回调函数。可以利用该机制为路由定义前提条件,如果在现有路径上继续执行没有意义,则可将控制权交给剩下的路径。
使用多个回调函数处理路由(记得指定 next 对象):
app.get('/info', (req, res, next) => {
    console.log('token校验')
    let isValid = true
    if (isValid) {
        next() // 放行
    } else {
        res.end('token校验失败')
    }
}, (req, res) => {
    res.send('查询成功')
})
2
3
4
5
6
7
8
9
10
11
使用回调函数数组处理路由:
function cb1(req, res, next) {
    console.log('cb1')
    next()
}
function cb2(req, res, next) {
    console.log('cb2')
    next()
}
function cb3(req, res, next) {
    console.log('cb3')
    res.send('cb3')
}

app.get('/abc', [cb1, cb2, cb3])
2
3
4
5
6
7
8
9
10
11
12
13
14
混合使用函数和函数数组处理路由:
function cb1(req, res, next) {
    console.log('cb1')
    next()
}
function cb2(req, res, next) {
    console.log('cb2')
    next()
}

app.get('/abcd',[cb1, cb2], (req, res, next) => {
    console.log('cb4')
    next()
}, (req, res) => {
    res.send('cb5')
})
2
3
4
5
6
7
8
9
10
11
12
13
14
15
# 中间件
Express 是一个自身功能极简,完全是由路由和中间件构成一个的 web 开发框架:从本质上来说,一个 Express 应用就是在调用各种中间件。
中间件(Middleware) 是一个函数,它可以访问请求对象(request object (req)), 响应对象(response object (res)), 和 web 应用中处于请求-响应循环流程中的中间件,一般被命名为 next 的变量。
中间件的功能包括:
- 执行任何代码。
- 修改请求和响应对象。
- 终结请求-响应循环。
- 调用堆栈中的下一个中间件。
如果当前中间件没有终结请求-响应循环,则必须调用 next() 方法将控制权交给下一个中间件,否则请求就会挂起。
Express 应用可使用如下几种中间件:
- 应用级中间件
- 路由级中间件
- 错误处理中间件
- 内置中间件
- 第三方中间件
使用可选则挂载路径,可在应用级别或路由级别装载中间件。另外,你还可以同时装在一系列中间件函数,从而在一个挂载点上创建一个子中间件栈。
# 应用级中间件
const express = require('express')

const app = express()

app.get('/', (req, res) => {
    res.send('首页')
})

app.get('/login', (req, res) => {
    res.send('登陆')
})


// 在这上面的请求不受这个中间件影响
// 没有挂载路径的中间件,应用的每个请求都会执行该中间件
app.use((req, res, next) => {
    // 可以用来判断token信息等
    console.log('每个请求都会执行这个' + Date.now())
    next()
})

app.get('/abc', (req, res) => {
    res.send('abc')
})

app.listen(3000, () => {
    console.log('server start')
})
2
3
4
5
6
7
8
9
10
11
12
13
14
15
16
17
18
19
20
21
22
23
24
25
26
27
28
# 路由级中间件
路由级中间件和应用级中间件一样,只是它绑定的对象为 express.Router()。
route2/apiRoute.js
const express = require('express')

const router = express.Router()

// 没有挂载路径的中间件,通过该路由的每个请求都会执行该中间件
router.use(function (req, res, next) {
    console.log('api的路由中间件')
    next()
})

router.get('/home', (req, res) => {
    res.send('/api/home')
})

router.get('/login', (req, res) => {
    res.send('/api/login')
})

// 一个中间件栈,显示任何指向 /api/user/:id 的 HTTP 请求的信息
router.use('/user/:id', function (req, res, next) {
    console.log('Request URL:', req.originalUrl)
    next()
}, function (req, res, next) {
    console.log('Request Type:', req.method)
    next()
})

// 一个中间件栈,处理指向 /api/user/:id 的 GET 请求
router.get('/user/:id', function (req, res, next) {
    // 如果 user id 为 0, 跳到下一个路由
    if (req.params.id == 0) next('route')
    // 负责将控制权交给栈中下一个中间件
    else next() //
}, function (req, res, next) {
    // 渲染常规页面
    res.render('regular')
})

// 处理 /user/:id, 渲染一个特殊页面
router.get('/user/:id', function (req, res, next) {
    console.log(req.params.id)
    res.render('special')
})


module.exports = router
2
3
4
5
6
7
8
9
10
11
12
13
14
15
16
17
18
19
20
21
22
23
24
25
26
27
28
29
30
31
32
33
34
35
36
37
38
39
40
41
42
43
44
45
46
route/IndexRoute.js
const express = require('express')

const route = express.Router()

route.get('/', (req, res) => {
    res.send('/')
})

route.get('/home', (req, res) => {
    res.send('/home')
})

module.exports = route
2
3
4
5
6
7
8
9
10
11
12
13
index3.js
const express = require('express')
const apiRoutes = require('./route2/apiRoute')
const indexRoutes = require('./route/IndexRoute')

const app = express()


// 在这上面的请求不受这个中间件影响
// 没有挂载路径的中间件,应用的每个请求都会执行该中间件
app.use((req, res, next) => {
    // 可以用来判断token信息等
    console.log('应用中间件--每个请求都会执行这个' + Date.now())
    next()
})

app.use('/', indexRoutes)
app.use('/api', apiRoutes)

app.listen(3000, () => {
    console.log('server start')
})
2
3
4
5
6
7
8
9
10
11
12
13
14
15
16
17
18
19
20
21
# 错误处理中间件
错误处理中间件和其他中间件定义类似,只是要使用 4 个参数,而不是 3 个,其签名如下: (err, req, res, next)。
const express = require('express')
const apiRoutes = require('./route2/apiRoute')
const indexRoutes = require('./route/IndexRoute')

const app = express()


// 在这上面的请求不受这个中间件影响
// 没有挂载路径的中间件,应用的每个请求都会执行该中间件
app.use((req, res, next) => {
    // 可以用来判断token信息等
    console.log('应用中间件--每个请求都会执行这个' + Date.now())
    next()
})

app.use('/', indexRoutes)
app.use('/api', apiRoutes)

// 错误处理中间件
app.use((req, res) => {
    res.status(404).send('错误')
})
// 官方给的是这个例子,这个是程序发生错误才会执行,上面这个是找不到接口就会执行
app.use(function(err, req, res, next) {
    console.error(err.stack)
    res.status(500).send('错误的请求')
})

app.listen(3000, () => {
    console.log('server start')
})
2
3
4
5
6
7
8
9
10
11
12
13
14
15
16
17
18
19
20
21
22
23
24
25
26
27
28
29
30
31
# 内置的中间件
express.static 是 Express 唯一内置的中间件。它基于 serve-static,负责在 Express 应用中提托管静态资源。每个应用可有多个静态目录。
app.use(express.static('public'))
app.use(express.static('uploads'))
app.use(express.static('files'))
2
3
# 第三方中间件
安装所需功能的 node 模块,并在应用中加载,可以在应用级加载,也可以在路由级加载。
下面的例子安装并加载了一个解析 cookie 的中间件: cookie-parser
$ npm install cookie-parser
var express = require('express')
var app = express()
var cookieParser = require('cookie-parser')

// 加载用于解析 cookie 的中间件
app.use(cookieParser())
2
3
4
5
6
# 获取请求参数
get
req.query
post
//配置解析post参数的-不用下载第三方 ,内置(旧版本是需要下载body-parser)
app.use(express.urlencoded({extended:false})) // (Content-Type: application/x-www-form-urlencoded)post参数- username=kerwin&password=1234
app.use(express.json()) //post参数- {name:"",age:100}
req.body
2
3
4
const express = require('express')

const router = express.Router()

// 没有挂载路径的中间件,通过该路由的每个请求都会执行该中间件
router.use(function (req, res, next) {
    console.log('api的路由中间件')
    next()
})

router.get('/login', (req, res) => {
    console.log(req.query)
    res.send(req.query)
})
router.post('/login', (req, res) => {
    console.log(req.body)
    res.send(req.body)
})


module.exports = router
2
3
4
5
6
7
8
9
10
11
12
13
14
15
16
17
18
19
20
21
get请求

post请求application/x-www-form-urlencoded

post请求 apllication/json格式

# 利用 Express 托管静态文件
通过 Express 内置的 express.static 可以方便地托管静态文件,例如图片、CSS、JavaScript 文件等。
将静态资源文件所在的目录作为参数传递给 express.static 中间件就可以提供静态资源文件的访问了。例如,假设在 public 目录放置了图片、CSS 和 JavaScript 文件,你就可以:
app.use(express.static('public'))
现在,public 目录下面的文件就可以访问了。
http://localhost:3000/images/kitten.jpg
http://localhost:3000/css/style.css
http://localhost:3000/js/app.js
http://localhost:3000/images/bg.png
http://localhost:3000/hello.html
2
3
4
5
所有文件的路径都是相对于存放目录的,因此,存放静态文件的目录名不会出现在 URL 中。
如果你的静态资源存放在多个目录下面,你可以多次调用 express.static 中间件:
app.use(express.static('public'))
app.use(express.static('files'))
2
访问静态资源文件时,express.static 中间件会根据目录添加的顺序查找所需的文件。
如果你希望所有通过 express.static 访问的文件都存放在一个**“虚拟(virtual)”目录**(即目录根本不存在)下面,可以通过为静态资源目录指定一个挂载路径的方式来实现,如下所示:
app.use('/static', express.static('public'))
现在,你就可以通过带有 “/static” 前缀的地址来访问 public 目录下面的文件了。
http://localhost:3000/static/images/kitten.jpg
http://localhost:3000/static/css/style.css
http://localhost:3000/static/js/app.js
http://localhost:3000/static/images/bg.png
http://localhost:3000/static/hello.html
2
3
4
5
# 服务端渲染(模板引擎)
服务器渲染,后端嵌套模板,后端渲染模板,SSR(后端把页面组装)
- 做好静态页面,动态效果。
- 把前端代码提供给后端,后端要把静态html以及里面的假数据给删掉,通过模板进行动态生成html的内容
前后端分离,BSR(前端中组装页面)
做好静态页面,动态效果。
json模拟,ajax,动态创建页面。
真实接口数据,前后联调。
把前端提供给后端静态资源文件夹。
npm i ejs
要在应用中进行如下设置才能让 Express 渲染模板文件:
- views, 放模板文件的目录,比如: app.set('views', './views')
- view engine, 模板引擎,比如: app.set('view engine', 'ejs')
// 模版引擎管理
app.set('views', './views')
app.set('view engine', 'ejs')
2
3
如果想使用html文件,需要做如下配置:
// 模版引擎管理
app.set('views', './views')
app.set('view engine', 'html')
app.engire("html", require("ejs").renderFile) // 支持直接渲染html文件
1
2
3
4
<%%>流程控制标签(写的是if else,for)
<%= %>输出标签(原文输出HTML标签)
<%- %>输出标签(HTML会被浏览器解析)
<%# %>注释标签
<%- include('user/show', {user: user)%>导入公共的模板内容
2
3
4
5
header.ejs
<header>
    <h1>我是公共的header文件 </h1>
    <%if(showTitle){%>
        <h6>会员中心</h6>
    <%}%>
</header>

<style>
    header{
        background-color: red;
    }
</style>
2
3
4
5
6
7
8
9
10
11
12
login.ejs
<!DOCTYPE html>
<html lang="en">
<head>
    <meta charset="UTF-8">
    <meta http-equiv="X-UA-Compatible" content="IE=edge">
    <meta name="viewport" content="width=device-width, initial-scale=1.0">
    <title>Document</title>
    <link rel="stylesheet" type="text/css" href="/css/login.css">
</head>
<body>
    <%-include("./header.ejs", {showTitle: false})%>
    <form action="/login" method="post">
        <label name="username">账号:<input name="username" type="text"></label><br/>
        <label name="password">密码:<input name="password" type="password"></label><br/>
        <input id="getButton" type="submit" value="登陆"></input>
    </form>

    <p style="background-color: red;"><%=message%></p>

</body>
</html>
2
3
4
5
6
7
8
9
10
11
12
13
14
15
16
17
18
19
20
21
home.ejs
<!DOCTYPE html>
<html lang="en">
<head>
    <meta charset="UTF-8">
    <meta http-equiv="X-UA-Compatible" content="IE=edge">
    <meta name="viewport" content="width=device-width, initial-scale=1.0">
    <title>Document</title>
</head>
<body>
    <%-include("./header.ejs", {showTitle: true})%>
    <h1>首页</h1>
    <p><%=title%></p>

    <ul>
        <%for(let i = 0; i < list.length; i++) {%>
            <li><%=list[i]%></li>
        <%}%>
    </ul>

    <%-html%>
    <!-- 这种注释会被看到 -->
    <%#这种注释在原文件中不会被渲染上%>
</body>
</html>
2
3
4
5
6
7
8
9
10
11
12
13
14
15
16
17
18
19
20
21
22
23
24
route/IndexRoute.js
const express = require('express')

const route = express.Router()

route.get('/', (req, res) => {
    res.send('/')
})

route.get('/home', (req, res) => {
    // res.send('/home')
    let title = "模版引擎渲染"
    let list = ['111', '222', '333']
    let html = '<b>我是加粗的文字<%-%>会识别html</b>'
    res.render('home', {title: title, list: list, html: html})
})
route.get('/login', (req, res) => {
    res.render('login',{message: ''})
})

route.post('/login', (req, res) => {
    if(req.body.username == 'dep' && req.body.password == '123456') {
        // 重定向
        res.redirect('/home')
    } else {
        res.render('login', {message: '账号或密码错误,登录失败'})
    }
})

module.exports = route
2
3
4
5
6
7
8
9
10
11
12
13
14
15
16
17
18
19
20
21
22
23
24
25
26
27
28
29
index3.js
const express = require('express')
const apiRoutes = require('./route2/apiRoute')
const indexRoutes = require('./route/IndexRoute')

const app = express()

// 静态资源管理
app.use(express.static('public'))
app.use(express.static('static'))

// 模版引擎管理
app.set('views', './views')
app.set('view engine', 'ejs')

app.use(express.urlencoded({extended:false})) // (Content-Type: application/x-www-form-urlencoded)post参数- username=kerwin&password=1234
app.use(express.json()) // post参数- {name:"",age:100}


app.use('/', indexRoutes)


app.listen(3000, () => {
    console.log('server start')
})
2
3
4
5
6
7
8
9
10
11
12
13
14
15
16
17
18
19
20
21
22
23
24
# express生成器
你可以通过 npx (包含在 Node.js 8.2.0 及更高版本中)命令来运行 Express 应用程序生成器。
$ npx express-generator
对于较老的 Node 版本,请通过 npm 将 Express 应用程序生成器安装到全局环境中并使用:
$ npm install -g express-generator
$ express
2
默认引擎是jade 模板引擎,所以在创建的时候要指定--view <engine>添加对视图引擎(view)
npx express-generator --view ejs
Morgan模块的作用是记录HTTP请求日志。
Morgan是一个Node.js的HTTP请求日志中间件,可以记录请求和响应的相关信息。例如,可以记录所有请求的URL和状态码。Morgan模块可以帮助开发者更好地构建、管理Web应用程序,其应用场景不仅限于以上内容,具体还需根据业务需求进行使用和扩展。
var logger = require('morgan');
app.use(logger('dev'));
2

获取cookie信息
/* GET home page. */
router.get('/', function(req, res, next) {
  // 获取前端的cookie
  console.log(req.cookies)
  // 设置前端的cookie
  res.cookie('name', '123')
  res.render('index', { title: 'Express' });
});
2
3
4
5
6
7
8
9


# javascript操作cookie
在JavaScript中,可以使用 document 对象来操作 cookie。以下是常用的几个方法:
document.cookie: 这是一个属性,而不是一个方法。通过它可以读取或修改 cookie。所有的 cookie 都被存储在这个属性中,每个 cookie 由分号和空格分隔。document.cookie = "name=value": 通过这个方法可以设置一个 cookie。如果这个 cookie 不存在,那么它会被创建;如果它已经存在,那么它会被更新。- `document.cookie.split("; "): 通过这个方法可以获取所有的 cookie,并将它们储存在一个数组中。每个 cookie 都是数组中的一个元素。
document.cookie = document.cookie.split("; ")[index]: 通过这个方法可以删除一个 cookie。首先,我们需要获取所有的 cookie,然后选择我们想要删除的 cookie。
以下是一些示例代码:
设置一个 cookie:
javascriptdocument.cookie = "username=John Doe";
读取一个 cookie:
javascriptlet username = document.cookie;console.log(username); // 会输出 "username=John Doe" (如果存在的话)
修改一个 cookie:
javascriptdocument.cookie = "username=Jane Doe"; // 将 "John Doe" 修改为 "Jane Doe"
删除一个 cookie:
javascriptdocument.cookie = document.cookie.split("; ")[0]; // 这会删除第一个 cookie
# 模版引擎对比
多种模板引擎在Node中的应用(性能对比及使用方法) (opens new window)
Node.js 中有许多模板引擎可供选择,每个都有其自己的优点和适用场景。以下是一些常见的 Node.js 模板引擎的对比以及如何选择的一些建议:
- EJS (Embedded JavaScript Templates):
- 优点:与普通的 JavaScript 高度兼容,易于学习和使用,支持条件语句和循环等控制结构。
- 适用场景:小型项目或初学者,或者需要在模板中嵌入 JavaScript 逻辑的情况。
- Pug (以前称为 Jade):
- 优点:简洁的语法,可读性高,支持模板继承和布局,生成的 HTML 结构干净整洁。
- 适用场景:用于创建整洁的HTML结构,特别适合静态页面生成或者需要高度可维护性的项目。
- Handlebars:
- 优点:逻辑较少,可维护性好,支持局部模板和模板继承。
- 适用场景:适用于需要较少逻辑的项目,以及需要共享模板部分的情况。
- Mustache:
- 优点:极简的语法,跨多种编程语言通用,适用于生成简单的文本模板。
- 适用场景:当需要在多个不同的编程语言中使用相同模板时。
- Nunjucks:
- 优点:功能丰富,支持继承、宏、过滤器等高级功能,类似于Jinja2模板。
- 适用场景:适合大型项目,需要更高级功能和复杂逻辑的场景。
- Swig:
- 优点:速度快,支持自定义过滤器和标签,与Express.js紧密集成。
- 适用场景:需要高性能的项目,特别是与Express.js一起使用的情况。
# MongoDB
# 关系型与非关系型数据库
关系型数据库特点: (1) sql语句增删改查操作
(2)保持事务的一致性,事物机制(回滚)
mysql,sqlserver,db2,oracle
非关系型数据库 特点: ( 1) no sql:not only sql;
(2)轻量,高效,自由。 mongodb ,Hbase,Redis
3.为啥喜欢mongodb?
- 由于MongoDB独特的数据处理方式,可以将热点数据加载到内存,故而对查询来讲,会非常快(当然也会非常消耗内存);
- 同时由于采用了BSON的方式存储数据,
- 故而对JSON格式数据具有非常好的支持性以及友好的表结构修改性,文档式的存储方式,数据友好可见;
- 数据库的分片集群负载具有非常好的扩展性以及非常不错的自动故障转移。


# 安装数据库
https://docs.mongodb.com/manual/administration/install-community/
由于很早之前就安装过,就没有重新安装
在服务和应用管理中启动MongoDB

# 数据库操作
# 启动数据库
进入安装目录
(1)windows
mongod --dbpath d:/data/db # 服务端
mongo # 客户端
2
(2)mac
mongod --config /usr/local/etc/mongod.conf
mongo
2

登陆数据库
是直接进入mongo.exe所在的文件夹,然后执行这个命令

mongo --host 127.0.0.1 --port 27017 -u "账号" -p "密码" --authenticationDatabase "admin"
mongo --host 127.0.0.1 --port 27017 -u "root" -p "root" --authenticationDatabase "admin"
2

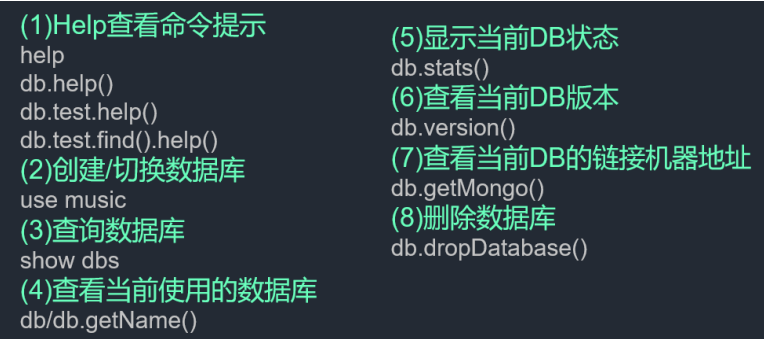
创建/切换数据库
use 数据库名称
查询数据库
show dbs
查看当前使用的数据库
db
为某个数据库添加用户
use 数据库名  (切换到数据库或者创建数据库)
db.createUser({
  user: "admin",
  pwd: "123456",
  roles: ["readWrite"]
})
2
3
4
5
6

# nodejs连接数据库
先用express-generator项目生成器生成一个项目
npx express-generator --view ejs
安装mongoose
npm install mongoose --save
config/db.config.js
有密码连接方式
// 数据库
const mongoose = require('mongoose')


// 设置 MongoDB 连接字符串
const connectionString = 'mongodb://admin:123456@localhost:27017/express-mongo';

// 使用 Mongoose 连接到 MongoDB
mongoose.connect(connectionString, { useNewUrlParser: true, useUnifiedTopology: true })
    .then(() => {
        console.log('成功连接到 express-mongo 数据库!');
    })
    .catch(err => {
        console.error('无法连接到 MongoDB:', err);
    });
2
3
4
5
6
7
8
9
10
11
12
13
14
15
16
无密码连接方式
const mongoose = require("mongoose")

mongoose.connect("mongodb://127.0.0.1:27017/project")
//插入集合和数据,数据库project会自动创建
2
3
4
bin/www.js(启动文件)中引入这个文件
// 引入数据库模块
require('../config/db.config')
2
连接到 "admin" 数据库然后切换到其他数据库通常是出于以下几个原因:
- 身份验证和权限控制:连接到 "admin" 数据库允许你在切换到其他数据库之前进行身份验证和权限控制。MongoDB 的身份验证通常是在 "admin" 数据库中配置的,因此你需要连接到 "admin" 数据库来验证用户的身份和权限,然后才能切换到其他数据库。这有助于确保只有经过身份验证的用户才能访问其他数据库,并限制他们的访问权限。
- 全局操作:有些操作需要在数据库级别执行,例如创建新的数据库、列出所有数据库、列出所有集合等。这些全局操作通常需要在 "admin" 数据库上执行。
- 集群环境下的管理:在集群环境中,可能需要在 "admin" 数据库上执行管理操作,例如启动和停止服务器、管理复制集、管理分片等。
相关操作:
增加数据
 UserModel.create({
    // username: username, password: password, age: age
    username, password, age
  }).then(data => {})
1
2
3
4查询数据
  UserModel.find({}, ["username", "age"]).sort({age: -1}).skip((page - 1) * limit).limit(limit)
  .then(data => {})
1
2更新数据
UserModel.updateOne({_id: req.params.id}, {
    username, age
  }).then(data => {})
1
2
3删除数据
UserModel.deleteOne({_id}1
model/UserMode.js
const mongoose = require('mongoose')

const Schema = mongoose.Schema

const UserType = {
    username: String,
    password: String,
    age: Number
}

const UserModel = mongoose.model("user", new Schema(UserType))
// 模型user 将会对应 users 集合,
module.exports = UserModel
2
3
4
5
6
7
8
9
10
11
12
13
routes/users.js
var express = require('express');
var router = express.Router();
const UserModel = require('../model/UserModel')

/* GET users listing. */
router.get('/', function(req, res, next) {
  res.send('respond with a resource');
});

router.get('/list', function(req, res) {
  const {page, limit} = req.query
  UserModel.find({}, ["username", "age"]).sort({age: -1}).skip((page - 1) * limit).limit(limit)
  .then(data => {
    res.send({
      code: 1,
      data,
      msg: '获取成功'
    })
  }).catch({
    code: 0,
    data: '',
    msg: '获取失败'
  })

})

router.post('/add', function(req, res, next) {
  const {username, password, age} = req.body
  UserModel.create({
    // username: username, password: password, age: age
    username, password, age
  }).then(data => {
    console.log(data)
    res.send({
      code: 1,
      msg: '添加成功'
    })
  }).catch(err => {
    console.log(err)
    res.send({
      code: 1,
      msg: '添加失败'
    })
  })
});

router.put('/edit/:id', function(req, res, next) {
  const {username, age} = req.body
  UserModel.updateOne({_id: req.params.id}, {
    username, age
  }).then(data => {
    console.log(data)
    res.send({
      code: 1,
      msg: '修改成功'
    })
  }).catch(err => {
    console.log(err)
    res.send({
      code: 1,
      msg: '修改失败'
    })
  })
});

router.delete('/delete/:id', (req, res) => {
  UserModel.deleteOne({
    _id: req.params.id
  }).then(data => {
    res.send({
      code: 1,
      msg: '删除成功'
    })
  }).catch(err => {
    console.log(err)
    res.send({
      code: 1,
      msg: '删除失败'
    })
  })
})


module.exports = router;
2
3
4
5
6
7
8
9
10
11
12
13
14
15
16
17
18
19
20
21
22
23
24
25
26
27
28
29
30
31
32
33
34
35
36
37
38
39
40
41
42
43
44
45
46
47
48
49
50
51
52
53
54
55
56
57
58
59
60
61
62
63
64
65
66
67
68
69
70
71
72
73
74
75
76
77
78
79
80
81
82
83
84
views/index.ejs
<!DOCTYPE html>
<html>

<head>
  <title>
    <%= title %>
  </title>
  <style>
    .edit {
      background-color: bisque;
    }
    .delete {
      background-color: red;
    }
  </style>
  <link rel='stylesheet' href='/stylesheets/style.css' />
</head>

<body>
  <div>
    <label name="id">id<input name="id" id="_id" type="hidden"></label><br />
    <label name="username">账号:<input name="username" id="username" type="text"></label><br />
    <label name="password">密码:<input name="password" id="password" type="password"></label><br />
    <label name="age">年龄:<input name="age" id="age" type="text"></label><br />
    <input id="addButton" type="submit" value="添加"></input>
    <input id="editButton" type="submit" value="确定修改"></input>
    <input id="deleteButton" type="submit" value="清空"></input>
  </div>
  <table border="1">
    <thead>
      <tr>
        <th>id</th>
        <th>姓名</th>
        <th>年龄</th>
        <th colspan="2">操作</th>
      </tr>
    </thead>
    <tbody id="tbody">

    </tbody>
  </table>

  <script>
    const _id = document.querySelector('#_id')
    const username = document.querySelector('#username')
    const password = document.querySelector('#password')
    const age = document.querySelector('#age')
    const addButton = document.querySelector('#addButton')
    const tbody = document.querySelector('#tbody')
    const deleteButton = document.querySelector('#deleteButton')
    addButton.onclick = function () {
      fetch('http://localhost:3000/api/user/add', {
        method: 'POST',
        body: JSON.stringify({
          username: username.value,
          password: password.value,
          age: age.value,
        }),
        headers: {
          'Content-Type': 'application/json'
        }
      }).then(res => res.json()).then(data => {
        console.log(data)
        getTableData()
      })
    }

    getTableData()
    // 获取表格数据
    function getTableData() {
      fetch('http://localhost:3000/api/user/list?page=1&limit=6')
      .then(res => res.json())
      .then(res => {
        if (res.code) {
          console.log(res)
          tbody.innerHTML = res.data.map(item => {
            return `
                <tr>
                  <td class="id">${item._id}</td>
                  <td class="username">${item.username}</td>
                  <td class="age">${item.age}</td>
                  <td><button class="edit">修改</button></td>
                  <td><button class="delete">删除</button></td>
                </tr>
                `
          }).join("")
        } else {
          tbody.innerHTML = `
                <tr>
                  <td colspan="5">暂无数据</td>
                </tr>
              `
        }
      })
    }

      // 事件委托方式给每个按钮添加点击事件
      tbody.addEventListener('click', function(event) {
        if(event.target.classList.contains("edit")) {
          const pNode = event.target.parentNode.parentNode;
          // console.log(pNode)
          // console.log(pNode.querySelector('.id'))
          username.value = pNode.querySelector('.username').innerText
          age.value = pNode.querySelector('.age').innerText
          _id.value = pNode.querySelector('.id').innerText
        }
        if(event.target.classList.contains("delete")) {
          const pNode = event.target.parentNode.parentNode;
          const id = pNode.querySelector('.id').innerText
          fetch(`http://localhost:3000/api/user/delete/${id}`, {
            method: 'DELETE'
          })
          .then(res => res.json())
          .then(res => {
            if(res.code) {
              alert('删除成功')
              getTableData()
            } else {
              alert('删除失败')
            }
          })
        }
      })

      // 修改数据
      editButton.onclick = function() {
        fetch(`http://localhost:3000/api/user/edit/${_id.value}`, {
          method: 'PUT',
          body: JSON.stringify({
            username: username.value,
            age: age.value,
          }),
          headers: {
            'Content-Type': 'application/json'
          }
        }).then(res => res.json()).then(res => {
          if(res.code) {
              alert('修改成功')
              getTableData()
            } else {
              alert('修改失败')
            }
        })
      }

      // 清空表格数据
      deleteButton.onclick = function() {
        username.value = ''
        password.value = ''
        age.value = ''
      }
  </script>
</body>

</html>
2
3
4
5
6
7
8
9
10
11
12
13
14
15
16
17
18
19
20
21
22
23
24
25
26
27
28
29
30
31
32
33
34
35
36
37
38
39
40
41
42
43
44
45
46
47
48
49
50
51
52
53
54
55
56
57
58
59
60
61
62
63
64
65
66
67
68
69
70
71
72
73
74
75
76
77
78
79
80
81
82
83
84
85
86
87
88
89
90
91
92
93
94
95
96
97
98
99
100
101
102
103
104
105
106
107
108
109
110
111
112
113
114
115
116
117
118
119
120
121
122
123
124
125
126
127
128
129
130
131
132
133
134
135
136
137
138
139
140
141
142
143
144
145
146
147
148
149
150
151
152
153
154
155
# 接口规范与业务分层
# 接口规范
RESTful架构
服务器上每一种资源,比如一个文件,一张图片,一部电影,都有对应的url地址,如果我们的客户端需要对服务器上的这个资源进行操作,就需要通过http协议执行相应的动作来操作它,比如进行获取,更新,删除。
简单来说就是url地址中只包含名词表示资源,使用http动词表示动作进行操作资源举个例子:左边是错误的设计,而右边是正确的


# 业务分层

将以前的项目改为MVC架构
routes/users.js
var express = require('express');
var router = express.Router();
const UserModel = require('../model/UserModel')
const UserController = require('../controller/UserController')

/* GET users listing. */
router.get('/', function(req, res, next) {
  res.send('respond with a resource');
});

// 获取用户列表
router.get('/list', UserController.getUserList)
// 添加用户
router.post('/add', UserController.addUser);
// 修改用户
router.put('/edit/:id', UserController.editUser);
// 删除用户
router.delete('/delete/:id', UserController.deleteUser)


module.exports = router;
2
3
4
5
6
7
8
9
10
11
12
13
14
15
16
17
18
19
20
21
22
controller/UserController.js
const UserService = require("../service/UserService")

const UserController = {
    // 添加用户
    addUser: (req, res) => {
        const {username, password, age} = req.body
        UserService.addUser(username, password, age).then(data => {
          console.log(data)
          res.send({
            code: 1,
            msg: '添加成功'
          })
        }).catch(err => {
          console.log(err)
          res.send({
            code: 1,
            msg: '添加失败'
          })
        })
    },
    // 修改用户
    editUser: (req, res) => {
        const id = req.params.id
        const {username, age} = req.body
        UserService.editUser(id, username, age).then(data => {
          console.log(data)
          res.send({
            code: 1,
            msg: '修改成功'
          })
        }).catch(err => {
          console.log(err)
          res.send({
            code: 1,
            msg: '修改失败'
          })
        })
    },
    // 删除用户
    deleteUser: async (req, res) => {
        const data = await UserService.deleteUser(req.params.id)
        res.send({
            code: 1,
            msg: '删除成功'
        })
    },
    // 查找用户列表
    getUserList: (req, res) => {
        const {page, limit} = req.query
        UserService.getUserList(page, limit).then(data => {
            res.send({
                code: 1,
                data,
                msg: '获取成功'
            })
        }).catch(err => {
            console.log(err)
            res.send({
              code: 1,
              msg: '获取失败'
            })
        })
    }
}

module.exports = UserController
2
3
4
5
6
7
8
9
10
11
12
13
14
15
16
17
18
19
20
21
22
23
24
25
26
27
28
29
30
31
32
33
34
35
36
37
38
39
40
41
42
43
44
45
46
47
48
49
50
51
52
53
54
55
56
57
58
59
60
61
62
63
64
65
66
service/UserService.js
const UserModel = require('../model/UserModel')

const UserService = {
    // 添加用户
    addUser: (username, password, age) => {
        return UserModel.create({
            // username: username, password: password, age: age
            username, password, age
        })
    },
    // 修改用户
    editUser: (id, username, age) => {
        return UserModel.updateOne({_id: id}, {
            username, age
        })
    },
    // 获取用户列表
    getUserList: (page, limit) => {
        return UserModel.find({}, ["username", "age"])
        .sort({age: -1})
        .skip((page - 1) * limit)
        .limit(limit)
    },
    // 删除用户
    deleteUser: (id) => {
        return UserModel.deleteOne({
            _id: id
        })
    }
}

module.exports = UserService
2
3
4
5
6
7
8
9
10
11
12
13
14
15
16
17
18
19
20
21
22
23
24
25
26
27
28
29
30
31
32
# 登录鉴权
# Cookie&Session
「HTTP 无状态」我们知道,HTTP 是无状态的。也就是说,HTTP 请求方和响应方间无法维护状态,都是一次性的,它不知道前后的请求都发生了什么。但有的场景下,我们需要维护状态。最典型的,一个用户登陆微博,发布、关注、评论,都应是在登录后的用户状态下的。「标记」那解决办法是什么呢?

安装
npm install express-session
npm install connect-mongo  (持久化存储session)
2
app.js
var createError = require('http-errors');
var express = require('express');
...
const session = require('express-session');
const MongoStore = require('connect-mongo');

var indexRouter = require('./routes/index');
var usersRouter = require('./routes/users');
var loginRouter = require('./routes/login');

var app = express();

....

// 设置session
app.use(
  session({
    name: 'depSystem',
    secret: "depSession", // 服务器生成 session 的签名
    resave: true, // //重新设置session后, 会自动重新计算过期时间
    saveUninitialized: true, //强制将为初始化的 session 存储
    cookie: {
      maxAge: 1000 * 60 * 10,// 过期时间
      secure: false, // 为 true 时候表示只有 https 协议才能访问cookie
    },
    rolling: true, //为 true 表示 超时前刷新,cookie 会重新计时; 为 false 表示在超时前刷新多少次,都是按照第一次刷新开始计时。
    store: MongoStore.create({
        mongoUrl: 'mongodb://admin:123456@127.0.0.1:27017/express_session',
        ttl: 1000 * 60 * 10 // 过期时间
    })
  })
)

// 设置中间件, session过期校验
app.use((req, res, next) => {
  // 排除登陆相关的路由和接口
  if(req.url.includes("login")) {
    next()
    return
  }
  if(req.session.user) {
    // 重新设置一下session,只要在没过期前请求接口,就会重新计时session的过期的时间
    req.session.myDate = Date.now()
    next()
  } else {
    console.log('认证失败')
    // 是接口, 返回错误码
    // 不是接口就重定向
    // AJAX 请求本身并不能直接控制浏览器的重定向行为。
    // 重定向是由浏览器进行的操作,与 AJAX 请求本身无关。
    req.url.includes("api") ? res.status(401).json({
      code: 3,
      msg: '认证失败,请重新登录'
    }) : res.redirect("/login")
  }
})

app.use('/', indexRouter);
app.use('/api/user', usersRouter);
app.use('/login', loginRouter)

module.exports = app;
2
3
4
5
6
7
8
9
10
11
12
13
14
15
16
17
18
19
20
21
22
23
24
25
26
27
28
29
30
31
32
33
34
35
36
37
38
39
40
41
42
43
44
45
46
47
48
49
50
51
52
53
54
55
56
57
58
59
60
61
62
63
login.ejs
<!DOCTYPE html>
<html>

<head>
  <title>
    <%= title %>
  </title>
  <style>
  </style>
  <link rel='stylesheet' href='/stylesheets/style.css' />
</head>

<body>
    <h1>xxx后台管理系统</h1>
  <div>
    <label name="username">账号:<input name="username" id="username" type="text"></label><br />
    <label name="password">密码:<input name="password" id="password" type="password"></label><br />
    <input id="loginButton" type="submit" value="登陆"></input>
  </div>

  <script>
    const username = document.querySelector('#username')
    const password = document.querySelector('#password')
    const loginButton = document.querySelector('#loginButton')
    loginButton.onclick = function () {
      fetch('http://localhost:3000/api/user/login', {
        method: 'POST',
        body: JSON.stringify({
          username: username.value,
          password: password.value
        }),
        headers: {
          'Content-Type': 'application/json'
        }
      }).then(res => res.json()).then(data => {
        console.log('登陆', data)
        if(data.code) {
            location.href="/"
            alert(data.msg)
        } else {
            alert(data.msg)
        }
      })
    }
  </script>
</body>

</html>
2
3
4
5
6
7
8
9
10
11
12
13
14
15
16
17
18
19
20
21
22
23
24
25
26
27
28
29
30
31
32
33
34
35
36
37
38
39
40
41
42
43
44
45
46
47
48
index.ejs
<!DOCTYPE html>
<html>

<head>
  <title>
    <%= title %>
  </title>
  <style>
    .edit {
      background-color: bisque;
    }
    .delete {
      background-color: red;
    }
  </style>
  <link rel='stylesheet' href='/stylesheets/style.css' />
</head>

<body>
  <button id="exit">退出登陆</button>
  <div>
    <label name="id">id<input name="id" id="_id" type="hidden"></label><br />
    <label name="username">账号:<input name="username" id="username" type="text"></label><br />
    <label name="password">密码:<input name="password" id="password" type="password"></label><br />
    <label name="age">年龄:<input name="age" id="age" type="text"></label><br />
    <input id="addButton" type="submit" value="添加"></input>
    <input id="editButton" type="submit" value="确定修改"></input>
    <input id="deleteButton" type="submit" value="清空"></input>
  </div>
  <table border="1">
    <thead>
      <tr>
        <th>id</th>
        <th>姓名</th>
        <th>年龄</th>
        <th colspan="2">操作</th>
      </tr>
    </thead>
    <tbody id="tbody">

    </tbody>
  </table>

  <script>
    const _id = document.querySelector('#_id')
    const username = document.querySelector('#username')
    const password = document.querySelector('#password')
    const age = document.querySelector('#age')
    const addButton = document.querySelector('#addButton')
    const tbody = document.querySelector('#tbody')
    const deleteButton = document.querySelector('#deleteButton')
    const exit = document.querySelector('#exit')
    addButton.onclick = function () {
      fetch('http://localhost:3000/api/user/add', {
        method: 'POST',
        body: JSON.stringify({
          username: username.value,
          password: password.value,
          age: age.value,
        }),
        headers: {
          'Content-Type': 'application/json'
        }
      }).then(res => res.json()).then(data => {
        console.log(data)
        getTableData()
        if (res.code == 3) {
              window.location.href = "/login"
        }
      })
    }

    // 退出
    exit.onclick = function() {
      fetch("http://localhost:3000/api/user/logout").then(res => res.json())
      .then(res => {
        if(res.code) {
          location.href="/login"
        } else {
          alert("退出登陆失败")
        }
      })
    }

    getTableData()
    // 获取表格数据
    function getTableData() {
      fetch('http://localhost:3000/api/user/list?page=1&limit=6')
      .then(res => res.json())
      .then(res => {
        if (res.code) {
          console.log(res)
          tbody.innerHTML = res.data.map(item => {
            return `
                <tr>
                  <td class="id">${item._id}</td>
                  <td class="username">${item.username}</td>
                  <td class="age">${item.age}</td>
                  <td><button class="edit">修改</button></td>
                  <td><button class="delete">删除</button></td>
                </tr>
                `
          }).join("")
        } else if (res.code == 3) {
              window.location.href = "/login"
        }else {
          tbody.innerHTML = `
                <tr>
                  <td colspan="5">暂无数据</td>
                </tr>
              `
        }
      })
    }

      // 事件委托方式给每个按钮添加点击事件
      tbody.addEventListener('click', function(event) {
        if(event.target.classList.contains("edit")) {
          const pNode = event.target.parentNode.parentNode;
          // console.log(pNode)
          // console.log(pNode.querySelector('.id'))
          username.value = pNode.querySelector('.username').innerText
          age.value = pNode.querySelector('.age').innerText
          _id.value = pNode.querySelector('.id').innerText
        }
        if(event.target.classList.contains("delete")) {
          const pNode = event.target.parentNode.parentNode;
          const id = pNode.querySelector('.id').innerText
          fetch(`http://localhost:3000/api/user/delete/${id}`, {
            method: 'DELETE'
          })
          .then(res => res.json())
          .then(res => {
            if(res.code) {
              alert('删除成功')
              getTableData()
            } else if(res.code == 0){
              alert('删除失败')
            } else if (res.code == 3) {
              window.location.href = "/login"
            }
          })
        }
      })

      // 修改数据
      editButton.onclick = function() {
        fetch(`http://localhost:3000/api/user/edit/${_id.value}`, {
          method: 'PUT',
          body: JSON.stringify({
            username: username.value,
            age: age.value,
          }),
          headers: {
            'Content-Type': 'application/json'
          }
        }).then(res => res.json()).then(res => {
          if(res.code) {
              alert('修改成功')
              getTableData()
            }else if (res.code == 3) {
              window.location.href = "/login"
            } else {
              alert('修改失败')
            }
        })
      }

      // 清空表格数据
      deleteButton.onclick = function() {
        username.value = ''
        password.value = ''
        age.value = ''
      }
  </script>
</body>

</html>
2
3
4
5
6
7
8
9
10
11
12
13
14
15
16
17
18
19
20
21
22
23
24
25
26
27
28
29
30
31
32
33
34
35
36
37
38
39
40
41
42
43
44
45
46
47
48
49
50
51
52
53
54
55
56
57
58
59
60
61
62
63
64
65
66
67
68
69
70
71
72
73
74
75
76
77
78
79
80
81
82
83
84
85
86
87
88
89
90
91
92
93
94
95
96
97
98
99
100
101
102
103
104
105
106
107
108
109
110
111
112
113
114
115
116
117
118
119
120
121
122
123
124
125
126
127
128
129
130
131
132
133
134
135
136
137
138
139
140
141
142
143
144
145
146
147
148
149
150
151
152
153
154
155
156
157
158
159
160
161
162
163
164
165
166
167
168
169
170
171
172
173
174
175
176
177
178
controller/UserController.js
const UserService = require("../service/UserService")

const UserController = {
    // 登陆
    login: (req, res) => {
      const {username, password} = req.body
      UserService.login(username, password).then(data => {
        console.log(data)
        if(data) {
          //设置session {}
          req.session.user = data //设置session对象,
          //默认存在内存中。
          res.send({
            code: 1,
            msg: '登陆成功'
          })
        } else {
          res.send({
            code: 0,
            msg: '账号或者密码错误或账号不存在'
          })
        }

      }).catch(err => {
        console.log(err)
        res.send({
          code: 0,
          msg: '账号或者密码错误'
        })
      })
    },
    // 退出登陆
    logout: (req, res) => {
      req.session.destroy(()=>{
        res.send({
          code: 1,
          msg: "退出成功"
        })
      })
    }
}

module.exports = UserController
2
3
4
5
6
7
8
9
10
11
12
13
14
15
16
17
18
19
20
21
22
23
24
25
26
27
28
29
30
31
32
33
34
35
36
37
38
39
40
41
42
43
service/UserService.js
const UserModel = require('../model/UserModel')

const UserService = {
    // 登陆
    login: (username, password) => {
        return UserModel.findOne({username, password})
    }
}

module.exports = UserService
2
3
4
5
6
7
8
9
10
routes/users.js
var express = require('express');
var router = express.Router();
const UserModel = require('../model/UserModel')
const UserController = require('../controller/UserController')

/* GET users listing. */
router.get('/', function(req, res, next) {
  res.send('respond with a resource');
});

// 用户登录
router.post('/login', UserController.login)
// 退出登陆
router.get('/logout', UserController.logout)

module.exports = router;
2
3
4
5
6
7
8
9
10
11
12
13
14
15
16
# JSON Web Token (JWT)

我为什么要保存这可恶的session呢, 只让每个客户端去保存该多好?

当然, 如果一个人的token 被别人偷走了, 那我也没办法, 我也会认为小偷就是合法用户, 这其实和一个人的session id 被别人偷走是一样的。
这样一来, 我就不保存session id 了, 我只是生成token , 然后验证token , 我用我的CPU计算时间获取了我的session 存储空间 !
解除了session id这个负担, 可以说是无事一身轻, 我的机器集群现在可以轻松地做水平扩展, 用户访问量增大, 直接加机器就行。 这种无状态的感觉实在是太好了!
缺点:
- 占带宽,正常情况下要比 session_id 更大,需要消耗更多流量,挤占更多带宽,假如你的网站每月有 10 万次的浏览器,就意味着要多开销几十兆的流量。听起来并不多,但日积月累也是不小一笔开销。实际上,许多人会在 JWT 中存储的信息会更多;
- 无法在服务端注销,那么久很难解决劫持问题;
- 性能问题,JWT 的卖点之一就是加密签名,由于这个特性,接收方得以验证 JWT 是否有效且被信任。对于有着严格性能要求的 Web 应用,这并不理想,尤其对于单线程环境。
注意:
CSRF攻击的原因是浏览器会自动带上cookie,而不会带上token;
以CSRF攻击为例:
cookie:用户点击了链接,cookie未失效,导致发起请求后后端以为是用户正常操作,于是进行扣款操作; token:用户点击链接,由于浏览器不会自动带上token,所以即使发了请求,后端的token验证不会通过,所以不会进行扣款操作;
安装
npm install jsonwebtoken
utils/JWT.js
const jwt = require('jsonwebtoken')
const secret ="dep-token"
const JWT = {
    generate(value, expires) {
        return jwt.sign(value, secret, {expiresIn: expires})
    },
    verify(token) {
        try {
            return jwt.verify(token, secret)
        } catch(error) {
            return false
        }
    }
}
module.exports = JWT
2
3
4
5
6
7
8
9
10
11
12
13
14
15
app.js
var createError = require('http-errors');
var express = require('express');
var path = require('path');
var cookieParser = require('cookie-parser');
var logger = require('morgan');
// 引入JWT工具包
const JWT = require("./utils/JWT");

var indexRouter = require('./routes/index');
var usersRouter = require('./routes/users');
var loginRouter = require('./routes/login');

var app = express();
....

// 设置中间件,token过期体验
app.use((req, res, next)=> {
  // 排除login相关的路由和接口
  if(req.url.includes("login")) {
    next()
    return
  }
  // ?.相当于req.headers["authorization"] && req.headers["authorization"].split(" ")[1]
  const token = req.headers["authorization"]?.split(" ")[1]
  console.log("获取到的token", token)
  if(token) {
    const payload = JWT.verify(token)
    console.log("解析的token", payload)
    if(payload) {
      // 重新计算token过期时间
      const newToken = JWT.generate({
        _id: payload._id,
        username: payload.username
      }, "1d")
      res.header("Authorization",newToken)
      next()
    } else {
      res.status(401).send({
        code: 3,
        msg: "登陆过期"
      })
    }
  } else {
    next()
  }
})

app.use('/', indexRouter);
app.use('/api/user', usersRouter);
app.use('/login', loginRouter)


module.exports = app;
2
3
4
5
6
7
8
9
10
11
12
13
14
15
16
17
18
19
20
21
22
23
24
25
26
27
28
29
30
31
32
33
34
35
36
37
38
39
40
41
42
43
44
45
46
47
48
49
50
51
52
53
54
controller/UserController.js
const UserService = require("../service/UserService")
const JWT = require("../utils/JWT")

const UserController = {
    // 登陆
    login: (req, res) => {
      const {username, password} = req.body
      UserService.login(username, password).then(data => {
        console.log(data)
        if(data) {
          // 设置token
          const token = JWT.generate({
            _id:data._id,
            username:data.username
          },"1d")
          // token返回在header
          res.header("Authorization",token)
          res.send({
            code: 1,
            msg: '登陆成功'
          })
        } else {
          res.send({
            code: 0,
            msg: '账号或者密码错误或账号不存在'
          })
        }

      }).catch(err => {
        console.log(err)
        res.send({
          code: 0,
          msg: '账号或者密码错误'
        })
      })
    },
    // 退出登陆 (token方式不需要退出接口)
    // logout: (req, res) => {
    //   req.session.destroy(()=>{
    //     res.send({
    //       code: 1,
    //       msg: "退出成功"
    //     })
    //   })
    // },
}

module.exports = UserController
2
3
4
5
6
7
8
9
10
11
12
13
14
15
16
17
18
19
20
21
22
23
24
25
26
27
28
29
30
31
32
33
34
35
36
37
38
39
40
41
42
43
44
45
46
47
48
login.ejs
<!DOCTYPE html>
<html>

<head>
  <title>
    <%= title %>
  </title>
  <style>
  </style>
  <link rel='stylesheet' href='/stylesheets/style.css' />
  <script src="https://cdn.jsdelivr.net/npm/axios/dist/axios.min.js"></script>
  <script>
    // 拦截器
            //拦截器,
            axios.interceptors.request.use(function (config) {
            // console.log("请求发出前,执行的方法")
            // Do something before request is sent
            return config;
        }, function (error) {
            // Do something with request error
            return Promise.reject(error);
        });

        // Add a response interceptor
        axios.interceptors.response.use(function (response) {
            // console.log("请求成功后 ,第一个调用的方法")
            const {authorization } = response.headers
            authorization && localStorage.setItem("token",authorization)
            return response;
        }, function (error) {
            // Any status codes that falls outside the range of 2xx cause this function to trigger
            // Do something with response error
            return Promise.reject(error);
        });
  </script>
</head>

<body>
    <h1>xxx后台管理系统</h1>
  <div>
    <label name="username">账号:<input name="username" id="username" type="text"></label><br />
    <label name="password">密码:<input name="password" id="password" type="password"></label><br />
    <input id="loginButton" type="submit" value="登陆"></input>
  </div>

  <script>
    const username = document.querySelector('#username')
    const password = document.querySelector('#password')
    const loginButton = document.querySelector('#loginButton')
    loginButton.onclick = function () {
      axios.post("/api/user/login",{
        username: username.value,
        password: password.value
      }).then(res => {
        console.log('登陆', res.data)
        if(res.data.code == 1) {
            location.href="/"
            alert(res.data.msg)
        } else {
            alert(res.data.msg)
        }
      })
    }
  </script>
</body>

</html>
2
3
4
5
6
7
8
9
10
11
12
13
14
15
16
17
18
19
20
21
22
23
24
25
26
27
28
29
30
31
32
33
34
35
36
37
38
39
40
41
42
43
44
45
46
47
48
49
50
51
52
53
54
55
56
57
58
59
60
61
62
63
64
65
66
67
index.ejs
<!DOCTYPE html>
<html>

<head>
  <title>
    <%= title %>
  </title>
  <style>
    .edit {
      background-color: bisque;
    }
    .delete {
      background-color: red;
    }
  </style>
  <link rel='stylesheet' href='/stylesheets/style.css' />
  <script src="https://cdn.jsdelivr.net/npm/axios/dist/axios.min.js"></script>
  <script>
    //拦截器,
    axios.interceptors.request.use(function (config) {
      // console.log("请求发出前,执行的方法")
      // Do something before request is sent
      const token = localStorage.getItem("token")
      config.headers.Authorization = `Bearer ${token}`
      return config;
    }, function (error) {
      // Do something with request error
      return Promise.reject(error);
    });

    // Add a response interceptor
    axios.interceptors.response.use(function (response) {
      // console.log("请求成功后 ,第一个调用的方法")
      const {
        authorization
      } = response.headers
      authorization && localStorage.setItem("token", authorization)
      return response;
    }, function (error) {
      // console.log(error.response.status)
      if(error.response.status===401){
        localStorage.removeItem("token")
        location.href = "/login"
      }
      return Promise.reject(error);
    });
  </script>
</head>

<body>
  <button id="exit">退出登陆</button>
  <div>
    <label name="id">id<input name="id" id="_id" type="hidden"></label><br />
    <label name="username">账号:<input name="username" id="username" type="text"></label><br />
    <label name="password">密码:<input name="password" id="password" type="password"></label><br />
    <label name="age">年龄:<input name="age" id="age" type="text"></label><br />
    <input id="addButton" type="submit" value="添加"></input>
    <input id="editButton" type="submit" value="确定修改"></input>
    <input id="deleteButton" type="submit" value="清空"></input>
  </div>
  <table border="1">
    <thead>
      <tr>
        <th>id</th>
        <th>姓名</th>
        <th>年龄</th>
        <th colspan="2">操作</th>
      </tr>
    </thead>
    <tbody id="tbody">

    </tbody>
  </table>

  <script>
    const _id = document.querySelector('#_id')
    const username = document.querySelector('#username')
    const password = document.querySelector('#password')
    const age = document.querySelector('#age')
    const addButton = document.querySelector('#addButton')
    const tbody = document.querySelector('#tbody')
    const deleteButton = document.querySelector('#deleteButton')
    const exit = document.querySelector('#exit')
    addButton.onclick = function () {
      axios.post("/api/user/add", {
          username: username.value,
          password: password.value,
          age: age.value
      }).then(res => {
        console.log(res.data)
        getTableData()
        if (res.data.code == 3) {
            window.location.href = "/login"
        }
      })
    }

    // 退出
    exit.onclick = function() {
      localStorage.removeItem("token")
      location.href = "/login"
    }

    getTableData()
    // 获取表格数据
    function getTableData() {
      axios.get('http://localhost:3000/api/user/list?page=1&limit=6')
    .then(res => {
        if (res.data.code) {
          console.log(res.data)
          tbody.innerHTML = res.data.data.map(item => {
            return `
                <tr>
                  <td class="id">${item._id}</td>
                  <td class="username">${item.username}</td>
                  <td class="age">${item.age}</td>
                  <td><button class="edit">修改</button></td>
                  <td><button class="delete">删除</button></td>
                </tr>
                `
          }).join("")
        } else if (res.data.code == 3) {
              window.location.href = "/login"
        }else {
          tbody.innerHTML = `
                <tr>
                  <td colspan="5">暂无数据</td>
                </tr>
              `
        }
      })
    }

      // 事件委托方式给每个按钮添加点击事件
      tbody.addEventListener('click', function(event) {
        if(event.target.classList.contains("edit")) {
          const pNode = event.target.parentNode.parentNode;
          // console.log(pNode)
          // console.log(pNode.querySelector('.id'))
          username.value = pNode.querySelector('.username').innerText
          age.value = pNode.querySelector('.age').innerText
          _id.value = pNode.querySelector('.id').innerText
        }
        if(event.target.classList.contains("delete")) {
          const pNode = event.target.parentNode.parentNode;
          const id = pNode.querySelector('.id').innerText
          axios.delete(`/api/user/delete/${id}`).then(res => {
            if(res.data.code) {
              alert('删除成功')
              getTableData()
            } else if(res.data.code == 0){
              alert('删除失败')
            } else if (res.data.code == 3) {
              window.location.href = "/login"
            }
          })
        }
      })

      // 修改数据
      editButton.onclick = function() {
        axios.put(`/api/user/edit/${_id.value}`, {
            username: username.value,
            age: age.value,
        }).then(res => {
          if(res.data.code) {
              alert('修改成功')
              getTableData()
            }else if (res.data.code == 3) {
              window.location.href = "/login"
            } else {
              alert('修改失败')
            }
        })
      }

      // 清空表格数据
      deleteButton.onclick = function() {
        username.value = ''
        password.value = ''
        age.value = ''
      }
  </script>
</body>

</html>
2
3
4
5
6
7
8
9
10
11
12
13
14
15
16
17
18
19
20
21
22
23
24
25
26
27
28
29
30
31
32
33
34
35
36
37
38
39
40
41
42
43
44
45
46
47
48
49
50
51
52
53
54
55
56
57
58
59
60
61
62
63
64
65
66
67
68
69
70
71
72
73
74
75
76
77
78
79
80
81
82
83
84
85
86
87
88
89
90
91
92
93
94
95
96
97
98
99
100
101
102
103
104
105
106
107
108
109
110
111
112
113
114
115
116
117
118
119
120
121
122
123
124
125
126
127
128
129
130
131
132
133
134
135
136
137
138
139
140
141
142
143
144
145
146
147
148
149
150
151
152
153
154
155
156
157
158
159
160
161
162
163
164
165
166
167
168
169
170
171
172
173
174
175
176
177
178
179
180
181
182
183
184
185
186
# 文件上传管理
Multer 是一个 node.js 中间件,用于处理 multipart/form-data 类型的表单数据,它主要用于上传文件。
注意: Multer 不会处理任何非 multipart/form-data 类型的表单数据。
安装
npm install --save multer
users.js
var express = require('express');
var router = express.Router();
const UserModel = require('../model/UserModel')
const UserController = require('../controller/UserController')

// 上传文件
const multer  = require('multer')
const upload = multer({ dest: 'public/uploads/' })

// 添加用户
router.post('/form/add', upload.single("avator"), UserController.addUser);


module.exports = router;
2
3
4
5
6
7
8
9
10
11
12
13
14
controller/UserController.js
const UserService = require("../service/UserService")
const JWT = require("../utils/JWT")

const UserController = {
    addUser: (req, res) => {
        console.log(req.file)
        const avatar = req.file?`/uploads/${req.file.filename}`:`/images/default.png`
        const {username, password, age} = req.body
        UserService.addUser(username, password, age, avatar).then(data => {
          console.log(data)
          res.send({
            code: 1,
            msg: '添加成功'
          })
        }).catch(err => {
          console.log(err)
          res.send({
            code: 1,
            msg: '添加失败'
          })
        })
    }
}

module.exports = UserController
2
3
4
5
6
7
8
9
10
11
12
13
14
15
16
17
18
19
20
21
22
23
24
25
简单方式上传文件(前端)
<!DOCTYPE html>
<html>
<body>
  <form action="/api/user/form/add" method="post" enctype="multipart/form-data">
    <label name="username">账号:<input name="username"  type="text"></label><br />
    <label name="password">密码:<input name="password" type="password"></label><br />
    <label name="age">年龄:<input name="age" type="text"></label><br />
    <label name="age">文件:<input name="avator" type="file"></label><br />
    <input type="submit" value="添加"></input>
  </form>
</body>
</html>
2
3
4
5
6
7
8
9
10
11
12
利用axios上传文件
<!DOCTYPE html>
<html>

<head>
  <script src="https://cdn.jsdelivr.net/npm/axios/dist/axios.min.js"></script>
</head>

<body>
  <button id="exit">退出登陆</button>
  <div>
    <label name="id">id<input name="id" id="_id" type="hidden"></label><br />
    <label name="username">账号:<input name="username" id="username" type="text"></label><br />
    <label name="password">密码:<input name="password" id="password" type="password"></label><br />
    <label name="age">年龄:<input name="age" id="age" type="text"></label><br />
    <label name="avator">文件:<input id="avator" name="avator" type="file"></label><br />
    <input id="addButton" type="submit" value="添加"></input>
    <input id="editButton" type="submit" value="确定修改"></input>
    <input id="deleteButton" type="submit" value="清空"></input>
  </div>
  <table border="1">
    <thead>
      <tr>
        <th>id</th>
        <th>姓名</th>
        <th>年龄</th>
        <th>头像</th>
        <th colspan="2">操作</th>
      </tr>
    </thead>
    <tbody id="tbody">

    </tbody>
  </table>

  <script>
    const _id = document.querySelector('#_id')
    const username = document.querySelector('#username')
    const password = document.querySelector('#password')
    const age = document.querySelector('#age')
    const addButton = document.querySelector('#addButton')
    const avator = document.querySelector('#avator')
    addButton.onclick = function () {
      console.log(avator.files[0])
      const formData = new FormData()
      formData.append("username",username.value)
      formData.append("password",password.value)
      formData.append("age", age.value)
      formData.append("avator",avator.files[0])
      axios.post("/api/user/form/add", formData, {
        headers: {
          "Content-Type": "multipart/form-data"
        }
      }).then(res => {
        console.log(res.data)
        getTableData()
        if (res.data.code == 3) {
            window.location.href = "/login"
        }
      })
    }
  </script>
</body>

</html>
2
3
4
5
6
7
8
9
10
11
12
13
14
15
16
17
18
19
20
21
22
23
24
25
26
27
28
29
30
31
32
33
34
35
36
37
38
39
40
41
42
43
44
45
46
47
48
49
50
51
52
53
54
55
56
57
58
59
60
61
62
63
64
# APIDOC - API 文档生成工具
pidoc 是一个简单的 RESTful API 文档生成工具,它从代码注释中提取特定格式的内容生成文档。支持诸如 Go、Java、C++、Rust 等大部分开发语言,具体可使用 apidoc lang 命令行查看所有的支持列表。
apidoc 拥有以下特点:
- 跨平台,linux、windows、macOS 等都支持;
- 支持语言广泛,即使是不支持,也很方便扩展;
- 支持多个不同语言的多个项目生成一份文档;
- 输出模板可自定义;
- 根据文档生成 mock 数据;
npm install -g apidoc
安装上了,却提示没有命令,才发现,我修改了全局安装包的位置
默认是C:\Users\<用户名>\AppData\Roaming\npm\node_modules
修改回来
npm config set prefix C:\Users\Administrator.SC-201902031211\AppData\Roaming\npm

vscode安装插件ApiDoc Snippets

直接输api就可以自动生成注释
选择apiDocumentation

routes/users.js
var express = require('express');
var router = express.Router();
const UserModel = require('../model/UserModel')
const UserController = require('../controller/UserController')

// 上传文件
const multer  = require('multer')
const upload = multer({ dest: 'public/uploads/' })

/* GET users listing. */
router.get('/', function(req, res, next) {
  res.send('respond with a resource');
});

/**
 * 获取用户列表
 * @api {post} /api/user/list list
 * @apiName list
 * @apiGroup userGroup
 * @apiVersion  1.0.0
 *
 *
 * @apiParam  {String} username 用户名
 * @apiParam  {String} password 密码
 * @apiParam  {Number} age 年龄
 * @apiParam  {File} avator 头像
 *
 * @apiSuccess (0) {Number} code 失败
 * @apiSuccess (1) {Number} code 成功
 * @apiSuccess (3) {Number} code 没有权限
 *
 * @apiParamExample  {type} Request-Example:
 * {
 *     username : "admin",
 *     password : "123",
 *     age : 12,
 *     avator : File,
 * }
 *
 *
 * @apiSuccessExample {type} Success-Response:
 * {
 *     code: 1,
 *     success: true,
 *     msg: '请求成功'
 * }
 *
 *
 */
router.get('/list', UserController.getUserList)
// 添加用户
router.post('/form/add', upload.single("avator"), UserController.addUser);
// 修改用户
router.put('/edit/:id', UserController.editUser);
/**
 *
 * @api {delete} /api/user/delete deleteUser
 * @apiName deleteUser
 * @apiGroup userGroup
 * @apiVersion  1.0.0
 *
 *
 * @apiParam  {NUmber} id 要删除的id
 *
 * @apiSuccess (0) {Number} code 失败
 * @apiSuccess (1) {Number} code 成功
 * @apiSuccess (3) {Number} code 没有权限
 *
 *
 *
 * @apiSuccessExample {type} Success-Response:
 * {
 *     code: 1,
 *     success: true,
 *     msg: '请求成功'
 * }
 *
 *
 */
router.delete('/delete/:id', UserController.deleteUser)
// 用户登录
router.post('/login', UserController.login)
// 退出登陆
// router.get('/logout', UserController.logout)


module.exports = router;
2
3
4
5
6
7
8
9
10
11
12
13
14
15
16
17
18
19
20
21
22
23
24
25
26
27
28
29
30
31
32
33
34
35
36
37
38
39
40
41
42
43
44
45
46
47
48
49
50
51
52
53
54
55
56
57
58
59
60
61
62
63
64
65
66
67
68
69
70
71
72
73
74
75
76
77
78
79
80
81
82
83
84
85
86
87
88
生成接口文档
apidoc -i src/ -o doc/ #官网例子

apidoc -i routes/ -o doc/
2
3
执行命令后,会生成doc目录,点击目录下面的index.html打开,选择版本就可以查看了

# Koa

koa 是由 Express 原班人马打造的,致力于成为一个更小、更富有表现力、更健壮的 Web 框架。使用 koa 编写 web 应用,通过组合不同的 generator,可以免除重复繁琐的回调函数嵌套,并极大地提升错误处理的效率。koa 不在内核方法中绑定任何中间件,它仅仅提供了一个轻量优雅的函数库,使得编写 Web 应用变得得心应手。
# 基本使用
app.js
const Koa = require("koa")

const app = new Koa()

app.use(ctx => {
    ctx.body = "koa"
})

app.listen(3000, ()=> {
    console.log("服务器启动成功")
})
2
3
4
5
6
7
8
9
10
11

# Koa和Express对比
Koa 和 Express 都是流行的 Node.js Web 应用程序框架,它们有一些相似之处,但也有一些重要的区别。Koa 出现的原因主要是为了解决 Express 在某些方面的限制和不足,让开发者有更多的灵活性和控制。
以下是 Koa 和 Express 的主要区别和为什么出现了 Koa:
- 异步/Generator 支持:
- Express 使用回调函数来处理请求和中间件,这在处理异步操作时可能会导致回调地狱(callback hell)。
- Koa 使用 Generator 函数(或者现在也支持 Async/Await)来处理中间件,这使得异步流程更加清晰和易于管理。这是 Koa 最显著的区别之一,有助于更好地处理异步操作。
- 中间件处理:
- Express 中间件在请求和响应对象之间传递,这导致一些中间件的编写方式相对复杂。
- Koa 的中间件更加简洁和模块化,可以使用
next参数来控制中间件的执行流程,使得中间件的编写和组合更加直观。
- Context 对象:
- Koa 引入了一个
context对象,它包含了请求和响应相关的所有信息,而不是像 Express 那样将这些信息分散在不同的对象中。这使得操作请求和响应更加方便和一致。
- Koa 引入了一个
- 路由:
- Express 依赖于第三方库(如
express.Router)来处理路由,这使得路由管理相对独立。 - Koa 不提供内置的路由系统,但它的灵活性允许开发者选择自己喜欢的路由库,如
koa-router。
- Express 依赖于第三方库(如
- 错误处理:
- Koa 通过
try...catch语句来处理错误,使错误处理更加直观。 - Express 使用传统的中间件方式处理错误,这可能会导致一些不便之处。
- Koa 通过
总的来说,Koa 出现的原因主要是为了提供更加现代、灵活和易于扩展的框架,以应对 Node.js Web 开发的新需求。它的异步支持、简化的中间件处理、清晰的错误处理以及更好的上下文管理使得开发者能够更轻松地构建复杂的 Web 应用程序。然而,Express 仍然是一个非常流行和稳定的框架,特别适合那些不需要大量异步处理和更高级特性的项目。选择 Koa 还是 Express 取决于项目的需求和开发者的偏好。
# koa vs express
通常都会说 Koa 是洋葱模型,这重点在于中间件的设计。但是按照上面的分析,会发现 Express 也是类似的,不同的是Express 中间件机制使用了 Callback 实现,这样如果出现异步则可能会使你在执行顺序上感到困惑,因此如果我们想做接口耗时统计、错误处理 Koa 的这种中间件模式处理起来更方便些。最后一点响应机制也很重要,Koa 不是立即响应,是整个中间件处理完成在最外层进行了响应,而 Express 则是立即响应。
更轻量
- koa 不提供内置的中间件;
- koa 不提供路由,而是把路由这个库分离出来了(koa/router)
Context对象
- koa增加了一个Context的对象,作为这次请求的上下文对象(在koa2中作为中间件的第一个参数传入)。同时Context上也挂载了Request和Response两个对象。和Express类似,这两个对象都提供了大量的便捷方法辅助开发, 这样的话对于在保存一些公有的参数的话变得更加合情合理
异步流程控制
- express采用callback来处理异步, koa v1采用generator,koa v2 采用async/await。
- generator和async/await使用同步的写法来处理异步,明显好于callback和promise,
中间件模型
- express基于connect中间件,线性模型;
- koa中间件采用洋葱模型(对于每个中间件,在完成了一些事情后,可以非常优雅的将控制权传递给下一个中间件,并能够等待它完成,当后续的中间件完成处理后,控制权又回到了自己)

 express.js
const express = require("express")

const app = express()
// 同步: 输出结果  1 2 3
app.use((req, res, next) => {
    if(req.url == '/favicon.ico') return
    console.log('1')
    next()
    console.log('3')
    res.send({
        ok: 1
    })
})
app.use((req, res) => {
    console.log(2)
})

app.listen(3000, (req, res) => {
    console.log("服务器启动成功")
})
2
3
4
5
6
7
8
9
10
11
12
13
14
15
16
17
18
19
20
const express = require("express")

const app = express()

// 异步 输出 1 2 4 3
app.use(async (req, res, next) => {
    if(req.url == '/favicon.ico') return
    console.log(1)
    await next()
    console.log(4, res.token) // 4 undefined
    res.send({
        ok: 1
    })
})
app.use(async (req, res) => {
    console.log(2)
    await delay(5)
    res.token = 'asdafsdfsdfsdfsdfsdf'
    console.log(3)
})

function delay(time) {
    return new Promise((resolve, reject) => {
        setTimeout(resolve, time * 1000)
    })
}

app.listen(3000, (req, res) => {
    console.log("服务器启动成功")
})
2
3
4
5
6
7
8
9
10
11
12
13
14
15
16
17
18
19
20
21
22
23
24
25
26
27
28
29
30
koa.js
const Koa = require("Koa")

const app = new Koa()

// // 同步: 输出结果  1 2 3
app.use((ctx, next) => {
    if(ctx.url == '/favicon.ico') return
    console.log(1)
    next()
    console.log(3)
    ctx.body = {
        ok: 1
    }
})
app.use((ctx) => {
    console.log(2)
})

app.listen(3000, (req, res) => {
    console.log("服务器启动成功")
})
2
3
4
5
6
7
8
9
10
11
12
13
14
15
16
17
18
19
20
21
const Koa = require("Koa")

const app = new Koa()

// 异步 输出 1 2 3 4 (并且返回的内容是停5秒才会渲染)
app.use(async (ctx, next) => {
    if(ctx.url == '/favicon.ico') return
    console.log(1)
    const mytoken = await next() // 4 asdsfsdgfsdgsfdgdfgdfg
    console.log(4, mytoken)
    ctx.body = {
        ok: 1
    }
})
app.use(async (ctx) => {
    console.log(2)
    await delay(5)
    console.log(3)
    return 'asdsfsdgfsdgsfdgdfgdfg'
})

function delay(time) {
    return new Promise((resolve, reject) => {
        setTimeout(resolve, time * 1000)
    })
}


app.listen(3000, (req, res) => {
    console.log("服务器启动成功")
})
2
3
4
5
6
7
8
9
10
11
12
13
14
15
16
17
18
19
20
21
22
23
24
25
26
27
28
29
30
31
# 路由
安装
npm install koa-router
var Koa = require("koa")
var Router = require("koa-router")

var app = new Koa()
var router = new Router()

router.post("/list",(ctx)=>{
    ctx.body=["111","222","333"]
})
app.use(router.routes()).use(router.allowedMethods())
app.listen(3000)
2
3
4
5
6
7
8
9
10
11
router.allowedMethods作用

Koa-router 请求方式: get 、 put 、 post 、 patch 、 delete 、 del ,而使用方法就是 router.方式() ,比如 router.get() 和 router.post() 。而 router.all() 会匹配所有的请求方法。
拆分路由
routes/list.js
const Router = require("koa-router")
const router = new Router()

router.get("/", (ctx) => {
    ctx.body = ["111","222","333"]
})

router.put("/:id", (ctx) => {
    ctx.body = {
        ok: 1,
        id: ctx.params.id,
        msg: "更新成功"
    }
})

router.post("/add", (ctx) => {
    ctx.body = {
        ok: 1,
        msg: "添加成功"
    }
})

router.del("/:id", (ctx) => {
    ctx.body = {
        ok: 1,
        id: ctx.params.id,
        msg: "删除成功"
    }
})


module.exports = router
2
3
4
5
6
7
8
9
10
11
12
13
14
15
16
17
18
19
20
21
22
23
24
25
26
27
28
29
30
31
32
routes/user.js
const Router = require("koa-router")
const router = new Router()

router.get("/", (ctx) => {
    ctx.body = ["111","222","333"]
}).put("/:id", (ctx) => {
    ctx.body = {
        ok: 1,
        id: ctx.params.id,
        msg: "更新成功"
    }
}).post("/add", (ctx) => {
    ctx.body = {
        ok: 1,
        msg: "添加成功"
    }
}).del("/:id", (ctx) => {
    ctx.body = {
        ok: 1,
        id: ctx.params.id,
        msg: "删除成功"
    }
})


module.exports = router
2
3
4
5
6
7
8
9
10
11
12
13
14
15
16
17
18
19
20
21
22
23
24
25
26
routes/home.js
const Router = require("koa-router")
const router = new Router()

router.get("/", (ctx) => {
    ctx.body = `
        <html>
            <h1>主页</h1>
        </html>
    `
})

module.exports = router
2
3
4
5
6
7
8
9
10
11
12
routes/index.js
const Router = require("koa-router")
const router = new Router()

const list = require("./list")
const user = require("./user")
const home = require("./home")

// 添加路由前缀
// router.prefix("/api")

router.use('/api/list', list.routes(), list.allowedMethods())
router.use('/api/user', user.routes(), user.allowedMethods())
router.use('/home', home.routes(), home.allowedMethods())

// 路由重定向
//写法1
router.redirect('/', '/home');
//写法2
// router.get("/",(ctx)=>{
//     ctx.redirect("/home")
// })


module.exports = router
2
3
4
5
6
7
8
9
10
11
12
13
14
15
16
17
18
19
20
21
22
23
24
25
app.js
const Koa = require("Koa")
const router = require("./routes/index")
const app = new Koa()

app.use(router.routes()).use(router.allowedMethods())

app.listen(3000, () => {
    console.log("服务器启动成功")
})
2
3
4
5
6
7
8
9
10
# 静态资源
安装:
npm install koa-static
public/index.html
<!DOCTYPE html>
<html lang="en">
<head>
    <meta charset="UTF-8">
    <meta http-equiv="X-UA-Compatible" content="IE=edge">
    <meta name="viewport" content="width=device-width, initial-scale=1.0">
    <title>Document</title>
    <link rel="stylesheet" href="/css/index.css">
</head>
<body>
    <div>
        主页
    </div>
</body>
</html>
2
3
4
5
6
7
8
9
10
11
12
13
14
15
public/css/index.css
div {
    background-color: red;
}
2
3
app.js
const Koa = require("Koa")
const router = require("./routes/index")
const path = require("path")
// 静态资源
const static = require("koa-static")

const app = new Koa()

// 静态资源管理
app.use(static(
    path.join(__dirname, "public")
))

app.use(router.routes()).use(router.allowedMethods())

app.listen(3000, () => {
    console.log("服务器启动成功")
})
2
3
4
5
6
7
8
9
10
11
12
13
14
15
16
17
18
19
# 获取请求参数
# get参数
在koa中,获取GET请求数据源头是koa中request对象中的query方法或querystring方法,query返回是格式化好的参数对象,querystring返回的是请求字符串,由于ctx对request的API有直接引用的方式,所以获取GET请求数据有两个途径。
- 是从上下文中直接获取 请求对象ctx.query,返回如 { a:1, b:2 } 请求字符串 ctx.querystring,返回如 a=1&b=2
- 是从上下文的request对象中获取 请求对象ctx.request.query,返回如 { a:1, b:2 } 请求字符串 ctx.request.querystring,返回如 a=1&b=2
# post参数
对于POST请求的处理,koa-bodyparser中间件可以把koa2上下文的formData数据解析到ctx.request.body中
安装
npm install koa-bodyparser
const bodyParser = require('koa-bodyparser')

// 使用ctx.body解析中间件
app.use(bodyParser())
2
3
4
app.js
const Koa = require("Koa")
const router = require("./routes/index")
const path = require("path")
// 静态资源
const static = require("koa-static")
// post参数处理
const bodyParser = require("koa-bodyparser")

const app = new Koa()

// 静态资源管理
app.use(static(
    path.join(__dirname, "public")
))
// post参数管理
app.use(bodyParser())

app.use(router.routes()).use(router.allowedMethods())

app.listen(3000, () => {
    console.log("服务器启动成功")
})
2
3
4
5
6
7
8
9
10
11
12
13
14
15
16
17
18
19
20
21
22
routes/user.js
const Router = require("koa-router")
const router = new Router()

router.get("/login", (ctx) => {
    console.log("get请求参数", ctx.query, ctx.querystring)
    ctx.body = ctx.query
}).post("/login", (ctx) => {
    console.log("post请求参数", ctx.request.body)
    const {username, password} = ctx.request.body
    if(username == 'admin' && password == '123456') {
        ctx.redirect("/")
    } else {
        ctx.redirect("/index.html")
    }
    ctx.body = ctx.request.body
})


module.exports = router
2
3
4
5
6
7
8
9
10
11
12
13
14
15
16
17
18
19
public/index.html
<!DOCTYPE html>
<html lang="en">
<head>
    <meta charset="UTF-8">
    <meta http-equiv="X-UA-Compatible" content="IE=edge">
    <meta name="viewport" content="width=device-width, initial-scale=1.0">
    <title>Document</title>
    <link rel="stylesheet" type="text/css" href="/css/login.css">
</head>
<body>
    <div method="post">
        <label name="username">账号:<input name="username" id ="username" type="text"></label><br/>
        <label name="password">密码:<input name="password" id ="password" type="password"></label><br/>
        <input id="getButton" type="submit" value="get登陆"></input>
        <input id="postButton" type="submit" value="post登陆"></input>
    </div>

    <script src="/js/login.js"></script>

</body>
</html>
2
3
4
5
6
7
8
9
10
11
12
13
14
15
16
17
18
19
20
21
public/js/login.js
const getButton = document.getElementById("getButton")
const postButton = document.getElementById("postButton")

const userInput = document.getElementById("username")
const pwdInput = document.getElementById("password")

getButton.onclick = function() {
    let username = userInput.value
    let password = pwdInput.value
    fetch(`/api/user/login?username=${username}&password=${password}`)
    .then(res=>res.json())
    .then(res=>{
        console.log(res)
    })
}

postButton.onclick = function() {
    let username = userInput.value
    let password = pwdInput.value
    console.log(username, password)
    // post请求
    fetch(`/api/user/login`, {
        method: 'post',
        body: JSON.stringify({
            username: username,
            password: password
        }),
        headers: {
            'Content-Type': 'application/json'
        }
    }).then(res => res.json())
    .then(data => {
        console.log(data)
    })
}
2
3
4
5
6
7
8
9
10
11
12
13
14
15
16
17
18
19
20
21
22
23
24
25
26
27
28
29
30
31
32
33
34
35
# ejs模板
安装
# 安装koa模板使用中间件
npm install --save koa-views

# 安装ejs模板引擎
npm install --save ejs
2
3
4
5
文件目录
├── package.json
├── index.js
└── view
    └── index.ejs
2
3
4
app.js
const Koa = require("Koa")
const router = require("./routes/index")
const path = require("path")
// 静态资源
const static = require("koa-static")
// post参数处理
const bodyParser = require("koa-bodyparser")
// 模版引擎
const views = require("koa-views")

const app = new Koa()

// 静态资源管理
app.use(static(
    path.join(__dirname, "public")
))
// post参数管理
app.use(bodyParser())
// 模版引擎管理
app.use(views(path.join(__dirname, './views'), {
    extension: 'ejs'
}))

app.use(router.routes()).use(router.allowedMethods())

app.listen(3000, () => {
    console.log("服务器启动成功")
})
2
3
4
5
6
7
8
9
10
11
12
13
14
15
16
17
18
19
20
21
22
23
24
25
26
27
28
home.js
const Router = require("koa-router")
const router = new Router()

router.get("/", async (ctx) => {
   let username = "张三"
   console.log("访问了/home")
   await ctx.render("home", {username})
})

module.exports = router
2
3
4
5
6
7
8
9
10
home.ejs
<!DOCTYPE html>
<html lang="en">
<head>
    <meta charset="UTF-8">
    <meta name="viewport" content="width=device-width, initial-scale=1.0">
    <title>Document</title>
</head>
<body>
    <h1>home模板页面</h1>
    <div>欢迎<%= username%>回来</div>
</body>
</html>
2
3
4
5
6
7
8
9
10
11
12
# cookie&session
# cookie
koa提供了从上下文直接读取、写入cookie的方法
- ctx.cookies.get(name, [options]) 读取上下文请求中的cookie
- ctx.cookies.set(name, value, [options]) 在上下文中写入cookie
//获取cookie
console.log(ctx.cookies.get("age"))

//设置cookie
ctx.cookies.set("location","dalian")
2
3
4
5
# session
koa-session-minimal 适用于koa2 的session中间件,提供存储介质的读写接口 。
安装
npm install koa-session-minimal
app.js
const Koa = require("Koa")
const router = require("./routes/index")
const path = require("path")
// 静态资源
const static = require("koa-static")
// post参数处理
const bodyParser = require("koa-bodyparser")
// 模版引擎
const views = require("koa-views")
// session
const session = require("koa-session-minimal")

const app = new Koa()

// 静态资源管理
app.use(static(
    path.join(__dirname, "public")
))
// post参数管理
app.use(bodyParser())
// 模版引擎管理
app.use(views(path.join(__dirname, './views'), {
    extension: 'ejs'
}))
// session管理
app.use(session({
    key: "SESSION_ID",
    cookie: {
        maxAge: 1000*60
    }
}))

app.use(async (ctx, next) => {
    console.log("访问的路径", ctx.url, "获取session", ctx.session.user)
    if(ctx.url.includes("login")) {
        await next()
        return
    }
    if(ctx.session.user) {
        // 重新设置以下sesssion
        ctx.session.mydate = new Date()
        await next()
    } else {
        await ctx.redirect("/login")
    }
})

app.use(router.routes()).use(router.allowedMethods())

app.listen(3000, () => {
    console.log("服务器启动成功")
})
2
3
4
5
6
7
8
9
10
11
12
13
14
15
16
17
18
19
20
21
22
23
24
25
26
27
28
29
30
31
32
33
34
35
36
37
38
39
40
41
42
43
44
45
46
47
48
49
50
51
52
53
routes/user.js
const Router = require("koa-router")
const router = new Router()

router.get("/login", (ctx) => {
    console.log("get请求参数", ctx.query, ctx.querystring)
    ctx.body = ctx.query
}).post("/login", (ctx) => {
    console.log("post请求参数", ctx.request.body)
    const {username, password} = ctx.request.body
    if(username == 'admin' && password == '123456') {
        //设置sessionId
        ctx.session.user = {
            username:"admin"
        }
        ctx.body = {
            code: 1,
            msg: "登陆成功"
        }
    } else {
        ctx.body = {
            code: 0,
            msg: "账号或密码有误"
        }
    }
})


module.exports = router
2
3
4
5
6
7
8
9
10
11
12
13
14
15
16
17
18
19
20
21
22
23
24
25
26
27
28
views/login.ejs
<!DOCTYPE html>
<html>

<head>
  <title>
   登陆
  </title>
  <style>
  </style>
  <link rel='stylesheet' href='/stylesheets/style.css' />
  <script src="https://cdn.jsdelivr.net/npm/axios/dist/axios.min.js"></script>
</head>

<body>
    <h1>xxx后台管理系统</h1>
  <div>
    <label name="username">账号:<input name="username" id="username" type="text"></label><br />
    <label name="password">密码:<input name="password" id="password" type="password"></label><br />
    <input id="loginButton" type="submit" value="登陆"></input>
  </div>

  <script>
    const username = document.querySelector('#username')
    const password = document.querySelector('#password')
    const loginButton = document.querySelector('#loginButton')
    loginButton.onclick = function () {
      axios.post("/api/user/login",{
        username: username.value,
        password: password.value
      }).then(res => {
        console.log('登陆', res.data)
        if(res.data.code == 1) {
            location.href="/"
            alert(res.data.msg)
        } else {
            alert(res.data.msg)
        }
      })
    }
  </script>
</body>

</html>
2
3
4
5
6
7
8
9
10
11
12
13
14
15
16
17
18
19
20
21
22
23
24
25
26
27
28
29
30
31
32
33
34
35
36
37
38
39
40
41
42
43
# JWT
JWT.js
const jwt = require('jsonwebtoken')
const secret ="dep-token"
const JWT = {
    generate(value, expires) {
        return jwt.sign(value, secret, {expiresIn: expires})
    },
    verify(token) {
        try {
            return jwt.verify(token, secret)
        } catch(error) {
            return false
        }
    }
}
module.exports = JWT
2
3
4
5
6
7
8
9
10
11
12
13
14
15
app.js
app.use(async(ctx, next) => {
    //排除login相关的路由和接口
    if (ctx.url.includes("login")) {
        await next()
        return
    }
    const token = ctx.headers["authorization"]?.split(" ")[1]
    // console.log(req.headers["authorization"])
    if(token){
        const payload =  JWT.verify(token)
        if(payload){
            //重新计算token过期时间
            const newToken = JWT.generate({
                _id:payload._id,
                username:payload.username
            },"10s")

            ctx.set("Authorization",newToken)
            await next()
        }else{
            ctx.status = 401
            ctx.body = {errCode:-1,errInfo:"token过期"}
        }
    }else{
        await next()
    }
})
2
3
4
5
6
7
8
9
10
11
12
13
14
15
16
17
18
19
20
21
22
23
24
25
26
27
routes/user.js
const Router = require("koa-router")
const JWT = require("../util/JWT")
const router = new Router()

router.post("/login", (ctx) => {
    // console.log()
    const { username, password } = ctx.request.body
    if (username === "admin" && password === "123456") {
        //设置header
        const token = JWT.generate({
            _id: "111",
            username: "admin"
        }, "10s")
        //token返回在header
        ctx.set("Authorization", token)

        ctx.body = {
            ok: 1
        }
    } else {
        ctx.body = {
            ok: 0
        }
    }

})

module.exports = router
2
3
4
5
6
7
8
9
10
11
12
13
14
15
16
17
18
19
20
21
22
23
24
25
26
27
28
login.ejs
<!DOCTYPE html>
<html>

<head>
  <title>
    <%= title %>
  </title>
  <style>
  </style>
  <link rel='stylesheet' href='/stylesheets/style.css' />
  <script src="https://cdn.jsdelivr.net/npm/axios/dist/axios.min.js"></script>
  <script>
    // 拦截器
            //拦截器,
            axios.interceptors.request.use(function (config) {
            // console.log("请求发出前,执行的方法")
            // Do something before request is sent
            return config;
        }, function (error) {
            // Do something with request error
            return Promise.reject(error);
        });

        // Add a response interceptor
        axios.interceptors.response.use(function (response) {
            // console.log("请求成功后 ,第一个调用的方法")
            const {authorization } = response.headers
            authorization && localStorage.setItem("token",authorization)
            return response;
        }, function (error) {
            // Any status codes that falls outside the range of 2xx cause this function to trigger
            // Do something with response error
            return Promise.reject(error);
        });
  </script>
</head>

<body>
    <h1>xxx后台管理系统</h1>
  <div>
    <label name="username">账号:<input name="username" id="username" type="text"></label><br />
    <label name="password">密码:<input name="password" id="password" type="password"></label><br />
    <input id="loginButton" type="submit" value="登陆"></input>
  </div>

  <script>
    const username = document.querySelector('#username')
    const password = document.querySelector('#password')
    const loginButton = document.querySelector('#loginButton')
    loginButton.onclick = function () {
      axios.post("/api/user/login",{
        username: username.value,
        password: password.value
      }).then(res => {
        console.log('登陆', res.data)
        if(res.data.code == 1) {
            location.href="/"
            alert(res.data.msg)
        } else {
            alert(res.data.msg)
        }
      })
    }
  </script>
</body>

</html>
2
3
4
5
6
7
8
9
10
11
12
13
14
15
16
17
18
19
20
21
22
23
24
25
26
27
28
29
30
31
32
33
34
35
36
37
38
39
40
41
42
43
44
45
46
47
48
49
50
51
52
53
54
55
56
57
58
59
60
61
62
63
64
65
66
67
# 上传文件
https://www.npmjs.com/package/@koa/multer
安装
npm install --save @koa/multer multer
const multer = require('@koa/multer');
const upload = multer({ dest: 'public/uploads/' })

router.post("/",upload.single('avatar'),
(ctx,next)=>{
    console.log(ctx.request.body,ctx.file)
    ctx.body={
        ok:1,
        info:"add user success"
    }
})
2
3
4
5
6
7
8
9
10
11
# 操作MongoDB
const mongoose = require("mongoose")

mongoose.connect("mongodb://127.0.0.1:27017/express_project")
//插入集合和数据,数据库kerwin_project会自动创建
2
3
4
const mongoose = require("mongoose")
const Schema = mongoose.Schema
const UserType = {
    username:String,
    password:String,
    age:Number,
    avatar:String
}

const UserModel = mongoose.model("user",new Schema(UserType))
// 模型user 将会对应 users 集合,
module.exports = UserModel
2
3
4
5
6
7
8
9
10
11
12
# MYSQL
nodejs 操作数据库
npm install mysql2
app.js
可以使用 try catch来捕获错误
const express = require('express')
const mysql2 = require("mysql2")
const app = express()

app.use('/', async (req, res) => {
    const config = getDBConfig()
    const promisePool = mysql2.createPool(config).promise();
    // 增删改查语句都放这个query里面
    // 查询
    // let user =  await promisePool.query("select user_id,username,nick_name from sys_user");
    let user =  await promisePool.query("insert into sys_user ( dept_id, username, nick_name) values(?,?,?)", [2, "test", "测试"]);
    console.log(user)
    if(user[0].length) {
        res.send(user[0])
    } else {
        res.send("查询失败")
    }
})

app.listen(3000, () => {
    console.log("服务器启动成功")
})


function getDBConfig() {
    return {
        host: '127.0.0.1',
        user: 'root',
        port: 3306,
        password: 'root',
        database: 'vue-admin',
        connectionLimit: 1 //创建一个连接池
    }
}
2
3
4
5
6
7
8
9
10
11
12
13
14
15
16
17
18
19
20
21
22
23
24
25
26
27
28
29
30
31
32
33
34
35
查询:
promisePool.query('select * from users');

插入:
promisePool.query('INSERT INTO `users`(`id`,`name`,`age`, `password`) VALUES (?,?,?,?)',[null,"admin",100,"123456"]);

更新:
promisePool.query(`UPDATE users SET name = ? ,age=? WHERE id = ?`,["xiaoming2",20,1])

删除:
promisePool.query(`delete from users where id=?`,[1])
2
3
4
5
6
7
8
9
10
11
# Socket编程
# websocket介绍

应用场景:
弹幕
媒体聊天
协同编辑
基于位置的应用
体育实况更新
股票基金报价实时更新
WebSocket并不是全新的协议,而是利用了HTTP协议来建立连接。我们来看看WebSocket连接是如何创建的。
首先,WebSocket连接必须由浏览器发起,因为请求协议是一个标准的HTTP请求,格式如下:
GET ws://localhost:3000/ws/chat HTTP/1.1
Host: localhost
Upgrade: websocket
Connection: Upgrade
Origin: http://localhost:3000
Sec-WebSocket-Key: client-random-string
Sec-WebSocket-Version: 13
2
3
4
5
6
7
该请求和普通的HTTP请求有几点不同:
- GET请求的地址不是类似
/path/,而是以ws://开头的地址; - 请求头
Upgrade: websocket和Connection: Upgrade表示这个连接将要被转换为WebSocket连接; Sec-WebSocket-Key是用于标识这个连接,并非用于加密数据;Sec-WebSocket-Version指定了WebSocket的协议版本。
随后,服务器如果接受该请求,就会返回如下响应:
HTTP/1.1 101 Switching Protocols
Upgrade: websocket
Connection: Upgrade
Sec-WebSocket-Accept: server-random-string
2
3
4
该响应代码101表示本次连接的HTTP协议即将被更改,更改后的协议就是Upgrade: websocket指定的WebSocket协议。
版本号和子协议规定了双方能理解的数据格式,以及是否支持压缩等等。如果仅使用WebSocket的API,就不需要关心这些。
现在,一个WebSocket连接就建立成功,浏览器和服务器就可以随时主动发送消息给对方。消息有两种,一种是文本,一种是二进制数据。通常,我们可以发送JSON格式的文本,这样,在浏览器处理起来就十分容易。
为什么WebSocket连接可以实现全双工通信而HTTP连接不行呢?实际上HTTP协议是建立在TCP协议之上的,TCP协议本身就实现了全双工通信,但是HTTP协议的请求-应答机制限制了全双工通信。WebSocket连接建立以后,其实只是简单规定了一下:接下来,咱们通信就不使用HTTP协议了,直接互相发数据吧。
安全的WebSocket连接机制和HTTPS类似。首先,浏览器用wss://xxx创建WebSocket连接时,会先通过HTTPS创建安全的连接,然后,该HTTPS连接升级为WebSocket连接,底层通信走的仍然是安全的SSL/TLS协议。
浏览器支持
很显然,要支持WebSocket通信,浏览器得支持这个协议,这样才能发出ws://xxx的请求。目前,支持WebSocket的主流浏览器如下:
- Chrome
- Firefox
- IE >= 10
- Sarafi >= 6
- Android >= 4.4
- iOS >= 8
服务器支持
由于WebSocket是一个协议,服务器具体怎么实现,取决于所用编程语言和框架本身。Node.js本身支持的协议包括TCP协议和HTTP协议,要支持WebSocket协议,需要对Node.js提供的HTTPServer做额外的开发。已经有若干基于Node.js的稳定可靠的WebSocket实现,我们直接用npm安装使用即可。
# ws模块
安装
npm install ws
服务端
index.js
const express = require("express")
const app = express()

app.use(express.static("./public"))

// http响应
app.get("/", (req, res) => {
    res.send({
        ok: 1
    })
})

app.listen(3000, () => {
    console.log("服务器启动成功")
})

// websocket
const WebSocket = require("ws")
const WebSocketServer = WebSocket.WebSocketServer
const wss = new WebSocketServer({port: 8080})
// 接收客户端的连接
wss.on('connection', function connection(ws){
    // 接受客户端发送的消息
    ws.on('message', function message(data) {
        console.log('received: %s', data)
        // 转发给其他人
        console.log(wss.clients) // 连接服务端的所有客户
        wss.clients.forEach(function each(client) {
            if(client !== ws && client.readyState == WebSocket.OPEN) {
                client.send(data, {binary: false})
            }
        })
    })
    ws.send('欢迎来到聊天室')
})
2
3
4
5
6
7
8
9
10
11
12
13
14
15
16
17
18
19
20
21
22
23
24
25
26
27
28
29
30
31
32
33
34
35
36
public/ chat.html
<!DOCTYPE html>
<html lang="en">
<head>
    <meta charset="UTF-8">
    <meta http-equiv="X-UA-Compatible" content="IE=edge">
    <meta name="viewport" content="width=device-width, initial-scale=1.0">
    <title>Document</title>
</head>
<body>
    <h1>聊天室</h1>
    <script>
        const ws = new WebSocket("ws://localhost:8080");

        ws.onopen = () => {
            console.log("连接成功")
            ws.send("客户端发送来的消息")
        }
        ws.onmessage = (msgObj) => {
            console.log(msgObj, msgObj.data)
        }
        ws.onerror = () => {
            console.log("error")
        }

    </script>
</body>
</html>
2
3
4
5
6
7
8
9
10
11
12
13
14
15
16
17
18
19
20
21
22
23
24
25
26
27
权限验证
//前端
var ws = new WebSocket(`ws://localhost:8080?token=${localStorage.getItem("token")}`)
ws.onopen = () => {
      console.log("open")
      ws.send(JSON.stringify({
        type: WebSocketType.GroupList
      }))
    }
ws.onmessage = (evt) => {
    console.log(evt.data)
}
//后端
const WebSocket = require("ws");
const JWT = require('../util/JWT');
WebSocketServer = WebSocket.WebSocketServer
const wss = new WebSocketServer({ port: 8080 });
wss.on('connection', function connection(ws, req) {
  const myURL = new URL(req.url, 'http://127.0.0.1:3000');
  const payload = JWT.verify(myURL.searchParams.get("token"))
  if (payload) {
    ws.user = payload
    ws.send(createMessage(WebSocketType.GroupChat, ws.user, "欢迎来到聊天室"))

    sendBroadList() //发送好友列表
  } else {
    ws.send(createMessage(WebSocketType.Error, null, "token过期"))
  }
  // console.log(3333,url)
  ws.on('message', function message(data, isBinary) {
    const messageObj = JSON.parse(data)
    switch (messageObj.type) {
      case WebSocketType.GroupList:
        ws.send(createMessage(WebSocketType.GroupList, ws.user, JSON.stringify(Array.from(wss.clients).map(item => item.user))))
        break;
      case WebSocketType.GroupChat:
        wss.clients.forEach(function each(client) {
          if (client !== ws && client.readyState === WebSocket.OPEN) {
            client.send(createMessage(WebSocketType.GroupChat, ws.user, messageObj.data));
          }
        });
        break;
      case WebSocketType.SingleChat:
        wss.clients.forEach(function each(client) {
          if (client.user.username === messageObj.to && client.readyState === WebSocket.OPEN) {
            client.send(createMessage(WebSocketType.SingleChat, ws.user, messageObj.data));
          }
        });
        break;
    }

    ws.on("close",function(){
      //删除当前用户
      wss.clients.delete(ws.user)
      sendBroadList() //发送好用列表
    })
  });

});
const WebSocketType = {
  Error: 0, //错误
  GroupList: 1,//群列表
  GroupChat: 2,//群聊
  SingleChat: 3//私聊
}
function createMessage(type, user, data) {
  return JSON.stringify({
    type: type,
    user: user,
    data: data
  });
}

function sendBroadList(){
  wss.clients.forEach(function each(client) {
    if (client.readyState === WebSocket.OPEN) {
      client.send(createMessage(WebSocketType.GroupList, client.user, JSON.stringify(Array.from(wss.clients).map(item => item.user))))
    }
  });
}
2
3
4
5
6
7
8
9
10
11
12
13
14
15
16
17
18
19
20
21
22
23
24
25
26
27
28
29
30
31
32
33
34
35
36
37
38
39
40
41
42
43
44
45
46
47
48
49
50
51
52
53
54
55
56
57
58
59
60
61
62
63
64
65
66
67
68
69
70
71
72
73
74
75
76
77
78
79
chat.ejs
<!--
 * @作者: kerwin
 * @公众号: 大前端私房菜
-->
<!DOCTYPE html>
<html lang="en">

<head>
    <meta charset="UTF-8">
    <meta name="viewport" content="width=device-width, initial-scale=1.0">
    <title>Document</title>
</head>

<body>
    <h1>聊天室</h1>
    <input type="text" id="text"><button id="send">send</button>

    <select id="select">

    </select>
    <!-- 建立socket连接 带着token,后端验证 -->
    <script>
        var select = document.querySelector("#select")
        var send = document.querySelector("#send")
        var text = document.querySelector("#text")
        const WebSocketType = {
            Error: 0, //错误
            GroupList: 1,
            GroupChat: 2,
            SingleChat: 3
        }
        const ws = new WebSocket(`ws://localhost:8080?token=${localStorage.getItem("token")}`)
        ws.onopen = () => {
            console.log("open")

        }
        ws.onmessage = (msgObj) => {
            // console.log(msgObj.data)
            msgObj = JSON.parse(msgObj.data)

            switch (msgObj.type) {
                case WebSocketType.Error:
                    localStorage.removeItem("token")
                    location.href = "/login"
                    break;
                case WebSocketType.GroupList:
                    console.log(JSON.parse(msgObj.data))
                    const onlineList = JSON.parse(msgObj.data)
                    select.innerHTML = ""
                    select.innerHTML = `<option value="all">all</option>` + onlineList.map(item => `
                        <option value="${item.username}">${item.username}</option>
                    `).join("")
                    break;
                case WebSocketType.GroupChat:
                    var title = msgObj.user ? msgObj.user.username : "广播"
                    console.log(title + " : " + msgObj.data)
                    break;

                case WebSocketType.SingleChat:

                    console.log(msgObj.user.username + " : " + msgObj.data)
                    break;
            }
        }


        send.onclick = () => {
            if (select.value === "all") {
                // console.log("群发")
                ws.send(createMessage(WebSocketType.GroupChat, text.value))
            } else {
                // console.log("siliao")
                ws.send(createMessage(WebSocketType.SingleChat, text.value, select.value))
            }
        }

        function createMessage(type, data, to) {
            return JSON.stringify({
                type,
                data,
                to
            })
        }
    </script>
</body>

</html>
2
3
4
5
6
7
8
9
10
11
12
13
14
15
16
17
18
19
20
21
22
23
24
25
26
27
28
29
30
31
32
33
34
35
36
37
38
39
40
41
42
43
44
45
46
47
48
49
50
51
52
53
54
55
56
57
58
59
60
61
62
63
64
65
66
67
68
69
70
71
72
73
74
75
76
77
78
79
80
81
82
83
84
85
86
87
# socket.io模块
服务端:
const io = require('socket.io')(server);
io.on('connection', (socket) => {

  const payload = JWT.verify(socket.handshake.query.token)
  if (payload) {
    socket.user = payload
    socket.emit(WebSocketType.GroupChat, createMessage(socket.user, "欢迎来到聊天室"))
    sendBroadList() //发送好友列表
  } else {
    socket.emit(WebSocketType.Error, createMessage(null, "token过期"))
  }


  socket.on(WebSocketType.GroupList, () => {
    socket.emit(WebSocketType.GroupList, createMessage(null, Array.from(io.sockets.sockets).map(item => item[1].user).filter(item=>item)));
  })

  socket.on(WebSocketType.GroupChat, (messageObj) => {
    socket.broadcast.emit(WebSocketType.GroupChat, createMessage(socket.user, messageObj.data));
  })

  socket.on(WebSocketType.SingleChat, (messageObj) => {
    Array.from(io.sockets.sockets).forEach(function (socket) {
      if (socket[1].user.username === messageObj.to) {
        socket[1].emit(WebSocketType.SingleChat, createMessage(socket[1].user, messageObj.data));
      }
    })
  })

  socket.on('disconnect', reason => {

     sendBroadList() //发送好用列表
  });

});

function sendBroadList() {
  io.sockets.emit(WebSocketType.GroupList, createMessage(null, Array.from(io.sockets.sockets).map(item => item[1].user).filter(item=>item)))
}
//最后filter,是因为 有可能存在null的值
2
3
4
5
6
7
8
9
10
11
12
13
14
15
16
17
18
19
20
21
22
23
24
25
26
27
28
29
30
31
32
33
34
35
36
37
38
39
40
41
客户端:
const WebSocketType = {
    Error: 0, //错误
    GroupList: 1, //群列表
    GroupChat: 2, //群聊
    SingleChat: 3 //私聊
}


const socket = io(`ws://localhost:3000?token=${localStorage.getItem("token")}`);
socket.on("connect",()=>{
	socket.emit(WebSocketType.GroupList)
})
socket.on(WebSocketType.GroupList, (messageObj) => {
    select.innerHTML = ""
    select.innerHTML = `<option value="all">all</option>` + messageObj.data.map(item => `
    <option value="${item.username}">${item.username}</option>`).join("")
})

socket.on(WebSocketType.GroupChat, (msg) => {
	console.log(msg)
})

socket.on(WebSocketType.SingleChat, (msg) => {
	console.log(msg)
})

socket.on(WebSocketType.Error, (msg) => {
    localStorage.removeItem("token")
    location.href = "/login"
})

send.onclick = () => {
    if (select.value === "all") {
        socket.emit(WebSocketType.GroupChat,{
            data: text.value
        })
    } else {
        socket.emit(WebSocketType.SingleChat,{
            data: text.value,
            to:select.value
        })
    }
}
2
3
4
5
6
7
8
9
10
11
12
13
14
15
16
17
18
19
20
21
22
23
24
25
26
27
28
29
30
31
32
33
34
35
36
37
38
39
40
41
42
43
# mocha
单元测试是用来对一个模块、一个函数或者一个类来进行正确性检验的测试工作。
比如对函数abs(),我们可以编写出以下几个测试用例:
输入正数,比如1、1.2、0.99,期待返回值与输入相同;
输入负数,比如-1、-1.2、-0.99,期待返回值与输入相反;
输入0,期待返回0;
输入非数值类型,比如null、[]、{},期待抛出Error。
把上面的测试用例放到一个测试模块里,就是一个完整的单元测试。
如果单元测试通过,说明我们测试的这个函数能够正常工作。如果单元测试不通过,要么函数有bug,要么测试条件输入不正确,总之,需要修复使单元测试能够通过。
单元测试通过后有什么意义呢?如果我们对abs()函数代码做了修改,只需要再跑一遍单元测试,如果通过,说明我们的修改不会对abs()函数原有的行为造成影响,如果测试不通过,说明我们的修改与原有行为不一致,要么修改代码,要么修改测试。
这种以测试为驱动的开发模式最大的好处就是确保一个程序模块的行为符合我们设计的测试用例。在将来修改的时候,可以极大程度地保证该模块行为仍然是正确的。
mocha是JavaScript的一种单元测试框架,既可以在浏览器环境下运行,也可以在Node.js环境下运行。
使用mocha,我们就只需要专注于编写单元测试本身,然后,让mocha去自动运行所有的测试,并给出测试结果。
mocha的特点主要有:
- 既可以测试简单的JavaScript函数,又可以测试异步代码,因为异步是JavaScript的特性之一;
- 可以自动运行所有测试,也可以只运行特定的测试;
- 可以支持before、after、beforeEach和afterEach来编写初始化代码。
安装
npm install mocha
新建test目录
test/test1.js
const sum = require("../sum")
const assert = require("assert")

// describe 一组测试,嵌套
// it 一个测试

describe("大的组1测试", () => {
    describe("小的组1测试", () => {
        it("sum() 结果应该返回 0",()=>{
            assert.strictEqual(sum(),0)
        })
        it("sum(1) 结果应该返回 1",()=>{
            assert.strictEqual(sum(1),1)
        })
    })

    describe('小的组2测试', () => {
        it("sum(1,2) 结果应该返回 3",()=>{
            assert.strictEqual(sum(1,2),3)
        })
        it("sum(1,2,3) 结果应该返回 6",()=>{
            assert.strictEqual(sum(1,2,3),6)
        })
    })
})

describe("大的组2测试",()=>{

})
2
3
4
5
6
7
8
9
10
11
12
13
14
15
16
17
18
19
20
21
22
23
24
25
26
27
28
29
package.json
  "scripts": {
    "test": "mocha"
  }
2
3
npm test

# chai断言库

npm install chai
test/test2.js
var chai = require('chai')
var assert = chai.assert;

describe('assert Demo', function () {
    it('use assert lib', function () {
        var value = "hello";
        assert.typeOf(value, 'string')
        assert.equal(value, 'hello')
        assert.lengthOf(value, 5)
    })
})
2
3
4
5
6
7
8
9
10
11
test/test3.js
var chai = require('chai');
chai.should();

describe('should Demo', function(){
    it('use should lib', function () {
        var value = 'hello'
        value.should.exist.and.equal('hello').and.have.length(5).and.be.a('string')
        // value.should.be.a('string')
        // value.should.equal('hello')
        // value.should.not.equal('hello2')
        // value.should.have.length(5);
    })
});
2
3
4
5
6
7
8
9
10
11
12
13
test/test4.js
var chai = require('chai');
var expect = chai.expect;

describe('expect Demo', function() {
    it('use expect lib', function () {
        var value = 'hello'
        var number = 3

        expect(number).to.be.at.most(5)
        expect(number).to.be.at.least(3)
        expect(number).to.be.within(1, 4)

        expect(value).to.exist
        expect(value).to.be.a('string')
        expect(value).to.equal('hello')
        expect(value).to.not.equal('您好')
        expect(value).to.have.length(5)
    })
});
2
3
4
5
6
7
8
9
10
11
12
13
14
15
16
17
18
19

# 异步测试
test/test5.js
const fs = require("fs")
const fsp = fs.promises
var assert  =require("assert")

describe('异步测试1', () => {
    it("异步读取文件1",(done)=>{
        fs.readFile("./1.txt","utf8",(err,data) =>{
            if(err){
                done(err)
            }else{
                assert.strictEqual(data,"hello")
                done()
            }
        })
    })
})


describe('异步测试2', () => {
    it("异步读取文件2", async ()=>{
        var data = await fsp.readFile("./1.txt","utf8")
        assert.strictEqual(data,"hello")
    })
})
2
3
4
5
6
7
8
9
10
11
12
13
14
15
16
17
18
19
20
21
22
23
24
# http测试
安装
npm install supertest
npm install koa
2
app.js
const Koa =require("koa")
const app = new Koa()

app.use((ctx)=>{
    ctx.body ="<h1>hello</h1>"
})

// app.listen(3000)

module.exports = app
2
3
4
5
6
7
8
9
10
test/test6.js
const request = require('supertest')
const app = require('../app');

describe('#test koa app', () => {
    let server = app.listen(3000);
    describe('#test server', () => {
        it('#test GET /', async () => {
            await request(server)
                .get('/')
                .expect('Content-Type', /text\/html/)
                .expect(200, '<h1>hello</h1>');
        });

        after(function () {
            server.close()
        });
    });
});
2
3
4
5
6
7
8
9
10
11
12
13
14
15
16
17
18

# 钩子函数
describe('#hello.js', () => {
    describe('#sum()', () => {
        before(function () {
            console.log('before:');
        });

        after(function () {
            console.log('after.');
        });

        beforeEach(function () {
            console.log('  beforeEach:');
        });

        afterEach(function () {
            console.log('  afterEach.');
        });
    });
});
2
3
4
5
6
7
8
9
10
11
12
13
14
15
16
17
18
19
var axios = require("axios")
var assert = require("assert")

var supertest = require("supertest")
var app = require("../app")
// describe('测试接口1', () => {
//     it("返回html代码片段测试1",async ()=>{
//       //axios axios.get
//         var res = await axios.get("http://localhost:3000/")
//         assert.strictEqual(res.data,"<h1>hello</h1>")
//     })
// })

describe('测试接口2', () => {
    let server
    it("返回html代码片段测试2",async ()=>{
      //axios axios.get
      await supertest(server).get("/")
      .expect("Content-Type",/text\/html/)
      .expect(200,'<h1>hello</h1>')
    })

    before(()=>{
      server = app.listen(3000)
    })

    after(()=>{
        server.close()
    })
})
2
3
4
5
6
7
8
9
10
11
12
13
14
15
16
17
18
19
20
21
22
23
24
25
26
27
28
29
30
# 补充
# Buffer(缓冲器)
Buffer 是一个类似于数组的 对象 ,用于表示固定长度的字节序列
Buffer 本质是一段内存空间,专门用来处理 二进制数据 。

特点
Buffer 大小固定且无法调整
Buffer 性能较好,可以直接对计算机内存进行操作
每个元素的大小为 1 字节(byte)

创建 Buffer
Buffer.alloc
//创建了一个长度为 10 字节的 Buffer,相当于申请了 10 字节的内存空间,每个字节的值为 0
let buf_1 = Buffer.alloc(10); // 结果为 <Buffer 00 00 00 00 00 00 00 00 00 00>
1
2Buffer.allocUnsafe
//创建了一个长度为 10 字节的 Buffer,buffer 中可能存在旧的数据, 可能会影响执行结果,所以叫
unsafe
let buf_2 = Buffer.allocUnsafe(10);
1
2
3Buffer.from
//通过字符串创建 Buffer
let buf_3 = Buffer.from('hello');
//通过数组创建 Buffer
let buf_4 = Buffer.from([105, 108, 111, 118, 101, 121, 111, 117]);
1
2
3
4
Buffer 与字符串的转化
我们可以借助 toString 方法将 Buffer 转为字符串
let buf_4 = Buffer.from([105, 108, 111, 118, 101, 121, 111, 117]);
console.log(buf_4.toString())
2
toString 默认是按照 utf-8 编码方式进行转换的。
Buffer 的读写
Buffer 可以直接通过 [] 的方式对数据进行处理。
//读取
console.log(buf_3[1]);
//修改
buf_3[1] = 97;
//查看字符串结果
console.log(buf_3.toString());
2
3
4
5
6
注意:
如果修改的数值超过 255 ,则超过 8 位数据会被舍弃
一个 utf-8 的字符 一般 占 3 个字节
//创建了一个长度为 10 字节的 Buffer,相当于申请了 10 字节的内存空间,每个字节的值为 0
let buf_1 = Buffer.alloc(10); // 结果为 <Buffer 00 00 00 00 00 00 00 00 00 00>
console.log(buf_1)
//创建了一个长度为 10 字节的 Buffer,buffer 中可能存在旧的数据, 可能会影响执行结果,所以叫unsafe
let buf_2 = Buffer.allocUnsafe(10);
console.log(buf_2)

//通过字符串创建 Buffer
let buf_3 = Buffer.from('hello');
//通过数组创建 Buffer
let buf_4 = Buffer.from([105, 108, 111, 118, 101, 121, 111, 117]);
console.log(buf_3)
console.log(buf_4)
console.log(buf_4.toString())
2
3
4
5
6
7
8
9
10
11
12
13
14

# HTTP 协议
HTTP(hypertext transport protocol)协议;中文叫超文本传输协议是一种基于TCP/IP的应用层通信协议
这个协议详细规定了 浏览器 和万维网 服务器 之间互相通信的规则。
协议中主要规定了两个方面的内容
客户端:用来向服务器发送数据,可以被称之为请求报文
服务端:向客户端返回数据,可以被称之为响应报文
# 请求报文的组成
请求行
请求头
空行
请求体
HTTP 的请求行
请求方法(get、post、put、delete等)
请求 URL(统一资源定位器)
例如:http://www.baidu.com:80/index.html?a=100&b=200#logo
http: 协议(https、ftp、ssh等)
www.baidu.com 域名
80 端口号
/index.html 路径
a=100&b=200 查询字符串
#logo 哈希(锚点链接)
HTTP协议版本号
HTTP 请求头
格式:『头名:头值』
常见的请求头有:
| 请求头 | 解释 |
|---|---|
| Host | 主机名 |
| Connection | 连接的设置 keep-alive(保持连接);close(关闭连接) |
| Cache-Control | 缓存控制 max-age = 0 (没有缓存) |
| Upgrade-Insecure-Requests | 将网页中的http请求转化为https请求(很少用)老网站升级 |
| User-Agent | 用户代理,客户端字符串标识,服务器可以通过这个标识来识别这个请求来自哪个客户端 ,一般在PC端和手机端的区分 |
| Accept | 设置浏览器接收的数据类型 |
| Accept-Encoding | 设置接收的压缩方式 |
| Accept-Language | 设置接收的语言 q=0.7 为喜好系数,满分为1 |
| Cookie |

HTTP 的请求体
请求体内容的格式是非常灵活的,
(可以是空)==> GET请求,
(也可以是字符串,还可以是JSON)===> POST请求
例如:
字符串:keywords=手机&price=2000
JSON:{"keywords":"手机","price":2000}
# 响应报文的组成
响应行
HTTP/1.1 200 OK1HTTP/1.1:HTTP协议版本号
200:响应状态码 404 Not Found 500 Internal Server Error
还有一些状态码,参考:https://developer.mozilla.org/zh-CN/docs/Web/HTTP/Status
OK:响应状态描述
响应头
Cache-Control:缓存控制 private 私有的,只允许客户端缓存数据
Connection 链接设置
Content-Type:text/html;charset=utf-8 设置响应体的数据类型以及字符集,响应体为html,字符集
utf-8
Content-Length:响应体的长度,单位为字节
1
2
3
4
5空行
响应体
响应体内容的类型是非常灵活的,常见的类型有 HTML、CSS、JS、图片、JSON

设置资源类型(mime类型)
媒体类型(通常称为 Multipurpose Internet Mail Extensions 或 MIME 类型 )是一种标准,用来表示文档、文件或字节流的性质和格式。
mime 类型结构: [type]/[subType]
例如: text/html text/css image/jpeg image/png application/json
2
HTTP 服务可以设置响应头 Content-Type 来表明响应体的 MIME 类型,浏览器会根据该类型决定如何处理资源
下面是常见文件对应的 mime 类型
html: 'text/html',
css: 'text/css',
js: 'text/javascript',
png: 'image/png',
jpg: 'image/jpeg',
gif: 'image/gif',
mp4: 'video/mp4',
mp3: 'audio/mpeg',
json: 'application/json'
2
3
4
5
6
7
8
9
对于未知的资源类型,可以选择 application/octet-stream 类型,浏览器在遇到该类型的响应时,会对响应体内容进行独立存储,也就是我们常见的 下载效果
# 防盗链
防盗链图片是一种措施,用于防止其他网站或第三方资源在未经授权的情况下直接嵌套或链接到你的网站上的图片资源。这通常是出于以下几个原因:
- 带宽和资源保护:如果其他网站直接链接到你的图片资源,它们会消耗你的服务器带宽和资源,增加了服务器负担,可能导致额外的费用。
- 内容控制:你可能希望控制你的图片资源的分发和访问,确保只有授权的用户或特定网站能够查看这些图片。
- 数据隐私:某些图片可能包含敏感信息,需要限制访问,以确保数据隐私。
为了实现防盗链图片,网站管理员通常会采取以下措施:
- HTTP Referer 检查:就像你之前提到的 Express 中间件一样,服务器可以检查请求的 Referer 头部,确保它是来自授权网站的请求。如果不是,服务器可以拒绝访问或返回错误响应。
- 令牌验证:服务器可以要求请求者提供特定的令牌或密钥,以验证他们是否有权访问图片资源。这可以通过添加查询参数或请求头部来完成。
- IP 地址白名单:服务器可以配置一个白名单,只允许特定 IP 地址范围的请求访问图片资源。
- Cookie 检查:服务器可以检查请求中的 Cookie,以验证用户是否已经登录或拥有特定的凭证来访问图片。
- CDN(内容分发网络)控制:如果你使用 CDN 来分发图片资源,CDN 本身可能提供防盗链功能,可以配置规则来限制哪些来源可以访问资源。
需要注意的是,防盗链图片的实现可能会对正常用户造成一些不便,因为有些浏览器或代理服务器可能会更改或隐藏 Referer 头部,或者在请求中不发送 Referer 头部。因此,在实施这些措施时,需要谨慎平衡安全性和用户友好性。
app.js
const express = require('express')

const app = express()

// 防盗链 (要放在静态资源管理的前面)
app.use((req, res, next) => {
    // 检测请求头中的referer是否为127.0.0.1
    // 获取 referer
    let referer = req.get('referer')
    if(referer) {
        // 实例化
        let url = new URL(referer)
        // 获取hostname
        let hostname = url.hostname
        console.log(hostname)
        if(hostname !== '127.0.0.1') {
            console.log('执行了终止');
            res.status(404).send('<h1>not found</h1>');
            return;
        }
    }
    next()
})

// 静态资源管理
app.use(express.static('public'))


app.listen(3000, () => {
    console.log('server start')
})
2
3
4
5
6
7
8
9
10
11
12
13
14
15
16
17
18
19
20
21
22
23
24
25
26
27
28
29
30
31
public/index.html
<!DOCTYPE html>
<html lang="en">
<head>
    <meta charset="UTF-8">
    <meta http-equiv="X-UA-Compatible" content="IE=edge">
    <meta name="viewport" content="width=device-width, initial-scale=1.0">
    <title>Document</title>
</head>
    <h1>index页面</h1>
    <image src="http://127.0.0.1:3000/img/bg.png" />
</body>
</html>
2
3
4
5
6
7
8
9
10
11
12
访问: http://127.0.0.1:3000/ 可以获取到


# lowdb
参考链接:https://www.npmjs.com/package/lowdb/v/1.0.0
lowdb 是一个轻量级的 JavaScript 数据库,通常用于小型 Node.js 或浏览器应用程序中,其主要作用是提供一种简单的方式来存储和管理应用程序的数据。以下是 lowdb 的主要作用和功能:
- 数据存储:
lowdb允许你在应用程序中轻松地存储数据。它使用 JSON 文件来持久化数据,因此你可以在多次应用程序启动之间保留数据。 - 数据查询:你可以使用
lowdb提供的查询方法来检索、过滤和操作存储的数据。这使得在数据集合中查找特定记录或执行复杂的数据操作变得更加容易。 - 数据更新:
lowdb提供了更新数据的方法,包括添加新数据、修改现有数据和删除数据。这使得你可以在应用程序中对数据进行实时的增删改查操作。 - 轻量级:与一些其他数据库系统相比,
lowdb是一个轻量级的解决方案,不需要复杂的设置或配置。这使得它非常适合小型项目或原型开发。 - 易于学习和使用:
lowdb的 API 非常简单,容易学习和使用,即使对于没有数据库经验的开发者也是如此。它的语法类似于 JavaScript 对象和数组操作。 - 无需服务器:与传统的数据库系统不同,
lowdb不需要独立的数据库服务器。数据存储在本地文件中,因此不需要额外的服务器配置或运维。 - 可扩展性:虽然
lowdb是一个轻量级的数据库,但它仍然可以通过插件和中间件来扩展其功能,以满足更复杂的需求。
请注意,lowdb 主要用于小型项目或原型开发,对于大型生产级应用程序来说,通常会选择更强大的数据库系统,如MongoDB、MySQL或PostgreSQL,以满足性能、可扩展性和复杂性方面的需求。
安装
npm install lowdb@1.0.0
lowdb.js
const low = require('lowdb')
const FileSync = require('lowdb/adapters/FileSync')
// 内容写在db.json文件
const adapter = new FileSync('db.json')
const db = low(adapter)

// 设置默认
db.defaults({ posts: [], user: {} })
  .write()

// 添加一条数据
db.get('posts')
.push({ id: 1, title: '1111'})
.write()
// 从头部添加
db.get('posts')
.unshift({ id: 2, title: '222'})
.write()
db.get('posts')
.unshift({ id: 3, title: '333'})
.write()

// 查找
let res = db.get('posts')
  .find({ id: 2 })
  .value()
console.log(res)

// 删除一条
let res1 = db.remove('posts')
  .find({ id: 2 })
  .value()
console.log(res1)
// 删除满足条件的
let res2 = db.get('posts')
  .remove(item => item.id == 2)
  .value()
console.log(res2)

// 更新数据
db.get('posts').find({ id: 3 }).assign({title: "修改的内容"})

// Set a user using Lodash shorthand syntax
db.set('user.name', 'abc')
.write()
2
3
4
5
6
7
8
9
10
11
12
13
14
15
16
17
18
19
20
21
22
23
24
25
26
27
28
29
30
31
32
33
34
35
36
37
38
39
40
41
42
43
44
45
# json-server
json-server 本身是一个 JS 编写的工具包,可以快速搭建 RESTful API 服务
官方地址: https://github.com/typicode/json-server
操作步骤:
全局安装 json-server
npm i -g json-server1创建 JSON 文件(db.json),编写基本结构
{
  "song": [
    { "id": 1, "name": "干杯", "singer": "五月天" },
    { "id": 2, "name": "当", "singer": "动力火车" },
    { "id": 3, "name": "不能说的秘密", "singer": "周杰伦" }
  ],
  "user": [
    { "id": 1, "name": "张三", "age": 18 }
  ]
}
1
2
3
4
5
6
7
8
9
10
11以 JSON 文件所在文件夹作为工作目录 ,执行如下命令
json-server --watch db.json1

访问所有

