 网络爬虫
网络爬虫
# 网络爬虫
# 入门程序
1.创建maven工程
2.导包
<dependency>
    <groupId>org.apache.httpcomponents</groupId>
    <artifactId>httpclient</artifactId>
    <version>4.5.2</version>
</dependency>
 <dependency>
      <groupId>org.slf4j</groupId>
      <artifactId>slf4j-log4j12</artifactId>
      <version>1.7.30</version>
      <scope>test</scope>
  </dependency>
2
3
4
5
6
7
8
9
10
11
3.配置日志,log4j.properties
og4j.rootLogger=DEBUG,A1
log4j.logger.com.ep = DEBUG

log4j.appender.A1=org.apache.log4j.ConsoleAppender
log4j.appender.A1.layout=org.apache.log4j.PatternLayout
log4j.appender.A1.layout.ConversionPattern=%-d{yyyy-MM-dd HH:mm:ss,SSS} [%t] [%c]-[%p] %m%n
2
3
4
5
6
4.编写程序
package com.ep;

import org.apache.http.HttpEntity;
import org.apache.http.client.methods.CloseableHttpResponse;
import org.apache.http.client.methods.HttpGet;
import org.apache.http.impl.client.CloseableHttpClient;
import org.apache.http.impl.client.HttpClients;
import org.apache.http.util.EntityUtils;

import java.io.IOException;

/***
 * @author dep
 * @version 1.0
 */
public class CrawlerFirst {
    public static void main(String[] args) throws IOException {
        // 1.创建httpClient对象
        CloseableHttpClient httpClient = HttpClients.createDefault();

        // 2.输入网址,发送get请求创建httpGet对象
        HttpGet httpGet = new HttpGet("http://www.itcast.cn");

        // 3. 发起请求,返回形影,使用httpClient对象发起请求
        CloseableHttpResponse response = httpClient.execute(httpGet);

        // 4.解析响应,获取数据
        // 判断状态码是否是200
        if (response.getStatusLine().getStatusCode() == 200) {
            HttpEntity httpEntity = response.getEntity();
            String content = EntityUtils.toString(httpEntity, "utf8");
            System.out.println(content);


        }

    }
}
2
3
4
5
6
7
8
9
10
11
12
13
14
15
16
17
18
19
20
21
22
23
24
25
26
27
28
29
30
31
32
33
34
35
36
37
38
39
# 2. HttpClient
网络爬虫就是用程序帮助我们访问网络上的资源,我们一直以来都是使用HTTP协议访问互联网的网页,网络爬虫需要编写程序,在这里使用同样的HTTP协议访问网页。 这里我们使用Java的 HTTP协议客户端 HttpClient这个技术,来实现抓取网页数据。
# 2.1 Get请求
package com.ep;

import org.apache.http.HttpEntity;
import org.apache.http.client.methods.CloseableHttpResponse;
import org.apache.http.client.methods.HttpGet;
import org.apache.http.impl.client.CloseableHttpClient;
import org.apache.http.impl.client.HttpClients;
import org.apache.http.util.EntityUtils;

import java.io.IOException;


/***
 * @author dep
 * @version 1.0
 */
public class HttpClientGetTest {
    public static void main(String[] args) {
        // 1.创建httpClient对象
        CloseableHttpClient httpClient = HttpClients.createDefault();

        // 2.输入网址,发送get请求创建httpGet对象
        HttpGet httpGet = new HttpGet("http://www.itcast.cn");

        // 3. 发起请求,返回形影,使用httpClient对象发起请求
        CloseableHttpResponse response = null;
        try {
            response = httpClient.execute(httpGet);
            // 4.解析响应,获取数据
            // 判断状态码是否是200
            if (response.getStatusLine().getStatusCode() == 200) {
                HttpEntity httpEntity = response.getEntity();
                String content = EntityUtils.toString(httpEntity, "utf8");
                System.out.println(content.length());
            }
        } catch (IOException e) {
            throw new RuntimeException(e);
        }
        finally {
            try {
                // 关闭资源
                response.close();
                httpClient.close();
            } catch (IOException e) {
                throw new RuntimeException(e);
            }
        }
    }
}
2
3
4
5
6
7
8
9
10
11
12
13
14
15
16
17
18
19
20
21
22
23
24
25
26
27
28
29
30
31
32
33
34
35
36
37
38
39
40
41
42
43
44
45
46
47
48
49
# 2.2 带参数的Get请求
package com.ep;

import org.apache.http.HttpEntity;
import org.apache.http.client.methods.CloseableHttpResponse;
import org.apache.http.client.methods.HttpGet;
import org.apache.http.client.utils.URIBuilder;
import org.apache.http.impl.client.CloseableHttpClient;
import org.apache.http.impl.client.HttpClients;
import org.apache.http.util.EntityUtils;

import java.io.IOException;
import java.net.URISyntaxException;

/***
 * @author dep
 * @version 1.0
 */
public class HttpParameterGet {
    public static void main(String[] args) throws URISyntaxException {
        CloseableHttpClient httpClient = HttpClients.createDefault();

        // 创建URIBuilder
        URIBuilder uriBuilder = new URIBuilder("http://www.baidu.com/s");
        // 设置参数 ,多个参数,直接后面.setParameter就行了
        uriBuilder.setParameter("wd","github");

        // 2.输入网址,发送get请求创建httpGet对象
        HttpGet httpGet = new HttpGet(uriBuilder.build());

        // 3. 发起请求,返回形影,使用httpClient对象发起请求
        CloseableHttpResponse response = null;
        try {
            response = httpClient.execute(httpGet);
            // 4.解析响应,获取数据
            // 判断状态码是否是200
            if (response.getStatusLine().getStatusCode() == 200) {
                HttpEntity httpEntity = response.getEntity();
                String content = EntityUtils.toString(httpEntity, "utf8");
                System.out.println(content.length());
            }
        } catch (IOException e) {
            throw new RuntimeException(e);
        }
        finally {
            try {
                // 关闭资源
                response.close();
                httpClient.close();
            } catch (IOException e) {
                throw new RuntimeException(e);
            }
        }
    }
}
2
3
4
5
6
7
8
9
10
11
12
13
14
15
16
17
18
19
20
21
22
23
24
25
26
27
28
29
30
31
32
33
34
35
36
37
38
39
40
41
42
43
44
45
46
47
48
49
50
51
52
53
54
55
# 2.3 Post请求
同Get请求,唯一就是httpGet变为httpPost
2.4 带参数的Post请求
package com.ep;

import org.apache.http.HttpEntity;
import org.apache.http.NameValuePair;
import org.apache.http.client.entity.UrlEncodedFormEntity;
import org.apache.http.client.methods.CloseableHttpResponse;
import org.apache.http.client.methods.HttpGet;
import org.apache.http.client.methods.HttpPost;
import org.apache.http.client.utils.URIBuilder;
import org.apache.http.impl.client.CloseableHttpClient;
import org.apache.http.impl.client.HttpClients;
import org.apache.http.message.BasicNameValuePair;
import org.apache.http.util.EntityUtils;

import java.io.IOException;
import java.io.UnsupportedEncodingException;
import java.util.ArrayList;

/***
 * @author dep
 * @version 1.0
 */
public class HttpParameterPost {
    public static void main(String[] args) throws UnsupportedEncodingException {
        CloseableHttpClient httpClient = HttpClients.createDefault();

       // 创建httpPost对象,设置url访问地址
        HttpPost httpPost = new HttpPost("http://www.baidu.com/s");

        // 声明List集合,封装表单中的参数
        ArrayList<NameValuePair> params = new ArrayList<NameValuePair>();
        params.add(new BasicNameValuePair("wd","github"));

        // 创建表单的Entity对象,第一个参数就是封装好的表单数据,第二个参数就是编码
        UrlEncodedFormEntity formEntity = new UrlEncodedFormEntity(params, "utf8");

        // 设置表单的Entity对象到Post请求中
        httpPost.setEntity(formEntity);

        // 3. 发起请求,返回形影,使用httpClient对象发起请求
        CloseableHttpResponse response = null;
        try {
            response = httpClient.execute(httpPost);
            // 4.解析响应,获取数据
            // 判断状态码是否是200
            if (response.getStatusLine().getStatusCode() == 200) {
                HttpEntity httpEntity = response.getEntity();
                String content = EntityUtils.toString(httpEntity, "utf8");
                System.out.println(content);
            }
        } catch (IOException e) {
            throw new RuntimeException(e);
        }
        finally {
            try {
                // 关闭资源
                response.close();
                httpClient.close();
            } catch (IOException e) {
                throw new RuntimeException(e);
            }
        }
    }
}
2
3
4
5
6
7
8
9
10
11
12
13
14
15
16
17
18
19
20
21
22
23
24
25
26
27
28
29
30
31
32
33
34
35
36
37
38
39
40
41
42
43
44
45
46
47
48
49
50
51
52
53
54
55
56
57
58
59
60
61
62
63
64
65
# 2.4 连接池
package com.ep;

import org.apache.http.client.methods.CloseableHttpResponse;
import org.apache.http.client.methods.HttpGet;
import org.apache.http.impl.client.CloseableHttpClient;
import org.apache.http.impl.client.HttpClients;
import org.apache.http.impl.conn.PoolingHttpClientConnectionManager;
import org.apache.http.util.EntityUtils;

import javax.xml.ws.http.HTTPBinding;
import java.io.IOException;

/***
 * @author dep
 * @version 1.0
 */
public class HttpClientPoolTest {
    public static void main(String[] args) {
        // 创建连接池管理器
        PoolingHttpClientConnectionManager cm = new PoolingHttpClientConnectionManager();

        // 设置最大连接数
        cm.setMaxTotal(100);

        // 设置每个主机的最大连接数
        cm.setDefaultMaxPerRoute(10);

        // 使用连接池管理器发送请求
        doGet(cm);
        doGet(cm);
    }

    private static void doGet(PoolingHttpClientConnectionManager cm){
        // 不是每次创建新的HttpClient,而是从连接池中获取HttpClient对象
        CloseableHttpClient httpClient = HttpClients.custom().setConnectionManager(cm).build();

        HttpGet httpGet = new HttpGet("http://www.itcast.cn");

        CloseableHttpResponse response = null;
        try {
             response = httpClient.execute(httpGet);
             if(response.getStatusLine().getStatusCode() == 200) {
                 String content = EntityUtils.toString(response.getEntity(),"utf8");
                 System.out.println(content);
             }
        } catch (IOException e) {
            throw new RuntimeException(e);
        } finally {
            if (response != null) {
                try {
                    response.close();
                } catch (IOException e) {
                    throw new RuntimeException(e);
                }
                // 不能关闭HttpCient,有连接池管理HttpClient
            }
        }

    }
}
2
3
4
5
6
7
8
9
10
11
12
13
14
15
16
17
18
19
20
21
22
23
24
25
26
27
28
29
30
31
32
33
34
35
36
37
38
39
40
41
42
43
44
45
46
47
48
49
50
51
52
53
54
55
56
57
58
59
60
61
# 2.5 配置请求信息
// 配置请求信息
RequestConfig config = RequestConfig.custom().setConnectionRequestTimeout(1000) // 创建连接的最长时间,单位是毫秒
        .setConnectionRequestTimeout(500) // 设置获取连接的最长时间,单位是毫秒
        .setSocketTimeout(10 * 1000) // 设置数据传输的最长时间,单位是毫秒
        .build();

// 给请求设置请求信息
httpGet.setConfig(config);
2
3
4
5
6
7
8
完整代码:
package com.ep;

import org.apache.http.HttpEntity;
import org.apache.http.client.config.RequestConfig;
import org.apache.http.client.methods.CloseableHttpResponse;
import org.apache.http.client.methods.HttpGet;
import org.apache.http.impl.client.CloseableHttpClient;
import org.apache.http.impl.client.HttpClients;
import org.apache.http.util.EntityUtils;

import java.io.IOException;

/***
 * @author dep
 * @version 1.0
 */
public class HttpConfigTest {
    public static void main(String[] args) {
        // 1.创建httpClient对象
        CloseableHttpClient httpClient = HttpClients.createDefault();

        // 2.输入网址,发送get请求创建httpGet对象
        HttpGet httpGet = new HttpGet("http://www.itcast.cn");
        // 配置请求信息
        RequestConfig config = RequestConfig.custom().setConnectionRequestTimeout(1000) // 创建连接的最长时间,单位是毫秒
                .setConnectionRequestTimeout(500) // 设置获取连接的最长时间,单位是毫秒
                .setSocketTimeout(10 * 1000) // 设置数据传输的最长时间,单位是毫秒
                .build();

        // 给请求设置请求信息
        httpGet.setConfig(config);

        // 3. 发起请求,返回形影,使用httpClient对象发起请求
        CloseableHttpResponse response = null;
        try {
            response = httpClient.execute(httpGet);
            // 4.解析响应,获取数据
            // 判断状态码是否是200
            if (response.getStatusLine().getStatusCode() == 200) {
                HttpEntity httpEntity = response.getEntity();
                String content = EntityUtils.toString(httpEntity, "utf8");
                System.out.println(content.length());
            }
        } catch (IOException e) {
            throw new RuntimeException(e);
        }
        finally {
            try {
                // 关闭资源
                response.close();
                httpClient.close();
            } catch (IOException e) {
                throw new RuntimeException(e);
            }
        }
    }
}
2
3
4
5
6
7
8
9
10
11
12
13
14
15
16
17
18
19
20
21
22
23
24
25
26
27
28
29
30
31
32
33
34
35
36
37
38
39
40
41
42
43
44
45
46
47
48
49
50
51
52
53
54
55
56
57
# 3.Jsoup
我们抓取到页面之后,还需要对页面进行解析。可以使用字符串处理工具解析页面,也可以使用正则表达式,但是这些方法都会带来很大的开发成本,所以我们需要使用一款专门解析html页面的技术。
# 3.1. jsoup介绍
jsoup是一款Java 的 HTML解析器,可直接解析某个URL地址、HTML文木内容。它提供了一套非常省力的 API,可通过DOM,CSS 以及类似于jQuery 的操作方法来取出和操作数据。
jsoup的主要功能如下:
- 从一个URL,文件或字符串中解析HTML;
- 使用DOM或CSS选择器来查找、取出数据;
- 可操作 HTML元素、属性、文本;
导入依赖
 	<dependency>
      <groupId>org.jsoup</groupId>
      <artifactId>jsoup</artifactId>
      <version>1.14.3</version>
    </dependency>
    <dependency>
      <groupId>junit</groupId>
      <artifactId>junit</artifactId>
      <version>4.12</version>
      <scope>test</scope>
    </dependency>
    <!-- https://mvnrepository.com/artifact/commons-io/commons-io -->
    <dependency>
      <groupId>commons-io</groupId>
      <artifactId>commons-io</artifactId>
      <version>2.11.0</version>
    </dependency>
    <dependency>
      <groupId>org.apache.commons</groupId>
      <artifactId>commons-lang3</artifactId>
      <version>3.12.0</version>
    </dependency>
2
3
4
5
6
7
8
9
10
11
12
13
14
15
16
17
18
19
20
21
22
# 3.2 jsoup解析
# 3.2.1 解析URL
Jsoup可以直接输入url,它会发起请求并获取数据,封装为Document对象
    @Test
    public void  parseUrl() throws IOException {
        // 解析url地址
        Document document = Jsoup.parse(new URL("https://www.baidu.com"),3000);
        // 获取title的内容
        Element title = document.getElementsByTag("title").first();
        System.out.println(title.text());
    }
2
3
4
5
6
7
8
虽然使用Jsoup可以替代HttpClient直接发起请求解析数据,但是往往不会这样用,因为实际的开发过程中,需要使用到多线程,连接池,代理等等方式,而 jsoup 对这些的支持并不是很好,所以我们一般把 jsoup仅仅作为 Html解析工具使用。
# 3.2.2 解析字符串
    @Test
    public void parseString() throws IOException {
        // 使用工具类读取文件,获取字符串
        String content = FileUtils.readFileToString(new File("F:\\@前端\\html\\example1.html"),"gbk");

        // 解析字符串
        Document document = Jsoup.parse(content);
        String title = document.getElementsByTag("title").first().text();
        System.out.println(title);
    }
2
3
4
5
6
7
8
9
10
# 3.2.3 解析文件
    @Test
    public void parseFile() throws IOException {
        Document document = Jsoup.parse(new File("F:\\\\@前端\\\\html\\\\example1.html"), "gbk");
        String title = document.getElementsByTag("title").first().text();
        System.out.println(title);
    }
2
3
4
5
6
# 3.2.4 元素获取
dom元素获取:
- 根据id查询元素getElementByld
- 根据标签获取元素getElementsByTag
- 根据class获取元素 getElementsByClass
- 根据属性获取元素getElementsByAttribute
Selector选择器获取:
document.select()
tagname:通过标签查找元素,比如: span
#id:通过ID查找元素,比如: #city_bj
.class:通过class名称查找元素,比如: .class_av
[attribute]:利用属性查找元素,比如: [abc]。
[attr=value]:利用属性值来查找元素,比如: [class=s_name]
# 3.2.5. Selector选择器组合使用。
el#id:元素+ID,比如:h3city_bjl
el.class:元素+class,比如:li.class_av
el[attr]:元素+属性名,比如:span[abc]任意组合:比如: span[abc].s_namev
ancestor child:查找某个元素下子元素,比如: .city_con li 查找"city_con"下的所有li
parent > child:查找某个父元素下的直接子元素,比如:.city_con >ul>li 查找city_con第一级(直接子元素)的ul,再找所有ul下的第一级
parent >*:查找某个父元素下所有直接子元素。
# 4.爬虫案例
学习了HttpClient和 Jsoup,就掌握了如何抓取数据和如何解析数据,接下来,我们做一个小练习,把京东的手机数据抓取下来。主要目的是HttpCliet和 Jsoup的学习。
创建数据库
CREATE TABLE `jd_item`(
	`id` bigint (10) NOT NULL AUTO_INCREMENT COMMENT '主键id',
	`spu` bigint (15) DEFAULT NULL COMMENT '商品集合id',
	`sku` bigint (15) DEFAULT NULL COMMENT '商品最小品类单元id',
	`title` varchar(100) DEFAULT NULL COMMENT '商品标题',
	`price` bigint (10) DEFAULT NULL COMMENT '商品价格',
	`pic` varchar (200) DEFAULT NULL COMMENT '商品图片',
	`ur1` varchar (200) DEFAULT NULL COMMENT '商品详情地址',
	`created` datetime DEFAULT NULL COMMENT '创建时间',
	`updated` datetime DEFAULT NULL COMMENT '更新时间',
	PRIMARY KEY ( `id` ),
KEY `sku` (`sku`) USING BTREE
)ENGINE=InnoDB DEFAULT CHARSET=utf8 COMMENT='京东商品表';
1
2
3
4
5
6
7
8
9
10
11
12
13
创建maven工程,导入依赖
  <parent>
    <groupId>org.springframework.boot</groupId>
    <artifactId>spring-boot-starter-parent</artifactId>
    <version>2.0.2.RELEASE</version>
  </parent>

<!--    springMVC-->
    <dependency>
      <groupId>org.springframework.boot</groupId>
      <artifactId>spring-boot-starter-web</artifactId>
    </dependency>
<!--    SpringData Jpa-->
    <dependency>
      <groupId>org.springframework.boot</groupId>
      <artifactId>spring-boot-starter-data-jpa</artifactId>
    </dependency>

<!--    mysql连接包-->
    <dependency>
      <groupId>mysql</groupId>
      <artifactId>mysql-connector-java</artifactId>
    </dependency>
  <!-- HttpClient -->
    <dependency>
       <groupId>org.apache.httpcomponents</groupId>
      <artifactId>httpclient</artifactId>
    </dependency>

    <dependency>
      <groupId>org.apache.commons</groupId>
      <artifactId>commons-lang3</artifactId>
    </dependency>

    <dependency>
      <groupId>org.jsoup</groupId>
      <artifactId>jsoup</artifactId>
      <version>1.14.3</version>
    </dependency>
2
3
4
5
6
7
8
9
10
11
12
13
14
15
16
17
18
19
20
21
22
23
24
25
26
27
28
29
30
31
32
33
34
35
36
37
38
application.properties
#DB configuration:
spring.datasource.driverClassName=com.mysql.jdbc.Driver
spring.datasource.url=jdbc:mysql://127.0.0.1:3306/crawler
spring.datasource.username=root
spring.datasource.password=root

#JPA Configuration:
spring.jpa.database=MySQL
spring.jpa.show-sql=true
2
3
4
5
6
7
8
9
编写实体类
package com.ep.jd.pojo;

import javax.persistence.*;
import java.util.Date;

/***
 * @author dep
 * @version 1.0
 */

@Entity
@Table(name = "jd_item")
public class Item {

    @Id
    @GeneratedValue(strategy = GenerationType.IDENTITY)
    private Long id;
    // 标准产品单位(商品集合)
    private Long spu;
    // 库存量单位(最小品类单元)
    private Long sku;
    // 商品标题
    private String title;
    // 商品价格
    private Double price;
    /// 商品图片
    private String pic;
    // 创建时间
    private Date created;
    private Date updated;

    public Long getId() {
        return id;
    }

    public void setId(Long id) {
        this.id = id;
    }

    public Long getSpu() {
        return spu;
    }

    public void setSpu(Long spu) {
        this.spu = spu;
    }

    public Long getSku() {
        return sku;
    }

    public void setSku(Long sku) {
        this.sku = sku;
    }

    public String getTitle() {
        return title;
    }

    public void setTitle(String title) {
        this.title = title;
    }

    public Double getPrice() {
        return price;
    }

    public void setPrice(Double price) {
        this.price = price;
    }

    public String getPic() {
        return pic;
    }

    public void setPic(String pic) {
        this.pic = pic;
    }

    public Date getCreated() {
        return created;
    }

    public void setCreated(Date created) {
        this.created = created;
    }

    public Date getUpdated() {
        return updated;
    }

    public void setUpdated(Date updated) {
        this.updated = updated;
    }

    @Override
    public String toString() {
        return "Item{" +
                "id=" + id +
                ", spu=" + spu +
                ", sku=" + sku +
                ", title='" + title + '\'' +
                ", price=" + price +
                ", pic='" + pic + '\'' +
                ", created=" + created +
                ", updated=" + updated +
                '}';
    }
}
2
3
4
5
6
7
8
9
10
11
12
13
14
15
16
17
18
19
20
21
22
23
24
25
26
27
28
29
30
31
32
33
34
35
36
37
38
39
40
41
42
43
44
45
46
47
48
49
50
51
52
53
54
55
56
57
58
59
60
61
62
63
64
65
66
67
68
69
70
71
72
73
74
75
76
77
78
79
80
81
82
83
84
85
86
87
88
89
90
91
92
93
94
95
96
97
98
99
100
101
102
103
104
105
106
107
108
109
110
编写dao
package com.ep.jd.dao;

import com.ep.jd.pojo.Item;
import org.springframework.data.jpa.repository.JpaRepository;
import org.springframework.stereotype.Repository;

/***
 * @author dep
 * @version 1.0
 */
@Repository
public interface ItemDao  extends JpaRepository<Item, Long> {
}
2
3
4
5
6
7
8
9
10
11
12
13
14
编写Service
package com.ep.jd.service;

import com.ep.jd.pojo.Item;

import java.util.List;

/***
 * @author dep
 * @version 1.0
 */
public interface ItemService {

    /**
     * 保存商品信息
     * @param item
     */
    public void save(Item item);

    /***
     * 查询所有商品
     * @param item
     * @return
     */
    public List<Item> findAll(Item item);
}
2
3
4
5
6
7
8
9
10
11
12
13
14
15
16
17
18
19
20
21
22
23
24
25
编写Service实现类
package com.ep.jd.service.impl;

import com.ep.jd.dao.ItemDao;
import com.ep.jd.pojo.Item;
import com.ep.jd.service.ItemService;
import org.springframework.beans.factory.annotation.Autowired;
import org.springframework.data.domain.Example;
import org.springframework.stereotype.Service;
import org.springframework.transaction.annotation.Transactional;

import java.util.List;

/***
 * @author dep
 * @version 1.0
 */
@Service
public class ItemServiceImpl implements ItemService {

    @Autowired
    private ItemDao itemDao;

    @Override
    @Transactional
    public void save(Item item) {
        itemDao.save(item);
    }

    @Override
    public List<Item> findAll(Item item) {
        // 声明查询条件
        Example<Item> example = Example.of(item);
        // 根据查询条件进行查询数据
        List<Item> list = itemDao.findAll(example);
        return list;
    }
}
2
3
4
5
6
7
8
9
10
11
12
13
14
15
16
17
18
19
20
21
22
23
24
25
26
27
28
29
30
31
32
33
34
35
36
37
编写引导类
package com.ep.jd;

import org.springframework.boot.SpringApplication;
import org.springframework.boot.autoconfigure.SpringBootApplication;
import org.springframework.scheduling.annotation.EnableScheduling;

/***
 * @author dep
 * @version 1.0
 */
@SpringBootApplication
// 使用定时任务,需要先开启定时任务,需要加注解
@EnableScheduling
public class Application {
    public static void main(String[] args) {
        SpringApplication.run(Application.class, args);
    }
}
2
3
4
5
6
7
8
9
10
11
12
13
14
15
16
17
18
19
封装HttpClient
package com.ep.jd.util;

import org.apache.http.client.HttpClient;
import org.apache.http.client.config.RequestConfig;
import org.apache.http.client.methods.CloseableHttpResponse;
import org.apache.http.client.methods.HttpGet;
import org.apache.http.impl.client.CloseableHttpClient;
import org.apache.http.impl.client.HttpClients;
import org.apache.http.impl.conn.PoolingHttpClientConnectionManager;
import org.apache.http.util.EntityUtils;
import org.springframework.stereotype.Component;

import java.io.File;
import java.io.FileOutputStream;
import java.io.IOException;
import java.util.UUID;

/***
 * @author dep
 * @version 1.0
 */
@Component
public class HttpUtils {
    private PoolingHttpClientConnectionManager cm;

    public HttpUtils() {
        this.cm = new PoolingHttpClientConnectionManager();
        // 设置最大连接数
        cm.setMaxTotal(100);

        // 设置每个主机的最大连接数
        cm.setDefaultMaxPerRoute(10);
    }

    /**
     * 根据请求地址下载页面数据
     */
    public String doGetHtml(String url){
        // 获取HttpClient对象
        CloseableHttpClient httpClient = HttpClients.custom().setConnectionManager(this.cm).build();
        // 创建httpGet请求对象,设置url地址
        HttpGet httpGet = new HttpGet(url);
        // 设置请求信息
        httpGet.setConfig(this.getConfig());

        CloseableHttpResponse response = null;

        try {
            // 使用HttpClient发送请求,获取响应
            response = httpClient.execute(httpGet);
            // 解析响应,返回结果
            if(response.getStatusLine().getStatusCode() == 200) {
                // 判断响应体Entity是否不为空,如果不为空就可以使用EntityUtils
                String content = EntityUtils.toString(response.getEntity(), "utf8");
                return content;
            }
        } catch (IOException e) {
            throw new RuntimeException(e);
        } finally {
            try {
                if (response != null) {
                    response.close();
                }
            } catch (IOException e) {
                throw new RuntimeException(e);
            }
        }
        // 返回空串
        return "";

    }

    /**
     * 根据请求地址下载图片
     * @param url
     * @return
     */
    public String doGetImage(String url){
        // 获取HttpClient对象
        CloseableHttpClient httpClient = HttpClients.custom().setConnectionManager(this.cm).build();
        // 创建httpGet请求对象,设置url地址
        HttpGet httpGet = new HttpGet(url);
        // 设置请求信息
        httpGet.setConfig(this.getConfig());

        httpGet.setHeader("User-Agent","Mozilla/5.0 (Windows NT 10.0; Win64; x64) AppleWebKit/537.36 (KHTML, like Gecko) Chrome/103.0.0.0 Safari/537.36");
        httpGet.setHeader("sec-ch-ua",".Not/A)Brand\";v=\"99\", \"Google Chrome\";v=\"103\", \"Chromium\";v=\"103");

        CloseableHttpResponse response = null;
        FileOutputStream outputStream = null;

        try {
            // 使用HttpClient发送请求,获取响应
            response = httpClient.execute(httpGet);
            // 解析响应,返回结果
            if(response.getStatusLine().getStatusCode() == 200) {
                // 下载图片
                // 获取图片的后缀
                String extName = url.substring(url.lastIndexOf("."));

                //创建图片名,重命名图片
                String picName = UUID.randomUUID().toString() + extName;
                //下载图片
                //声明OutPutStream
                outputStream = new FileOutputStream(new File("E:\\images:\\" + picName));
                response.getEntity().writeTo(outputStream);

                // 返回图片名称
                return picName;
            }
        } catch (IOException e) {
            throw new RuntimeException(e);
        } finally {
            try {
                if (response != null) {
                    response.close();
                }
                if (outputStream != null) {
                    outputStream.close();
                }
            } catch (IOException e) {
                throw new RuntimeException(e);
            }
        }
        // 返回空串
        return "";

    }

    private RequestConfig getConfig() {
        // 配置请求信息
        RequestConfig config = RequestConfig.custom().setConnectionRequestTimeout(1000) // 创建连接的最长时间,单位是毫秒
                .setConnectionRequestTimeout(500) // 设置获取连接的最长时间,单位是毫秒
                .setSocketTimeout(10 * 1000) // 设置数据传输的最长时间,单位是毫秒
                .build();
        return config;
    }
}
2
3
4
5
6
7
8
9
10
11
12
13
14
15
16
17
18
19
20
21
22
23
24
25
26
27
28
29
30
31
32
33
34
35
36
37
38
39
40
41
42
43
44
45
46
47
48
49
50
51
52
53
54
55
56
57
58
59
60
61
62
63
64
65
66
67
68
69
70
71
72
73
74
75
76
77
78
79
80
81
82
83
84
85
86
87
88
89
90
91
92
93
94
95
96
97
98
99
100
101
102
103
104
105
106
107
108
109
110
111
112
113
114
115
116
117
118
119
120
121
122
123
124
125
126
127
128
129
130
131
132
133
134
135
136
137
138
139
编写定时任务
package com.ep.jd.task;
import com.ep.jd.pojo.Item;
import com.ep.jd.service.ItemService;
import com.ep.jd.util.HttpUtils;
import com.fasterxml.jackson.databind.ObjectMapper;
import org.jsoup.Jsoup;
import org.jsoup.nodes.Document;
import org.jsoup.nodes.Element;
import org.jsoup.select.Elements;
import org.springframework.beans.factory.annotation.Autowired;
import org.springframework.scheduling.annotation.Scheduled;
import org.springframework.stereotype.Component;
import java.util.Date;
import java.util.List;
/***
* @author dep
* @version 1.0
*/
@Component
public class ItemTask {
@Autowired
private HttpUtils httpUtils;
@Autowired
private ItemService itemService;
// 当下载任务完成后,间隔多长时间进行下一次的任务
@Scheduled(fixedDelay = 100*1000)
public void itemTask() {
// 声明要解析的初始地址
String url = "https://search.jd.com/Search?keyword=%E6%89%8B%E6%9C%BA&wq=%E6%89%8B%E6%9C%BA&pvid=21eadb733591426dbccf55c911ef732d&s=57&click=0&page=";
// 按照页面对手机的搜索结果进行遍历解析
for (int i = 1; i < 10; i += 2) {
String html = httpUtils.doGetHtml(url + i);
System.out.println(html.length());
// 解析页面,获取商品数据存储
// this.parse(html);
System.out.println(html);
}
System.out.println("手机数据抓取完毕");
}
// 解析页面。获取商品数据并存储
public void parse(String html){
// 解析html获取Document
Document doc = Jsoup.parse(html);
// 获取spu信息
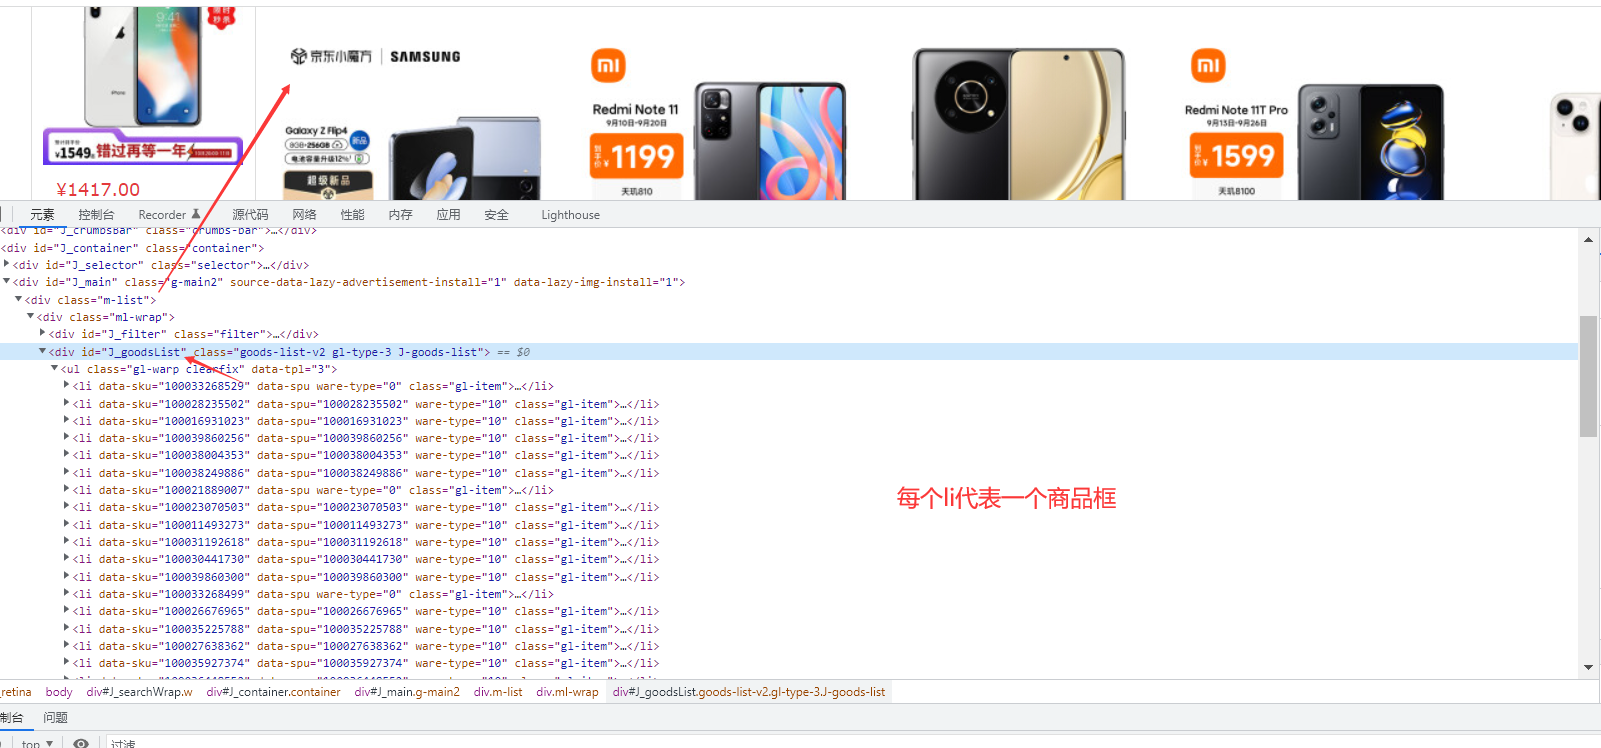
Elements spuEles = doc.select("div#J_goodsList > ul > li");
for (Element spuEle: spuEles) {
// 获取spu
long spu = Long.parseLong(spuEle.attr("data-spu"));
// 获取sku信息
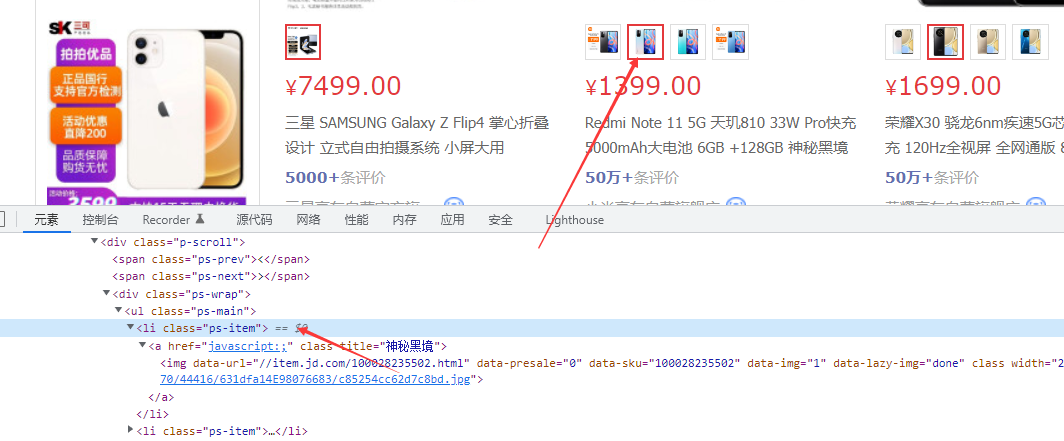
Elements skuEles = spuEle.select("li.ps-item");
for (Element skuEle: skuEles) {
long sku = Long.parseLong(skuEle.select("[data-sku]").attr("data-sku"));
// 根据sku查询商品数据
Item item = new Item();
item.setSku(sku);
List<Item> list = itemService.findAll(item);
if(list.size() > 0) {
// 如果商品存在,就进行下一个循环,该商品不保存,因为已存在
continue;
}
// 设置商品的spu
item.setSpu(spu);
// 设置商品的详情url
String imgUrl = "https://item.jd.com/"+sku+".html";
item.setUrl(imgUrl);
// 获取商品的图片
String picUrl = "https:" + skuEle.select("img[data-sku]").first().attr("data-lazy-img");
picUrl = picUrl.replace("(/n7/)|(/n9/)", "/n1/");
String picName = httpUtils.doGetImage(picUrl);
item.setPic(picName);
// 获取商品价格(从详情页面拿商品的价格)
String itemDetailHtml = httpUtils.doGetHtml(item.getUrl());
Document itemDetialDoc = Jsoup.parse(itemDetailHtml);
String price = itemDetialDoc.select("span.p-price .price").text();
item.setPrice(new Double(price));
// 获取商品的标题
String title = itemDetialDoc.select("div.sku-name").text();
item.setTitle(title);
item.setCreated(new Date());
item.setUpdated(item.getCreated());
// 保存商品数据到数据库
itemService.save(item);
System.out.println(item);
}
}
}
}
2
3
4
5
6
7
8
9
10
11
12
13
14
15
16
17
18
19
20
21
22
23
24
25
26
27
28
29
30
31
32
33
34
35
36
37
38
39
40
41
42
43
44
45
46
47
48
49
50
51
52
53
54
55
56
57
58
59
60
61
62
63
64
65
66
67
68
69
70
71
72
73
74
75
76
77
78
79
80
81
82
83
84
85
86
87
88
89
90
91
92
93
94
95
96
97
98
99
100
101
102
103
104
105
106
# 5.WebMagic介绍
昨天完成了爬虫的入门的学习,是一个最基本的爬虫案例,今天我们要学习一款爬虫框架的使用就是 WebMagic。其底层用到了我们上一天课程所使用的HttpClient和 Jsoup,让我们能够更方便的开发爬虫。 webMagic项目代码分为核心和扩展两部分。核心部分(webmagic-core)是一个精简的、模块化的爬虫实现,而扩展部分则包括一些便利的、实用性的功能。 webMagic的设计目标是尽量的模块化,并体现爬虫的功能特点。这部分提供非常简单、灵活的API,在基本不改变开发模式的情况下,编写一个爬虫。 扩展部分(webmagic-extension)提供一些便捷的功能,例如注解模式编写爬虫等。同时内置了一些常用的组件,便于爬虫开发。
# 5.1 架构介绍
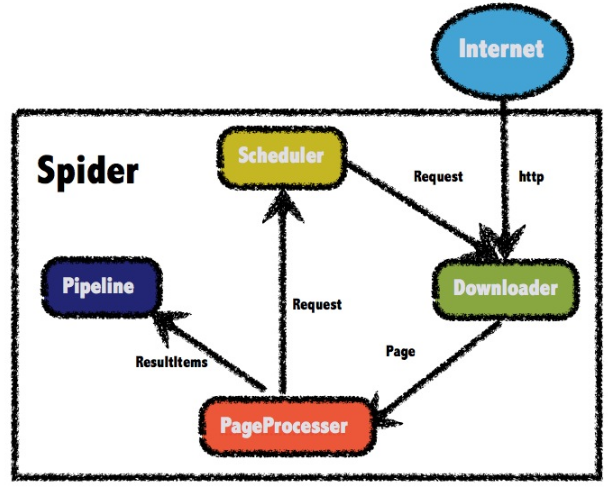
WebMagic的结构分为Downloader、PageProcessor、Scheduler、Pipeline四大组件,并由Spider将它们彼此组织起来。这四大组件对应爬虫生命周期中的下载、处理、管理和持久化等功能。WebMagic的设计参考了Scapy,但是实现方式更Java化一些。 而spider则将这几个组件组织起来,让它们可以互相交互,流程化的执行,可以认为Spider是一个大的容器,它也是 WebMagic逻辑的核心。
# 5.1.1. WebMagic的四个组件
# 1.Downloaderv
Downloader负责从互联网上下载页面,以便后续处理。WebMagic 默认使用了Apache HttpClient 作为下载工具。
# 2.PageProcessor
PageProcessor负责解析页面,抽取有用信息,以及发现新的链接。WebMagic使用Jsoup作为HTML解析工具,并基于其开发了解析XPath 的工具Xsoup。 在这四个组件中,PageProcessor对于每个站点每个页面都不一样,是需要使用者定制的部分。
# 3.Scheduler
Scheduler负责管理待抓取的URL,以及一些去重的工作。WebMagic默认提供了JDK的内存队列来管理URL,并用集合来进行去重。也支持使用Redis进行分布式管理。
# 4.Pipelinew
Pipeline负责抽取结果的处理,包括计算、持久化到文件、数据库等。WebMagic默认提供了“输出到控制台”和“保存到文件”两种结果处理方案。 Pipeline定义了结果保存的方式,如果你要保存到指定数据库,则需要编写对应的 Pipeline。对于一类需求一般只需编写一个Pipeline。
# 5.1.2. 用于数据流转的对象
- Request
Request是对URL地址的一层封装,一个Request对应一个URL地址。
它是PageProcessor与Downloader交互的载体,也是PageProcessor控制Downloader唯一方式。
除了URL本身外,它还包含一个Key-Value结构的字段extra。你可以在extra中保存一些特殊的属性,然后在其他地方读取,以完成不同的功能。例如附加上一个页面的一些信息等。
- Page
Page代表了从Downloader下载到的一个页面——可能是HTML,也可能是JSON或者其他文本格式的内容。
Page是WebMagic抽取过程的核心对象,它提供一些方法可供抽取、结果保存等。
- ResultItems
ResultItems相当于一个Map,它保存PageProcessor处理的结果,供Pipeline使用。它的API与Map很类似,值得注意的是它有一个字段skip,若设置为true,则不应被Pipeline处理。
# 5.2. 入门案例
# 5.2.1. 加入依赖
创建Maven工程,并加入以下依赖
    <!-- https://mvnrepository.com/artifact/us.codecraft/webmagic-core -->
    <dependency>
      <groupId>us.codecraft</groupId>
      <artifactId>webmagic-core</artifactId>
      <version>0.7.5</version>
    </dependency>
    <!-- https://mvnrepository.com/artifact/us.codecraft/webmagic-extension -->
    <dependency>
      <groupId>us.codecraft</groupId>
      <artifactId>webmagic-extension</artifactId>
      <version>0.7.5</version>
    </dependency>
2
3
4
5
6
7
8
9
10
11
12
# 5.2.2. 加入配置文件
WebMagic使用slf4j-log4j12作为slf4j的实现。
添加log4j.properties配置文件
log4j.rootLogger=INFO,A1
log4j.appender.A1=org.apache.log4j.ConsoleAppender
log4j.appender.A1.layout=org.apache.log4j.PatternLayout
log4j.appender.A1.layout.ConversionPattern=%-d{yyyy-MM-dd HH:mm:ss,SSS} [%t] [%c]-[%p] %m%n
2
3
4
# 5.2.3 编写程序
package com.ep;

import org.jetbrains.annotations.NotNull;
import us.codecraft.webmagic.Page;
import us.codecraft.webmagic.Site;
import us.codecraft.webmagic.Spider;
import us.codecraft.webmagic.processor.PageProcessor;

/***
 * @author dep
 * @version 1.0
 */
public class JobProcessor implements PageProcessor {

    // 解析页面
    public void process(Page page) {
        // 解析返回数据page,并且把解析的结果放到ResultItems中
        page.putField("title", page.getHtml().css(".nav-item a").all());
    }

    private Site site = Site.me();
    public Site getSite() {
        return site;
    }

    public static void main(String[] args) {
        Spider.create(new JobProcessor())
                //初始访问url地址
                .addUrl("https://getp.gitee.io/docs/")
                .run(); // 执行爬虫
    }
}
2
3
4
5
6
7
8
9
10
11
12
13
14
15
16
17
18
19
20
21
22
23
24
25
26
27
28
29
30
31
32
# 5.3. WebMagic功能
# 实现PageProcessor
抽取元素Selectable
WebMagic里主要使用了三种抽取技术:XPath、正则表达式和CSS选择器。另外,对于JSON格式的内容,可使用JsonPath进行解析。
- XPath
以上是获取属性class=mt的div标签,里面的h1标签的内容
page.getHtml().xpath("//div[@class=mt]/h1/text()")
- CSS选择器
CSS选择器是与XPath类似的语言。在上一次的课程中,我们已经学习过了Jsoup的选择器,它比XPath写起来要简单一些,但是如果写复杂一点的抽取规则,就相对要麻烦一点。
div.mt>h1表示class为mt的div标签下的直接子元素h1标签
page.getHtml().css("div#news_div > ul > li:nth-child(1) a").toString()
- 正则表达式
正则表达式则是一种通用的文本抽取语言。在这里一般用于获取url地址。
抽取元素API
Selectable相关的抽取元素链式API是WebMagic的一个核心功能。使用Selectable接口,可以直接完成页面元素的链式抽取,也无需去关心抽取的细节。
在刚才的例子中可以看到,page.getHtml()返回的是一个Html对象,它实现了Selectable接口。这个接口包含的方法分为两类:抽取部分和获取结果部分。
| 方法 | 说明 | 示例 |
|---|---|---|
| xpath(String xpath) | 使用XPath选择 | html.xpath("//div[@class='title']") |
| $(String selector) | 使用Css选择器选择 | html.$("div.title") |
| $(String selector,String attr) | 使用Css选择器选择 | html.$("div.title","text") |
| css(String selector) | 功能同$(),使用Css选择器选择 | html.css("div.title") |
| links() | 选择所有链接 | html.links() |
| regex(String regex) | 使用正则表达式抽取 | html.regex("(.*?)") |
       // 解析返回数据page,并且把解析的结果放到ResultItems中
        // css
        page.putField("title", page.getHtml().css(".nav-item a").all());

        // XPath
        page.putField("div2",page.getHtml().xpath("//div[@class=nav-item]/a"));

        // 正则表达式
        page.putField("div3",page.getHtml().css(".nav-item a").regex(".*首页.*").all());
2
3
4
5
6
7
8
9
获取结果API
当链式调用结束时,我们一般都想要拿到一个字符串类型的结果。这时候就需要用到获取结果的API了。
我们知道,一条抽取规则,无论是XPath、CSS选择器或者正则表达式,总有可能抽取到多条元素。WebMagic对这些进行了统一,可以通过不同的API获取到一个或者多个元素。
| 方法 | 说明 | 示例 |
|---|---|---|
| get() | 返回一条String类型的结果 | String link= html.links().get() |
| toString() | 同get(),返回一条String类型的结果 | String link= html.links().toString() |
| all() | 返回所有抽取结果 | List links= html.links().all() |
当有多条数据的时候,使用get()和toString()都是获取第一个url地址。
page.putField("div3",page.getHtml().css(".nav-item a").regex(".*首页.*").all());
// 处理结果API
page.putField("div4",page.getHtml().css(".nav-item a").regex(".*首页.*").get());
page.putField("div5",page.getHtml().css(".nav-item a").regex(".*首页.*").toString());
2
3
4
# 获取链接
有了处理页面的逻辑,我们的爬虫就接近完工了,但是现在还有一个问题:一个站点的页面是很多的,一开始我们不可能全部列举出来,于是如何发现后续的链接,是一个爬虫不可缺少的一部分。
       // 获取链接
       page.addTargetRequests(page.getHtml().css(".nav-item a").links().regex(".*about.*").all());
       page.putField("url",page.getHtml().css("title").toString());
2
3
# 使用Pipeline保存结果
WebMagic用于保存结果的组件叫做Pipeline。我们现在通过“控制台输出结果”这件事也是通过一个内置的Pipeline完成的,它叫做ConsolePipeline。
那么,我现在想要把结果用保存到文件中,怎么做呢?只将Pipeline的实现换成"FilePipeline"就可以了。
    public static void main(String[] args) {
        Spider.create(new JobProcessor())
                //初始访问url地址
                .addUrl("https://getp.gitee.io/docs/")
                // 保存到文件
                .addPipeline(new FilePipeline("C:\\Users\\Administrator.SC-201902031211\\Desktop\\result"))
                .thread(5) // 设置有5个线程处理
                .run(); // 执行爬虫
    }
2
3
4
5
6
7
8
9
# 爬虫的配置、启动和终止
# Spider
Spider是爬虫启动的入口。在启动爬虫之前,我们需要使用一个PageProcessor创建一个Spider对象,然后使用run()进行启动。
同时Spider的其他组件(Downloader、Scheduler、Pipeline)都可以通过set方法来进行设置。
| 方法 | 说明 | 示例 |
|---|---|---|
| create(PageProcessor) | 创建Spider | Spider.create(new GithubRepoProcessor()) |
| addUrl(String…) | 添加初始的URL | spider .addUrl("http://webmagic.io/docs/") |
| thread(n) | 开启n个线程 | spider.thread(5) |
| run() | 启动,会阻塞当前线程执行 | spider.run() |
| start()/runAsync() | 异步启动,当前线程继续执行 | spider.start() |
| stop() | 停止爬虫 | spider.stop() |
| addPipeline(Pipeline) | 添加一个Pipeline,一个Spider可以有多个Pipeline | spider .addPipeline(new ConsolePipeline()) |
| setScheduler(Scheduler) | 设置Scheduler,一个Spider只能有个一个Scheduler | spider.setScheduler(new RedisScheduler()) |
| setDownloader(Downloader) | 设置Downloader,一个Spider只能有个一个Downloader | spider .setDownloader(new SeleniumDownloader()) |
| get(String) | 同步调用,并直接取得结果 | ResultItems result = spider.get("http://webmagic.io/docs/") |
| getAll(String…) | 同步调用,并直接取得一堆结果 | List |
# 爬虫配置Site
Site.me()可以对爬虫进行一些配置配置,包括编码、抓取间隔、超时时间、重试次数等。在这里我们先简单设置一下:重试次数为3次,抓取间隔为一秒
  private Site site = Site.me()
            .setCharset("utf8") // 编码
            .setSleepTime(1) // 抓取时间间隔
            .setTimeOut(10*1000) // 超时时间
            .setRetrySleepTime(3000) // 重试时间
            .setRetryTimes(3); // 重试次数
2
3
4
5
6
站点本身的一些配置信息,例如编码、HTTP头、超时时间、重试策略等、代理等,都可以通过设置Site对象来进行配置。
| 方法 | 说明 | 示例 |
|---|---|---|
| setCharset(String) | 设置编码 | site.setCharset("utf-8") |
| setUserAgent(String) | 设置UserAgent | site.setUserAgent("Spider") |
| setTimeOut(int) | 设置超时时间,单位是毫秒 | site.setTimeOut(3000) |
| setRetryTimes(int) | 设置重试次数 | site.setRetryTimes(3) |
| setCycleRetryTimes(int) | 设置循环重试次数 | site.setCycleRetryTimes(3) |
| addCookie(String,String) | 添加一条cookie | site.addCookie("dotcomt_user","code4craft") |
| setDomain(String) | 设置域名,需设置域名后,addCookie才可生效 | site.setDomain("github.com") |
| addHeader(String,String) | 添加一条addHeader | site.addHeader("Referer","https://github.com (opens new window)") |
| setHttpProxy(HttpHost) | 设置Http代理 | site.setHttpProxy(new HttpHost("127.0.0.1",8080)) |
# 6. 爬虫分类
网络爬虫按照系统结构和实现技术,大致可以分为以下几种类型:通用网络爬虫、聚焦网络爬虫、增量式网络爬虫、深层网络爬虫。 实际的网络爬虫系统通常是几种爬虫技术相结合实现的
# 6.1. 通用网络爬虫
通用网络爬虫又称全网爬虫(Scalable Web Crawler),爬行对象从一些种子 URL 扩充到整个 Web,主要为门户站点搜索引擎和大型 Web 服务提供商采集数据。
这类网络爬虫的爬行范围和数量巨大,对于爬行速度和存储空间要求较高,对于爬行页面的顺序要求相对较低,同时由于待刷新的页面太多,通常采用并行工作方式,但需要较长时间才能刷新一次页面。
简单的说就是互联网上抓取所有数据。
# 6.2. 聚焦网络爬虫
聚焦网络爬虫(Focused Crawler),又称主题网络爬虫(Topical Crawler),是指选择性地爬行那些与预先定义好的主题相关页面的网络爬虫。
和通用网络爬虫相比,聚焦爬虫只需要爬行与主题相关的页面,极大地节省了硬件和网络资源,保存的页面也由于数量少而更新快,还可以很好地满足一些特定人群对特定领域信息的需求 。
简单的说就是互联网上只抓取某一种数据。
# 6.3. 增量式网络爬虫
增量式网络爬虫(Incremental Web Crawler)是 指 对 已 下 载 网 页 采 取 增量式更新和只爬行新产生的或者已经发生变化网页的爬虫,它能够在一定程度上保证所爬行的页面是尽可能新的页面。
和周期性爬行和刷新页面的网络爬虫相比,增量式爬虫只会在需要的时候爬行新产生或发生更新的页面 ,并不重新下载没有发生变化的页面,可有效减少数据下载量,及时更新已爬行的网页,减小时间和空间上的耗费,但是增加了爬行算法的复杂度和实现难度。
简单的说就是互联网上只抓取刚刚更新的数据。
# 6.4. Deep Web 爬虫
Web 页面按存在方式可以分为表层网页(Surface Web)和深层网页(Deep Web,也称 Invisible Web Pages 或 Hidden Web)。
表层网页是指传统搜索引擎可以索引的页面,以超链接可以到达的静态网页为主构成的 Web 页面。
Deep Web 是那些大部分内容不能通过静态链接获取的、隐藏在搜索表单后的,只有用户提交一些关键词才能获得的 Web 页面。
# 7.案例开发分析
我们已经学完了WebMagic的基本使用方法,现在准备使用WebMagic实现爬取数据的功能。这里是一个比较完整的实现。在这里我们实现的是聚焦网络爬虫,只爬取招聘的相关数据。
参考:https://blog.csdn.net/Hpeacheng/article/details/124276335?ops_request_misc=%257B%2522request%255Fid%2522%253A%2522166394131416782391881335%2522%252C%2522scm%2522%253A%252220140713.130102334.pc%255Fall%255Fv2.%2522%257D&request_id=166394131416782391881335&biz_id=0&utm_medium=distribute.pc_search_result.none-task-blog-2~all_v2~first_rank_ecpm_v1~rank_v31_ecpm-3-124276335-null-null.142^v50^control_1,201^v3^add_ask&utm_term=java%E9%BB%91%E9%A9%AC%E7%BD%91%E7%BB%9C%E7%88%AC%E8%99%AB%E8%B5%84%E6%96%99&spm=1018.2226.3001.4187
# 7.1业务分析
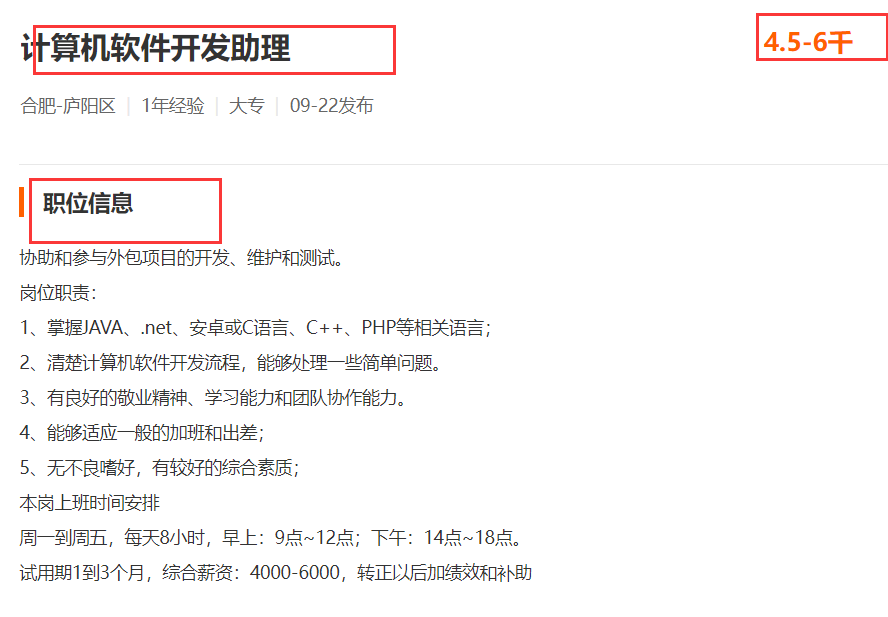
今天要实现的是爬取https://www.51job.com/上的招聘信息。只爬取“计算机软件”和“互联网电子商务”两个行业的信息。

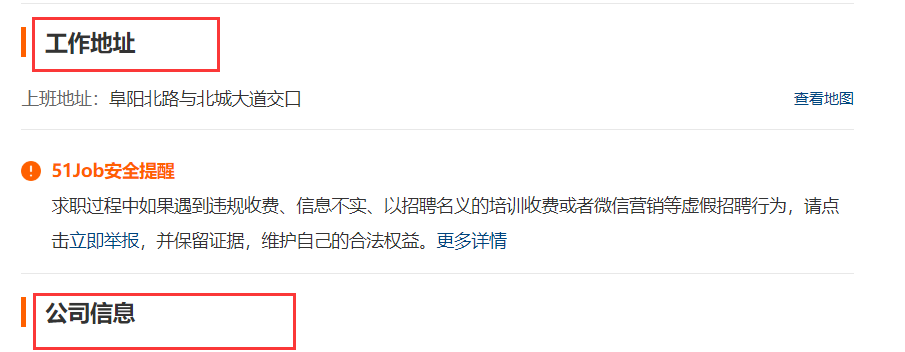
点击职位详情页,我们分析发现详情页还有一些数据需要抓取:
职位、公司名称、工作地点、薪资、发布时间、职位信息、公司联系方式、公司信息
# 7.2 数据库表
根据以上信息,设计数据库表
CREATE TABLE `job_info` (
  `id` bigint(20) NOT NULL AUTO_INCREMENT COMMENT '主键id',
  `company_name` varchar(100) DEFAULT NULL COMMENT '公司名称',
  `company_addr` varchar(200) DEFAULT NULL COMMENT '公司联系方式',
  `company_info` text COMMENT '公司信息',
  `job_name` varchar(100) DEFAULT NULL COMMENT '职位名称',
  `job_addr` varchar(50) DEFAULT NULL COMMENT '工作地点',
  `job_info` text COMMENT '职位信息',
	`salary_min` int(10) DEFAULT NULL COMMENT '薪资范围,最小',
  `salary_max` int(10) DEFAULT NULL COMMENT '薪资范围,最大',
  `url` varchar(150) DEFAULT NULL COMMENT '招聘信息详情页',
  `time` varchar(10) DEFAULT NULL COMMENT '职位最近发布时间',
  PRIMARY KEY (`id`)
) ENGINE=InnoDB AUTO_INCREMENT=1 DEFAULT CHARSET=utf8 COMMENT='招聘信息';
2
3
4
5
6
7
8
9
10
11
12
13
14
# 7.3实现流程
我们需要解析职位列表页,获取职位的详情页,再解析页面获取数据。
获取url地址的流程如下
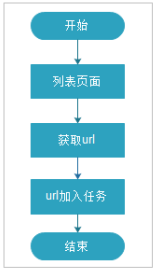
但是在这里有个问题:在解析页面的时候,很可能会解析出相同的url地址(例如商品标题和商品图片超链接,而且url一样),如果不进行处理,同样的url会解析处理多次,浪费资源。所以我们需要有一个url去重的功能
# Scheduler组件
WebMagic提供了Scheduler可以帮助我们解决以上问题。
Scheduler是WebMagic中进行URL管理的组件。一般来说,Scheduler包括两个作用:
对待抓取的URL队列进行管理。
对已抓取的URL进行去重。
WebMagic内置了几个常用的Scheduler。如果你只是在本地执行规模比较小的爬虫,那么基本无需定制Scheduler,但是了解一下已经提供的几个Scheduler还是有意义的。
| 类 | 说明 | 备注 |
|---|---|---|
| DuplicateRemovedScheduler | 抽象基类,提供一些模板方法 | 继承它可以实现自己的功能 |
| QueueScheduler | 使用内存队列保存待抓取URL | |
| PriorityScheduler | 使用带有优先级的内存队列保存待抓取URL | 耗费内存较QueueScheduler更大,但是当设置了request.priority之后,只能使用PriorityScheduler才可使优先级生效 |
| FileCacheQueueScheduler | 使用文件保存抓取URL,可以在关闭程序并下次启动时,从之前抓取到的URL继续抓取 | 需指定路径,会建立.urls.txt和.cursor.txt两个文件 |
| RedisScheduler | 使用Redis保存抓取队列,可进行多台机器同时合作抓取 | 需要安装并启动redis |
去重部分被单独抽象成了一个接口:DuplicateRemover,从而可以为同一个Scheduler选择不同的去重方式,以适应不同的需要,目前提供了两种去重方式。
| 类 | 说明 |
|---|---|
| HashSetDuplicateRemover | 使用HashSet来进行去重,占用内存较大 |
| BloomFilterDuplicateRemover | 使用BloomFilter来进行去重,占用内存较小,但是可能漏抓页面 |
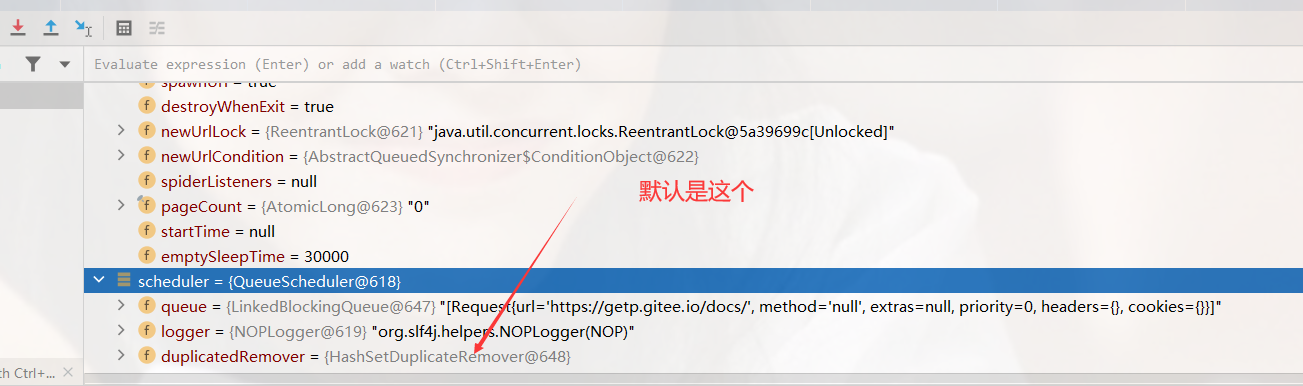
RedisScheduler是使用Redis的set进行去重,其他的Scheduler默认都使用HashSetDuplicateRemover来进行去重。
如果要使用BloomFilter,必须要加入以下依赖:
<!--WebMagic对布隆过滤器的支持-->
<dependency>
    <groupId>com.google.guava</groupId>
    <artifactId>guava</artifactId>
    <version>16.0</version>
</dependency>
2
3
4
5
6
public static void main(String[] args) {
        Spider spider = Spider.create(new JobProcessor())
                //初始访问url地址
                .addUrl("https://getp.gitee.io/docs/")
                // 保存到文件
                .addPipeline(new FilePipeline("C:\\Users\\Administrator.SC-201902031211\\Desktop\\result"))
                .setScheduler(new QueueScheduler()
                .setDuplicateRemover(new BloomFilterDuplicateRemover(10000000))) //参数设置需要对多少条数据去重
                .thread(5);// 设置有5个线程处理

        Scheduler scheduler = spider.getScheduler();
        spider.run();
    }
2
3
4
5
6
7
8
9
10
11
12
13
# 三种去重方式
去重就有三种实现方式,那有什么不同呢?
- HashSet
使用java中的HashSet不能重复的特点去重。优点是容易理解。使用方便。
缺点:占用内存大,性能较低。
- Redis去重
使用Redis的set进行去重。优点是速度快(Redis本身速度就很快),而且去重不会占用爬虫服务器的资源,可以处理更大数据量的数据爬取。
缺点:需要准备Redis服务器,增加开发和使用成本。
- 布隆过滤器(BloomFilter)
使用布隆过滤器也可以实现去重。优点是占用的内存要比使用HashSet要小的多,也适合大量数据的去重操作。
缺点:有误判的可能。没有重复可能会判定重复,但是重复数据一定会判定重复。
# 7.4案例实现
# 创建工程
创建Maven工程,并加入依赖。pom.xml为:
        <!--SpringMVC-->
        <dependency>
            <groupId>org.springframework.boot</groupId>
            <artifactId>spring-boot-starter-web</artifactId>
        </dependency>

        <!--SpringData Jpa-->
        <dependency>
            <groupId>org.springframework.boot</groupId>
            <artifactId>spring-boot-starter-data-jpa</artifactId>
        </dependency>

        <!--MySQL连接包-->
        <dependency>
        <groupId>mysql</groupId>
        <artifactId>mysql-connector-java</artifactId>
        </dependency>

        <!--WebMagic核心包-->
        <dependency>
            <groupId>us.codecraft</groupId>
            <artifactId>webmagic-core</artifactId>
            <version>0.7.5</version>
            <exclusions>
                <exclusion>
                    <groupId>org.slf4j</groupId>
                    <artifactId>slf4j-log4j12</artifactId>
                </exclusion>
            </exclusions>
        </dependency>
        <!--WebMagic扩展-->
        <dependency>
            <groupId>us.codecraft</groupId>
            <artifactId>webmagic-extension</artifactId>
            <version>0.7.5</version>
        </dependency>
        <!--WebMagic对布隆过滤器的支持-->
        <dependency>
            <groupId>com.google.guava</groupId>
            <artifactId>guava</artifactId>
            <version>16.0</version>
        </dependency>

        <!--工具包-->
        <dependency>
            <groupId>org.apache.commons</groupId>
            <artifactId>commons-lang3</artifactId>
        </dependency>
2
3
4
5
6
7
8
9
10
11
12
13
14
15
16
17
18
19
20
21
22
23
24
25
26
27
28
29
30
31
32
33
34
35
36
37
38
39
40
41
42
43
44
45
46
47
48
添加application.properties配置文件
#DB Configuration:
spring.datasource.driverClassName=com.mysql.jdbc.Driver
spring.datasource.url=jdbc:mysql://127.0.0.1:3306/carwler
spring.datasource.username=root
spring.datasource.password=root

#JPA Configuration:
spring.jpa.database=MySQL
spring.jpa.show-sql=true
2
3
4
5
6
7
8
9
# 编写Pojo
package com.ep.pojo;

import javax.persistence.Entity;
import javax.persistence.GeneratedValue;
import javax.persistence.GenerationType;
import javax.persistence.Id;

/***
 * @author dep
 * @version 1.0
 */
@Entity
public class JobInfo {

    @Id
    @GeneratedValue(strategy = GenerationType.IDENTITY)
    private Long id;
    private String companyName;
    private String companyAddr;
    private String companyInfo;
    private String jobName;
    private String jobAddr;
    private String jobInfo;
    private Integer salaryMin;
    private Integer salaryMax;
    private String url;
    private String time;

    public Long getId() {
        return id;
    }

    public void setId(Long id) {
        this.id = id;
    }

    public String getCompanyName() {
        return companyName;
    }

    public void setCompanyName(String companyName) {
        this.companyName = companyName;
    }

    public String getCompanyAddr() {
        return companyAddr;
    }

    public void setCompanyAddr(String companyAddr) {
        this.companyAddr = companyAddr;
    }

    public String getCompanyInfo() {
        return companyInfo;
    }

    public void setCompanyInfo(String companyInfo) {
        this.companyInfo = companyInfo;
    }

    public String getJobName() {
        return jobName;
    }

    public void setJobName(String jobName) {
        this.jobName = jobName;
    }

    public String getJobAddr() {
        return jobAddr;
    }

    public void setJobAddr(String jobAddr) {
        this.jobAddr = jobAddr;
    }

    public String getJobInfo() {
        return jobInfo;
    }

    public void setJobInfo(String jobInfo) {
        this.jobInfo = jobInfo;
    }

    public Integer getSalaryMin() {
        return salaryMin;
    }

    public void setSalaryMin(Integer salaryMin) {
        this.salaryMin = salaryMin;
    }

    public Integer getSalaryMax() {
        return salaryMax;
    }

    public void setSalaryMax(Integer salaryMax) {
        this.salaryMax = salaryMax;
    }

    public String getUrl() {
        return url;
    }

    public void setUrl(String url) {
        this.url = url;
    }

    public String getTime() {
        return time;
    }

    public void setTime(String time) {
        this.time = time;
    }

    @Override
    public String toString() {
        return "JobInfo{" +
                "id=" + id +
                ", companyName='" + companyName + '\'' +
                ", companyAddr='" + companyAddr + '\'' +
                ", companyInfo='" + companyInfo + '\'' +
                ", jobName='" + jobName + '\'' +
                ", jobAddr='" + jobAddr + '\'' +
                ", jobInfo='" + jobInfo + '\'' +
                ", salaryMin=" + salaryMin +
                ", salaryMax=" + salaryMax +
                ", url='" + url + '\'' +
                ", time='" + time + '\'' +
                '}';
    }
}
2
3
4
5
6
7
8
9
10
11
12
13
14
15
16
17
18
19
20
21
22
23
24
25
26
27
28
29
30
31
32
33
34
35
36
37
38
39
40
41
42
43
44
45
46
47
48
49
50
51
52
53
54
55
56
57
58
59
60
61
62
63
64
65
66
67
68
69
70
71
72
73
74
75
76
77
78
79
80
81
82
83
84
85
86
87
88
89
90
91
92
93
94
95
96
97
98
99
100
101
102
103
104
105
106
107
108
109
110
111
112
113
114
115
116
117
118
119
120
121
122
123
124
125
126
127
128
129
130
131
132
133
134
# 编写Dao
import com.ep.pojo.JobInfo;
import org.springframework.data.jpa.repository.JpaRepository;

/***
 * @author dep
 * @version 1.0
 */
@Repository
public interface JobInfoDao extends JpaRepository<JobInfo,Long> {
}
2
3
4
5
6
7
8
9
10
# 编写Service
package com.ep.service;

import com.ep.pojo.JobInfo;

import java.util.List;

/***
 * @author dep
 * @version 1.0
 */
public interface JobInfoService {

    /***
     * 保存数据
     * @param jobInfo
     */
    public void save(JobInfo jobInfo);

    /***
     * 根据条件查找
     * @param jobInfo
     * @return
     */
    public List<JobInfo> findJobInfo(JobInfo jobInfo);
}
2
3
4
5
6
7
8
9
10
11
12
13
14
15
16
17
18
19
20
21
22
23
24
25
# 编写Service实现类
package com.ep.service.impl;

import com.ep.dao.JobInfoDao;
import com.ep.pojo.JobInfo;
import com.ep.service.JobInfoService;
import org.springframework.beans.factory.annotation.Autowired;
import org.springframework.data.domain.Example;
import org.springframework.stereotype.Service;
import org.springframework.transaction.annotation.Transactional;

import java.util.List;

/***
 * @author dep
 * @version 1.0
 */
@Service
public class JobInfoServiceImpl implements JobInfoService {

    @Autowired
    private JobInfoDao jobInfoDao;

    @Override
    @Transactional
    public void save(JobInfo jobInfo) {
        //先从数据库查询数据,根据发布日期查询和url查询
        JobInfo param = new JobInfo();
        param.setUrl(jobInfo.getUrl());
        param.setTime(jobInfo.getTime());
        List<JobInfo> list = this.findJobInfo(param);

        if (list.size() == 0) {
            //没有查询到数据则新增或者修改数据
            this.jobInfoDao.saveAndFlush(jobInfo);
        }
    }

    @Override
    public List<JobInfo> findJobInfo(JobInfo jobInfo) {
        Example example = Example.of(jobInfo);
        List<JobInfo> list = this.jobInfoDao.findAll(example);
        return list;
    }
}
2
3
4
5
6
7
8
9
10
11
12
13
14
15
16
17
18
19
20
21
22
23
24
25
26
27
28
29
30
31
32
33
34
35
36
37
38
39
40
41
42
43
44
# 编写引导类
package com.ep;

import org.springframework.boot.SpringApplication;
import org.springframework.boot.autoconfigure.SpringBootApplication;
import org.springframework.scheduling.annotation.EnableScheduling;

@SpringBootApplication
@EnableScheduling // 开启定时任务
public class WebMagicItemApplication {

    public static void main(String[] args) {
        SpringApplication.run(WebMagicItemApplication.class, args);
    }

}
2
3
4
5
6
7
8
9
10
11
12
13
14
15
# 功能实现
package com.ep.task;
import com.alibaba.fastjson.JSONArray;
import com.alibaba.fastjson.JSONObject;
import com.ep.dao.JobInfoDao;
import com.ep.pojo.JobInfo;
import org.apache.commons.lang3.StringUtils;
import org.springframework.scheduling.annotation.Scheduled;
import org.springframework.stereotype.Component;
import us.codecraft.webmagic.Page;
import us.codecraft.webmagic.Site;
import us.codecraft.webmagic.Spider;
import us.codecraft.webmagic.processor.PageProcessor;
import us.codecraft.webmagic.scheduler.BloomFilterDuplicateRemover;
import us.codecraft.webmagic.scheduler.QueueScheduler;
/***
* @author dep
* @version 1.0
*/
@Component
public class JobProcess implements PageProcessor {
@Override
public void process(Page page) {
String jsonText = page.getHtml().css("script").regex(".*SEARCH_RESULT.*").get();
//把获取到的数据变成Json对象
if (StringUtils.isNotBlank(jsonText)){
String substring = jsonText.substring(jsonText.indexOf("{"), jsonText.lastIndexOf("}") + 1);
JSONObject parse =(JSONObject) JSONObject.parse(substring);
JSONArray engine_jds = parse.getJSONArray("engine_jds");
page.putField("engine_jds",engine_jds);
if (engine_jds.size()>0){
for (int i = 0; i < engine_jds.size(); i++) {
JSONObject o = (JSONObject)engine_jds.get(i);
JobInfo item=new JobInfo();
item.setCompanyName(o.get("company_name").toString());
item.setCompanyAddr(o.get("workarea_text").toString());
item.setCompanyInfo(o.get("companytype_text").toString()+o.get("companyind_text").toString()+o.get("companysize_text").toString());
item.setJobName(o.get("job_name").toString());
item.setJobAddr(o.get("workarea_text").toString());
item.setJobInfo(o.get("jobwelf").toString());
item.setSalary(o.get("providesalary_text").toString());
item.setUrl(o.get("job_href").toString());
item.setTime(o.get("issuedate").toString());
page.putField("item"+i,item);
}
//获取下一页的数据,加入到任务schedule中
for (int i = 1; i <=5 ; i++) {
System.out.println("第"+i+"次爬虫");
page.addTargetRequest("https://search.51job.com/list/000000,000000,0000,00,9,99,java,2,"+i+".html?lang=c&postchannel=0000&workyear=99&cotype=99°reefrom=99&jobterm=99&companysize=99&ord_field=0&dibiaoid=0&line=&welfare=");
}
}else{
return;//如果没有数据结束爬虫
}
}else{
System.out.println("没爬到数据");
return;
}
}
// 解析页面,获取招聘详情信息,保存数据
private void saveJobInfo(Page page) {
}
private Site site = Site.me()
.setCharset("gbk") // 设置编码
.setTimeOut(10*1000) // 设置超时时间
.setRetrySleepTime(3000) // 设置重试的间隔时间
.addHeader("User-Agent","Mozilla/5.0 (Windows NT 10.0; Win64; x64) AppleWebKit/537.36 (KHTML, like Gecko) Chrome/103.0.0.0 Safari/537.36")
.addCookie("token","152b9b67425a79e7ddbb859db35f1083632dac9e")
.setRetryTimes(3); // 设置重试的次数
@Override
public Site getSite() {
return site;
}
// initialDelay当任务启动后,等等多久执行方法
// fixDelay每个多久执行方法
@Scheduled(initialDelay = 1000, fixedDelay = 100*1000)
public void process() {
// 访问入口url
String url = "https://search.51job.com/list/000000,000000,0000,01%252C32,9,99,java,2,1.html?lang=c&stype=&postchannel=0000&workyear=99&cotype=99°reefrom=99&jobterm=99&companysize=99&providesalary=99&lonlat=0%2C0&radius=-1&ord_field=0&confirmdate=9&fromType=&dibiaoid=0&address=&line=&specialarea=00&from=&welfare=";
Spider.create(new JobProcess())
.addUrl(url)
.setScheduler(new QueueScheduler().setDuplicateRemover(new BloomFilterDuplicateRemover(100000)))
.thread(10)
.run();
}
}
2
3
4
5
6
7
8
9
10
11
12
13
14
15
16
17
18
19
20
21
22
23
24
25
26
27
28
29
30
31
32
33
34
35
36
37
38
39
40
41
42
43
44
45
46
47
48
49
50
51
52
53
54
55
56
57
58
59
60
61
62
63
64
65
66
67
68
69
70
71
72
73
74
75
76
77
78
79
80
81
82
83
84
85
86
87
88
89
90
91
92
93
# 使用和定制Pipeline
在WebMagic中,Pileline是抽取结束后,进行处理的部分,它主要用于抽取结果的保存,也可以定制Pileline可以实现一些通用的功能。在这里我们会定制Pipeline实现数据导入到数据库中
Pipeline输出
Pipeline的接口定义如下:
public interface Pipeline {
  // ResultItems保存了抽取结果,它是一个Map结构,
  // 在page.putField(key,value)中保存的数据,
  //可以通过ResultItems.get(key)获取
  public void process(ResultItems resultItems, Task task);

}
2
3
4
5
6
7
可以看到,Pipeline其实就是将PageProcessor抽取的结果,继续进行了处理的,其实在Pipeline中完成的功能,你基本上也可以直接在PageProcessor实现,那么为什么会有Pipeline?有几个原因:
- 为了模块分离
“页面抽取”和“后处理、持久化”是爬虫的两个阶段,将其分离开来,一个是代码结构比较清晰,另一个是以后也可能将其处理过程分开,分开在独立的线程以至于不同的机器执行。
- Pipeline的功能比较固定,更容易做成通用组件
每个页面的抽取方式千变万化,但是后续处理方式则比较固定,例如保存到文件、保存到数据库这种操作,这些对所有页面都是通用的。
在WebMagic里,一个Spider可以有多个Pipeline,使用Spider.addPipeline()即可增加一个Pipeline。这些Pipeline都会得到处理,例如可以使用
spider.addPipeline(new ConsolePipeline()).addPipeline(new FilePipeline())
实现输出结果到控制台,并且保存到文件的目标。
WebMagic中就已经提供了控制台输出、保存到文件、保存为JSON格式的文件几种通用的Pipeline。
| 类 | 说明 | 备注 |
|---|---|---|
| ConsolePipeline | 输出结果到控制台 | 抽取结果需要实现toString方法 |
| FilePipeline | 保存结果到文件 | 抽取结果需要实现toString方法 |
| JsonFilePipeline | JSON格式保存结果到文件 | |
| ConsolePageModelPipeline | (注解模式)输出结果到控制台 | |
| FilePageModelPipeline | (注解模式)保存结果到文件 | |
| JsonFilePageModelPipeline | (注解模式)JSON格式保存结果到文件 | 想持久化的字段需要有getter方法 |
案例自定义Pipeline导入数据
package com.ep.task;


import com.ep.pojo.JobInfo;
import com.ep.service.JobInfoService;
import net.minidev.json.JSONArray;
import org.springframework.beans.factory.annotation.Autowired;
import org.springframework.stereotype.Component;
import us.codecraft.webmagic.ResultItems;
import us.codecraft.webmagic.Task;
import us.codecraft.webmagic.pipeline.Pipeline;

/***
 * @author dep
 * @version 1.0
 */
@Component
public class SpringDataPipeline implements Pipeline {

    @Autowired
    private JobInfoService jobInfoService;
    @Override
    public void process(ResultItems resultItems, Task task) {
        // 获取封装好的招聘详情对象
        // 如果不为空,就存储到数据库中
        JSONArray engine_jds = resultItems.get("engine_jds");
        for (int i = 0; i < engine_jds.size(); i++) {
            JobInfo jobInfo = resultItems.get("item" + i);
            if (jobInfo != null) {
                // 保存到数据库中
                jobInfoService.save(jobInfo);
            }
        }

    }
}
2
3
4
5
6
7
8
9
10
11
12
13
14
15
16
17
18
19
20
21
22
23
24
25
26
27
28
29
30
31
32
33
34
35
36
# 8.扩展
# 8.1. 定时任务
在案例中我们使用的是Spring内置的Spring Task,这是Spring3.0加入的定时任务功能。我们使用注解的方式定时启动爬虫进行数据爬取。
我们使用的是@Scheduled注解,其属性如下:
1)**cron:**cron表达式,指定任务在特定时间执行;
2)fixedDelay:上一次任务执行完后多久再执行,参数类型为long,单位ms
3)**fixedDelayString:**与fixedDelay含义一样,只是参数类型变为String
4)**fixedRate:**按一定的频率执行任务,参数类型为long,单位ms
5)fixedRateString: 与fixedRate的含义一样,只是将参数类型变为String
6)**initialDelay:**延迟多久再第一次执行任务,参数类型为long,单位ms
7)**initialDelayString:**与initialDelay的含义一样,只是将参数类型变为String
8)**zone:**时区,默认为当前时区,一般没有用到
我们这里的使用比较简单,固定的间隔时间来启动爬虫。例如可以实现项目启动后,每隔一小时启动一次爬虫。
但是有可能业务要求更高,并不是定时定期处理,而是在特定的时间进行处理,这个时候我们之前的使用方式就不能满足需求了。例如我要在工作日(周一到周五)的晚上八点执行。这时我们就需要Cron表达式了。
# 8.1.1. Cron表达式
cron的表达式是字符串,实际上是由七子表达式,描述个别细节的时间表。这些子表达式是分开的空白,代表:
Seconds
Minutes
Hours
Day-of-Month
Month
Day-of-Week
Year (可选字段)
例 "0 0 12 ? * WED" 在每星期三下午12:00 执行,
“*” 代表整个时间段
每一个字段都有一套可以指定有效值,如
Seconds (秒) :可以用数字0-59 表示,
Minutes(分) :可以用数字0-59 表示,
Hours(时) :可以用数字0-23表示,
Day-of-Month(天) :可以用数字1-31 中的任一一个值,但要注意一些特别的月份
Month(月) :可以用0-11 或用字符串:
JAN, FEB, MAR, APR, MAY, JUN, JUL, AUG, SEP, OCT, NOV, DEC
Day-of-Week(天) :可以用数字1-7表示(1 = 星期日)或用字符口串:
SUN, MON, TUE, WED, THU, FRI, SAT
“/”:为特别单位,表示为“每”如“0/15”表示每隔15分钟执行一次,“0”表示为从“0”分开始, “3/20”表示表示每隔20分钟执行一次,“3”表示从第3分钟开始执行
“?”:表示每月的某一天,或第周的某一天
“L”:用于每月,或每周,表示为每月的最后一天,或每个月的最后星期几如“6L”表示“每月的最后一个星期五”
可以使用课堂资料的**CronExpBuilder(表达式生成器)**生成表达式
# 8.1.2Cron测试
先把之前爬虫的@Component注解取消,避免干扰测试
//@Component
public class JobProcessor implements PageProcessor {
2
编写使用Cron表达式的测试用例:
package com.ep.task;

import org.springframework.scheduling.annotation.Scheduled;
import org.springframework.stereotype.Component;

import java.time.LocalDateTime;

/***
 * @author dep
 * @version 1.0
 */
@Component
public class TaskTest {

    @Scheduled(cron = "0/5 * * * * *")
    public void test() {
        System.out.println(LocalDateTime.now() + "任务执行了");
    }
}
2
3
4
5
6
7
8
9
10
11
12
13
14
15
16
17
18
19
# 8.2. 网页去重
之前我们对下载的url地址进行了去重操作,避免同样的url下载多次。其实不光url需要去重,我们对下载的内容也需要去重。
在网上我们可以找到许多内容相似的文章。但是实际我们只需要其中一个即可,同样的内容没有必要下载多次,那么如何进行去重就需要进行处理了
# 8.2.1. 去重方案介绍
指纹码对比
最常见的去重方案是生成文档的指纹门。例如对一篇文章进行MD5加密生成一个字符串,我们可以认为这是文章的指纹码,再和其他的文章指纹码对比,一致则说明文章重复。
但是这种方式是完全一致则是重复的,如果文章只是多了几个标点符号,那仍旧被认为是重复的,这种方式并不合理。
BloomFilter
这种方式就是我们之前对url进行去重的方式,使用在这里的话,也是对文章进行计算得到一个数,再进行对比,缺点和方法1是一样的,如果只有一点点不一样,也会认为不重复,这种方式不合理。
KMP算法
KMP算法是一种改进的字符串匹配算法。KMP算法的关键是利用匹配失败后的信息,尽量减少模式串与主串的匹配次数以达到快速匹配的目的。能够找到两个文章有哪些是一样的,哪些不一样。
这种方式能够解决前面两个方式的“只要一点不一样就是不重复”的问题。但是它的时空复杂度太高了,不适合大数据量的重复比对。
还有一些其他的去重方式:最长公共子串、后缀数组、字典树、DFA等等,但是这些方式的空复杂度并不适合数据量较大的工业应用场景。我们需要找到一款性能高速度快,能够进行相似度对比的去重方案
Google 的 simhash 算法产生的签名,可以满足上述要求。这个算法并不深奥,比较容易理解。这种算法也是目前Google搜索引擎所目前所使用的网页去重算法。
# 8.2.2. SimHash
# 流程介绍
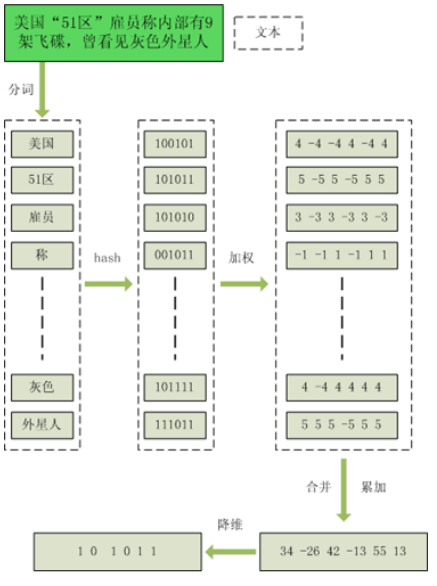
simhash是由 Charikar 在2002年提出来的,为了便于理解尽量不使用数学公式,分为这几步:
1、分词,把需要判断文本分词形成这个文章的特征单词。
2、hash,通过hash算法把每个词变成hash值,比如“美国”通过hash算法计算为 100101,“51区”通过hash算法计算为 101011。这样我们的字符串就变成了一串串数字。
3、加权,通过 2步骤的hash生成结果,需要按照单词的权重形成加权数字串,“美国”的hash值为“100101”,通过加权计算为“4 -4 -4 4 -4 4”
“51区”计算为 “ 5 -5 5 -5 5 5”。
4、合并,把上面各个单词算出来的序列值累加,变成只有一个序列串。
“美国”的 “4 -4 -4 4 -4 4”,“51区”的 “ 5 -5 5 -5 5 5”
把每一位进行累加, “4+5 -4+-5 -4+5 4+-5 -4+5 4+5”à“9 -9 1 -1 1 9”
5、降维,把算出来的 “9 -9 1 -1 1 9”变成 0 1 串,形成最终的simhash签名。
签名距离计算
我们把库里的文本都转换为simhash签名,并转换为long类型存储,空间大大减少。现在我们虽然解决了空间,但是如何计算两个simhash的相似度呢?
我们通过海明距离(Hamming distance)就可以计算出两个simhash到底相似不相似。两个simhash对应二进制(01串)取值不同的数量称为这两个simhash的海明距离。
举例如下: 10101 和 00110 从第一位开始依次有第一位、第四、第五位不同,则海明距离为3。对于二进制字符串的a和b,海明距离为等于在a XOR b运算结果中1的个数(普遍算法)。
导入simhash工程
参考项目:https://github.com/CreekLou/simhash.git
这个项目不能直接使用,因为jar包的问题,需要进行改造。这里使用课堂资料中已经改造好的。
# 8.3 代理的使用
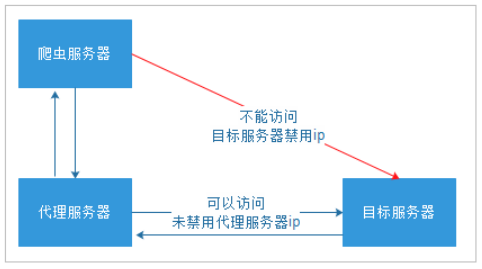
有些网站不允许爬虫进行数据爬取,因为会加大服务器的压力。其中一种最有效的方式是通过ip+时间进行鉴别,因为正常人不可能短时间开启太多的页面,发起太多的请求。
我们使用的WebMagic可以很方便的设置爬取数据的时间(参考第二天的的3.1. 爬虫的配置、启动和终止)。但是这样会大大降低我们爬取数据的效率,如果不小心ip被禁了,会让我们无法爬去数据,那么我们就有必要使用代理服务器来爬取数据。
# 8.3.1. 代理服务器
代理(英语:Proxy),也称网络代理,是一种特殊的网络服务,允许一个网络终端(一般为客户端)通过这个服务与另一个网络终端(一般为服务器)进行非直接的连接。
提供代理服务的电脑系统或其它类型的网络终端称为代理服务器(英文:Proxy Server)。一个完整的代理请求过程为:客户端首先与代理服务器创建连接,接着根据代理服务器所使用的代理协议,请求对目标服务器创建连接、或者获得目标服务器的指定资源。
我们就需要知道代理服务器在哪里(ip和端口号)才可以使用。网上有很多代理服务器的提供商,但是大多是免费的不好用,付费的还行。
提供两个免费代理ip的服务商网站:
米扑代理
https://proxy.mimvp.com/free.php
西刺免费代理IP
http://www.xicidaili.com/
上面两个失效了
http://www.66ip.cn/
# 8.3.2. 使用代理
WebMagic使用的代理APIProxyProvider。因为相对于Site的“配置”,ProxyProvider定位更多是一个“组件”,所以代理不再从Site设置,而是由HttpClientDownloader设置。
| API | 说明 |
|---|---|
| HttpClientDownloader.setProxyProvider(ProxyProvider proxyProvider) | 设置代理 |
ProxyProvider有一个默认实现:SimpleProxyProvider。它是一个基于简单Round-Robin的、没有失败检查的ProxyProvider。可以配置任意个候选代理,每次会按顺序挑选一个代理使用。它适合用在自己搭建的比较稳定的代理的场景。
如果需要根据实际使用情况对代理服务器进行管理(例如校验是否可用,定期清理、添加代理服务器等),只需要自己实现APIProxyProvider即可。
可以访问网址http://ip.json-json.com/ 测试当前请求的ip
为了避免干扰,把其他任务的@Component注释掉,在案例中加入编写以下逻辑:
package com.ep.task;

import org.springframework.scheduling.annotation.Scheduled;
import org.springframework.stereotype.Component;
import us.codecraft.webmagic.Page;
import us.codecraft.webmagic.Site;
import us.codecraft.webmagic.Spider;
import us.codecraft.webmagic.downloader.HttpClientDownloader;
import us.codecraft.webmagic.processor.PageProcessor;
import us.codecraft.webmagic.proxy.Proxy;
import us.codecraft.webmagic.proxy.SimpleProxyProvider;

/***
 * @author dep
 * @version 1.0
 */
@Component
public class ProxyTest implements PageProcessor {
    @Scheduled(fixedDelay = 1000*10)
    public void Process() {
        // 创建下载器Downloader
        HttpClientDownloader httpClientDownloader = new HttpClientDownloader();
        // 给下载器设置代理服务器信息
        httpClientDownloader.setProxyProvider(SimpleProxyProvider.from(new Proxy("124.156.100.83",8118)));
        Spider.create(new ProxyTest())
                .addUrl("http://ip.json-json.com/")
                .setDownloader(httpClientDownloader) // 设置下载器
                .run();
    }

    @Override
    public void process(Page page) {
        System.out.println(page.getHtml().css("body").toString());
    }

    private Site site = Site.me();
    @Override
    public Site getSite() {
        return site;
    }
}
2
3
4
5
6
7
8
9
10
11
12
13
14
15
16
17
18
19
20
21
22
23
24
25
26
27
28
29
30
31
32
33
34
35
36
37
38
39
40
41
42