 从0搭建后台管理系统
从0搭建后台管理系统
# 项目初始化
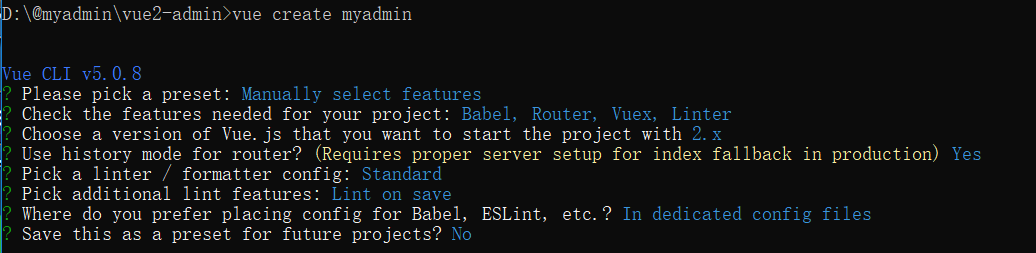
# 创建项目
vue create 项目名称
手动选择项目特性 :Manually select features
选择Vue项目必要的插件Vue Router,Babel,Vuex, Linter
选择项目为vue2.x版本
不选择history模式的前端路由(即选择hash模式)
选择standard ESLint一来规范项目代码
让ESLint在代码保存时工作:Lint on save
选择将ESLint,Babel等插件的配置放在单独的文件中:In dedicated config files
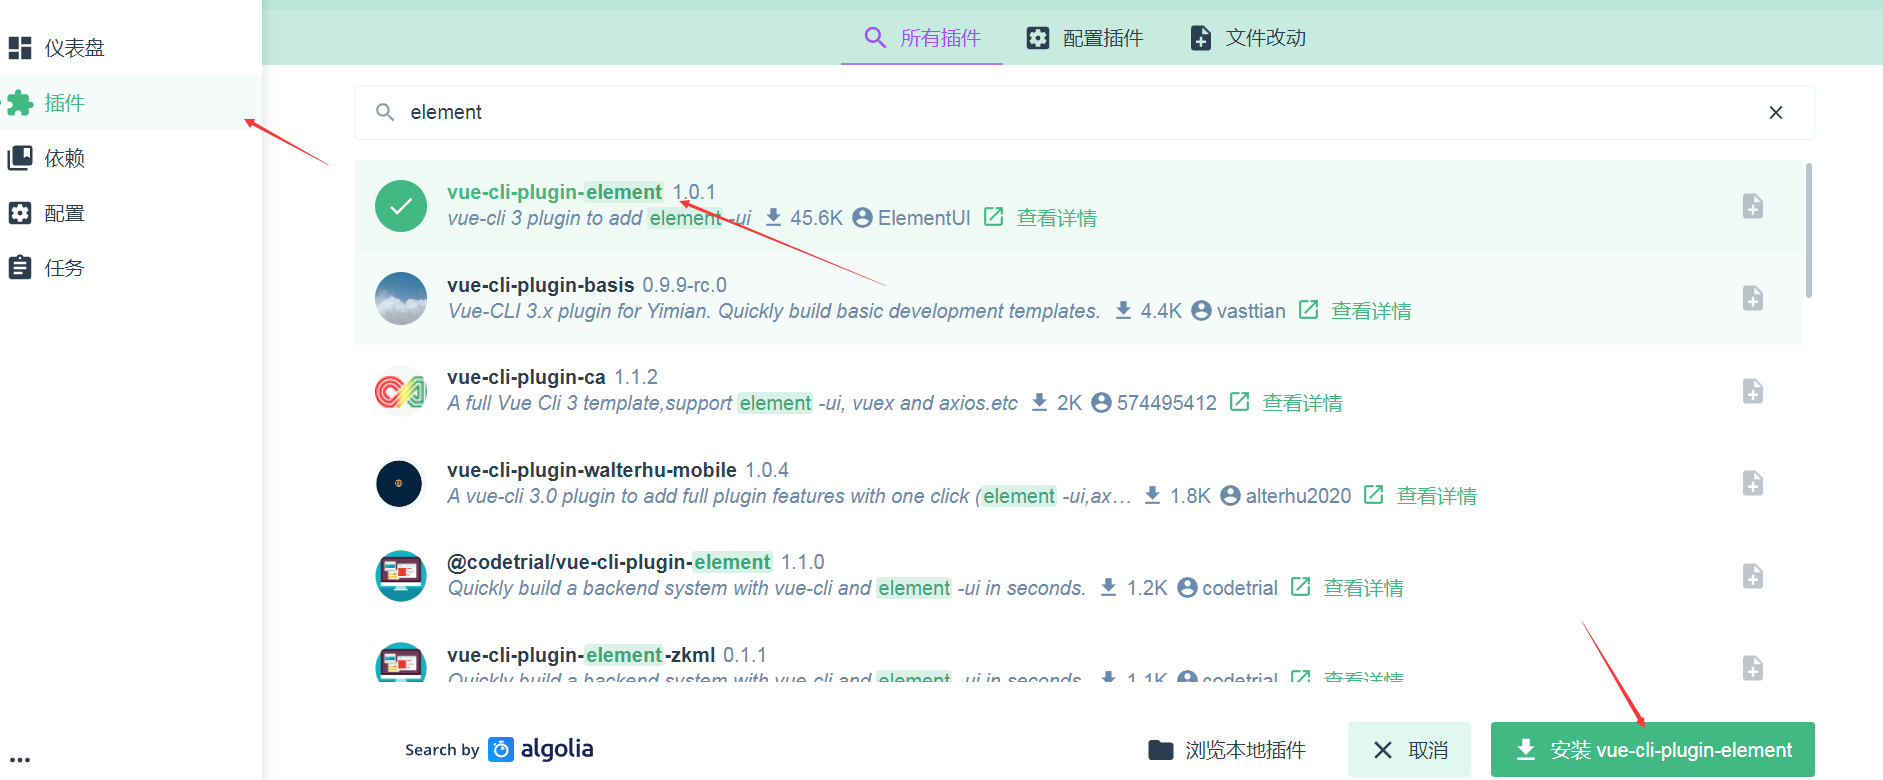
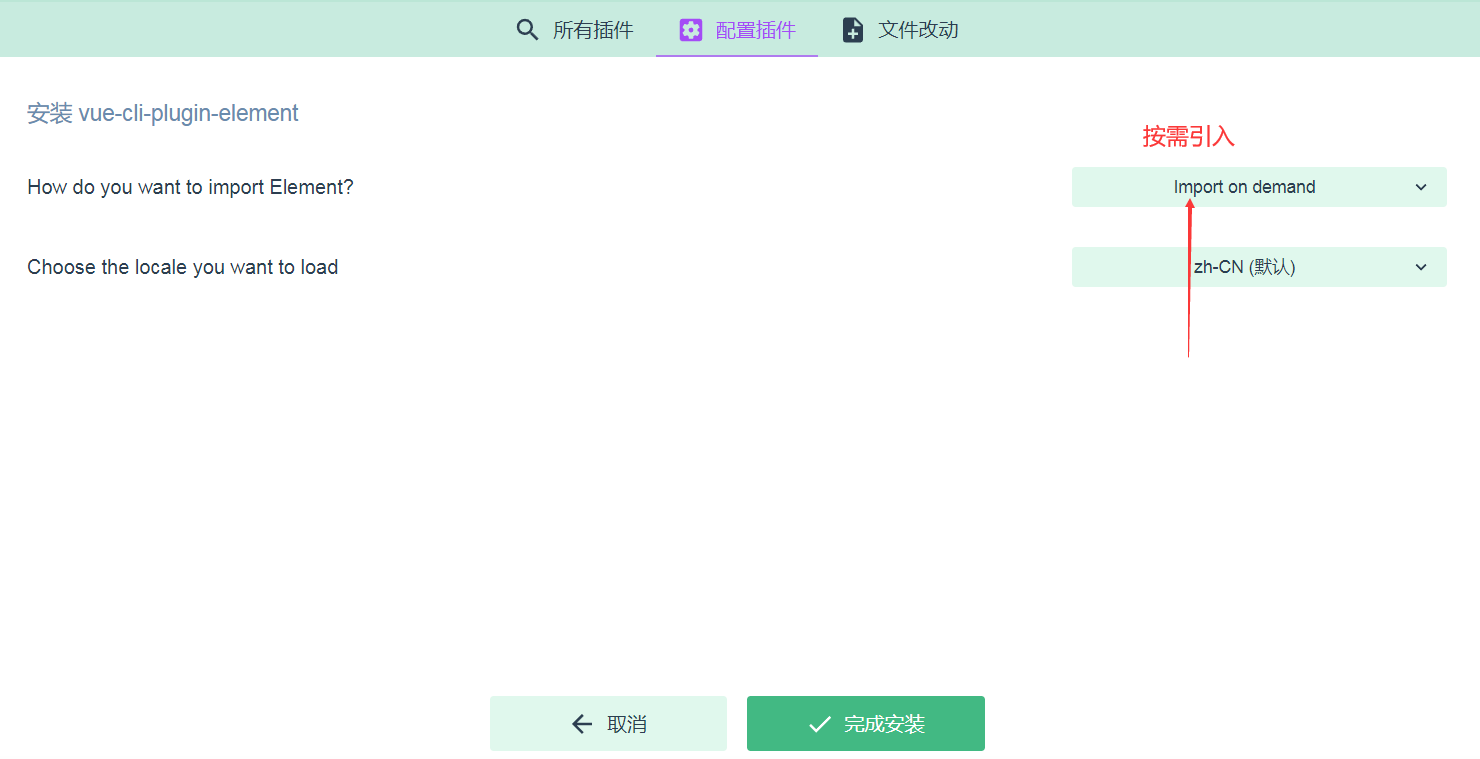
# 安装element-ui
使用vue ui进入图形化界面安装
推荐按需引入的方式
手动安装:
https://element.eleme.io/#/zh-CN/component/quickstart
npm i element-ui -S
在src下建文件:src->plugins->element.js
import Vue from 'vue'
import { Button } from 'element-ui'

Vue.use(Button)
2
3
4
main.js
import './plugins/element.js'
最后选择了全局引入element-ui,因为要用到el-scrollbar
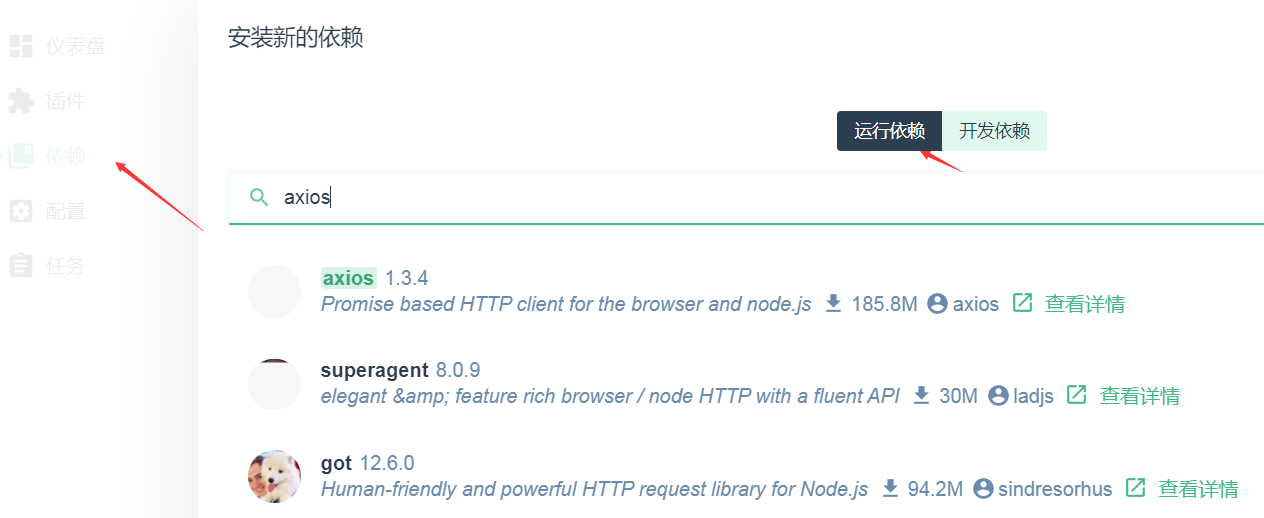
# 安装axios库
依赖->安装依赖->运行依赖->axios
手动安装:
-save-dev是指将包信息添加到 package.json 里的 devDependencies节点,表示开发时依赖的包。
-save是指将包信息添加到 package.json 里的dependencies节点,表示发布时依赖的包。
npm install axios --save
# 在安装过程中遇到eslint版本太高
npm install axios --force 或者 npm install axios --legacy-peer-dep
2
3
- 一是 --force 无视冲突,强制获取远端npm库资源 (覆盖之前)
- 二是 --legacy-peer-deps 忽视依赖冲突,继续安装(不覆盖之前)
# 目录结构
├── build                      # 构建相关
├── mock                       # 项目mock 模拟数据
├── plop-templates             # 基本模板
├── public                     # 静态资源
│   │── favicon.ico            # favicon图标
│   └── index.html             # html模板
├── src                        # 源代码
│   ├── api                    # 所有请求
│   ├── assets                 # 主题 字体等静态资源
│   ├── components             # 全局公用组件
│   ├── directive              # 全局指令
│   ├── filters                # 全局 filter
│   ├── icons                  # 项目所有 svg icons
│   ├── lang                   # 国际化 language
│   ├── plugins                # 插件
│   ├── layout                 # 全局 layout
│   ├── router                 # 路由
│   ├── store                  # 全局 store管理
│   ├── styles                 # 全局样式
│   ├── utils                  # 全局公用方法
│   ├── vendor                 # 公用vendor
│   ├── views                  # views 所有页面
│   ├── App.vue                # 入口页面
│   ├── main.js                # 入口文件 加载组件 初始化等
│   └── permission.js          # 权限管理
├── tests                      # 测试
├── .env.xxx                   # 环境变量配置 (production生产者 development开发者)
├── .eslintrc.js               # eslint 配置项
├── .babelrc                   # babel-loader 配置
├── .prettier.config.js        # 代码格式化
├── .travis.yml                # 自动化CI配置
├── vue.config.js              # vue-cli 配置
├── postcss.config.js          # postcss 配置
└── package.json               # package.json
2
3
4
5
6
7
8
9
10
11
12
13
14
15
16
17
18
19
20
21
22
23
24
25
26
27
28
29
30
31
32
33
34
35
# 全局样式表
src->style->index.scss
html,
body,
#app{
  height: 100%;
  margin: 0;
  padding: 0;
}
h1,h2,h3,h4,h5,h6,ul,p {
  margin: 0;
  padding: 0;
}

a:focus,
a:active {
  outline: none;
}

a,
a:focus,
a:hover {
  cursor: pointer;
  color: inherit;
  text-decoration: none;
}

div:focus {
  outline: none;
}

.fr {
  float: right;
}

.fl {
  float: left;
}

ul {
  list-style: none;
}
2
3
4
5
6
7
8
9
10
11
12
13
14
15
16
17
18
19
20
21
22
23
24
25
26
27
28
29
30
31
32
33
34
35
36
37
38
39
40
# 设置基础信息
src->setting.js
module.exports = {
  /**
   * @description 网站标题
   */
  zhTitle: '爱写bug的小邓程序员',
  enTitle: 'Vue-admin',
  /***
   * @description 网站logo
   */
  logo: 'https://blog-1300527744.cos-website.ap-chongqing.myqcloud.com/img/icon.png',
  /**
   * @description 是否显示 tagsView
   */
  tagsView: true,
  /**
   * @description 固定头部
   */
  fixedHeader: true,
  /**
   * @description 记住密码状态下的token在Cookie中存储的天数,默认1天
   */
  tokenCookieExpires: 1,
  /**
   * @description 记住密码状态下的密码在Cookie中存储的天数,默认1天s
   */
  passCookieExpires: 1,
  /**
   * @description token key
   */
  TokenKey: 'token',
  /**
   * token时间戳
   */
  TIME_STAMP: 'timeStamp',
  /**
   * token过期时间 2小时
   */
  TOKEN_TIMEOUT_VALUE: 2 * 3600 * 1000,
  /**
   * @description 请求超时时间,毫秒(默认2分钟)
   */
  timeout: 1200000,
  /**
   * @description 是否显示logo
   */
  sidebarLogo: true,
  /**
   * 是否显示设置的底部信息
   */
  showFooter: true,
  /**
   * 底部文字,支持html语法
   */
  footerTxt: '© 2018-2022',
  /**
   * 备案号
   */
  caseNumber: '',
  /**
   * 默认主题色
   */
  DEFAULT_THEME_COLOR: '#409eff'
}
2
3
4
5
6
7
8
9
10
11
12
13
14
15
16
17
18
19
20
21
22
23
24
25
26
27
28
29
30
31
32
33
34
35
36
37
38
39
40
41
42
43
44
45
46
47
48
49
50
51
52
53
54
55
56
57
58
59
60
61
62
63
64
# 配置vue.config.js
'use strict'
const path = require('path')
const defaultSettings = require('./src/settings')
// @vue/cli-service 提供的 defineConfig 帮手函数,以获得更好的类型提示
const { defineConfig } = require('@vue/cli-service')

const NodePolyfillPlugin = require('node-polyfill-webpack-plugin')

const name = defaultSettings.title || 'vue2-admin'

function resolve (dir) {
  return path.join(__dirname, dir)
}

module.exports = defineConfig({
  devServer: {
    proxy: {
      '/dev-api': { // 匹配所有以/dev-api开头的请求路径
        target: 'http://localhost:8000', // 代理目标的基础路径
        changeOrigin: true,
        pathRewrite: { '^/dev-api': '' }
      }
    }
  },
  transpileDependencies: true,
  configureWebpack: {
    name: name,
    resolve: {
      alias: {
        // src别名配置
        '@': resolve('src')
      }
    },
    plugins: [new NodePolyfillPlugin()]
  }
})
2
3
4
5
6
7
8
9
10
11
12
13
14
15
16
17
18
19
20
21
22
23
24
25
26
27
28
29
30
31
32
33
34
35
36
37
# 跨域配置
.env.development
ENV = 'development'

# base api
VUE_APP_BASE_API = '/dev-api'
2
3
4
.env.production
ENV = 'production'

# base api
VUE_APP_BASE_API = '/prod-api'
2
3
4
vue.config.js
module.exports = defineConfig({
  devServer: {
    proxy: {
      '/dev-api': {
        // 匹配所有以/dev-api开头的请求路径
        target: 'http://localhost:8000', // 代理目标的基础路径
        changeOrigin: true,
        pathRewrite: { '^/dev-api': '' }
      }
    }
  }
})
2
3
4
5
6
7
8
9
10
11
12
# 封装token相关方法
需要先搞懂几个问题
- token要存储在
cookie还是localSorage中? - 为什么token还要在vuex里面存一份?
- (使用localStorage存储)改进参考文章自己封装【加密存储token】在localStorage带有过期时间 (opens new window)
本地缓存
utils->store.js (封装处理localStorage相关方法)
/**
 * 存储数据
 * @param key
 * @param value
 */
export const setItem = (key, value) => {
  // 将数组、对象类型的数据转化为 JSON 字符串进行存储
  if (typeof value === 'object') {
    value = JSON.stringify(value)
  }
  window.localStorage.setItem(key, value)
}

/***
 * 获取数据
 * @param key
 * @returns {string|any}
 */
export const getItem = (key) => {
  const data = window.localStorage.getItem(key)
  try {
    return JSON.parse(data)
  } catch (err) {
    return data
  }
}

/**
 * 删除数据
 * @param key
 */
export const removeItem = (key) => {
  window.localStorage.removeItem(key)
}

/***
 * 删除所有数据
 */
export const removeAll = () => {
  window.localStorage.clear()
}
2
3
4
5
6
7
8
9
10
11
12
13
14
15
16
17
18
19
20
21
22
23
24
25
26
27
28
29
30
31
32
33
34
35
36
37
38
39
40
41
42
# vueX模块化
store->index.js
import Vue from 'vue'
import Vuex from 'vuex'
import getters from './getters.js'

Vue.use(Vuex)

// 获取modules下的所有文件
const modulesFiles = require.context('./modules', true, /\.js$/)

// 匹配modules下所有的文件,这样就不用一个个手动导入了
const modules = modulesFiles.keys().reduce((modules, modulePath) => {
  // set './app.js' => 'app'
  const moduleName = modulePath.replace(/^\.\/(.*)\.\w+$/, '$1')
  const value = modulesFiles(modulePath)
  modules[moduleName] = value.default
  return modules
}, {})

const store = new Vuex.Store({
  modules,
  getters
})

export default store
2
3
4
5
6
7
8
9
10
11
12
13
14
15
16
17
18
19
20
21
22
23
24
25
src->getters.js (创建快捷访问)
// getters 监听state对象的值的最新状态(计算属性)
const getters = {
  token: state => state.user.token
}
// 用上面简写的形式
// const getters = {
//   getToken(state) {
//     return state.user.token
//   }
// }
export default getters
2
3
4
5
6
7
8
9
10
11
12
src->modules->user.js
const user = {
  namespaced: true,
  // 全局state对象,用于保存所有组件的公共数据
  state: {
  },
  // 唯——个可以修改state值的方法(同步执行)
  mutations: {

  },
  actions: {

  }
}

export default user
2
3
4
5
6
7
8
9
10
11
12
13
14
15
16
# 封装axios
src->utils->request.js
import axios from 'axios'
import { Message } from 'element-ui'
import store from '@/store/index.js'
import { isCheckTimeout } from '@/utils/auth'
import i18n from '@/lang'

// 创建axios实例
const service = axios.create({
  baseURL: process.env.VUE_APP_BASE_API, // url = baseURL + requestURL
  timeout: 5000
})

const TOKEN = 'token'

// 请求拦截
service.interceptors.request.use(
  (config) => {
    if (store.getters.token) {
      // token已经过期(主动处理)
      if (isCheckTimeout()) {
        store.dispatch('user/logout')
        return Promise.reject(new Error(i18n.t('globalInfo.invalidity')))
      }
      // 每次请求将token携带过去
      config.headers[TOKEN] = store.getters.token
    }
    return config
  },
  (error) => {
    console.log(error)
    return Promise.reject(error)
  }
)

// 响应拦截
service.interceptors.response.use(
  (response) => {
    const res = response.data
    if (res.code !== 200) {
      Message({
        message: res.message || 'Error',
        type: 'error',
        duration: 5 * 1000
      })
      // 401 认证失败(token过期或失效或非法) 403 权限不足
      if (res.code === 401) {
        store.dispatch('user/logout')
      }
    } else {
      return res
    }
  },
  (error) => {
    Message({
      message: error.message || 'Error',
      type: 'error',
      duration: 5 * 1000
    })
    return Promise.reject(error)
  }
)

export default service
2
3
4
5
6
7
8
9
10
11
12
13
14
15
16
17
18
19
20
21
22
23
24
25
26
27
28
29
30
31
32
33
34
35
36
37
38
39
40
41
42
43
44
45
46
47
48
49
50
51
52
53
54
55
56
57
58
59
60
61
62
63
src->api->user.js
import request from '@/utils/request'

/***
 * 登陆请求
 * @param username 用户名
 * @param password 密码
 * @param code 验证码
 * @param uuid
 * @returns {*}
 */
export function login (username, password) {
  return request({
    url: '/login',
    method: 'post',
    data: {
      username,
      password
    }
  })
}

/**
 * 退出登陆(退出登陆时不需要调用接口)
 * @returns {*}
 */
export function logout () {
  return request({
    url: '/logout'
  })
}
2
3
4
5
6
7
8
9
10
11
12
13
14
15
16
17
18
19
20
21
22
23
24
25
26
27
28
29
30
# 代码规范
- 编码规范
- git规范
# 代码检测工具ESLint
官方文档:https://zh-hans.eslint.org/docs/latest/rules/
项目中的.eslintrc.js
// ESLint 配置文件遵循 commonJS 的导出规则,所导出的对象就是 ESLint 的配置对象
module.exports = {
  root: true, // 表示当前目录即为根目录,ESLint 规则将被限制到该目录下
  env: { // env 表示启用 ESLint 检测的环境
    node: true // 在 node 环境下启动 ESLint 检测
  },
  extends: [ // ESLint 中基础配置需要继承的配置
    'plugin:vue/essential',
    '@vue/standard'
  ],
  parserOptions: { // 解析器
    parser: '@babel/eslint-parser'
  },
  // 需要修改的启用规则及其各自的错误级别
  /**
   * 错误级别分为三种:
   * "off" 或 0 - 关闭规则
   * "warn" 或 1 - 开启规则,使用警告级别的错误:warn (不会导致程序退出)
   * "error" 或 2 - 开启规则,使用错误级别的错误:error (当被触发的时候,程序会退出)
   */
  rules: {
    'no-console': process.env.NODE_ENV === 'production' ? 'warn' : 'off',
    'no-debugger': process.env.NODE_ENV === 'production' ? 'warn' : 'off'
  }
}
2
3
4
5
6
7
8
9
10
11
12
13
14
15
16
17
18
19
20
21
22
23
24
25
ESLint常用规则
{
    "no-alert": 0, // 禁止使用alert confirm prompt
    "no-array-constructor": 2, // 禁止使用数组构造器
    "no-bitwise": 0, // 禁止使用按位运算符
    "no-caller": 1, // 禁止使用arguments.caller或arguments.callee
    "no-catch-shadow": 2, // 禁止catch子句参数与外部作用域变量同名
    "no-class-assign": 2, // 禁止给类赋值
    "no-cond-assign": 2, // 禁止在条件表达式中使用赋值语句
    "no-console": 2, // 禁止使用console
    "no-const-assign": 2, // 禁止修改const声明的变量
    "no-constant-condition": 2, // 禁止在条件中使用常量表达式 if(true) if(1)
    "no-continue": 0, // 禁止使用continue
    "no-control-regex": 2, // 禁止在正则表达式中使用控制字符
    "no-debugger": 2, // 禁止使用debugger
    "no-delete-var": 2, // 不能对var声明的变量使用delete操作符
    "no-div-regex": 1, // 不能使用看起来像除法的正则表达式/=foo/
    "no-dupe-keys": 2, // 在创建对象字面量时不允许键重复
    "no-dupe-args": 2, // 函数参数不能重复
    "no-duplicate-case": 2, // switch中的case标签不能重复
    "no-else-return": 2, // 如果if语句里面有return,后面不能跟else语句
    "no-empty": 2, // 块语句中的内容不能为空
    "no-empty-character-class": 2, // 正则表达式中的[]内容不能为空
    "no-empty-label": 2, // 禁止使用空label
    "no-eq-null": 2, // 禁止对null使用==或!=运算符
    "no-eval": 1, // 禁止使用eval
    "no-ex-assign": 2, // 禁止给catch语句中的异常参数赋值
    "no-extend-native": 2, // 禁止扩展native对象
    "no-extra-bind": 2, // 禁止不必要的函数绑定
    "no-extra-boolean-cast": 2, // 禁止不必要的bool转换
    "no-extra-parens": 2, // 禁止非必要的括号
    "no-extra-semi": 2, // 禁止多余的冒号
    "no-fallthrough": 1, // 禁止switch穿透
    "no-floating-decimal": 2, // 禁止省略浮点数中的0 .5 3.
    "no-func-assign": 2, // 禁止重复的函数声明
    "no-implicit-coercion": 1, // 禁止隐式转换
    "no-implied-eval": 2, // 禁止使用隐式eval
    "no-inline-comments": 0, // 禁止行内备注
    "no-inner-declarations": [2, "functions"], // 禁止在块语句中使用声明(变量或函数)
    "no-invalid-regexp": 2, // 禁止无效的正则表达式
    "no-invalid-this": 2, // 禁止无效的this,只能用在构造器,类,对象字面量
    "no-irregular-whitespace": 2, // 不能有不规则的空格
    "no-iterator": 2, // 禁止使用__iterator__ 属性
    "no-label-var": 2, // label名不能与var声明的变量名相同
    "no-labels": 2, // 禁止标签声明
    "no-lone-blocks": 2, // 禁止不必要的嵌套块
    "no-lonely-if": 2, // 禁止else语句内只有if语句
    "no-loop-func": 1, // 禁止在循环中使用函数(如果没有引用外部变量不形成闭包就可以)
    "no-mixed-requires": [0, false], // 声明时不能混用声明类型
    "no-mixed-spaces-and-tabs": [2, false], // 禁止混用tab和空格
    "linebreak-style": [0, "windows"], // 换行风格
    "no-multi-spaces": 1, // 不能用多余的空格
    "no-multi-str": 2, // 字符串不能用\换行
    "no-multiple-empty-lines": [1, "max": 2}], // 空行最多不能超过2行
    "no-native-reassign": 2, // 不能重写native对象
    "no-negated-in-lhs": 2, // in 操作符的左边不能有!
    "no-nested-ternary": 0, // 禁止使用嵌套的三目运算
    "no-new": 1, // 禁止在使用new构造一个实例后不赋值
    "no-new-func": 1, // 禁止使用new Function
    "no-new-object": 2, // 禁止使用new Object()
    "no-new-require": 2, // 禁止使用new require
    "no-new-wrappers": 2, // 禁止使用new创建包装实例,new String new Boolean new Number
    "no-obj-calls": 2, // 不能调用内置的全局对象,比如Math() JSON()
    "no-octal": 2, // 禁止使用八进制数字
    "no-octal-escape": 2, // 禁止使用八进制转义序列
    "no-param-reassign": 2, // 禁止给参数重新赋值
    "no-path-concat": 0, // node中不能使用__dirname或__filename做路径拼接
    "no-plusplus": 0, // 禁止使用++,--
    "no-process-env": 0, // 禁止使用process.env
    "no-process-exit": 0, // 禁止使用process.exit()
    "no-proto": 2, // 禁止使用__proto__属性
    "no-redeclare": 2, // 禁止重复声明变量
    "no-regex-spaces": 2, // 禁止在正则表达式字面量中使用多个空格 /foo bar/
    "no-restricted-modules": 0, // 如果禁用了指定模块,使用就会报错
    "no-return-assign": 1, // return 语句中不能有赋值表达式
    "no-script-url": 0, // 禁止使用javascript:void(0)
    "no-self-compare": 2, // 不能比较自身
    "no-sequences": 0, // 禁止使用逗号运算符
    "no-shadow": 2, // 外部作用域中的变量不能与它所包含的作用域中的变量或参数同名
    "no-shadow-restricted-names": 2, // 严格模式中规定的限制标识符不能作为声明时的变量名使用
    "no-spaced-func": 2, // 函数调用时 函数名与()之间不能有空格
    "no-sparse-arrays": 2, // 禁止稀疏数组, [1,,2]
    "no-sync": 0, // nodejs 禁止同步方法
    "no-ternary": 0, // 禁止使用三目运算符
    "no-trailing-spaces": 1, // 一行结束后面不要有空格
    "no-this-before-super": 0, // 在调用super()之前不能使用this或super
    "no-throw-literal": 2, // 禁止抛出字面量错误 throw error;
    "no-undef": 1, // 不能有未定义的变量
    "no-undef-init": 2, // 变量初始化时不能直接给它赋值为undefined
    "no-undefined": 2, // 不能使用undefined
    "no-unexpected-multiline": 2, // 避免多行表达式
    "no-underscore-dangle": 1, // 标识符不能以_开头或结尾
    "no-unneeded-ternary": 2, // 禁止不必要的嵌套 var isYes = answer === 1 ? true : false;
    "no-unreachable": 2, // 不能有无法执行的代码
    "no-unused-expressions": 2, // 禁止无用的表达式
    "no-unused-vars": [2, {"vars": "all", "args": "after-used"}], // 不能有声明后未被使用的变量或参数
    "no-use-before-define": 2, // 未定义前不能使用
    "no-useless-call": 2, // 禁止不必要的call和apply
    "no-void": 2, // 禁用void操作符
    "no-var": 0, // 禁用var,用let和const代替
    "no-warning-comments": [1, { "terms": ["todo", "fixme", "xxx"], "location": "start" }], // 不能有警告备注
    "no-with": 2, // 禁用with
    "array-bracket-spacing": [2, "never"], // 是否允许非空数组里面有多余的空格
    "arrow-parens": 0, // 箭头函数用小括号括起来
    "arrow-spacing": 0, // =>的前/后括号
    "accessor-pairs": 0, // 在对象中使用getter/setter
    "block-scoped-var": 0, // 块语句中使用var
    "brace-style": [1, "1tbs"], // 大括号风格
    "callback-return": 1, // 避免多次调用回调什么的
    "camelcase": 2, // 强制驼峰法命名
    "comma-dangle": [2, "never"], // 对象字面量项尾不能有逗号
    "comma-spacing": 0, // 逗号前后的空格
    "comma-style": [2, "last"], // 逗号风格,换行时在行首还是行尾
    "complexity": [0, 11], // 循环复杂度
    "computed-property-spacing": [0, "never"], // 是否允许计算后的键名什么的
    "consistent-return": 0, // return 后面是否允许省略
    "consistent-this": [2, "that"], // this别名
    "constructor-super": 0, // 非派生类不能调用super,派生类必须调用super
    "curly": [2, "all"], // 必须使用 if 中的大括号
    "default-case": 2, // switch语句最后必须有default
    "dot-location": 0, // 对象访问符的位置,换行的时候在行首还是行尾
    "dot-notation": [0, { "allowKeywords": true }], // 避免不必要的方括号
    "eol-last": 0, // 文件以单一的换行符结束
    "eqeqeq": 2, // 必须使用全等
    "func-names": 0, // 函数表达式必须有名字
    "func-style": [0, "declaration"], // 函数风格,规定只能使用函数声明/函数表达式
    "generator-star-spacing": 0, // 生成器函数*的前后空格
    "guard-for-in": 0, // for in循环要用if语句过滤
    "handle-callback-err": 0, // nodejs 处理错误
    "id-length": 0, // 变量名长度
    "indent": [2, 4], // 缩进风格
    "init-declarations": 0, // 声明时必须赋初值
    "key-spacing": [0, { "beforeColon": false, "afterColon": true }], // 对象字面量中冒号的前后空格
    "lines-around-comment": 0, // 行前/行后备注
    "max-depth": [0, 4], // 嵌套块深度
    "max-len": [0, 80, 4], // 字符串最大长度
    "max-nested-callbacks": [0, 2], // 回调嵌套深度
    "max-params": [0, 3], // 函数最多只能有3个参数
    "max-statements": [0, 10], // 函数内最多有几个声明
    "new-cap": 2, // 函数名首行大写必须使用new方式调用,首行小写必须用不带new方式调用
    "new-parens": 2, // new时必须加小括号
    "newline-after-var": 2, // 变量声明后是否需要空一行
    "object-curly-spacing": [0, "never"], // 大括号内是否允许不必要的空格
    "object-shorthand": 0, // 强制对象字面量缩写语法
    "one-var": 1, // 连续声明
    "operator-assignment": [0, "always"], // 赋值运算符 += -=什么的
    "operator-linebreak": [2, "after"], // 换行时运算符在行尾还是行首
    "padded-blocks": 0, // 块语句内行首行尾是否要空行
    "prefer-const": 0, // 首选const
    "prefer-spread": 0, // 首选展开运算
    "prefer-reflect": 0, // 首选Reflect的方法
    "quotes": [1, "single"], // 引号类型 `` ''
    "quote-props":[2, "always"], // 对象字面量中的属性名是否强制双引号
    "radix": 2, // parseInt必须指定第二个参数
    "id-match": 0, // 命名检测
    "require-yield": 0, // 生成器函数必须有yield
    "semi": [2, "always"], // 语句强制分号结尾
    "semi-spacing": [0, {"before": false, "after": true}], // 分号前后空格
    "sort-vars": 0, // 变量声明时排序
    "space-after-keywords": [0, "always"], // 关键字后面是否要空一格
    "space-before-blocks": [0, "always"], // 不以新行开始的块前面要不要有空格
    "space-before-function-paren": [0, "always"], // 函数定义时括号前面要不要有空格
    "space-in-parens": [0, "never"], // 小括号里面要不要有空格
    "space-infix-ops": 0, // 中缀操作符周围要不要有空格
    "space-return-throw-case": 2, // return throw case后面要不要加空格
    "space-unary-ops": [0, { "words": true, "nonwords": false }], // 一元运算符的前/后要不要加空格
    "spaced-comment": 0, // 注释风格要不要有空格什么的
    "strict": 2, // 使用严格模式
    "use-isnan": 2, // 禁止比较时使用NaN,只能用isNaN()
    "valid-jsdoc": 0, // jsdoc规则
    "valid-typeof": 2, // 必须使用合法的typeof的值
    "vars-on-top": 2, // var必须放在作用域顶部
    "wrap-iife": [2, "inside"], // 立即执行函数表达式的小括号风格
    "wrap-regex": 0, // 正则表达式字面量用小括号包起来
    "yoda": [2, "never"]// 禁止尤达条件
})
2
3
4
5
6
7
8
9
10
11
12
13
14
15
16
17
18
19
20
21
22
23
24
25
26
27
28
29
30
31
32
33
34
35
36
37
38
39
40
41
42
43
44
45
46
47
48
49
50
51
52
53
54
55
56
57
58
59
60
61
62
63
64
65
66
67
68
69
70
71
72
73
74
75
76
77
78
79
80
81
82
83
84
85
86
87
88
89
90
91
92
93
94
95
96
97
98
99
100
101
102
103
104
105
106
107
108
109
110
111
112
113
114
115
116
117
118
119
120
121
122
123
124
125
126
127
128
129
130
131
132
133
134
135
136
137
138
139
140
141
142
143
144
145
146
147
148
149
150
151
152
153
154
155
156
157
158
159
160
161
162
163
164
165
166
167
168
169
170
171
172
173
174
175
# 代码格式化Prettier
官网地址: https://www.prettier.cn/
什么是Prettier
Prettier是一个代码格式化工具,它可以支持JS/JSX/TS/Flow/JSON/CSS/LESS等文件格式。
为什么要用Prettier 用来替代lint中的一些场景,比如说分号/tab缩进/空格/引号,这些在lint工具检查出问题之后还需要手动修改,而通常这样的错误都是空格或者符号之类的,这样相对来说不太优雅,利用格式化工具自动生成省时省力。
如何自定义配置 Prettier提供了一套默认的配置,那么如何修改配置项符合我们自己的代码规范呢,有三种方法可以做到
- .prettierrc 文件
- prettier.config.js 文件
- package.json 中配置prettier属性
.prettierrc 文件配置例子
{
  // 不尾随分号
  "semi": false,
  // 使用单引号
  "singleQuote": true,
  // 多行逗号分割的语法中,最后一行不加逗号
  "trailingComma": "none"
}
1
2
3
4
5
6
7
8prettier.config.js 或者 .prettierrc.js,需要返回一个对象文件配置例子
module.exports = {
  semi: false,
  singleQuote: true,
  trailingComma: 'none'
}
1
2
3
4
5
# 项目中使用Prettier
安装Prettier插件
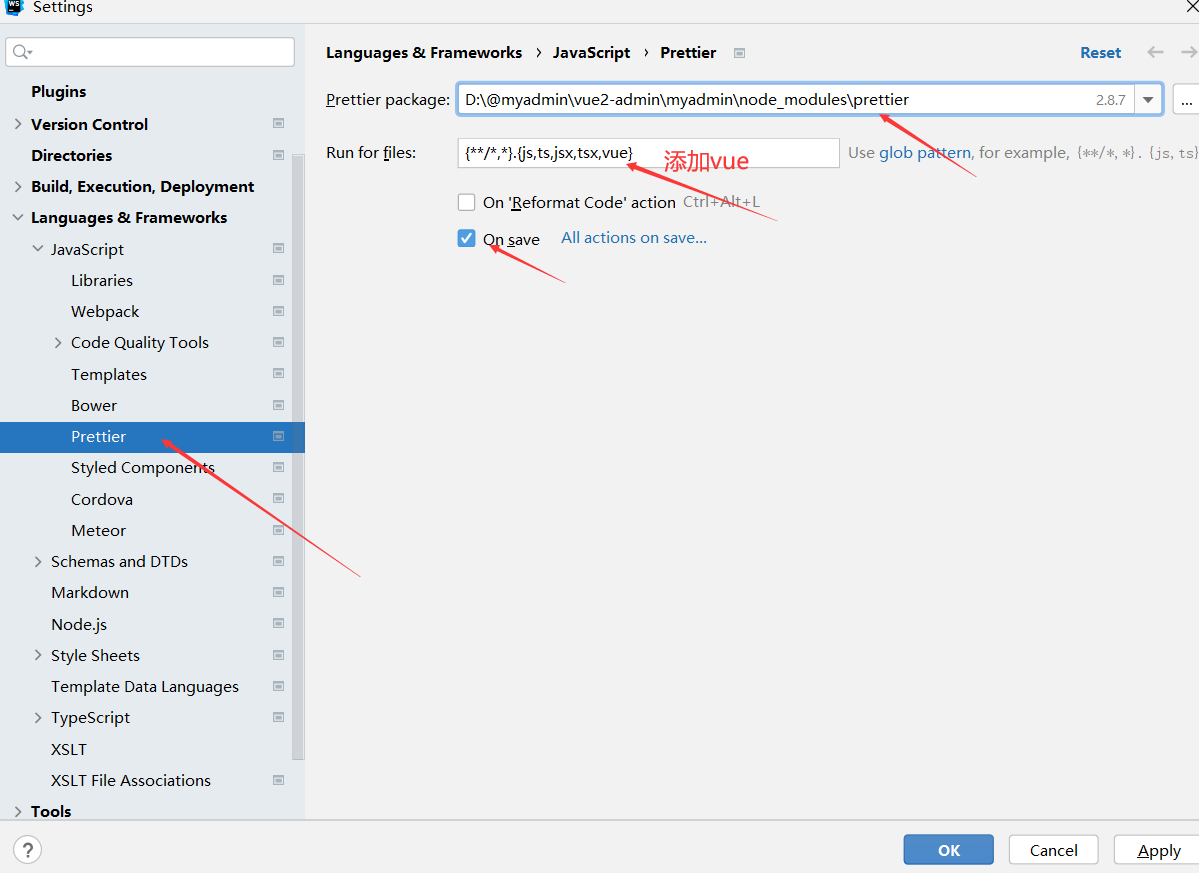
在项目中创建prettier.config.js文件
module.exports = {
  semi: false, // 不尾随分号
  singleQuote: true, // 使用单引号
  trailingComma: 'none' // 多行逗号分割的语法中,最后一行不加逗号
}
1
2
3
4
5
由于prettier会去掉方法名后面的空格,所以要在.eslint.js文件中配置,方法名后面不加空格
'space-before-function-paren': 'off' // 方法名后面不加空格
# git提交规范
约定式提交:https://www.conventionalcommits.org/zh-hans/v1.0.0/
<type>[optional scope]: <description>

[optional body]

[optional footer(s)]

--------  翻译 -------------

<类型>[可选 范围]: <描述>

[可选 正文]

[可选 脚注]
2
3
4
5
6
7
8
9
10
11
12
13
feat, // 新功能 featurefix, // 修复 bugdocs, // 文档注释style, // 代码格式(不影响代码运行的变动)refactor, // 重构(既不增加新功能,也不是修复bug)perf, // 性能优化test, // 增加测试chore, // 构建过程或辅助工具的变动revert, // 回退build// 打包
# 登录页面
在views下创建login文件夹,进行login相关页面编写
在编写登陆页面时使用到svgIcon组件
其中this.$t()相关 使用了Vue-i18n国际化
# 登录
核心代码如下:
            <el-form :model="userInfo" ref="loginForm" label-width="80px" size="mini" :rules="loginRules">
              <el-form-item :label="this.$t('login.username')" prop="username" class="input_label">
                <el-input v-model="userInfo.username">
                  <i slot="prefix">
                    <svg-icon icon-class="user"></svg-icon>
                  </i>
                </el-input>
              </el-form-item>
              <el-form-item :label="this.$t('login.password')" prop="password" class="input_label">
                <el-input v-model="userInfo.password" :type="passwordType">
                  <i slot="prefix">
                    <svg-icon icon-class="password"></svg-icon>
                  </i>
                  <i slot="suffix" class="password_eye">
                    <svg-icon :icon-class="passwordType === 'password' ? 'eye' : 'eye-open'" @click="onChangePwdType"></svg-icon>
                  </i>
                </el-input>
              </el-form-item>
              <el-form-item :label="this.$t('login.code')" prop="code" class="input_label">
                <el-input v-model="userInfo.code"></el-input>
              </el-form-item>
            </el-form>
2
3
4
5
6
7
8
9
10
11
12
13
14
15
16
17
18
19
20
21
22
校验输入数据是否合法
这里如果不放在computed里面国际化语言切换的时候会显示异常(校验信息会切换不过来)
如果不使用i18n国际化,可以放,data() {return { }} 里面
 computed: {
    loginRules () {
      const checkCode = (rule, value, callback) => {
        const pattern = /\d{6}/
        if (!pattern.test(value) || value.length !== 6) {
          callback(new Error(this.$t('login.codeIllegal')))
        } else {
          callback()
        }
      }
      const loginRules = {
        username: [
          { required: true, message: this.$t('login.inputUsername'), trigger: 'blur' },
          { min: 5, max: 15, message: this.$t('login.usernameLimit'), trigger: 'blur' }
        ],
        password: [
          { required: true, message: this.$t('login.inputPassword'), trigger: 'blur' },
          { min: 6, max: 18, message: this.$t('login.passwordLimit'), trigger: 'blur' }
        ],
        code: [
          { validator: checkCode, trigger: 'blur' }
        ]
      }
      return loginRules
    }
2
3
4
5
6
7
8
9
10
11
12
13
14
15
16
17
18
19
20
21
22
23
24
25
点击登录按钮,触发登录事件。(这里需要调用vuex中Action中的登陆方法,为什么要调用vuex里面的登陆方法,不直接发请求呢?这是因为登陆返回的数据要保存在vuex中)
src->api->user.js (编写登陆请求接口)
import request from '@/utils/request'

/***
 * 登陆请求
 * @param username 用户名
 * @param password 密码
 * @param code 验证码
 * @param uuid
 * @returns {*}
 */
export function login (username, password) {
  return request({
    url: '/login',
    method: 'post',
    data: {
      username,
      password
    }
  })
}
2
3
4
5
6
7
8
9
10
11
12
13
14
15
16
17
18
19
20
src->store->module->user.js(vuex中编写登陆相关事件)
import { login } from '@/api/user'
import { getItem, removeAll, setItem } from '@/utils/storage'
import { setTimeStamp } from '@/utils/auth'
import router from '@/router'

const user = {
  namespaced: true,
  // 全局state对象,用于保存所有组件的公共数据
  state: {
    token: getItem('token') || '',
  },
  // 唯——个可以修改state值的方法(同步执行)
  mutations: {
    // 保存token
    SET_TOKEN: (state, token) => {
      state.token = token
    }
  },
  actions: {
    // 未简化代码
    // Login (context, userInfo) {
    //   context.commit('SET_TOKEN',userInfo)
    // }
    // 这里统一使用解构赋值

    // 登陆
    login ({ commit }, userInfo) {
      return new Promise((resolve, reject) => {
        login(userInfo.username, userInfo.password).then(res => {
          // 将token信息保存到localstorage中
          setItem('token', res.data.token)
          // 将token存储到vueX中
          commit('SET_TOKEN', res.data.token)
          // 保存登陆时间
          setTimeStamp(Date.now())
          resolve(res)
        }).catch(error => {
          reject(error)
        })
      })
    },
    }
  }
}

export default user
2
3
4
5
6
7
8
9
10
11
12
13
14
15
16
17
18
19
20
21
22
23
24
25
26
27
28
29
30
31
32
33
34
35
36
37
38
39
40
41
42
43
44
45
46
47
这下就可以在登陆页面点击登录按钮,进行登录(登录成功之后,token会在localStorage和vuex中各存一份)
 // 登陆事件
    handleLogin () {
      this.$refs.loginForm.validate((valid) => {
        if (valid) {
          this.$store.dispatch('user/login', this.userInfo).then((res) => {
            this.$router.push('/')
          }).catch((err) => {
            Message.error(err)
          })
        } else {
          Message.error(this.$t('login.error'))
        }
      })
    }
2
3
4
5
6
7
8
9
10
11
12
13
14
# 路由导航拦截(获取用户信息,不登录拦截)
当用户未登陆时,不允许进入除
login之外的其他页面。用户登录后,
token未过期之前,不允许进入login页面
src->permission.js
import router from './router/index'
import store from './store/index'

// 白名单
const whiteList = ['/login']

// 路由前置导航守卫
router.beforeEach(async (to, from, next) => {
  // 存在token,进入主页
  if (store.getters.token) {
    if (to.path === '/login') {
      next('/')
    } else {
      // 判断用户资料是否获取
      // 若不存在用户信息,则需要获取用户信息
      if (!store.getters.userInfo) {
        // 触发获取用户信息的Action
        await store.dispatch('user/getUserInfo')
      }
      next()
    }
  } else {
    // 不存在token的情况,可以进入白名单
    if (whiteList.indexOf(to.path) > -1) {
      next()
    } else {
      next('/login')
    }
  }
})
2
3
4
5
6
7
8
9
10
11
12
13
14
15
16
17
18
19
20
21
22
23
24
25
26
27
28
29
30
31
# 退出
退出之后的操作
- 清理掉当前用户缓存数据
- 清理掉权限相关配置
- 返回到登录页
src->store->module->user.js
import { getUserInfo, login } from '@/api/user'
import { getItem, removeAll, setItem } from '@/utils/storage'
import { setTimeStamp } from '@/utils/auth'
import router from '@/router'

const user = {
  namespaced: true,
  // 全局state对象,用于保存所有组件的公共数据
  state: {
    token: getItem('token') || '',
    userInfo: getItem('userInfo') || null
  },
  // 唯——个可以修改state值的方法(同步执行)
  mutations: {
    // 保存token
    SET_TOKEN: (state, token) => {
      state.token = token
    },
    // 保存用户信息
    SET_USERINFO: (state, userInfo) => {
      state.userInfo = userInfo
    }
  },
  actions: {
     ......
    // 获取用户信息
    async getUserInfo ({ commit }) {
      const res = await getUserInfo()
      if (res && res.code === 200) {
        commit('SET_USERINFO', res.data)
        setItem('userInfo', JSON.stringify(res.data))
        return res
      }
    },
    // 退出登陆
    logout (context) {
      return new Promise((resolve, reject) => {
        context.commit('SET_TOKEN', '')
        context.commit('SET_USERINFO', null)
        removeAll()
        router.push('/login')
      })
    }
  }
}

export default user
2
3
4
5
6
7
8
9
10
11
12
13
14
15
16
17
18
19
20
21
22
23
24
25
26
27
28
29
30
31
32
33
34
35
36
37
38
39
40
41
42
43
44
45
46
47
# 用户主动退出
点击退出按钮,调用vuex中Actions中的logout方法
// 退出登陆
handleLogout() {
    this.$store.dispatch('user/logout')
}
2
3
4
# 用户被动退出
token失效- 单用户登录:其他人登录该账号被 “顶下来”
那么这两种场景下,在前端对应的处理方案一共也分为两种,共分为 主动处理 、被动处理 两种 :
- 主动处理:主要应对
token失效 - 被动处理:同时应对
token失效 与 单用户登录
想要搞明白 主动处理 方案,那么首先我们得先去搞明白对应的 背景 以及 业务逻辑 。
那么首先我们先明确一下对应的 背景:
我们知道
token表示了一个用户的身份令牌,对 服务端 而言,它是只认令牌不认人的。所以说一旦其他人获取到了你的token,那么就可以伪装成你,来获取对应的敏感数据。所以为了保证用户的信息安全,那么对于
token而言就被制定了很多的安全策略,比如:
- 动态
token(可变token)- 刷新
token- 时效
token- ...
这些方案各有利弊,没有绝对的完美的策略。
而我们此时所选择的方案就是 时效 token
对于 token 本身是拥有时效的,这个大家都知道。但是通常情况下,这个时效都是在服务端进行处理。而此时我们要在 服务端处理 token 时效的同时,在前端主动介入 token 时效的处理中。 从而保证用户信息的更加安全性。
# 主动处理
那么对应到我们代码中的实现方案为:
- 在用户登陆时,记录当前 登录时间
- 制定一个 失效时长
- 在接口调用时,根据 当前时间 对比 登录时间 ,看是否超过了 时效时长
- 如果未超过,则正常进行后续操作
- 如果超过,则进行 退出登录 操作
登录成功后保存登陆的时间
import { login } from '@/api/user'
import { getItem, removeAll, setItem } from '@/utils/storage'
import { setTimeStamp } from '@/utils/auth'
import router from '@/router'

const user = {
  namespaced: true,
  actions: {

    // 登陆
    login ({ commit }, userInfo) {
      return new Promise((resolve, reject) => {
        login(userInfo.username, userInfo.password).then(res => {
          ......
          // 保存登陆时间
          setTimeStamp(Date.now())
          resolve(res)
        }).catch(error => {
          reject(error)
        })
      })
    },
    }
  }
}

export default user
2
3
4
5
6
7
8
9
10
11
12
13
14
15
16
17
18
19
20
21
22
23
24
25
26
27
判断token是否有效相关
utils->auth.js
/***
 * 获取时间戳
 * @returns {string|*}
 */
export function getItemStamp() {
  return getItem(Config.TIME_STAMP)
}

/***
 * 设置时间戳
 */
export function setTimeStamp() {
  setItem(Config.TIME_STAMP, Date.now())
}

/**
 * 判断token是否过期
 */
export function isCheckTimeout() {
  // 当前时间戳
  const currentTime = Date.now()
  // 缓存时间戳
  const timeStamp = getItemStamp()
  return currentTime - timeStamp > Config.TOKEN_TIMEOUT_VALUE
}
2
3
4
5
6
7
8
9
10
11
12
13
14
15
16
17
18
19
20
21
22
23
24
25
每次请求之前,都先判断一下token是否失效
utils->request.js
// 请求拦截
service.interceptors.request.use(
  (config) => {
    if (store.getters.token) {
      // token已经过期(主动处理)
      if (isCheckTimeout()) {
        store.dispatch('user/logout')
        return Promise.reject(new Error(i18n.t('globalInfo.invalidity')))
      }
      // 每次请求将token携带过去
      config.headers[TOKEN] = store.getters.token
    }
    return config
  },
  (error) => {
    console.log(error)
    return Promise.reject(error)
  }
)
2
3
4
5
6
7
8
9
10
11
12
13
14
15
16
17
18
19
# 被动处理
这种情况是服务器端通知我们,告诉我们token过期或者权限发生变化
// 响应拦截
service.interceptors.response.use(
  (response) => {
    const res = response.data
    if (res.code !== 200) {
      Message({
        message: res.message || 'Error',
        type: 'error',
        duration: 5 * 1000
      })
      // 401 认证失败(token过期或失效或非法) 403 权限不足
      if (res.code === 401) {
        store.dispatch('user/logout')
      }
    } else {
      return res
    }
  },
  (error) => {
    Message({
      message: error.message || 'Error',
      type: 'error',
      duration: 5 * 1000
    })
    return Promise.reject(error)
  }
)
2
3
4
5
6
7
8
9
10
11
12
13
14
15
16
17
18
19
20
21
22
23
24
25
26
27
# Layout搭建
# 页面布局
页面布局示意图:
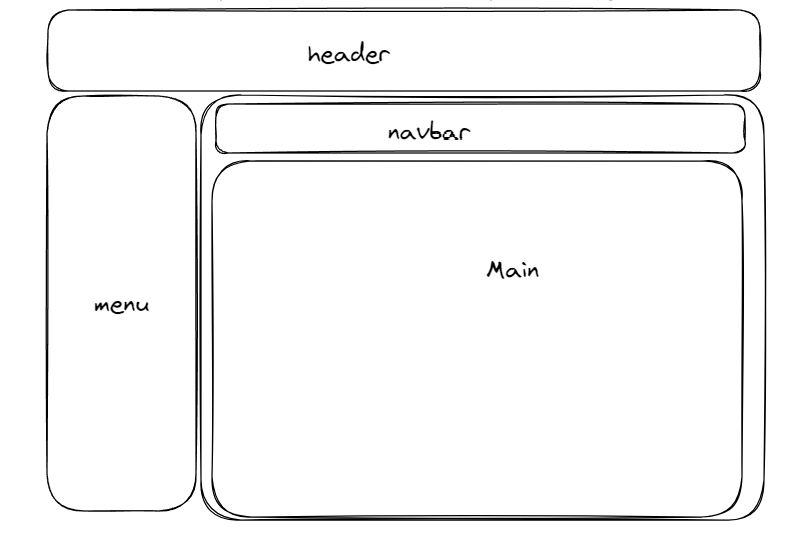
采用element-ui提供的Container 布局 (opens new window)容器对页面进行布局
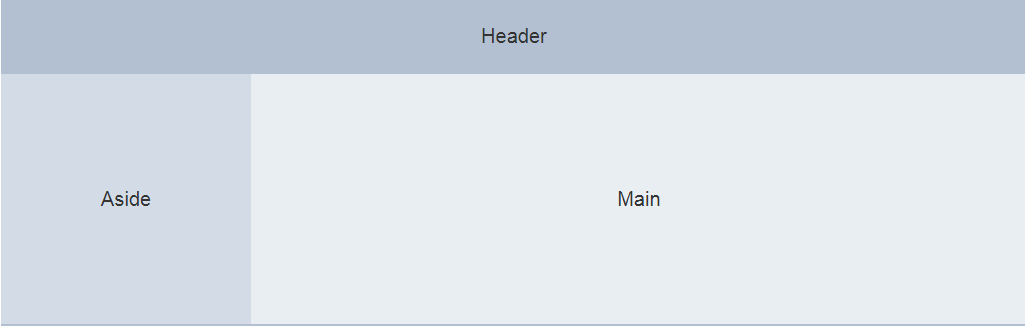
<el-container>
  <el-header>Header</el-header>
  <el-container>
    <el-aside width="200px">Aside</el-aside>
    <el-main>Main</el-main>
  </el-container>
</el-container>
2
3
4
5
6
7
当登录完成之后,那么我们会进入到 Layout 页面,这个 Layout 页面组件位于 Layout/index.vue 中,所以说想要实现这样的结构,那么我们就需要到对应的 layout 组件中进行。
# 创建相应组件
layout/components/Header/index.vuelayout/components/Sidebar/index.vuelayout/components/Navbar.vuelayout/components/AppMain.vuelayout/components/TagsView.vue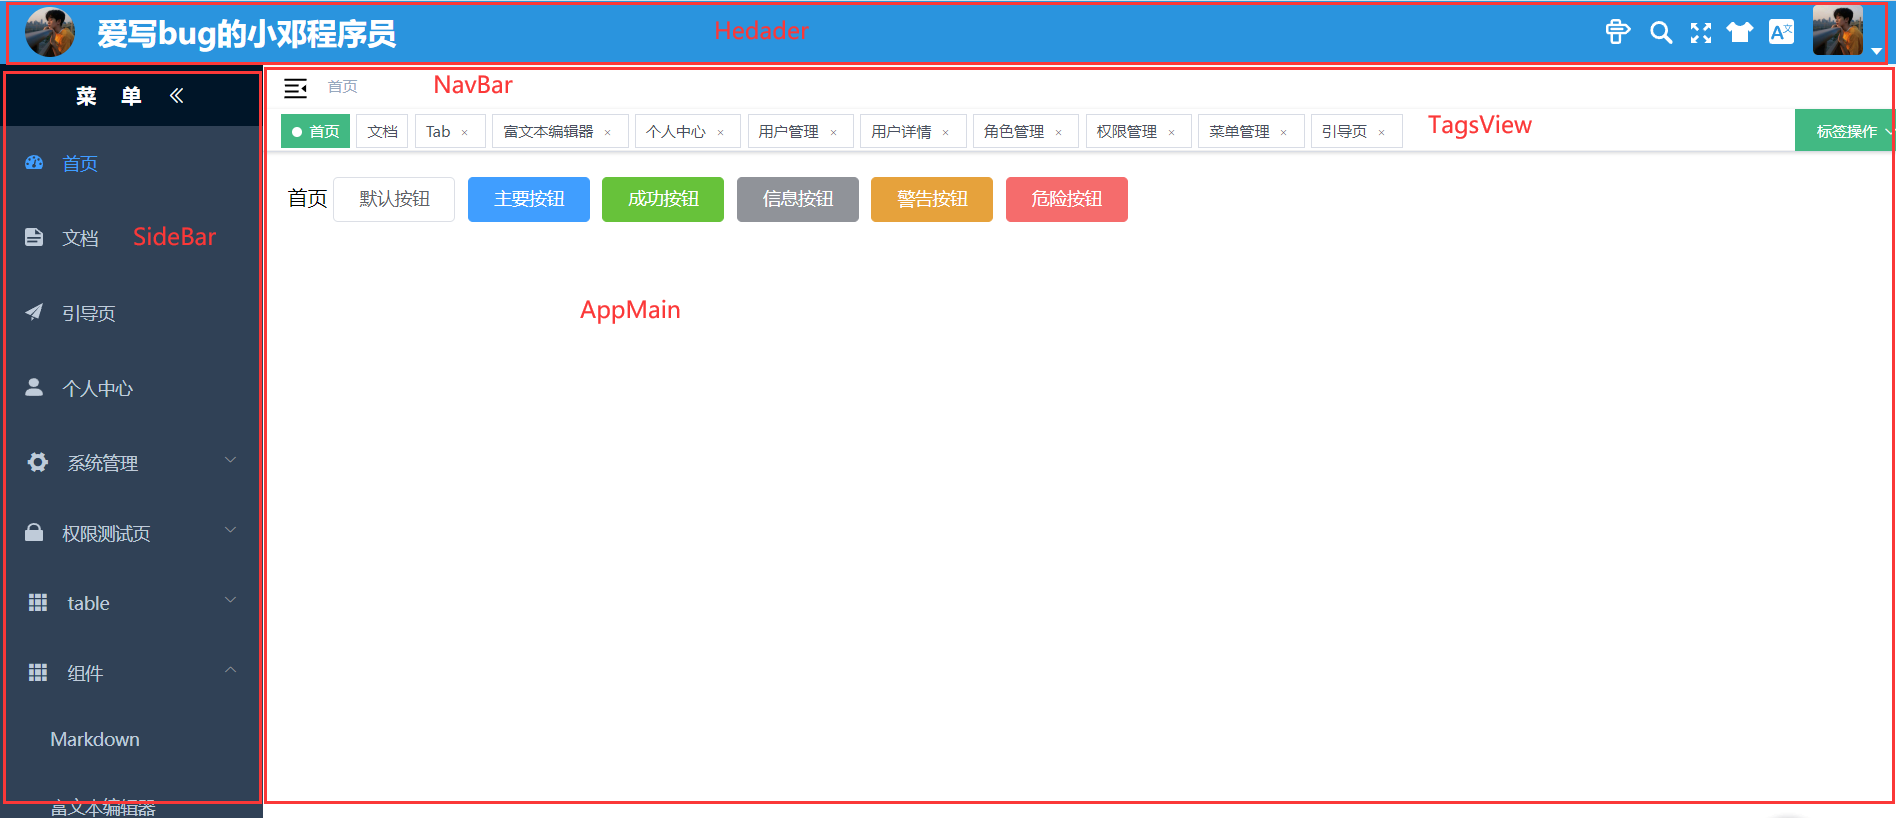
# 完善基本架构
<template>
  <el-container class="layout-container">
    <el-header :height="variables.headerHeight">
      <dep-header></dep-header>
    </el-header>
    <el-container class="app-wrapper">
      <!--左侧菜单-->
      <el-aside
        class="sidebar-container"
        :width="
          $store.getters.sidebar.opened
            ? variables.sideBarWidth
            : variables.hideSideBarWidth
        "
      >
        <Sidebar id="guide-sidebar"></Sidebar>
      </el-aside>
      <el-main class="main-container">
        <!-- 顶部的 navbar -->
        <navbar class="navbar-container"></navbar>
        <tags-view></tags-view>
        <!--内容区-->
        <app-main></app-main>
      </el-main>
    </el-container>
  </el-container>
</template>

<script>
import Sidebar from './components/Sidebar'
import Navbar from '@/layout/components/Navbar'
import AppMain from '@/layout/components/AppMain'
import DepHeader from '@/layout/components/Header'
import TagsView from '@/layout/components/TagsView'
export default {
  // eslint-disable-next-line vue/multi-word-component-names
  name: 'layout',
  components: {
    DepHeader,
    AppMain,
    Navbar,
    Sidebar,
    TagsView
  },
  data() {
    return {
      variables: {
        sideBarWidth: '210px',
        hideSideBarWidth: '50px',
        headerHeight: '50px'
      }
    }
  }
}
</script>
<style lang="scss" scoped>
@import '~@/styles/variables.scss';
.layout-container {
  width: 100%;
  height: 100%;
  .app-wrapper {
    position: relative;
    height: calc(100% - #{$headerHeight});
    width: 100%;
    .sidebar-container,
    .main-container {
      transition: width 0.28s;
    }
    .navbar-container {
      width: 100%;
      height: #{$navbarHeight};
      line-height: #{$navbarHeight};
      box-shadow: 0 1px 4px rgba(0, 21, 41, 0.08);
    }
  }
}
</style>
<style lang="scss">
@import '~@/styles/variables.scss';
.layout-container {
  .el-header {
    background: #{$headerBg};
    box-shadow: 0 1px 4px rgba(0, 21, 41, 0.08);
  }
  .el-main {
    padding: 0px;
  }
}
</style>
2
3
4
5
6
7
8
9
10
11
12
13
14
15
16
17
18
19
20
21
22
23
24
25
26
27
28
29
30
31
32
33
34
35
36
37
38
39
40
41
42
43
44
45
46
47
48
49
50
51
52
53
54
55
56
57
58
59
60
61
62
63
64
65
66
67
68
69
70
71
72
73
74
75
76
77
78
79
80
81
82
83
84
85
86
87
88
89
90
# 侧边栏
官网介绍:https://element.eleme.cn/#/zh-CN/component/menu
如果向实现点击菜单栏跳转,element-ui已经为我们提供了router属性,不过要在el-menu-item上加index属性,不足之处在于只能在页面内跳转,为此封装了Link组件 ,既可以页面内跳转,也可以跳转到外部链接
| 参数 | 说明 | 类型 | 可选值 | 默认值 |
|---|---|---|---|---|
| router | 是否使用 vue-router 的模式,启用该模式会在激活导航时以 index 作为 path 进行路由跳转 | boolean | - | false |
 <el-menu-item index="2">
    <i class="el-icon-menu"></i>
    <span slot="title">导航二</span>
  </el-menu-item>
2
3
4
上述代码是element-ui官网提供的子菜单代码,但是我们既想使用自定义svg图标渲染,又想使用element-ui提供的图标进行渲染,那么就要动态判断是自定义svg图标,还是element-ui提供的图标,为此封装了一个Item组件
layout->Sidebar->SidebarItem.vue
为了能够递归渲染菜单封装一个SidebarItem组件
<template>
  <div v-if="!item.hidden">
    <!--一级菜单-->
    <template
      v-if="
        hasOneShowingChild(item.children, item) &&
        (!onlyOneChild.children || onlyOneChild.noShowingChildren) &&
        !item.alwaysShow
      "
    >
      <!--自定义link组件可以实现外部链接跳转和内部链接跳转-->
      <d-link v-if="onlyOneChild.meta" :to="resolvePath(onlyOneChild.path)">
        <el-menu-item :index="resolvePath(onlyOneChild.path)">
          <!--这样就可以渲染菜单,为什么要写一个Item组件呢?为了实现icon可以用element-icon,也可以用外部引入的-->
          <!--<template slot="title">-->
          <!--  <i :class="onlyOneChild.meta.icon"></i>-->
          <!--  <span slot="title">{{ onlyOneChild.meta.title }}</span>-->
          <!--</template>-->
          <Item
            :icon="onlyOneChild.meta.icon || (item.meta && item.meta.icon)"
            :title="generateTitle(onlyOneChild.meta.title)"
          ></Item>
        </el-menu-item>
      </d-link>
    </template>
    <!--多级菜单-->
    <el-submenu v-else :index="resolvePath(item.path)" popper-append-to-body>
      <template slot="title">
        <Item
          v-if="item.meta"
          :icon="item.meta && item.meta.icon"
          :title="generateTitle(item.meta.title)"
        ></Item>
      </template>
      <!--递归调用-->
      <sidebar-item
        v-for="child in item.children"
        :key="child.path"
        :item="child"
        :base-path="resolvePath(child.path)"
      ></sidebar-item>
    </el-submenu>
  </div>
</template>

<script>
import path from 'path'
import { isExternal } from '@/utils/validate'
import { generateTitle } from '@/utils/i18n'
import DLink from './Link'
import Item from '@/layout/components/Sidebar/Item'
export default {
  name: 'SidebarItem',
  components: { Item, DLink },
  props: {
    item: {
      type: Object,
      required: true
    },
    basePath: {
      type: String,
      default: ''
    }
  },
  data() {
    // 修复问题:https://github.com/PanJiaChen/vue-admin-template/issues/237
    this.onlyOneChild = null
    return {}
  },
  methods: {
    generateTitle,
    // 判断是否只有一个需要显示的路由
    hasOneShowingChild(children = [], parent) {
      const showingChildren = children.filter((item) => {
        if (item.hidden) {
          return false
        } else {
          this.onlyOneChild = item
          return true
        }
      })
      if (showingChildren.length === 1) {
        return true
      }
      if (showingChildren.length === 0) {
        this.onlyOneChild = { ...parent, path: '', noShowingChildren: true }
        return true
      }
      return false
    },
    // 解析path
    resolvePath(routePath) {
      if (isExternal(routePath)) {
        return routePath
      }
      if (isExternal(this.basePath)) {
        return this.basePath
      }
      return path.resolve(this.basePath, routePath)
    }
  }
}
</script>

<style lang="scss" scoped></style>
2
3
4
5
6
7
8
9
10
11
12
13
14
15
16
17
18
19
20
21
22
23
24
25
26
27
28
29
30
31
32
33
34
35
36
37
38
39
40
41
42
43
44
45
46
47
48
49
50
51
52
53
54
55
56
57
58
59
60
61
62
63
64
65
66
67
68
69
70
71
72
73
74
75
76
77
78
79
80
81
82
83
84
85
86
87
88
89
90
91
92
93
94
95
96
97
98
99
100
101
102
103
104
105
106
layout->Sidebar->index.vue
<template>
<div class="sidebar" :style="{ height: sidebarHeight }">
<sidebar-logo
:style="{ backgroundColor: variables.subMenuHover }"
class="has-logo"
v-if="hasLogo"
:is-menu="true"
:collapse="!$store.getters.sidebar.opened"
></sidebar-logo>
<el-scrollbar wrap-class="scrollbar-wrapper">
<el-menu
:collapse="!$store.getters.sidebar.opened"
:default-active="activeMenu"
:background-color="variables.menuBg"
:text-color="variables.menuText"
:active-text-color="variables.menuActiveText"
>
<SidebarItem
v-for="route in routes"
:item="route"
:key="route.path"
:base-path="route.path"
></SidebarItem>
</el-menu>
</el-scrollbar>
</div>
</template>
<script>
import SidebarItem from '@/layout/components/Sidebar/SidebarItem'
import { constantRoutes, asyncRoutes } from '@/router'
import SidebarLogo from '@/layout/components/Sidebar/Logo'
export default {
// eslint-disable-next-line vue/multi-word-component-names
name: 'Sidebar',
components: { SidebarLogo, SidebarItem },
computed: {
// eslint-disable-next-line vue/return-in-computed-property
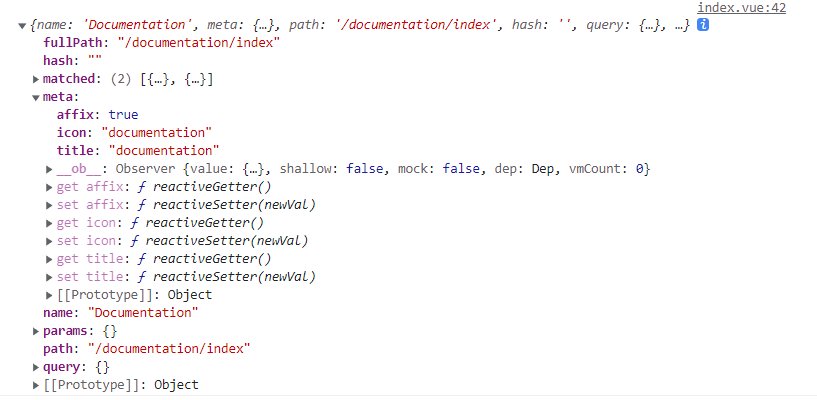
// 获取当前活跃的菜单,实现菜单高亮
activeMenu() {
const route = this.$route
console.log(route)
const { meta, path } = route
if (meta.activeMenu) {
return meta.activeMenu
}
return path
},
sidebarHeight() {
return this.hasLogo ? 'calc(100% - 50px)' : '100%'
}
},
data() {
return {
routes: [],
hasLogo: true,
variables: {
menuText: '#bfcbd9',
menuActiveText: '#409EFF',
subMenuActiveText: '#f4f4f5', // https://github.com/ElemeFE/element/issues/12951
menuBg: '#304156',
menuHover: '#263445',
subMenuBg: '#1f2d3d',
subMenuHover: '#001528'
}
}
},
created() {
this.routes = [...constantRoutes, ...asyncRoutes]
}
}
</script>
<style lang="scss"></style>
2
3
4
5
6
7
8
9
10
11
12
13
14
15
16
17
18
19
20
21
22
23
24
25
26
27
28
29
30
31
32
33
34
35
36
37
38
39
40
41
42
43
44
45
46
47
48
49
50
51
52
53
54
55
56
57
58
59
60
61
62
63
64
65
66
67
68
69
70
71
72
73
74
# 如何实现菜单高亮
 <el-menu :default-active="activeMenu"></el-menu>
<script>
     computed: {
    // 获取当前活跃的菜单,实现菜单高亮
    activeMenu() {
      const route = this.$route
      const { meta, path } = route
      if (meta.activeMenu) {
        return meta.activeMenu
      }
      return path
    }
  },
</script>
2
3
4
5
6
7
8
9
10
11
12
13
14
this.$route获取当前路由信息
# 后端搭建
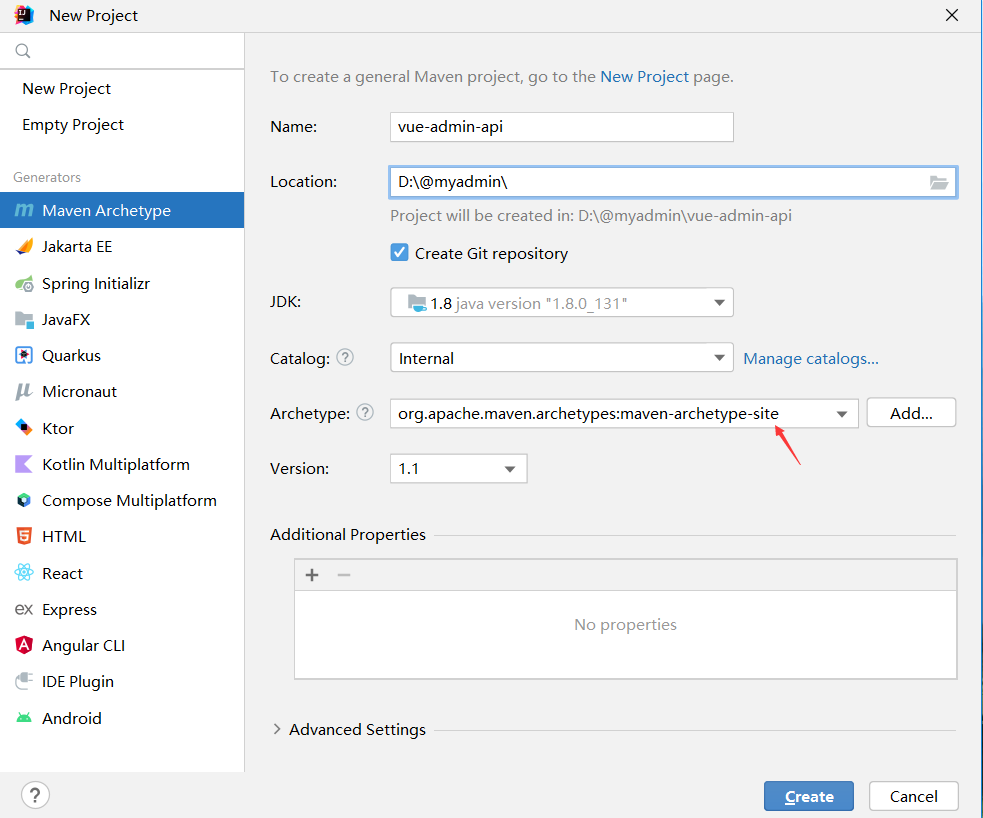
# 创建父工程
New Project - maven工程 - create from archetype: maven-archetype-quickstart (截图上的有误,选择quickstart就可以了)
字符编码 - Settings - File encoding
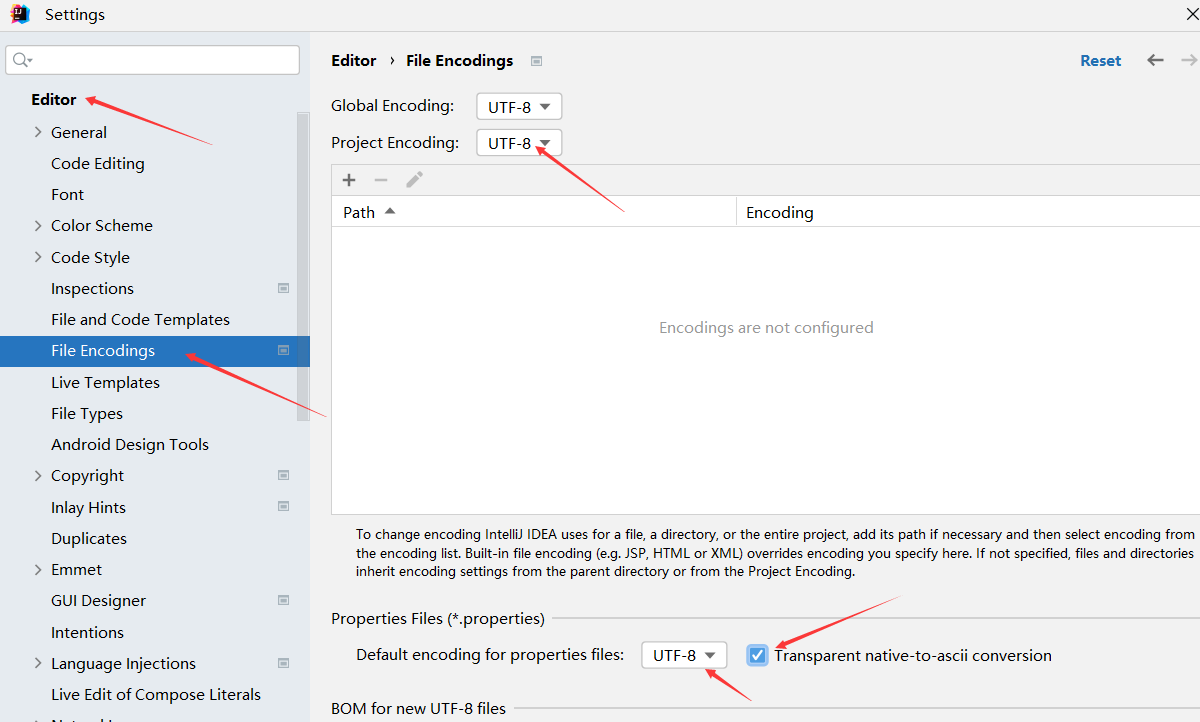
Transparent native-to-ascii conversion的意思是:自动转换ASCII编码。
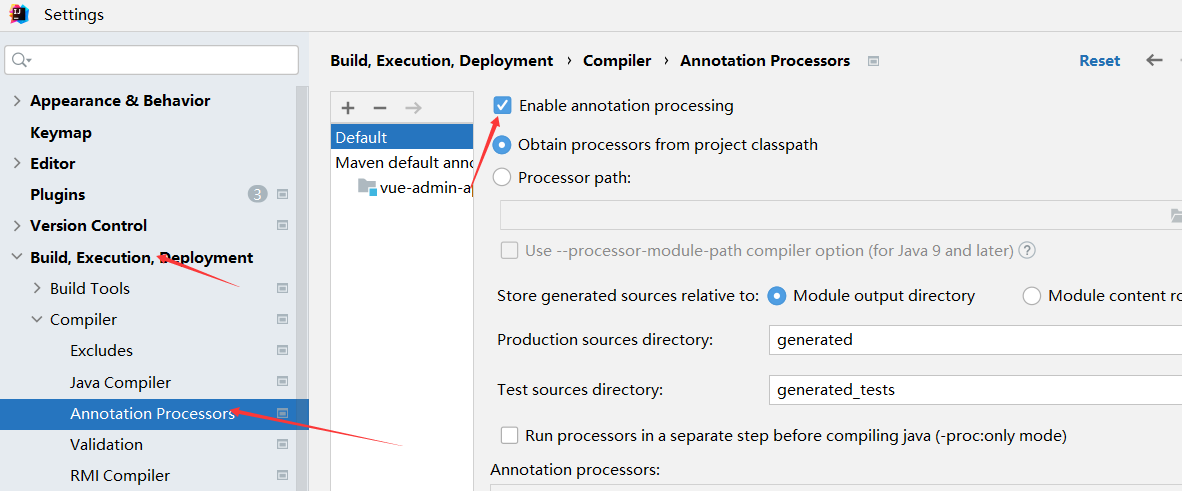
注解生效激活 - Settings - Annotation Processors
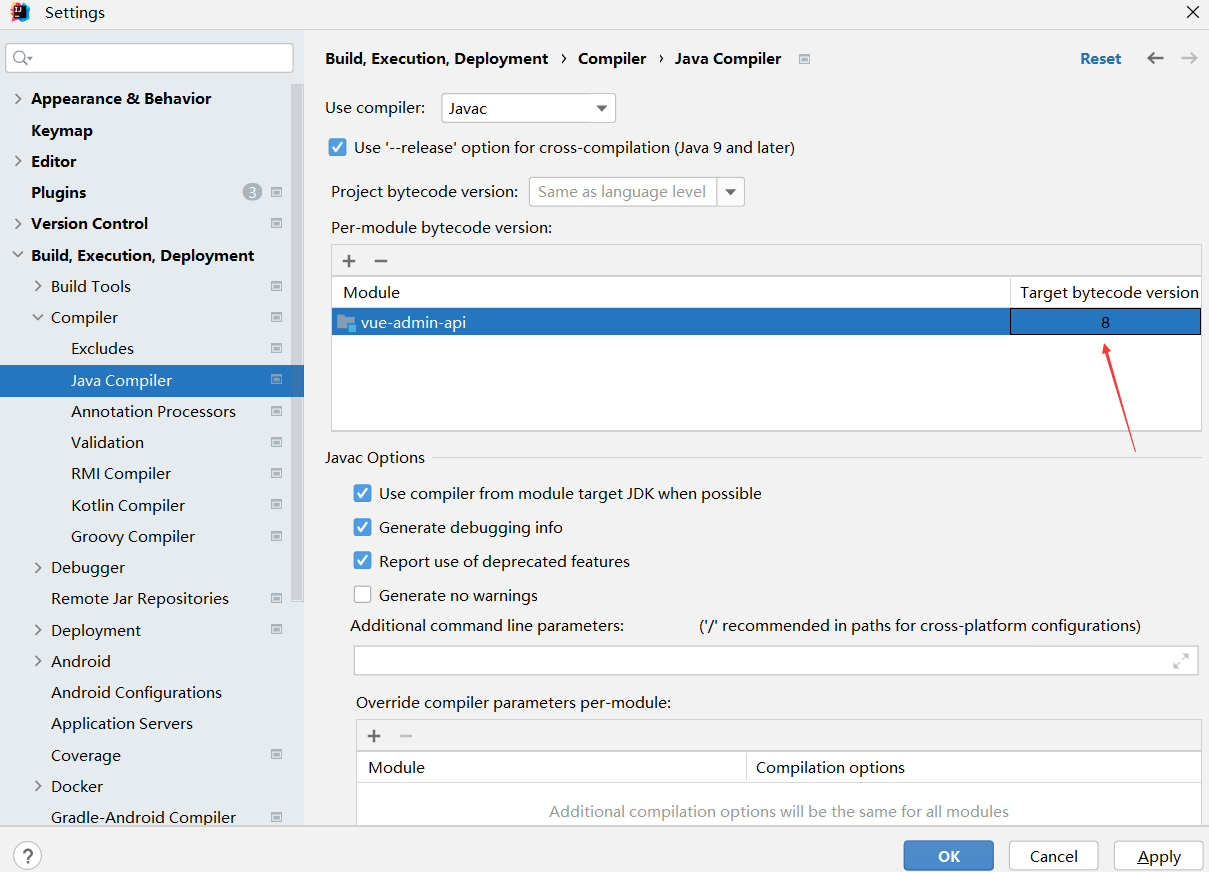
Java编译版本选8
src文件夹删掉
# 创建子工程
vue-admin-common
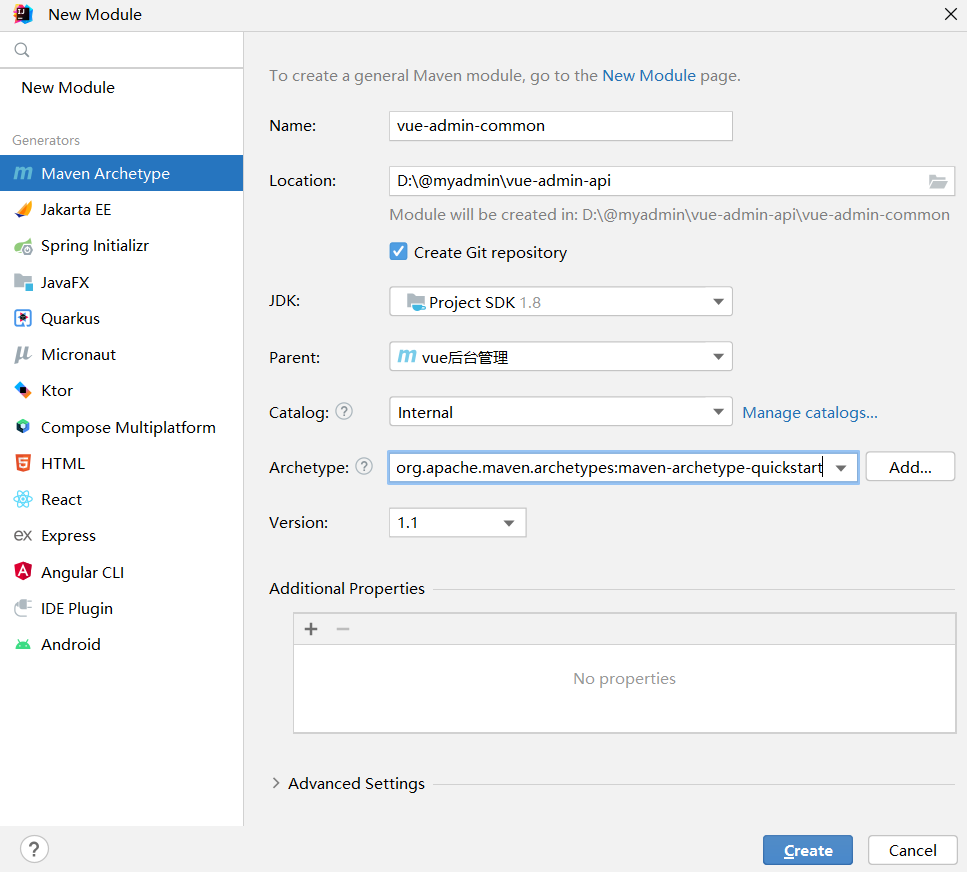
vue-admin-generator
vue-admin-logging
vue-admin-system
vue-admin-tools
# 通用组件
# svgIcon组件
为了在项目中使用svg图片,特意写了一个SvgIcon组件,用来展示svg图片
核心代码:
<template>
  <div
    v-if="isExternal"
    :style="styleExternalIcon"
    class="svg-external-icon svg-icon"
    v-on="$listeners"
  ></div>
  <svg v-else :class="svgClass" aria-hidden="true" v-on="$listeners">
    <use :xlink:href="iconName"></use>
  </svg>
</template>

<script>
import { isExternal } from '@/utils/validate'

export default {
  name: 'SvgIcon',
  props: {
    iconClass: {
      type: String,
      required: true
    },
    className: {
      type: String,
      default: ''
    }
  },
  computed: {
    // 判断是否是外部链接
    isExternal() {
      return isExternal(this.iconClass)
    },
    iconName() {
      return `#icon-${this.iconClass}`
    },
    svgClass() {
      if (this.className) {
        return 'svg-icon ' + this.className
      } else {
        return 'svg-icon'
      }
    },
    styleExternalIcon() {
      return {
        mask: `url(${this.iconClass}) no-repeat 50% 50%`,
        '-webkit-mask': `url(${this.iconClass}) no-repeat 50% 50%`
      }
    }
  }
}
</script>

<style lang="scss" scoped>
.svg-icon {
  width: 1em;
  height: 1em;
  vertical-align: -0.15em;
  fill: currentColor;
  overflow: hidden;
}

.svg-external-icon {
  background-color: currentColor;
  mask-size: cover !important;
  display: inline-block;
}
</style>
2
3
4
5
6
7
8
9
10
11
12
13
14
15
16
17
18
19
20
21
22
23
24
25
26
27
28
29
30
31
32
33
34
35
36
37
38
39
40
41
42
43
44
45
46
47
48
49
50
51
52
53
54
55
56
57
58
59
60
61
62
63
64
65
66
67
68
/**
 * @param {string} path
 * @returns {Boolean}
 * 判断是否是外部链接地址
 */
export function isExternal(path) {
  // 判断是否是以http:,https:,mailto:,tel:为开头
  return /^(https?:|mailto:|tel:)/.test(path)
}
2
3
4
5
6
7
8
9
10
vue.config.js 配置
module.exports = defineConfig({
  .....
  chainWebpack(config) {
    config.module.rule('svg').exclude.add(resolve('src/icons')).end()
    config.module
      .rule('icons')
      .test(/\.svg$/)
      .include.add(resolve('src/icons'))
      .end()
      .use('svg-sprite-loader')
      .loader('svg-sprite-loader')
      .options({
        symbolId: 'icon-[name]'
      })
      .end()
  }
})
2
3
4
5
6
7
8
9
10
11
12
13
14
15
16
17
icons->index.js
import Vue from 'vue'
import SvgIcon from '@/components/SvgIcon' // svgIcon组件

// 全局注册SvgIcon组件
Vue.component('svg-icon', SvgIcon)

/***
 * require.context(directory,useSubdirectories,regExp)
 * directory:表示检索的目录
 * useSubdirectories:表示是否检索子文件夹
 * regExp:匹配文件的正则表达式,一般是文件名
 */
const req = require.context('./svg', false, /\.svg$/)
const requireAll = requireContext => requireContext.keys().map(requireContext)
requireAll(req)

// 相当于引入
// import "./svg/404.svg"
// import "./svg/bug.svg"
// import "./svg/chart.svg"
// ....
2
3
4
5
6
7
8
9
10
11
12
13
14
15
16
17
18
19
20
21
在main.js中导入
import './icons'
使用
<svg-icon icon-class="password"></svg-icon>
项目中如果要添加svg图片,直接复制到icon->svg文件下,然后使用的使用直接用图片名字当成icon-class的值就可以了
# Link组件
// 判断是否是外部链接
export function isExternal(path) {
  // 判断是否是以http:,https:,mailto:,tel:为开头
  return /^(https?:|mailto:|tel:)/.test(path)
}
2
3
4
Link.vue
<template>
  <component :is="type" v-bind="linkProps(to)">
    <slot></slot>
  </component>
</template>

<script>
import { isExternal } from '@/utils/validate'
export default {
  // eslint-disable-next-line vue/multi-word-component-names
  name: 'Link',
  props: {
    // 要跳转的链接地址
    to: {
      type: String,
      required: true
    }
  },
  computed: {
    // 判断是否是外部链接
    isExternal() {
      return isExternal(this.to)
    },
    type() {
      // 如果是外部链接,就用a标签,不是外部标签就使用<router-link>
      if (this.isExternal) {
        return 'a'
      }
      return 'router-link'
    }
  },
  methods: {
    linkProps(to) {
      // 是外部链接添加属性  <a :href="to" target="_blank" rel="noopener"></a>
      if (this.isExternal) {
        return {
          href: to,
          target: '_blank',
          rel: 'noopener'
        }
      }
      // 不是外部链接  <router-link :to="to"></router-link>
      return {
        to: to
      }
    }
  }
}
</script>

<style lang="scss" scoped></style>
2
3
4
5
6
7
8
9
10
11
12
13
14
15
16
17
18
19
20
21
22
23
24
25
26
27
28
29
30
31
32
33
34
35
36
37
38
39
40
41
42
43
44
45
46
47
48
49
50
51
52
使用
<link :to="/path"></link>
# Item组件
<script>
export default {
  // eslint-disable-next-line vue/multi-word-component-names
  name: 'MenuItem',
  functional: true,
  props: {
    // 菜单图标
    icon: {
      type: String,
      default: ''
    },
    // 菜单名称
    title: {
      type: String,
      default: ''
    }
  },
  render(createElement, context) {
    const { icon, title } = context.props
    const vNodes = []
    if (icon) {
      // 如果菜单图标是element-ui自带的,采用i标签渲染
      if (icon.includes('el-icon')) {
        vNodes.push(<i class={[icon, 'sub-el-icon']} />)
      } else {
        // 如果是svg图标,采用自定义组件来展示
        vNodes.push(<svg-icon icon-class={icon} />)
      }
    }
    if (title) {
      vNodes.push(<span slot="title">{title}</span>)
    }
    return vNodes
  }
}
</script>
<style scoped>
.sub-el-icon {
  color: currentColor;
  width: 1em;
  height: 1em;
}
</style>
2
3
4
5
6
7
8
9
10
11
12
13
14
15
16
17
18
19
20
21
22
23
24
25
26
27
28
29
30
31
32
33
34
35
36
37
38
39
40
41
42
43
# wangEditor富文本编辑器
npm install @wangeditor/editor --save
npm install @wangeditor/editor-for-vue --save
2
# 知识扩展
# history路由模式和hash路由模式
细说前端路由的hash模式和 history模式 (opens new window)
面试被问及 hash 与 history 的区别该怎么回答? (opens new window)
| hash | history |
|---|---|
| 有 # 号 | 没有 # 号 |
| 能够兼容到IE8 | 只能兼容到IE10 |
| 实际的url之前使用哈希字符,这部分url不会发送到服务器,不需要在服务器层面上进行任何处理 | 每访问一个页面都需要服务器进行路由匹配生成 html 文件再发送响应给浏览器,消耗服务器大量资源 |
| 刷新不会存在 404 问题 | 浏览器直接访问嵌套路由时,会报 404 问题。 |
| 不需要服务器任何配置 | 需要在服务器配置一个回调路由 |
推荐使用 hash 模式
1、从兼容角度分析。
hash 可以兼容到 IE8,而 history 只能兼容到 IE10。
2、从网络请求的角度分析。
使用 hash 模式,地址改变时通过 hashchange 事件,只会读取哈希符号后的内容,并不会发起任何网络请求。
而 history 模式,每访问一个页面都要发起网络请求,每个请求都需要服务器进行路由匹配、数据库查询、生成HTML文档后再发送响应给浏览器,这个过程会消耗服务器的大量资源,给服务器的压力较大。
3、服务器配置角度分析。
hash 不需要服务器任何配置。
history 进行刷新页面时,无法找到url对应的页面,会出现 404 问题。因为域名后面的路由是由前端控制的,后端只能保留域名部分,所以就会造成页面丢失的问题,需要服务器端添加一个回退路由,就能解决该问题了。
hash 模式不足
1、hash 模式中的 # 也称作锚点,这里的的 # 和 css 中的 # 是一个意思,所以在 hash 模式内,页面定位会失效。
2、hash 不利于 SEO(搜索引擎优化)。
3、白屏时间问题。浏览器需要等待 JavaScript 文件加载完成之后渲染 HTML 文档内容,用户等待时间稍长。
# ESLint详解
【一听就懂】ESLint机制浅析 (opens new window)
官方文档:https://zh-hans.eslint.org/docs/latest/rules/
# 什么是babel
在创建项目的时候,我们选择了Babel,那么什么是Babel呢?
Babel 是现代 JavaScript 语法转换器
参考文章:
「前端基建」带你在Babel的世界中畅游 (opens new window)
面试官(7): 聊一聊 Babel? (opens new window)
深入浅出 Babel 上篇:架构和原理 + 实战 (opens new window)
# token存储到cookie还是localstorage
- 将 Token 存储在 webStorage(localStorage,sessionStorage) 中可以通过同域的js访问,这样导致很容易受到 ==xss== 攻击,特别是项目中引入很多第三方js库的情况下,如果js脚本被盗用,攻击者就可以轻易访问你的网站。
xss攻击:是一种注入代码攻击,通过在网站里注入script代码,当访问者浏览网站的时候通过注入的script代码窃取用户信息,盗用用户身份等
- 将 Token 存储在 cookie 中,可以指定 httponly 来防止 js 被读取,也可以指定 secure 来保证 Token 只在 HTTPS 下传输,缺点是不符合 RestFul 最佳实践,容易受到 ==CSRF== 攻击。
CSRF: 跨站点请求伪造,攻击者盗用已经认证过的用户信息,以用户信息的名义进行操作(转账,购买商品等),由于身份已经认证过了,所以网站会认为此操作是用户本人操作。 CSRF 并不能拿到用户信息,但它可以盗用用户的凭证进行操作。
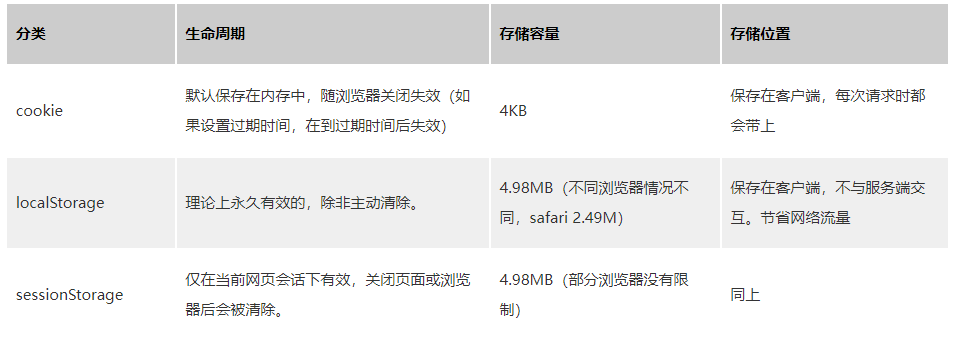
生命周期
cookie:可设置失效时间,没有设置的话,默认是关闭浏览器后失效
localStorage:除非被手动清除,否则将会永久保存。
sessionStorage: 仅在当前网页会话下有效,关闭页面或浏览器后就会被清除。
大小
cookie:4KB左右
localStorage: 5MB的信息。 sessionStorage: 同上。
http 请求
cookie:每次都会携带在HTTP头中,如果使用cookie保存过多数据会带来性能问题。
localStorage:仅在客户端(即浏览器)中保存,不参与和服务器的通信。 sessionStorage: 同上。
易用性
cookie:需要程序员自己封装,原生的Cookie接口不友好
localStorage:源生接口可以接受,亦可再次封装来对Object和Array有更好的支持 sessionStorage: 同上
应用场景
cookie:
- 请求时会自动携带,最合适的就是通过发送请求的时候做权限验证.
- 个数要少,尽量要少(各个浏览器的情况不一)
- 安全性
localStorage:
- 关闭浏览器不会清除,适用于存储一些不变的数据,
sessionStorage:
- 关闭浏览器会清除数据,用于一些较为敏感的数据
参考文章:
localStorage、sessionStorage 、cookie 三者的区别和应用场景 (opens new window)
# 为什么token还要在vuex里面存一份?
- vuex存储数据的特点:数据统一全局管理,一旦数据在某组件更新,其他所有组件数据都会更新,是响应式的,但是如果数据只存在vuex中,刷新页面vuex里的数据会重新初始化,导致数据丢失,恢复到原来的状态。
- localstorage(本地存储),永久性存储,但不是响应式的,当某个组件数据修改时,其他组件无法同步更新。
- vuex是存储到内存里,localStorage本地存储到磁盘里,从内存中读取数据,速度是远高于磁盘的,所以把数据存在vuex中可以提高获取token速度,提高性能。
- 通常是两者结合,拿到token后,把token 存储在localStorage和vuex中,vuex保证数据在各组件间同步更新,如果刷新页面数据更新丢失,可以从localStorage获取,通过结合vuex和localStorage本地存储,实现数据的持久化
# import path from 'path' 报错
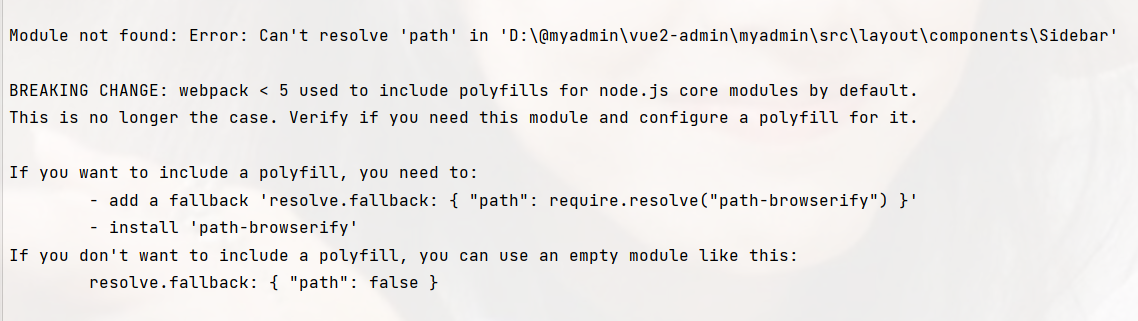
Module not found: Error: Can't resolve 'path' in 'D:\@myadmin\vue2-admin\myadmin\src\layout\components\Sidebar'

BREAKING CHANGE: webpack < 5 used to include polyfills for node.js core modules by default.
This is no longer the case. Verify if you need this module and configure a polyfill for it.

If you want to include a polyfill, you need to:
        - add a fallback 'resolve.fallback: { "path": require.resolve("path-browserify") }'
        - install 'path-browserify'
If you don't want to include a polyfill, you can use an empty module like this:
        resolve.fallback: { "path": false }
2
3
4
5
6
7
8
9
10
11
安装在 Webpack 中 Polyfill Node.js 核心模块。
npm install node-polyfill-webpack-plugin --force
在vue.config.json中添加
//头部引用
const NodePolyfillPlugin = require('node-polyfill-webpack-plugin')

//加入
configureWebpack: {
    plugins: [new NodePolyfillPlugin()]
}
2
3
4
5
6
7
# 按需引入element-ui,无法引入el-scrollbar
Scrollbar是element-ui的隐藏组件,没有暴露这个组件。
暴力解决
node_modules/element-ui/types下面添加一个scrollbar.d.ts的文件:
# v-on="$listeners"
# svg
以下内容摘自官网
# 什么是SVG?
- SVG 指可伸缩矢量图形 (Scalable Vector Graphics)
- SVG 用来定义用于网络的基于矢量的图形
- SVG 使用 XML 格式定义图形
- SVG 图像在放大或改变尺寸的情况下其图形质量不会有所损失
- SVG 是万维网联盟的标准
- SVG 与诸如 DOM 和 XSL 之类的 W3C 标准是一个整体
<?xml version="1.0" standalone="no"?>

<!DOCTYPE svg PUBLIC "-//W3C//DTD SVG 1.1//EN"
"http://www.w3.org/Graphics/SVG/1.1/DTD/svg11.dtd">

<svg width="100%" height="100%" version="1.1"
xmlns="http://www.w3.org/2000/svg">

<circle cx="100" cy="50" r="40" stroke="black"
stroke-width="2" fill="red"/>

</svg>
2
3
4
5
6
7
8
9
10
11
12
SVG 代码以 <svg> 元素开始,包括开启标签 <svg和关闭标签 。这是根元素。width 和 height 属性可设置此 SVG 文档的宽度和高度。version 属性可定义所使用的 SVG 版本,xmlns 属性可定义 SVG 命名空间。
SVG 的
<circle>用来创建一个圆。cx 和 cy 属性定义圆中心的 x 和 y 坐标。如果忽略这两个属性,那么圆点会被设置为 (0, 0)。r 属性定义圆的半径。stroke 和 stroke-width 属性控制如何显示形状的轮廓。我们把圆的轮廓设置为 2px 宽,黑边框。
fill 属性设置形状内的颜色。我们把填充颜色设置为红色。
SVG 文件可通过以下标签嵌入 HTML 文档:<embed>、<object> 或者 <iframe>。
# 使用 <embed> 标签
<embed src="rect.svg" width="300" height="100"
type="image/svg+xml"
pluginspage="http://www.adobe.com/svg/viewer/install/" />
2
3
**注释:**pluginspage 属性指向下载插件的 URL。
# 使用 <object> 标签
<object data="rect.svg" width="300" height="100"
type="image/svg+xml"
codebase="http://www.adobe.com/svg/viewer/install/" />
2
3
**注释:**codebase 属性指向下载插件的 URL。
# 使用 <iframe> 标签
<iframe> 标签可工作在大部分的浏览器中。
# aria-hidden:"true"
https://developer.mozilla.org/zh-CN/docs/Web/Accessibility/ARIA/Attributes/aria-hidden
# 为什么要写一个SvgIcon组件
# svg-sprite-loader
使用 svg-sprite-loader、svgo-loader 优化 svg symbols (opens new window)
# 动态组件
渲染一个“元组件”为动态组件。依 is 的值,来决定哪个组件被渲染。
<!-- 动态组件由 vm 实例的 `componentId` property 控制 -->
<component :is="componentId"></component>
2
# 引入variables.scss读取不到变量
关于Scss样式中使用 :export 导出的对象在js中未空对象问题解答 (opens new window)

# 自己实现vuex持久化
# 退出登录请求异常
cess to XMLHttpRequest at 'http://localhost:8000/login?logout' (redirected from 'http://localhost:8080/dev-api/logout') from origin 'http://localhost:8080' has been blocked by CORS policy: Response to preflight request doesn't pass access control check: No 'Access-Control-Allow-Origin' header is present on the requested resource.
Spring Security/logout请求默认跳转到/login?logout解决方案 (opens new window)
# CSS--BEM风格介绍
CSS--BEM风格介绍 (opens new window)
# fusejs使用说明
https://fusejs.io/api/options.html
# 基于路由的过渡效果
官方链接:https://router.vuejs.org/zh/guide/advanced/transitions.html#%E5%9F%BA%E4%BA%8E%E8%B7%AF%E7%94%B1%E7%9A%84%E5%8A%A8%E6%80%81%E8%BF%87%E6%B8%A1
# 自定义主题解决fonts丢失问题
:8080/fonts/element-icons.woff:1 GET http://localhost:8080/fonts/element-icons.woff net::ERR_ABORTED 404 (Not Found) :8080/fonts/element-icons.ttf:1 GET http://localhost:8080/fonts/element-icons.ttf net::ERR_ABORTED 404 (Not Found)
获取到的css 需要替换掉@font-face, 也就是不覆盖默认的@font-face
data.replace(/@font-face{[^}]+}/, '')
# git 打标签
git tag v1.0	//打标签
git tag -a v0.1 -m "version 0.1 released" 1094adb //指定标签名和说明文字
git tag	//查看所有标签
//若是忘记打,则查找历史提交commit id ,再打上
git log --pretty=oneline --abbrev-commit
git tag v0.9 f52c633
git show v0.9		//查看标签详细信息
git tag -d v0.1	//删除标签
git push origin v1.0	//推送标签到远程
git push origin –tags	//一次性推送全部本地标签
//删除标签,(若已推送到远程,先从本地删除,从远程删除)
git tag -d v0.9
git push origin :refs/tags/v0.9
2
3
4
5
6
7
8
9
10
11
12
13
# 导入组件报错(组件名字是index.vue,同目录下还有index.js)
export 'default' (imported as 'DUploadExcel') was not found in '@/components/DUploadExcel' (possible exports: getHeaderRow)
// 导入组件语句
import DUploadExcel from '@/components/DUploadExcel'
2
原因: 识别到了index.js
解决方法:
- import DUploadExcel from '@/components/DUploadExcel/index.vue'
- 修改index.js名称
# 弹窗自定义拖拽
参考文章:https://blog.csdn.net/qinleilei7760631/article/details/123885576
# 自定义组件v-model
自定义组件的 v-model (opens new window)
一个组件上的 v-model 默认会利用名为 value 的 prop 和名为 input 的事件,但是像单选框、复选框等类型的输入控件可能会将 value attribute 用于不同的目的 (opens new window)。model 选项可以用来避免这样的冲突:
# offsetWidth和clientWidth等介绍
参考文章:https://blog.csdn.net/weixin_39905500/article/details/110897355
- HTMLElement.offsetWidth是一个只读属性,返回一个元素的布局宽度。各浏览器的
offsetWidth可能有所不同)offsetWidth是测量包含元素的边框(border)、水平线上的内边距(padding)、竖直方向滚动条(scrollbar)(如果存在的话)、以及CSS设置的宽度(width)的值。即CSS3中的border-box模型的宽度。 - HTMLElement.clientWidth 属性表示元素的内部宽度,以像素计。
- HTMLElement.scrollWidth 这个只读属性是元素内容宽度的一种度量,包括由于overflow溢出而在屏幕上不可见的内容。
# requireContext.keys().map(requireContext)
requireContext.keys().map(requireContext)在批量导入时的作用 (opens new window)
require.context 的返回值,这个返回值是一个函数,只要传入函数名就会被 webpack 自动进行导入。
function(requireContext) {
	requireContext.keys() // 得到了所有导入的模块名数组
				  .map(function(moduleName){
				  			autorequire(moduleName) // webpack 自动导入
				  			})
				  				}
2
3
4
5
6
# 正则表达式
JavaScript正则表达式(完整版) (opens new window)
# 实现复制
使用插件 clipboard
npm install clipboard --save
# Vue自定义指令
函数:
bind第一次绑定到元素时调用(初始化)inserted被绑定元素插入父节点时调用 (仅保证父节点存在,但不一定已被插入文档中)update数据更新时调用componentUpdated指令所在组件的 VNode 及其子 VNode 全部更新后调用。unbind只调用一次,指令与元素解绑时调用。
传递参数:
el:指令绑定到的元素。这可以用于直接操作 DOM。binding:一个对象,包含以下属性。value:传递给指令的值。例如在 v-my-directive="1 + 1" 中,值是 2。oldValue:之前的值,仅在 beforeUpdate 和 updated 中可用。无论值是否更改,它都可用。arg:传递给指令的参数 (如果有的话)。例如在 v-my-directive:foo 中,参数是 "foo"。modifiers:一个包含修饰符的对象 (如果有的话)。例如在 v-my-directive.foo.bar 中,修饰符对象是 { foo: true, bar: true }。instance:使用该指令的组件实例。dir:指令的定义对象。
vnode:代表绑定元素的底层 VNode。prevNode:之前的渲染中代表指令所绑定元素的 VNode。仅在 beforeUpdate 和 updated 钩子中可用。
# 使用clipboard实现文本复制,点击svg图标报错
[Vue warn]: Error in v-on handler: "TypeError: First argument must be a String, HTMLElement, HTMLCollection, or NodeList"
pointer-events: none;你可以看的到某个元素,但是你无法摸的着,点击不到,点击会穿透触发到下层的元素
<svg-icon style="pointer-events: none" :icon-class="item" class="d-icons-item-icon"></svg-icon>
# 通信格式说明
{
    sql: '', // 非必传,如果传了这个,table里面的内容将不会生效
    table: { // 非必传
        name: '', // 表名称
        fields: ''. // 查询的字段,多个字段用逗号隔开,不传默认为*
        filter: [
        	{
                and: [
                    {
                        user_id: {
                            ">": 1
                        }
                    }
                ]
            },
            {
                 or: [ // 代表里面的关系是or
                    {
                        user_id: {
                            ">": 1
                        },
                        username: {
                            "=": "admin"
                        }
                    }
                ]
            }
        ],
      	group: 'username', // 非必传,多个字段用逗号隔开
        order: "user_id desc",  // 非必传,多个字段用逗号隔开
        page: 1, // 非必传 page和size如果二者只传一个有默认值(page: 1, size: 10)
        size: 2 // 非必传
    }
}
2
3
4
5
6
7
8
9
10
11
12
13
14
15
16
17
18
19
20
21
22
23
24
25
26
27
28
29
30
31
32
33
34
//添加
{
    "type": "add",
     "table": {
        "name": "sys_user",
        "data": {
            "dept_id": 4,
            "username": "test001",
            "nick_name": "test002"
        }
     }
}

// 修改
{
    "type": "edit",
     "table": {
        "name": "sys_user",
        "data": {
            "dept_id": 5
        },
        "filter": [
             {
                "and": [
                    {
                        "user_id": {
                            ">": 1
                        }
                    }
                ]
            }
        ]
     }
}

// 删除
{
    "type": "del",
     "table": {
        "name": "sys_user",
        "filter": [
             {
                "and": [
                    {
                        "user_id": {
                            ">": 2
                        }
                    }
                ]
            }
        ]
     }
}
2
3
4
5
6
7
8
9
10
11
12
13
14
15
16
17
18
19
20
21
22
23
24
25
26
27
28
29
30
31
32
33
34
35
36
37
38
39
40
41
42
43
44
45
46
47
48
49
50
51
52
53
# 打包流程与部署
最后发现只打包父项目就ok
父项目 install
然后打包子项目 A依赖B ,要先打包B
最后打包入口文件,也就是含有启动类的文件
打包后的地址在控制台

nohup java -jar myapp.jar &
# Swagger地址
http://localhost:8000/swagger-ui/#/
线上地址: http://www.006969.xyz:8000/swagger-ui/#/