 axios
axios
# axios
npm install axios --save
1
http://httpbin.org/
http://123.207.32.32:8000/home/multidata
http://123.207.32.32:8000/home/data?type=sell&page=1
Vue中发送网络请求有非常多的方式, 那么, 在开发中, 如何选择呢?
选择一: 传统的Ajax是基于XMLHttpRequest(XHR)
- 为什么不用它呢?
- 非常好解释, 配置和调用方式等非常混乱.
- 编码起来看起来就非常蛋疼.
- 所以真实开发中很少直接使用, 而是使用jQuery-Ajax
- 为什么不用它呢?
选择二: 在前面的学习中, 我们经常会使用jQuery-Ajax 相对于传统的Ajax非常好用.
- 为什么不选择它呢?
- 首先, 我们先明确一点: 在Vue的整个开发中都是不需要使用jQuery了.
- 那么, 就意味着为了方便我们进行一个网络请求, 特意引用一个jQuery, 你觉得合理吗?
- jQuery的代码1w+行.
- Vue的代码才1w+行.
- 完全没有必要为了用网络请求就引用这个重量级的框架.
- 为什么不选择它呢?
选择三: 官方在Vue1.x的时候, 推出了Vue-resource.
Vue-resource的体积相对于jQuery小很多. 另外Vue-resource是官方推出的.
- 为什么不选择它呢?
- 在Vue2.0退出后, Vue作者就在GitHub的Issues中说明了去掉vue-resource, 并且以后也不会再更新.
- 那么意味着以后vue-reource不再支持新的版本时, 也不会再继续更新和维护.
- 对以后的项目开发和维护都存在很大的隐患.
选择四: 在说明不再继续更新和维护vue-resource的同时, 作者还推荐了一个框架: axios axios有非常多的优点, 并且用起来也非常方便.
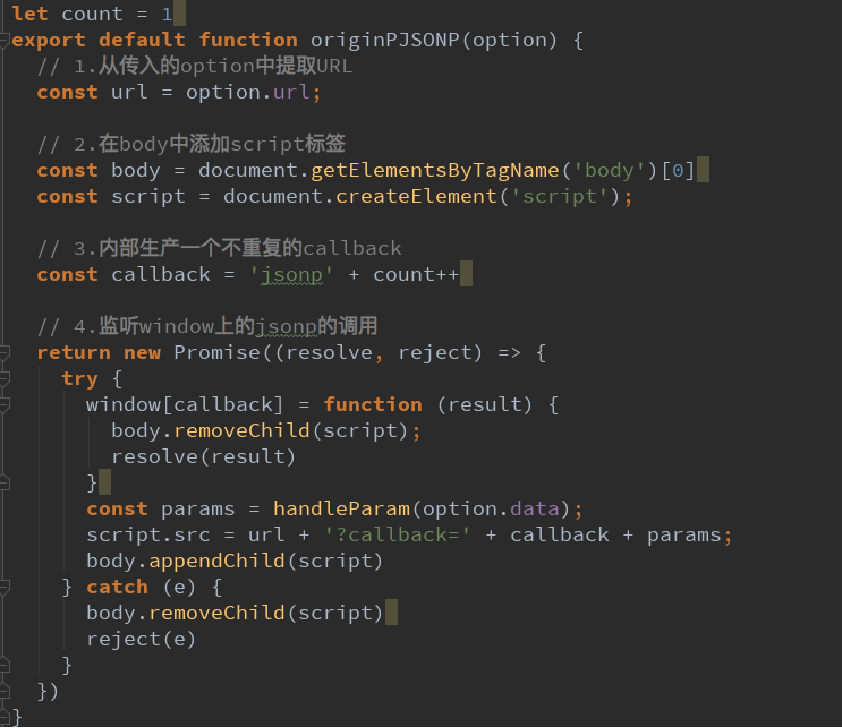
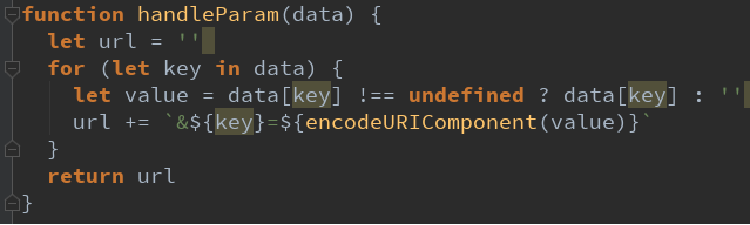
# jsonp
- 在前端开发中, 我们一种常见的网络请求方式就是JSONP
- 使用JSONP最主要的原因往往是为了解决跨域访问的问题.
- JSONP的原理是什么呢?
- JSONP的核心在于通过
<script>标签的src来帮助我们请求数据. - 原因是我们的项目部署在domain1.com服务器上时, 是不能直接访问domain2.com服务器上的资料的.
- 这个时候, 我们利用
<script>标签的src帮助我们去服务器请求到数据, 将数据当做一个javascript的 - 函数来执行, 并且执行的过程中传入我们需要的json.
- 所以, 封装jsonp的核心就在于我们监听window上的jsonp进行回调时的名称.
- JSONP的核心在于通过
- JSONP的原理是什么呢?

# axios特点
- 在浏览器中发送 XMLHttpRequests 请求
- 在 node.js 中发送 http请求
- 支持 Promise API
- 拦截请求和响应
- 转换请求和响应数据
支持多种请求方式:
axios(config)axios.request(config)axios.get(url[, config])axios.delete(url[, config])axios.head(url[, config])axios.post(url[, data[, config]])axios.put(url[, data[, config]])axios.patch(url[, data[, config]])
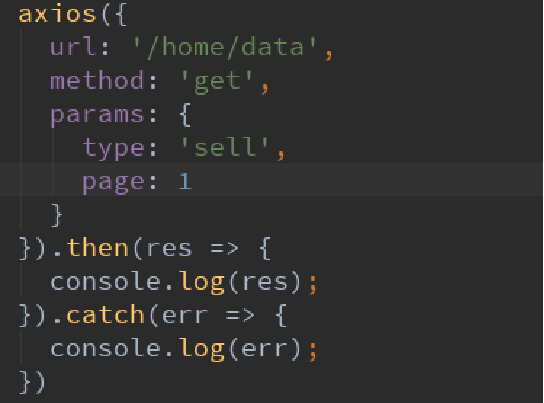
# 发送get请求
axios({
  url: 'http://123.207.32.32:8000/home/multidata',
  method: 'get' // 默认是get请求
}).then(res => {
  console.log(res)
})
1
2
3
4
5
6
2
3
4
5
6
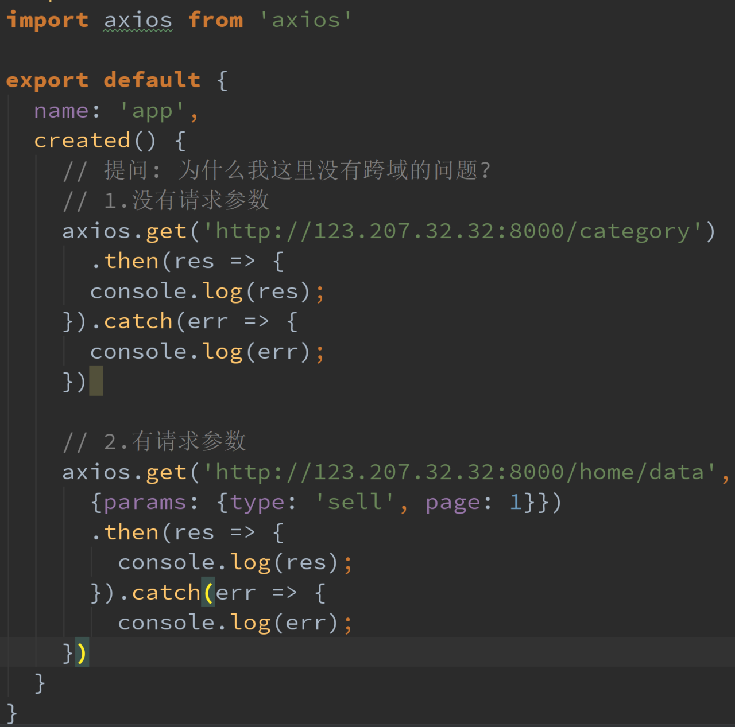
axios.get('http://123.207.32.32:8000/home/data',
  {params: { type: 'shell', page: 1}})
    .then(res => {
      console.log(res)
  })
1
2
3
4
5
2
3
4
5
使用axios.all, 可以放入多个请求的数组. axios.all([]) 返回的结果是一个数组,使用 axios.spread 可将数组 [res1,res2] 展开为 res1, res2
axios.all([axios.get('http://123.207.32.32:8000/home/multidata'),axios.get('http://123.207.32.32:8000/home/data',
  {params: {type: 'shell', page: 1}})
]).then(axios.spread((res1, res2) =>{
  console.log(res1)
  console.log(res2)
}))
1
2
3
4
5
6
2
3
4
5
6
全局配置
axios.defaults.baseURL = ‘123.207.32.32:8000’
axios.defaults.headers.post[‘Content-Type’] = ‘application/x-www-form-urlencoded’;
1
2
2
axios.defaults.baseURL = "http://123.207.32.32:8000"

axios.all([axios.get('/home/multidata'),axios.get('/home/data',
  {params: {type: 'shell', page: 1}})
]).then(axios.spread((res1, res2) =>{
  console.log(res1)
  console.log(res2)
}))
1
2
3
4
5
6
7
8
2
3
4
5
6
7
8
- 请求地址 url: '/user',
- 请求类型 method: 'get',
- 请根路径 baseURL: 'http://www.mt.com/api',
- 请求前的数据处理 transformRequest:[function(data){}],
- 请求后的数据处理 transformResponse: [function(data){}],
- 自定义的请求头 headers:{'x-Requested-With':'XMLHttpRequest'},
- URL查询对象 params:{ id: 12 },
- 查询对象序列化函数 paramsSerializer: function(params){ } request body data: { key: 'aa'},
- 超时设置s timeout: 1000,
- 跨域是否带Token withCredentials: false,
- 自定义请求处理 adapter: function(resolve, reject, config){},
- 身份验证信息 auth: { uname: '', pwd: '12'},
- 响应的数据格式 json / blob /document /arraybuffer / text / stream responseType: 'json',
# axios实例
- 为什么要创建axios的实例呢?
- 当我们从axios模块中导入对象时, 使用的实例是默认的实例.
- 当给该实例设置一些默认配置时, 这些配置就被固定下来了.
- 但是后续开发中, 某些配置可能会不太一样.
- 比如某些请求需要使用特定的baseURL或者timeout或者content-Type等.
- 这个时候, 我们就可以创建新的实例, 并且传入属于该实例的配置信息.
// 创建新的实例
const axiosInstance = axios.create({
  baseURL: 'http://123.207.32.32:8000',
  timeout: 5000,
  headers: {
    'Content-Type': 'application/x-www-form-urlencoded'
  }
})

axiosInstance({
  url:'/home/multidata',
  method: 'get'
}).then(res => {
  console.log(res)
}).catch(err => {
  console.log(err)
})
1
2
3
4
5
6
7
8
9
10
11
12
13
14
15
16
17
18
2
3
4
5
6
7
8
9
10
11
12
13
14
15
16
17
18
# axios封装
src->network->request.js
import axios from 'axios'
export function request(config) {
// 1.创建axios的实例
const instance = axios.create({
baseURL: 'http://123.207.32.32:8000',
timeout: 5000,
})
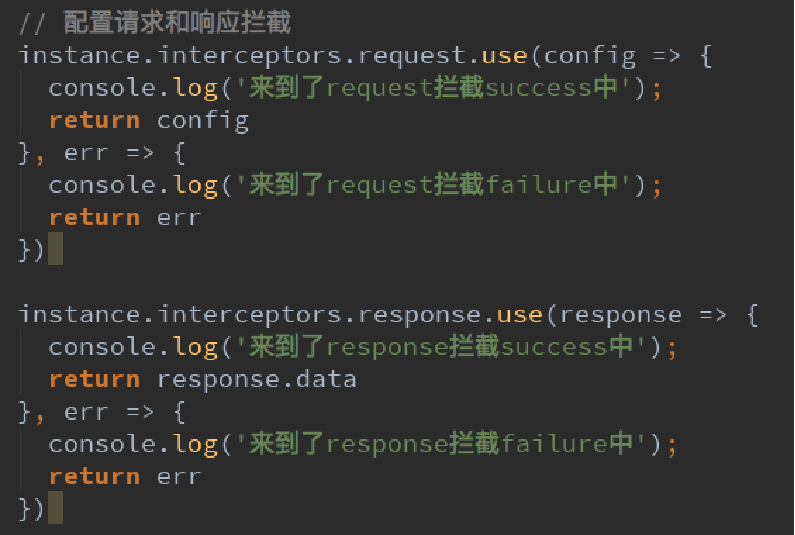
// 2.axios的拦截器
// 2.1请求拦截的作用
// 发送真正的网络请求
instance.interceptors.request.use(config => {
// console.log(config);
// 1.比如config中的一些信息不符合服务器的要求
// 2.比如每次发送网络请求时, 都希望在界面中显示一个请求的图标
// 3.某些网络请求(比如登录(token)), 必须携带一些特殊的信息
return config
}, err => {
console.log(err)
})
// 2.2响应拦截
instance.interceptors.response.use(res => {
return res.data
}, err => {
console.log(err)
})
// 3.发送真正的网络请求
return instance(config)
}
1
2
3
4
5
6
7
8
9
10
11
12
13
14
15
16
17
18
19
20
21
22
23
24
25
26
27
28
29
30
31
32
2
3
4
5
6
7
8
9
10
11
12
13
14
15
16
17
18
19
20
21
22
23
24
25
26
27
28
29
30
31
32
main.js
import {request} from './network/request'

request({
  url: '/home/multidata'
})
.then(res => {
  console.log(res)
})
.catch(err => {
  console.log(err)
})
1
2
3
4
5
6
7
8
9
10
11
2
3
4
5
6
7
8
9
10
11
# 拦截器
编辑 (opens new window)
上次更新: 2024/12/19, 09:15:30