 Maven
Maven
# Maven
# 1 为什么要学习Maven?
# 1、Maven 作为依赖管理工具
# ①jar 包的规模
随着我们使用越来越多的框架,或者框架封装程度越来越高,项目中使用的jar包也越来越多。项目中,一个模块里面用到上百个jar包是非常正常的。
比如下面的例子,我们只用到 SpringBoot、SpringCloud 框架中的三个功能:
- Nacos 服务注册发现
- Web 框架环境
- 图模板技术 Thymeleaf
最终却导入了 106 个 jar 包:
org.springframework.security:spring-security-rsa:jar:1.0.9.RELEASE:compile com.netflix.ribbon: ribbon:jar:2.3.0:compile org.springframework.boot:spring-boot-starter-thymeleaf:jar:2.3.6.RELEASE:compile commons-configuration:commons-configuration:jar:1.8:compile org.apache.logging.log4j:log4j-api:jar:2.13.3:compile org.springframework:spring-beans:jar:5.2.11.RELEASE:compile org.springframework.cloud:spring-cloud-starter-netflix-ribbon:jar:2.2.6.RELEASE:compile org.apache.tomcat.embed:tomcat-embed-websocket:jar:9.0.39:compile com.alibaba.cloud:spring-cloud-alibaba-commons:jar:2.2.6.RELEASE:compile org.bouncycastle:bcprov-jdk15on:jar:1.64:compile org.springframework.security:spring-security-crypto:jar:5.3.5.RELEASE:compile org.apache.httpcomponents:httpasyncclient:jar:4.1.4:compile com.google.j2objc:j2objc-annotations:jar:1.3:compile com.fasterxml.jackson.core:jackson-databind:jar:2.11.3:compile io.reactivex:rxjava:jar:1.3.8:compile ch.qos.logback:logback-classic:jar:1.2.3:compile org.springframework:spring-web:jar:5.2.11.RELEASE:compile io.reactivex:rxnetty-servo:jar:0.4.9:runtime org.springframework:spring-core:jar:5.2.11.RELEASE:compile io.github.openfeign.form:feign-form-spring:jar:3.8.0:compile io.github.openfeign.form:feign-form:jar:3.8.0:compile com.netflix.ribbon:ribbon-loadbalancer:jar:2.3.0:compile org.apache.httpcomponents:httpcore:jar:4.4.13:compile org.thymeleaf.extras:thymeleaf-extras-java8time:jar:3.0.4.RELEASE:compile org.slf4j:jul-to-slf4j:jar:1.7.30:compile com.atguigu.demo:demo09-base-entity:jar:1.0-SNAPSHOT:compile org.yaml:snakeyaml:jar:1.26:compile org.springframework.boot:spring-boot-starter-logging:jar:2.3.6.RELEASE:compile io.reactivex:rxnetty-contexts:jar:0.4.9:runtime org.apache.httpcomponents:httpclient:jar:4.5.13:compile io.github.openfeign:feign-core:jar:10.10.1:compile org.springframework.boot:spring-boot-starter-aop:jar:2.3.6.RELEASE:compile org.hdrhistogram:HdrHistogram:jar:2.1.9:compile org.springframework:spring-context:jar:5.2.11.RELEASE:compile commons-lang:commons-lang:jar:2.6:compile io.prometheus:simpleclient:jar:0.5.0:compile ch.qos.logback:logback-core:jar:1.2.3:compile org.springframework:spring-webmvc:jar:5.2.11.RELEASE:compile com.sun.jersey:jersey-core:jar:1.19.1:runtime javax.ws.rs:jsr311-api:jar:1.1.1:runtime javax.inject:javax.inject:jar:1:runtime org.springframework.cloud:spring-cloud-openfeign-core:jar:2.2.6.RELEASE:compile com.netflix.ribbon:ribbon-core:jar:2.3.0:compile com.netflix.hystrix:hystrix-core:jar:1.5.18:compile com.netflix.ribbon:ribbon-transport:jar:2.3.0:runtime org.springframework.boot:spring-boot-starter-json:jar:2.3.6.RELEASE:compile org.springframework.cloud:spring-cloud-starter-openfeign:jar:2.2.6.RELEASE:compile com.fasterxml.jackson.module:jackson-module-parameter-names:jar:2.11.3:compile com.sun.jersey.contribs:jersey-apache-client4:jar:1.19.1:runtime io.github.openfeign:feign-hystrix:jar:10.10.1:compile io.github.openfeign:feign-slf4j:jar:10.10.1:compile com.alibaba.nacos:nacos-client:jar:1.4.2:compile org.apache.httpcomponents:httpcore-nio:jar:4.4.13:compile com.sun.jersey:jersey-client:jar:1.19.1:runtime org.springframework.cloud:spring-cloud-context:jar:2.2.6.RELEASE:compile org.glassfish:jakarta.el:jar:3.0.3:compile org.apache.logging.log4j:log4j-to-slf4j:jar:2.13.3:compile com.fasterxml.jackson.datatype:jackson-datatype-jsr310:jar:2.11.3:compile org.springframework.cloud:spring-cloud-commons:jar:2.2.6.RELEASE:compile org.aspectj:aspectjweaver:jar:1.9.6:compile com.alibaba.cloud:spring-cloud-starter-alibaba-nacos-discovery:jar:2.2.6.RELEASE:compile com.google.guava:listenablefuture:jar:9999.0-empty-to-avoid-conflict-with-guava:compile com.alibaba.spring:spring-context-support:jar:1.0.10:compile jakarta.annotation:jakarta.annotation-api:jar:1.3.5:compile org.bouncycastle:bcpkix-jdk15on:jar:1.64:compile com.netflix.netflix-commons:netflix-commons-util:jar:0.3.0:runtime com.fasterxml.jackson.core:jackson-annotations:jar:2.11.3:compile com.google.guava:guava:jar:29.0-jre:compile com.google.guava:failureaccess:jar:1.0.1:compile org.springframework.boot:spring-boot:jar:2.3.6.RELEASE:compile com.fasterxml.jackson.datatype:jackson-datatype-jdk8:jar:2.11.3:compile com.atguigu.demo:demo08-base-api:jar:1.0-SNAPSHOT:compile org.springframework.cloud:spring-cloud-starter-netflix-archaius:jar:2.2.6.RELEASE:compile org.springframework.boot:spring-boot-autoconfigure:jar:2.3.6.RELEASE:compile org.slf4j:slf4j-api:jar:1.7.30:compile commons-io:commons-io:jar:2.7:compile org.springframework.cloud:spring-cloud-starter:jar:2.2.6.RELEASE:compile org.apache.tomcat.embed:tomcat-embed-core:jar:9.0.39:compile io.reactivex:rxnetty:jar:0.4.9:runtime com.fasterxml.jackson.core:jackson-core:jar:2.11.3:compile com.google.code.findbugs:jsr305:jar:3.0.2:compile com.netflix.archaius:archaius-core:jar:0.7.6:compile org.springframework.boot:spring-boot-starter-web:jar:2.3.6.RELEASE:compile commons-codec:commons-codec:jar:1.14:compile com.netflix.servo:servo-core:jar:0.12.21:runtime com.google.errorprone:error_prone_annotations:jar:2.3.4:compile org.attoparser:attoparser:jar:2.0.5.RELEASE:compile com.atguigu.demo:demo10-base-util:jar:1.0-SNAPSHOT:compile org.checkerframework:checker-qual:jar:2.11.1:compile org.thymeleaf:thymeleaf-spring5:jar:3.0.11.RELEASE:compile commons-fileupload:commons-fileupload:jar:1.4:compile com.netflix.ribbon:ribbon-httpclient:jar:2.3.0:compile com.netflix.netflix-commons:netflix-statistics:jar:0.1.1:runtime org.unbescape:unbescape:jar:1.1.6.RELEASE:compile org.springframework:spring-jcl:jar:5.2.11.RELEASE:compile com.alibaba.nacos:nacos-common:jar:1.4.2:compile commons-collections:commons-collections:jar:3.2.2:runtime javax.persistence:persistence-api:jar:1.0:compile com.alibaba.nacos:nacos-api:jar:1.4.2:compile org.thymeleaf:thymeleaf:jar:3.0.11.RELEASE:compile org.springframework:spring-aop:jar:5.2.11.RELEASE:compile org.springframework.boot:spring-boot-starter:jar:2.3.6.RELEASE:compile org.springframework.boot:spring-boot-starter-tomcat:jar:2.3.6.RELEASE:compile org.springframework.cloud:spring-cloud-netflix-ribbon:jar:2.2.6.RELEASE:compile org.springframework:spring-expression:jar:5.2.11.RELEASE:compile org.springframework.cloud:spring-cloud-netflix-archaius:jar:2.2.6.RELEASE:compile
而如果使用 Maven 来引入这些 jar 包只需要配置三个『依赖』:
    <!-- Nacos 服务注册发现启动器 -->
    <dependency>
        <groupId>com.alibaba.cloud</groupId>
        <artifactId>spring-cloud-starter-alibaba-nacos-discovery</artifactId>
    </dependency>

    <!-- web启动器依赖 -->
    <dependency>
        <groupId>org.springframework.boot</groupId>
        <artifactId>spring-boot-starter-web</artifactId>
    </dependency>

    <!-- 视图模板技术 thymeleaf -->
    <dependency>
        <groupId>org.springframework.boot</groupId>
        <artifactId>spring-boot-starter-thymeleaf</artifactId>
    </dependency>
2
3
4
5
6
7
8
9
10
11
12
13
14
15
16
17
# ②jar 包的来源
- 这个jar包所属技术的官网。官网通常是英文界面,网站的结构又不尽相同,甚至找到下载链接还发现需要通过特殊的工具下载。
- 第三方网站提供下载。问题是不规范,在使用过程中会出现各种问题。
- jar包的名称
- jar包的版本
- jar包内的具体细节
- 而使用 Maven 后,依赖对应的 jar 包能够自动下载,方便、快捷又规范。
# ③jar 包之间的依赖关系
框架中使用的 jar 包,不仅数量庞大,而且彼此之间存在错综复杂的依赖关系。依赖关系的复杂程度,已经上升到了完全不能靠人力手动解决的程度。另外,jar 包之间有可能产生冲突。进一步增加了我们在 jar 包使用过程中的难度。
下面是前面例子中 jar 包之间的依赖关系:
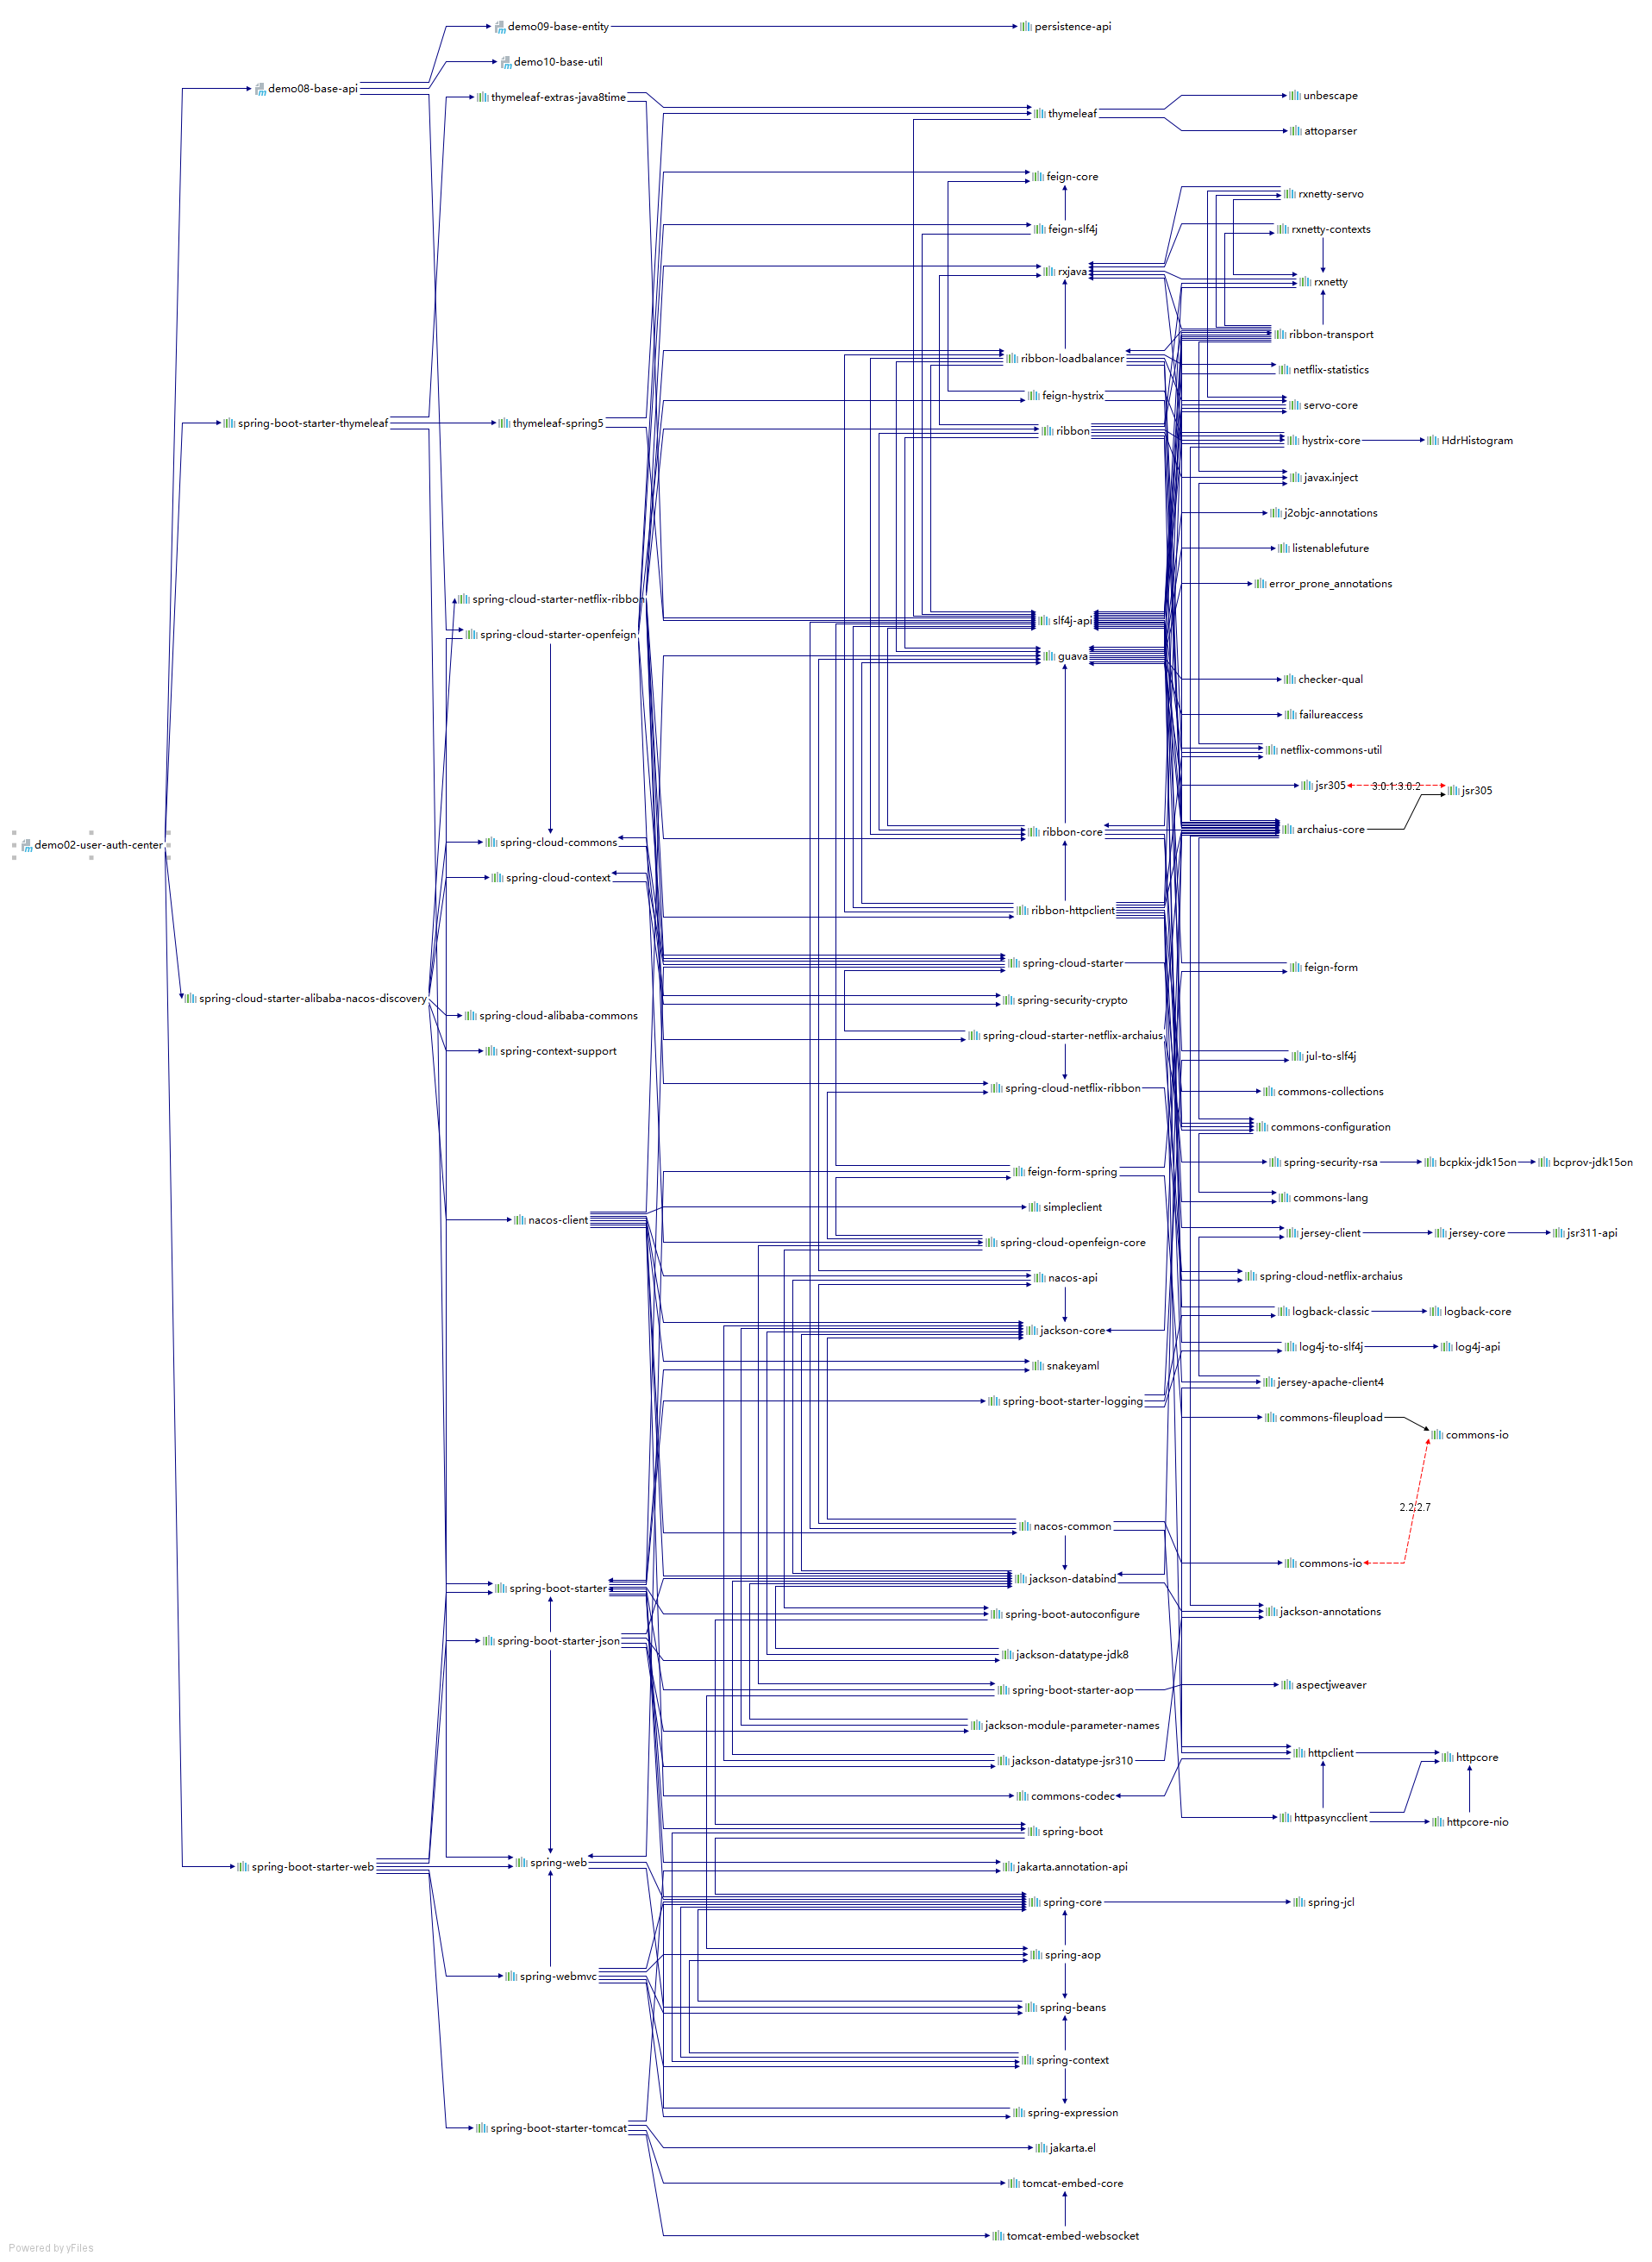
而实际上 jar 包之间的依赖关系是普遍存在的,如果要由程序员手动梳理无疑会增加极高的学习成本,而这些工作又对实现业务功能毫无帮助。
而使用 Maven 则几乎不需要管理这些关系,极个别的地方调整一下即可,极大的减轻了我们的工作量。
# 2、Maven 作为构建管理工具
# ①你没有注意过的构建
你可以不使用 Maven,但是构建必须要做。当我们使用 IDEA 进行开发时,构建是 IDEA 替我们做的。
# ②脱离 IDE 环境仍需构建
# 3、结论
- 管理规模庞大的 jar 包,需要专门工具。
- 脱离 IDE 环境执行构建操作,需要专门工具。
# 2 什么是 Maven?
Maven 是 Apache 软件基金会组织维护的一款专门为 Java 项目提供构建和依赖管理支持的工具。

# 1、构建
Java 项目开发过程中,构建指的是使用**『原材料生产产品』**的过程。
原材料
Java 源代码
基于 HTML 的 Thymeleaf 文件
图片
配置文件# (opens new window)……
产品
- 一个可以在服务器上运行的项目
构建过程包含的主要的环节:
- 清理:删除上一次构建的结果,为下一次构建做好准备
- 编译:Java 源程序编译成 *.class 字节码文件
- 测试:运行提前准备好的测试程序
- 报告:针对刚才测试的结果生成一个全面的信息
- 打包
- Java工程:jar包
- Web工程:war包
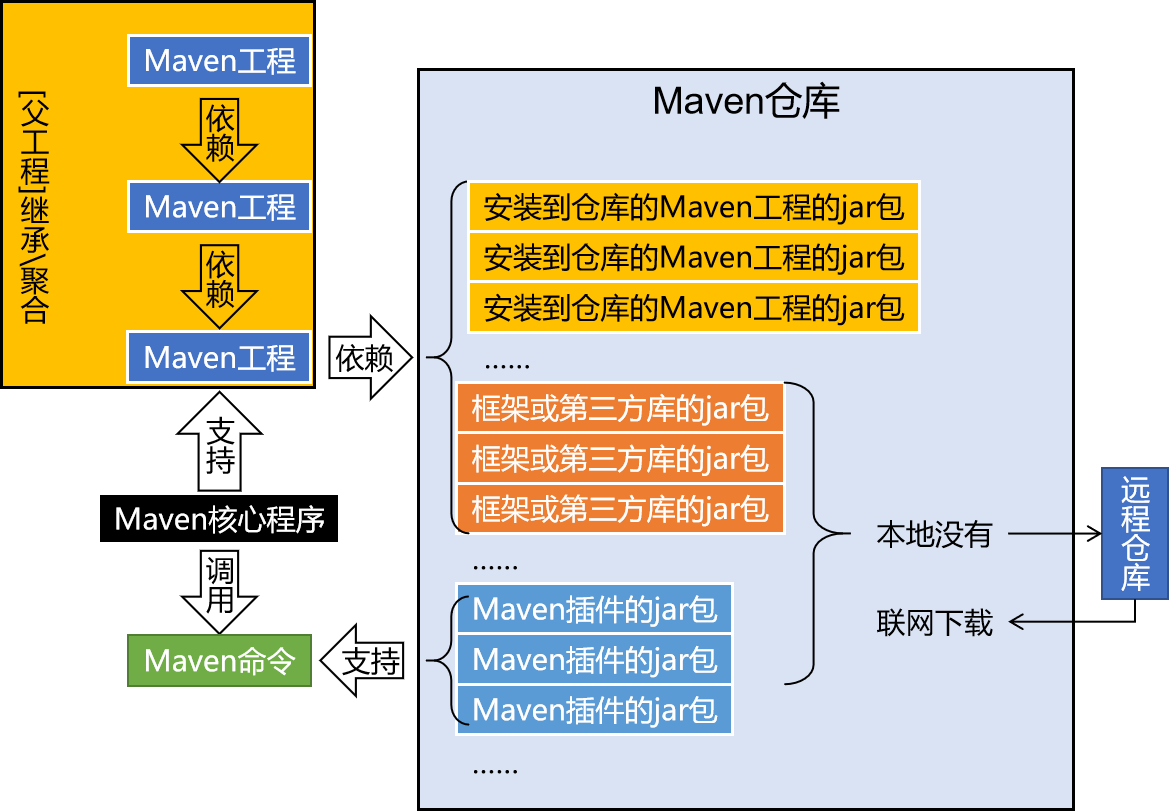
- 安装:把一个 Maven 工程经过打包操作生成的 jar 包或 war 包存入 Maven 仓库
- 部署
- 部署 jar 包:把一个 jar 包部署到 Nexus 私服服务器上
- 部署 war 包:借助相关 Maven 插件(例如 cargo),将 war 包部署到 Tomcat 服务器上
# 2、依赖
如果 A 工程里面用到了 B 工程的类、接口、配置文件等等这样的资源,那么我们就可以说 A 依赖 B。例如:
- junit-4.12 依赖 hamcrest-core-1.3
- thymeleaf-3.0.12.RELEASE 依赖 ognl-3.1.26
- ognl-3.1.26 依赖 javassist-3.20.0-GA
- thymeleaf-3.0.12.RELEASE 依赖 attoparser-2.0.5.RELEASE
- thymeleaf-3.0.12.RELEASE 依赖 unbescape-1.1.6.RELEASE
- thymeleaf-3.0.12.RELEASE 依赖 slf4j-api-1.7.26
依赖管理中要解决的具体问题:
- jar 包的下载:使用 Maven 之后,jar 包会从规范的远程仓库下载到本地
- jar 包之间的依赖:通过依赖的传递性自动完成
- jar 包之间的冲突:通过对依赖的配置进行调整,让某些jar包不会被导入
# 3、Maven 的工作机制
# 3 Maven核心程序解压与配置
# 1、Maven 官网地址
首页:
Maven – Welcome to Apache Maven(opens new window) (opens new window)
下载页面:
Maven – Download Apache Maven(opens new window) (opens new window)
下载链接:
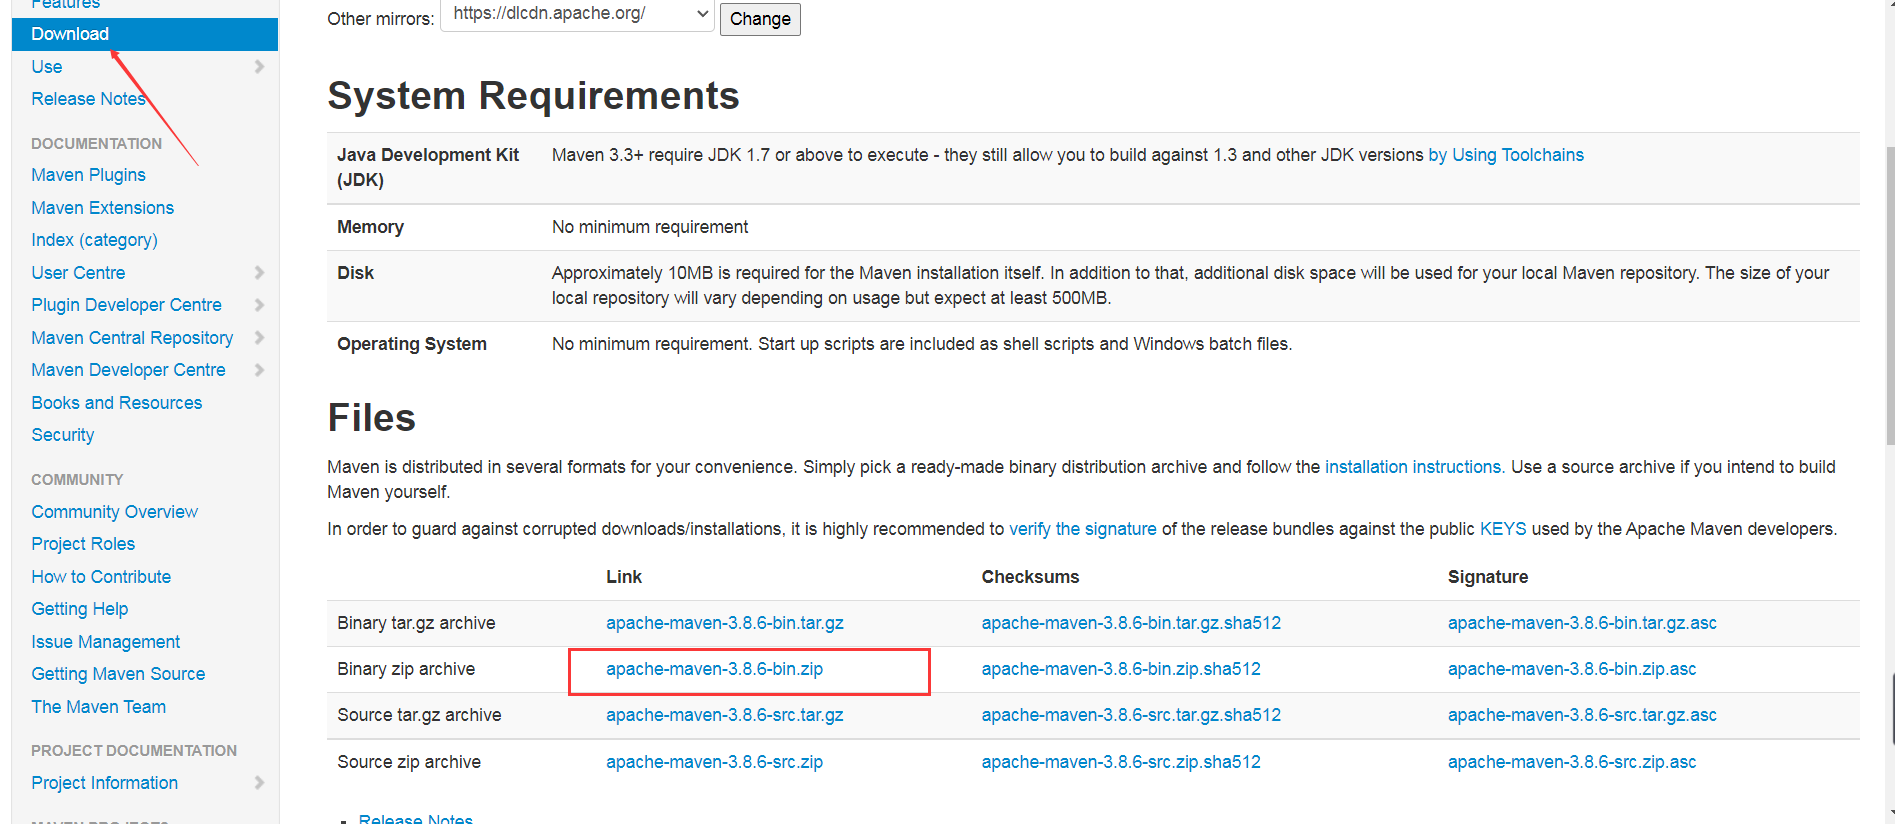
# 2、解压Maven核心程序
核心程序压缩包:apache-maven-3.8.6-bin.zip,解压到非中文、没有空格的目录。例如:
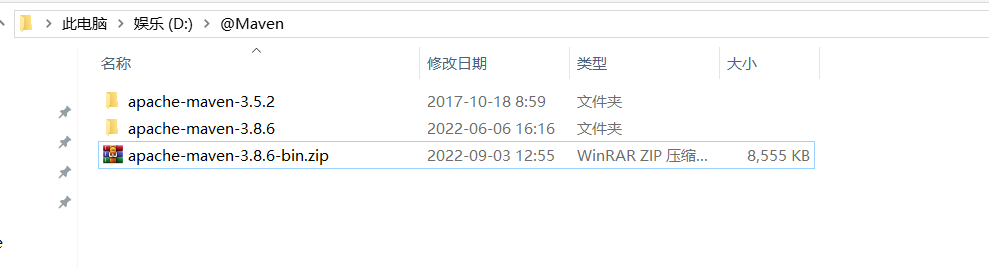
在解压目录中,我们需要着重关注 Maven 的核心配置文件:conf/settings.xml
# 3、指定本地仓库
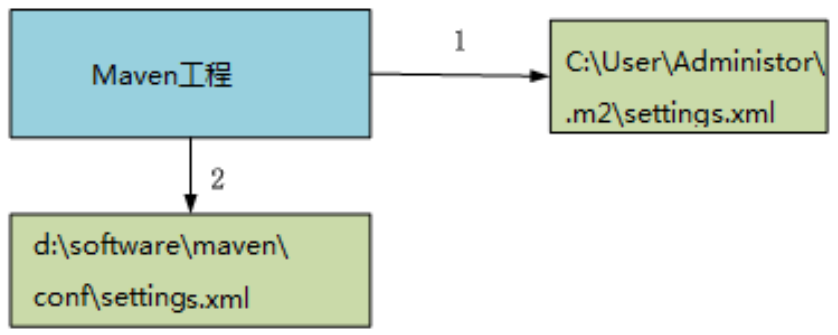
maven 仓库地址、私服等配置信息需要在 setting.xml 文件中配置,分为全局配置和用户配置。在 maven 安装目录下的有 conf/setting.xml 文件,此 setting.xml 文件用于 maven 的所有 project项目,它作为 maven 的全局配置。
如需要个性配置则需要在用户配置中设置,用户配置的 setting.xml 文件默认的位置在:${user.dir} /.m2/settings.xml 目录中,${user.dir} 指 windows 中的用户目录。
maven 会先找用户配置,如果找到则以用户配置文件为准,否则使用全局配置文件。
本地仓库默认值:用户家目录/.m2/repository。由于本地仓库的默认位置是在用户的家目录下,而家目录往往是在 C 盘,也就是系统盘。将来 Maven 仓库中 jar 包越来越多,仓库体积越来越大,可能会拖慢 C 盘运行速度,影响系统性能。所以建议将 Maven 的本地仓库放在其他盘符下。配置方式如下:
仓库地址下的conf->setting.xml
<!-- localRepository
| The path to the local repository maven will use to store artifacts.
|
| Default: ${user.home}/.m2/repository
<localRepository>/path/to/local/repo</localRepository>
-->
<!--配置maven仓库-->
<!--这个目录可以等执行构建命令时由maven创建-->
<localRepository>D:\@localwarehouse\maven_repository</localRepository>
2
3
4
5
6
7
8
9
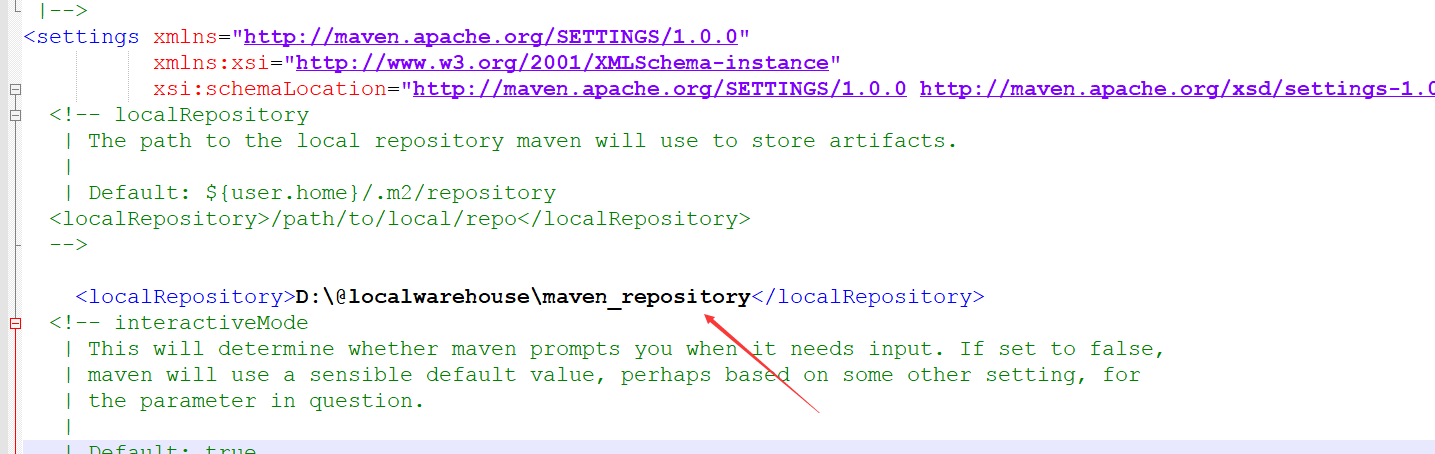
本地仓库这个目录,我们手动创建一个空的目录即可。
记住:一定要把 localRepository 标签从注释中拿出来。
注意:本地仓库本身也需要使用一个非中文、没有空格的目录。
# 4、配置阿里云提供的镜像仓库
Maven 下载 jar 包默认访问境外的中央仓库,而国外网站速度很慢。改成阿里云提供的镜像仓库,访问国内网站,可以让 Maven 下载 jar 包的时候速度更快。配置的方式是:
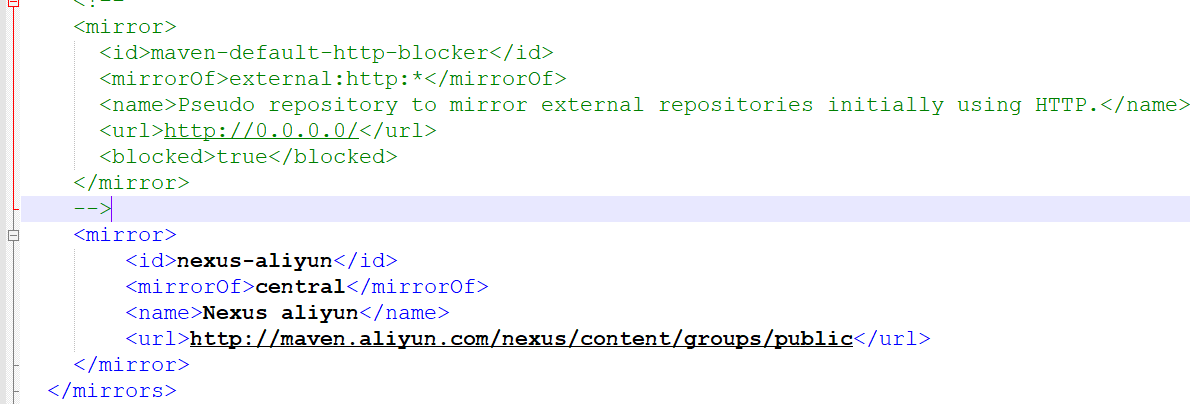
# ①将原有的例子配置注释掉
<!-- <mirror>
  <id>maven-default-http-blocker</id>
  <mirrorOf>external:http:*</mirrorOf>
  <name>Pseudo repository to mirror external repositories initially using HTTP.</name>
  <url>http://0.0.0.0/</url>
  <blocked>true</blocked>
</mirror> -->
2
3
4
5
6
7
# ②加入我们的配置
将下面 mirror 标签整体复制到 settings.xml 文件的 mirrors 标签的内部。
	<mirror>
		<id>nexus-aliyun</id>
		<mirrorOf>central</mirrorOf>
		<name>Nexus aliyun</name>
		<url>http://maven.aliyun.com/nexus/content/groups/public</url>
	</mirror>
2
3
4
5
6
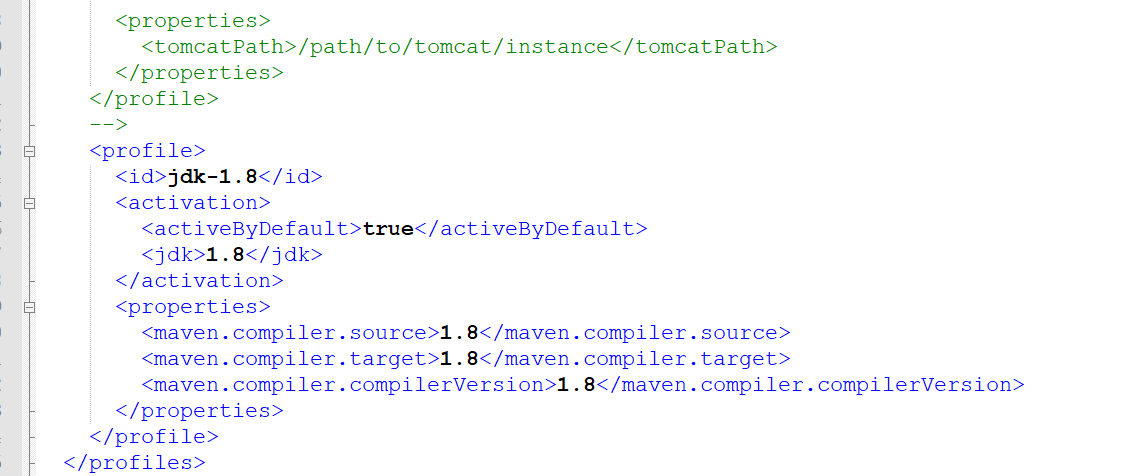
# 5、配置 Maven 工程的基础 JDK 版本
如果按照默认配置运行,Java 工程使用的默认 JDK 版本是 1.5,而我们熟悉和常用的是 JDK 1.8 版本。修改配置的方式是:将 profile 标签整个复制到 settings.xml 文件的 profiles 标签内。
	<profile>
	  <id>jdk-1.8</id>
	  <activation>
		<activeByDefault>true</activeByDefault>
		<jdk>1.8</jdk>
	  </activation>
	  <properties>
		<maven.compiler.source>1.8</maven.compiler.source>
		<maven.compiler.target>1.8</maven.compiler.target>
		<maven.compiler.compilerVersion>1.8</maven.compiler.compilerVersion>
	  </properties>
	</profile>
2
3
4
5
6
7
8
9
10
11
12
# 4 配置环境变量
# 1、检查 JAVA_HOME 配置是否正确
Maven 是一个用 Java 语言开发的程序,它必须基于 JDK 来运行,需要通过 JAVA_HOME 来找到 JDK 的安装位置。

可以使用下面的命令验证:
C:\Users\Administrator>echo %JAVA_HOME%
D:\software\Java

C:\Users\Administrator>java -version
java version "1.8.0_141"
Java(TM) SE Runtime Environment (build 1.8.0_141-b15)
Java HotSpot(TM) 64-Bit Server VM (build 25.141-b15, mixed mode)
2
3
4
5
6
7
# 2、配置 MAVEN_HOME

TIP
配置环境变量的规律:
XXX_HOME 通常指向的是 bin 目录的上一级
PATH 指向的是 bin 目录
# 3、配置PATH

# 4、验证
C:\Users\Administrator>mvn -v
Apache Maven 3.8.4 (9b656c72d54e5bacbed989b64718c159fe39b537)
Maven home: D:\software\apache-maven-3.8.4
Java version: 1.8.0_141, vendor: Oracle Corporation, runtime: D:\software\Java\jre
Default locale: zh_CN, platform encoding: GBK
OS name: "windows 10", version: "10.0", arch: "amd64", family: "windows"
2
3
4
5
6
# 5 创建父工程
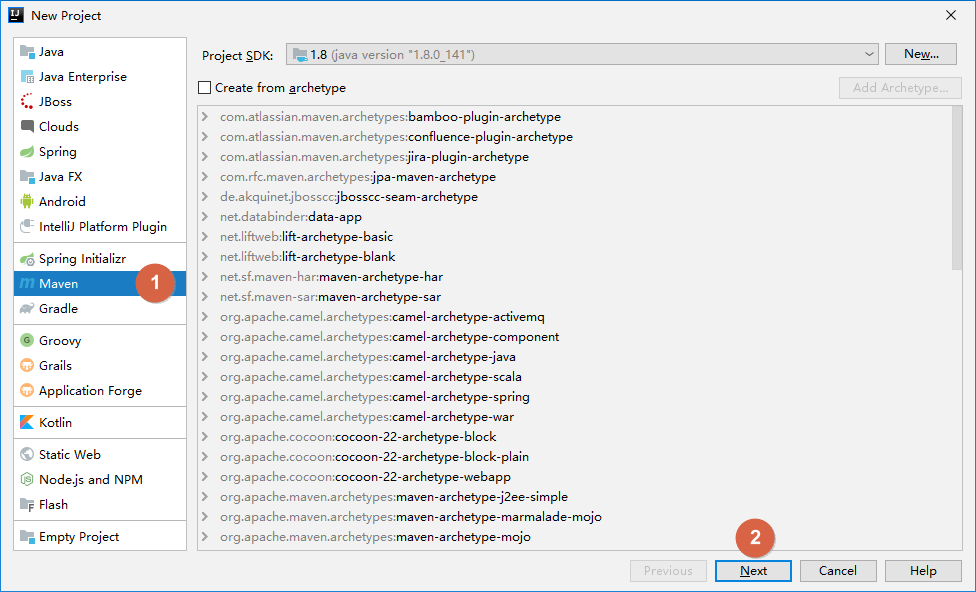
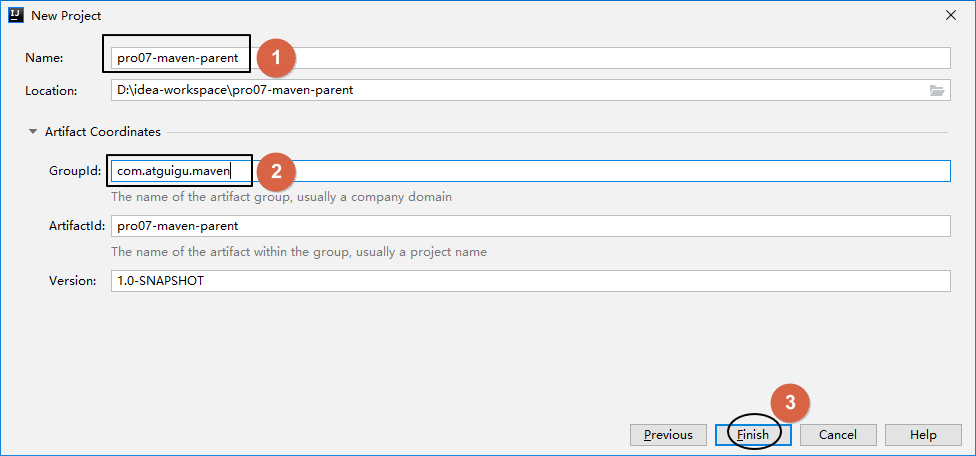
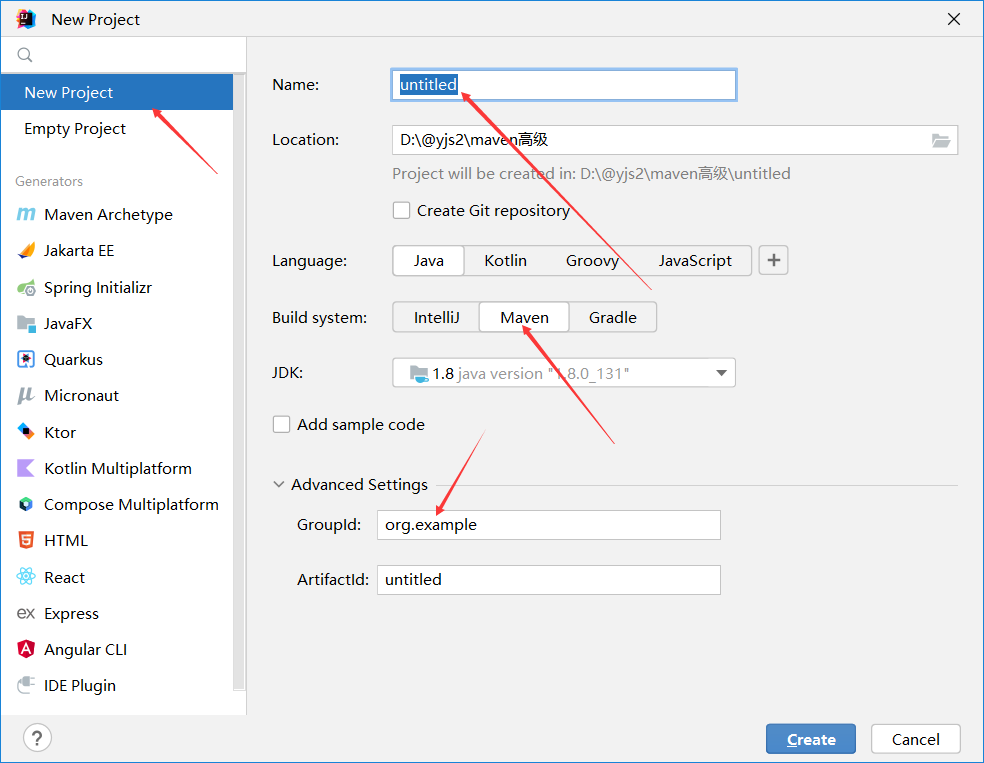
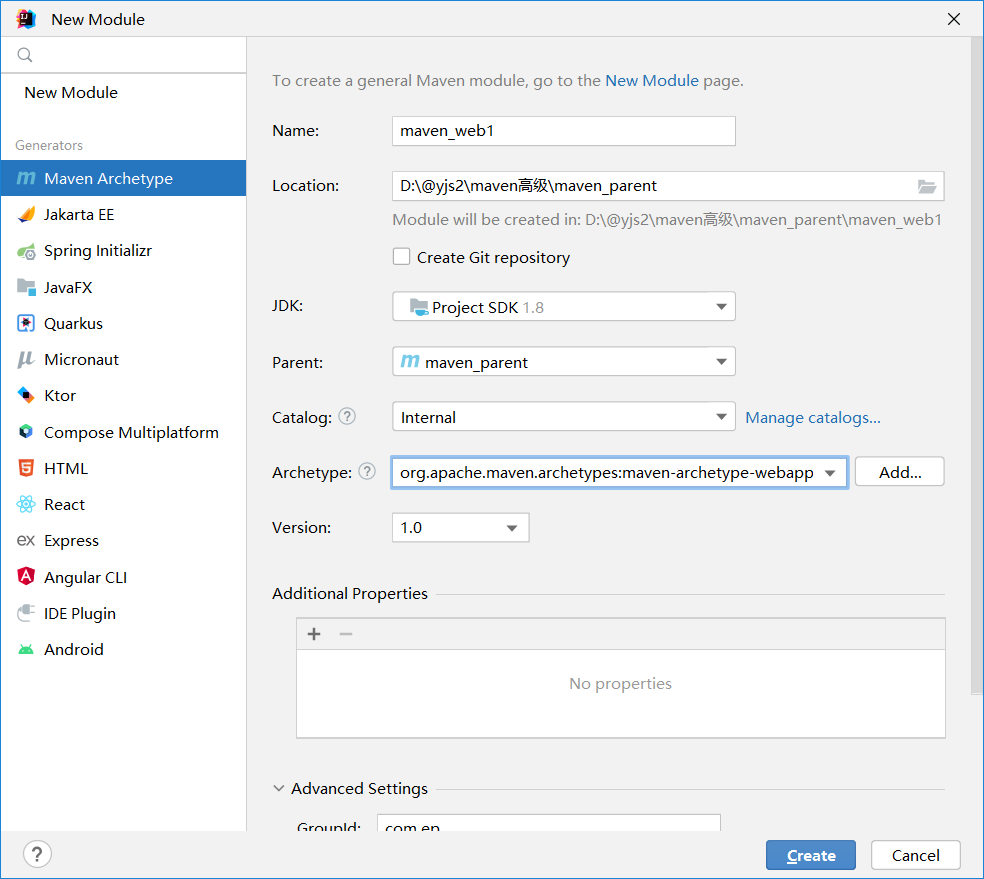
# 5.1、创建 Project

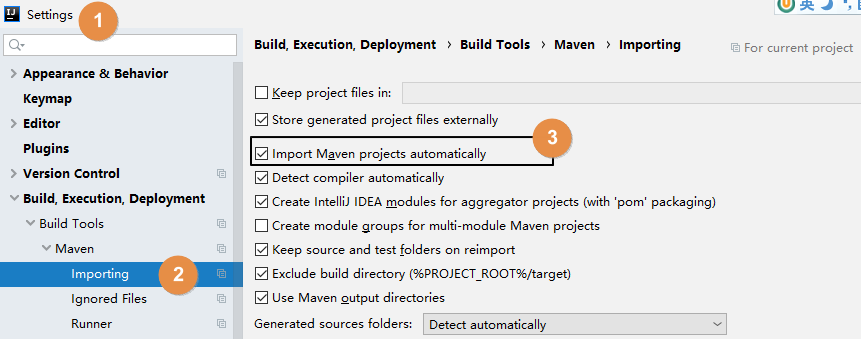
# 5.2、开启自动导入
创建 Project 后,IDEA 会自动弹出下面提示,我们选择**『Enable Auto-Import』**,意思是启用自动导入。

这个自动导入一定要开启,因为 Project、Module 新创建或 pom.xml 每次修改时都应该让 IDEA 重新加载 Maven 信息。这对 Maven 目录结构认定、Java 源程序编译、依赖 jar 包的导入都有非常关键的影响。
另外也可以通过 IDEA 的 Settings 设置来开启:
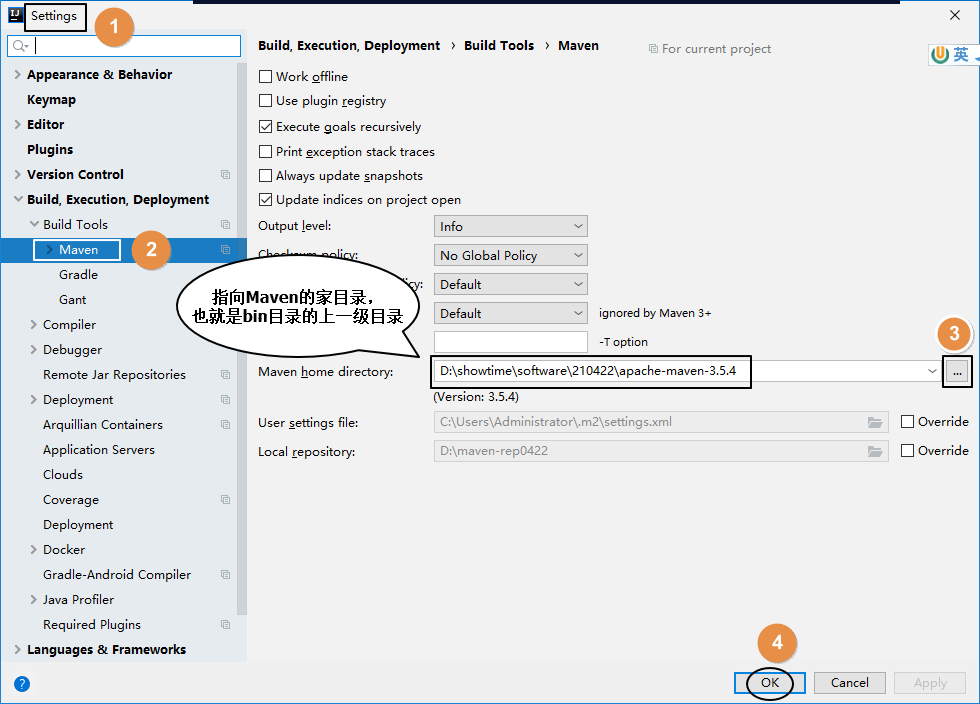
# 5.3、配置Maven信息
每次创建 Project 后都需要设置 Maven 家目录位置,否则 IDEA 将使用内置的 Maven 核心程序(不稳定)并使用默认的本地仓库位置。这样一来,我们在命令行操作过程中已下载好的 jar 包就白下载了,默认的本地仓库通常在 C 盘,还影响系统运行。
配置之后,IDEA 会根据我们在这里指定的 Maven 家目录自动识别到我们在 settings.xml 配置文件中指定的本地仓库。
# 6. Maven 常用命令
我们可以在 cmd 中通过一系列的 maven 命令来对我们的 maven-helloworld 工程进行编译、测试、运行、打包、安装、部署。
# 6.1 compile
compile 是 maven 工程的编译命令,作用是将 src/main/java 下的文件编译为 class 文件输出到 target目录下。
cmd 进入命令状态,执行 mvn compile,如下图提示成功:
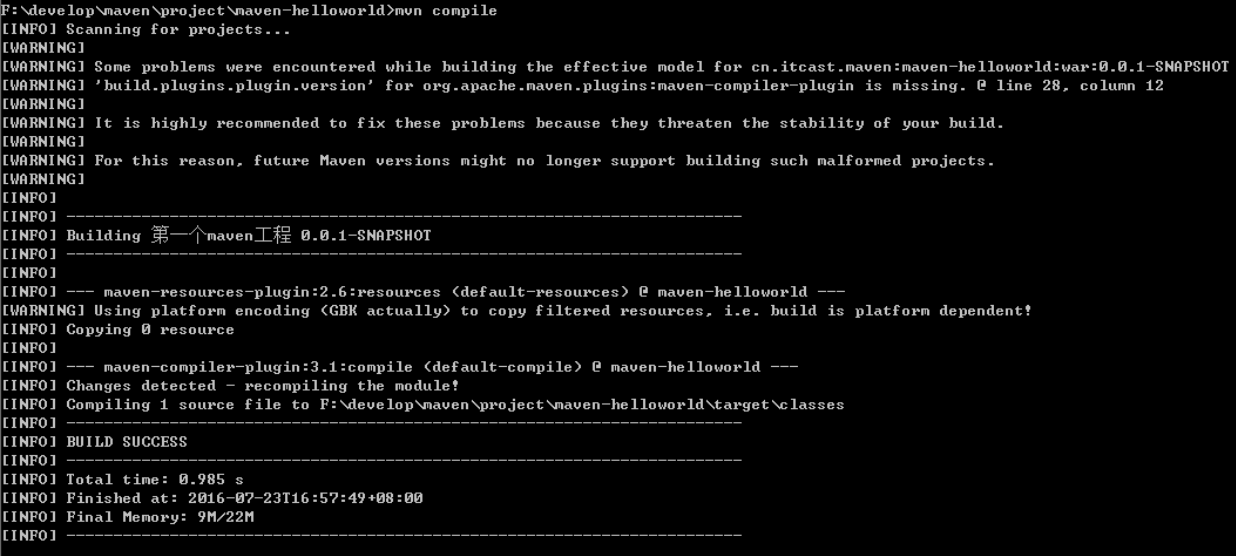
查看 target 目录,class 文件已生成,编译完成。

# 6.2 test
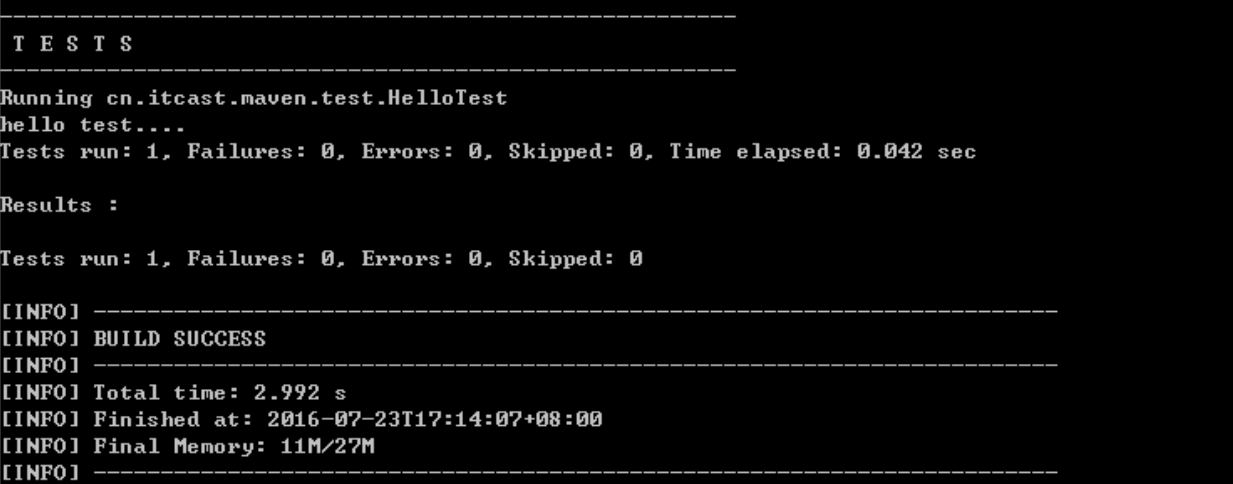
test 是 maven 工程的测试命令 mvn test,会执行 src/test/java 下的单元测试类。
cmd 执行 mvn test 执行 src/test/java 下单元测试类,下图为测试结果,运行 1 个测试用例,全部成功。
# 6.3 clean
clean 是 maven 工程的清理命令,执行 clean 会删除 target 目录及内容。
# 6.4 package
package 是 maven 工程的打包命令,对于 java 工程执行 package 打成 jar 包,对于 web 工程打成 war包。
# 6.5 install
install 是 maven 工程的安装命令,执行 install 将 maven 打成 jar 包或 war 包发布到本地仓库。
从运行结果中,可以看出:当后面的命令执行时,前面的操作过程也都会自动执行,
# 7 Maven指令的生命周期
maven 对项目构建过程分为三套相互独立的生命周期,请注意这里说的是“三套”,而且“相互独立”,
这三套生命周期分别是:
Clean Lifecycle 在进行真正的构建之前进行一些清理工作。
Default Lifecycle 构建的核心部分,编译,测试,打包,部署等等。
Site Lifecycle 生成项目报告,站点,发布站点。

# maven的概念模型
Maven 包含了一个项目对象模型 (Project Object Model),一组标准集合,一个项目生命周期(Project
Lifecycle),一个依赖管理系统(Dependency Management System),和用来运行定义在生命周期阶段
(phase)中插件(plugin)目标(goal)的逻辑。
# 依赖范围
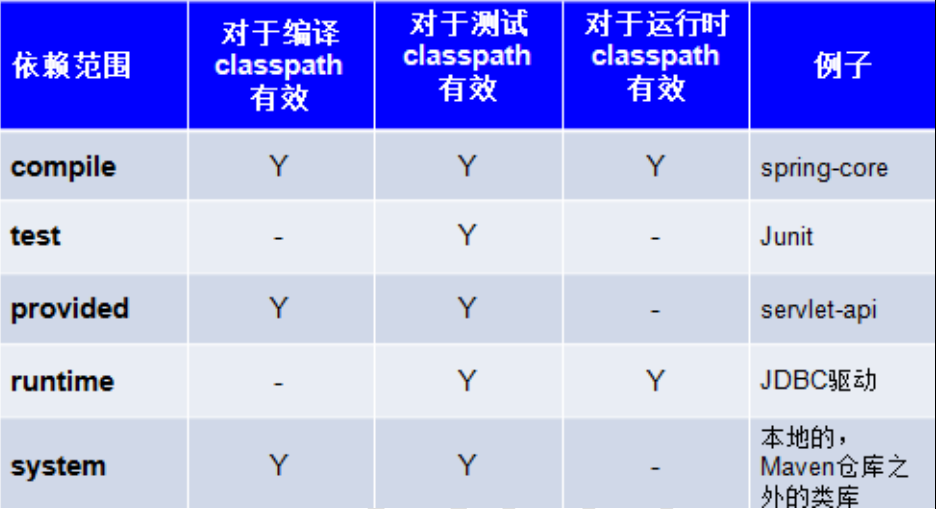
A 依赖 B,需要在 A 的 pom.xml 文件中添加 B 的坐标,添加坐标时需要指定依赖范围,依赖范围包括:
compile:编译范围,指 A 在编译时依赖 B,此范围为默认依赖范围。编译范围的依赖会用在编译、测试、运行,由于运行时需要所以编译范围的依赖会被打包。
provided:provided 依赖只有在当 JDK 或者一个容器已提供该依赖之后才使用, provided 依 赖在编译和测试时需要,在运行时不需要,比如:servlet api 被 tomcat 容器提供。
runtime:runtime 依赖在运行和测试系统的时候需要,但在编译的时候不需要。比如:jdbc的驱动包。由于运行时需要所以 runtime 范围的依赖会被打包。
test:test 范围依赖 在编译和运行时都不需要,它们只有在测试编译和测试运行阶段可用,比如:junit。由于运行时不需要所以 test范围依赖不会被打包。
system:system 范围依赖与 provided 类似,但是你必须显式的提供一个对于本地系统中 JAR文件的路径,需要指定 systemPath 磁盘路径,system依赖不推荐使用。
在 maven-web 工程中测试各 scop。
测试总结:
默认引入 的 jar 包 ------- compile 【默认范围 可以不写】(编译、测试、运行 都有效 )
servlet-api 、jsp-api ------- provided (编译、测试 有效)
运行时无效 防止和 tomcat 下 jar 冲突)
jdbc 驱动 jar 包 ---- runtime (测试、运行 有效 )
junit ----- test (测试有效)
依赖范围由强到弱的顺序是:compile>provided>runtime>test
# 8. 依赖冲突
# 8.1依赖传递
先添加 springmvc 的核心依赖的坐标
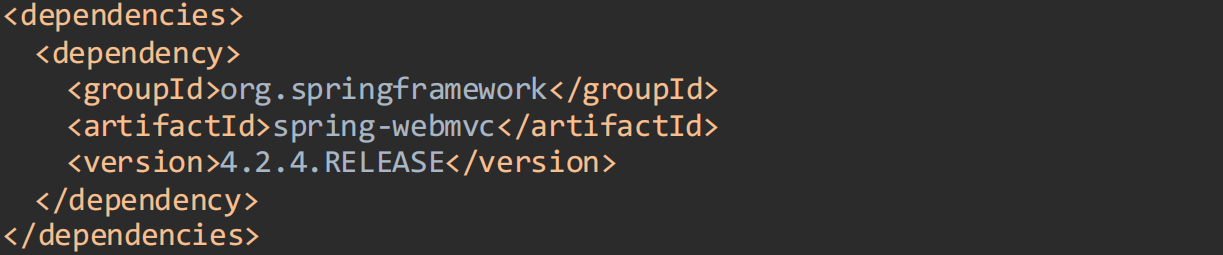
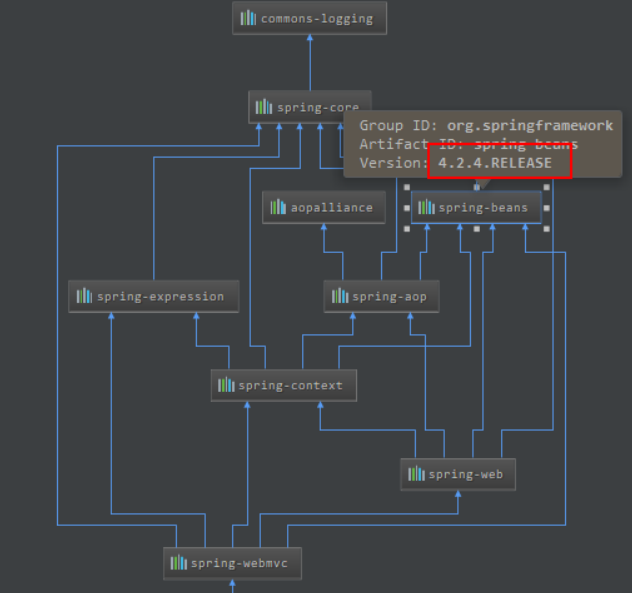
会发现出现除了 spring-webmvc 以外的其他 jar。因为我们的项目依赖 spring-webmv.jar,而spring-webmv.jar 会依赖 spring-beans.jar 等等,所以 spring-beans.jar 这些 jar 包也出现在了我
们的 maven 工程中,这种现象我们称为依赖传递。从下图中可看到他们的关系:(请注意spring-beans 的版本)
# 8.2依赖冲突的解决
接着添加一个依赖
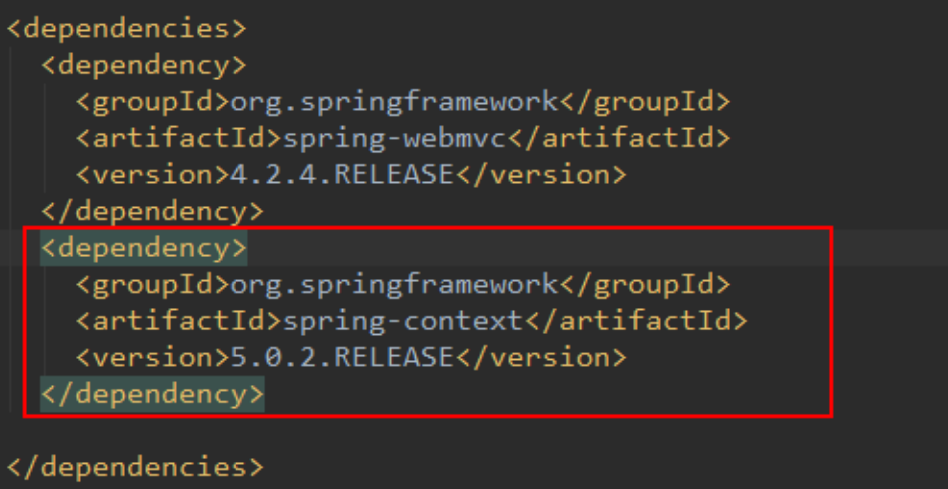
我们会发现这两个 jar 包同时都依赖了 spring-beans
但是spring-webmvc 依赖 spirng-beans-4.2.4,spring-context 依赖 spring-beans-5.0.2,但是发现spirng-beans-4.2.4 加入到工程中
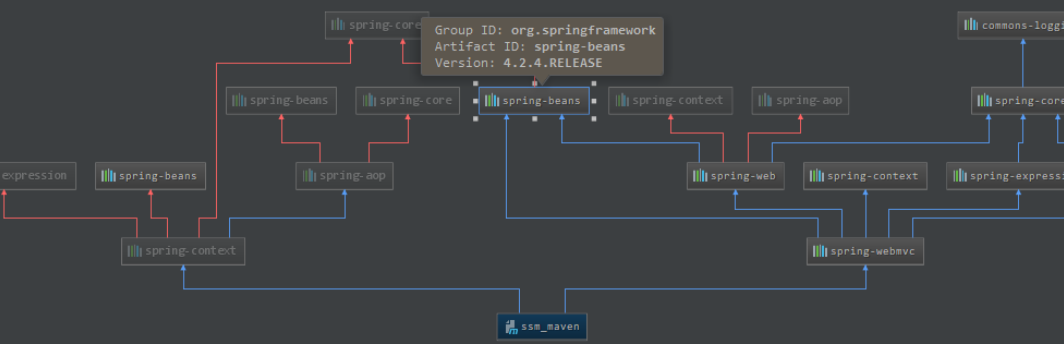
而我们希望 spring-beans-5.0.2 加入工程。这就造成了依赖冲突。解决依赖冲突有以下原则:
# 8.2.1 依赖调解原则
maven 自动按照下边的原则调解:
1、第一声明者优先原则
在 pom 文件定义依赖,先声明的依赖为准。
测试:
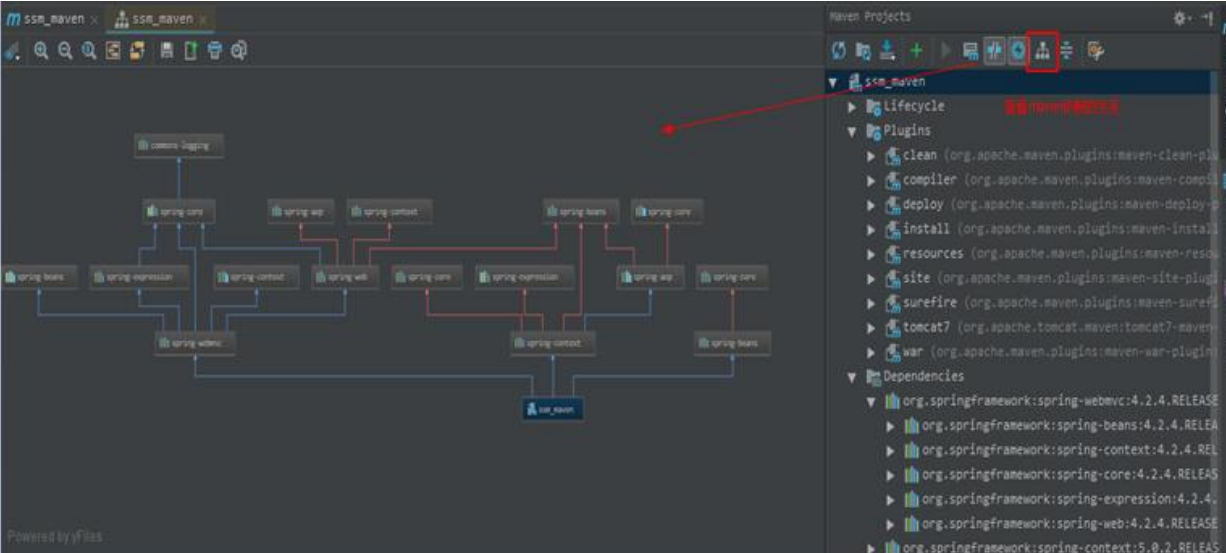
如果将上边 spring-webmvc 和 spring-context 顺序颠倒,系统将导入 spring-beans-5.0.2。
分析:
由于 spring-webmvc 在前边以 spring-webmvc 依赖的 spring-beans-5.0.2 为准,所以最终spring-beans-5.0.2 添加到了工程中。
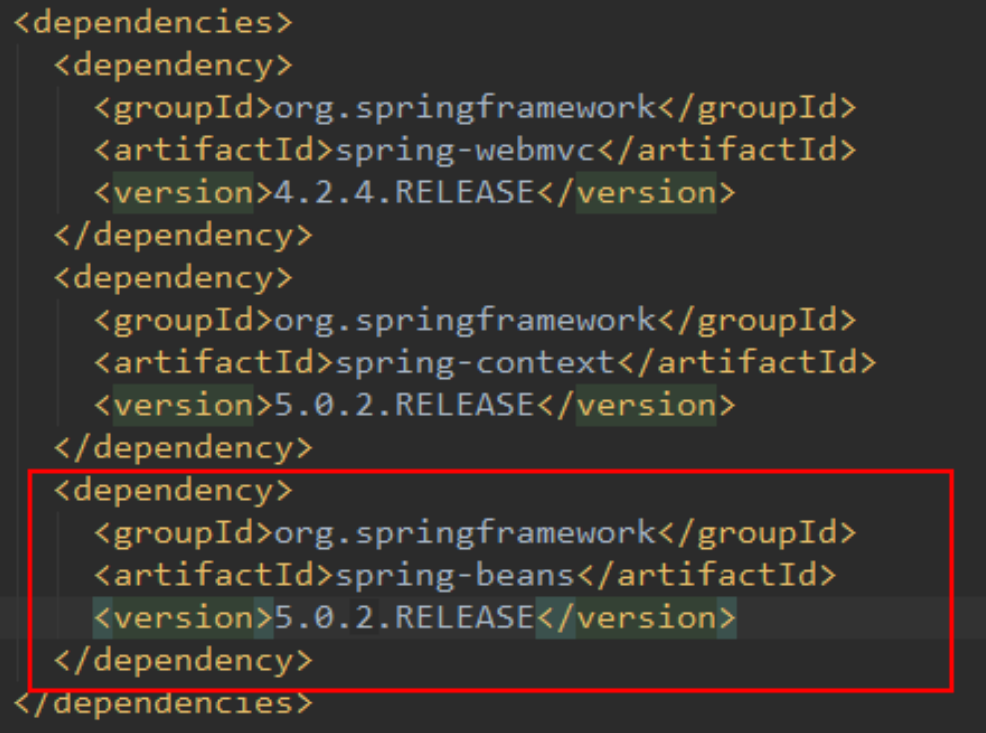
2、路径近者优先原则
例如:还是上述情况,spring-contex 和 spring-webmvc 都会传递过来 spirng-beans,那如果直接把 spring-beans 的依赖直接写到 pom 文件中,那么项目就不会再使用其他依赖传递来的 spring-beans,因为自己直接在 pom 中定义 spring-beans 要比其他依赖传递过来的路径要近。
在本工程中的 pom 中加入 spirng-beans-5.0.2 的依赖,根据路径近者优先原则,系统将导入spirng-beans-5.0.2:
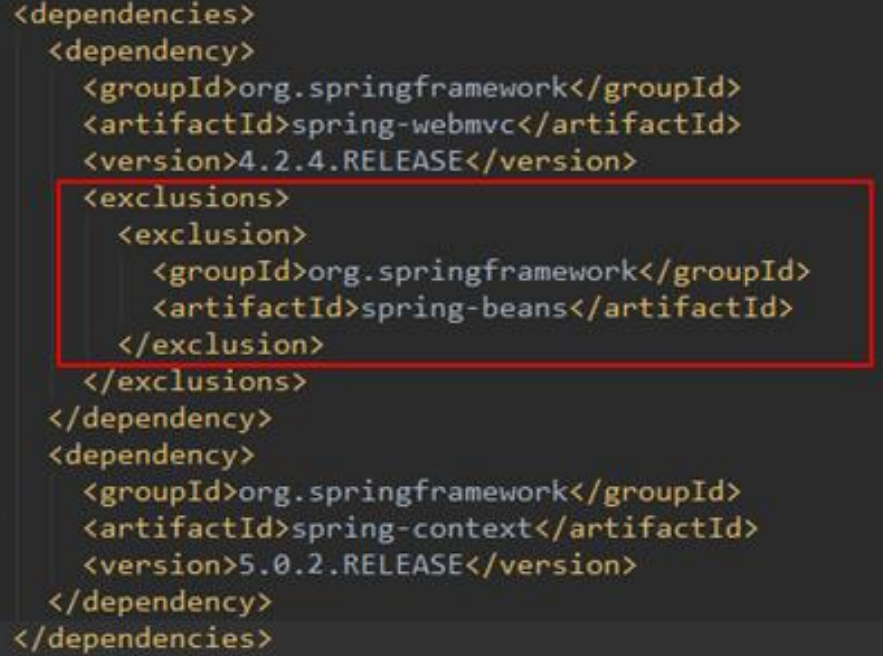
# 8.2.2 排除依赖
上边的问题也可以通过排除依赖方法辅助依赖调解,如下:
比如在依赖 spring-webmvc 的设置中添加排除依赖,排除 spring-beans,下边的配置表示:依赖 spring-webmvc,但排除 spring-webmvc 所依赖的 spring-beans。
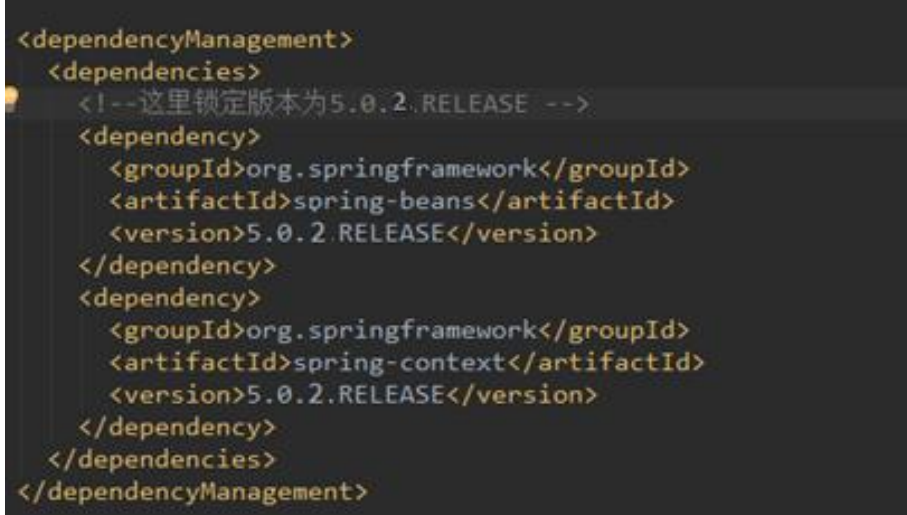
# 8.2.3 锁定版本
面对众多的依赖,有一种方法不用考虑依赖路径、声明优化等因素可以采用直接锁定版本的方法确定依赖构件的版本,版本锁定后则不考虑依赖的声明顺序或依赖的路径,以锁定的版本的为准添加到工程中,此方法在企业开发中常用。
如下的配置是锁定了 spring-beans 和 spring-context 的版本:
还可以把版本号提取出来,使用properties标签设置成变量。
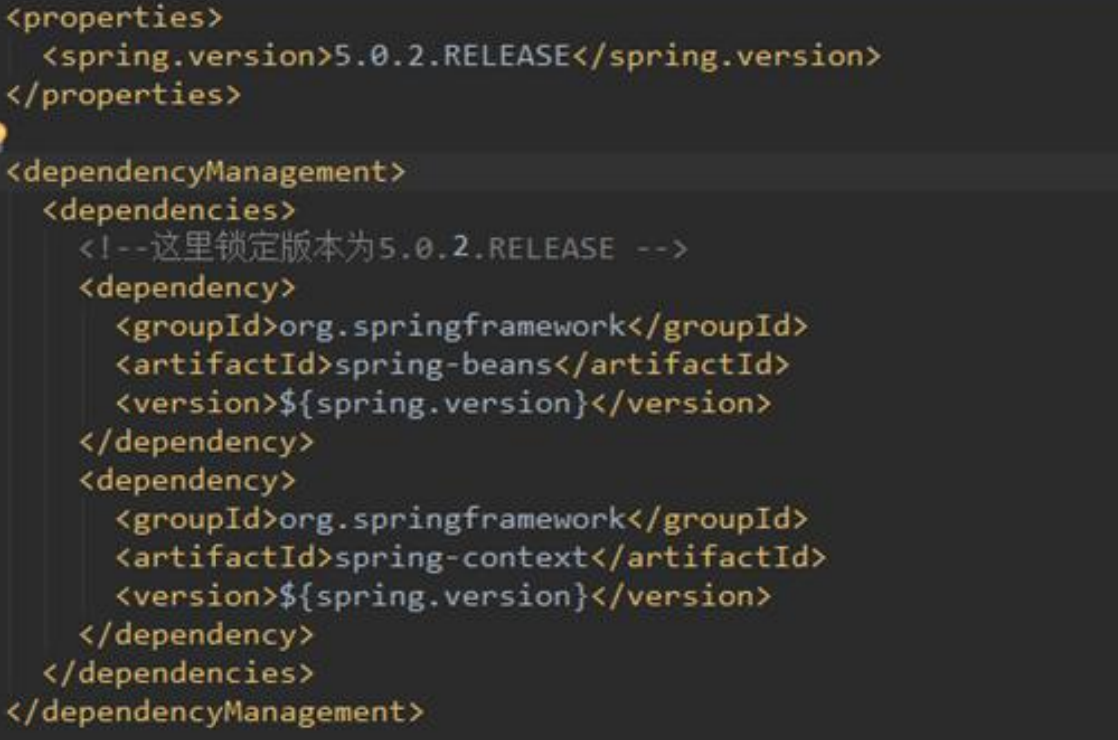
注意:在工程中锁定依赖的版本并不代表在工程中添加了依赖,如果工程需要添加锁定版本的依赖则需要单独添加<dependencies></dependencies>标签,如下:
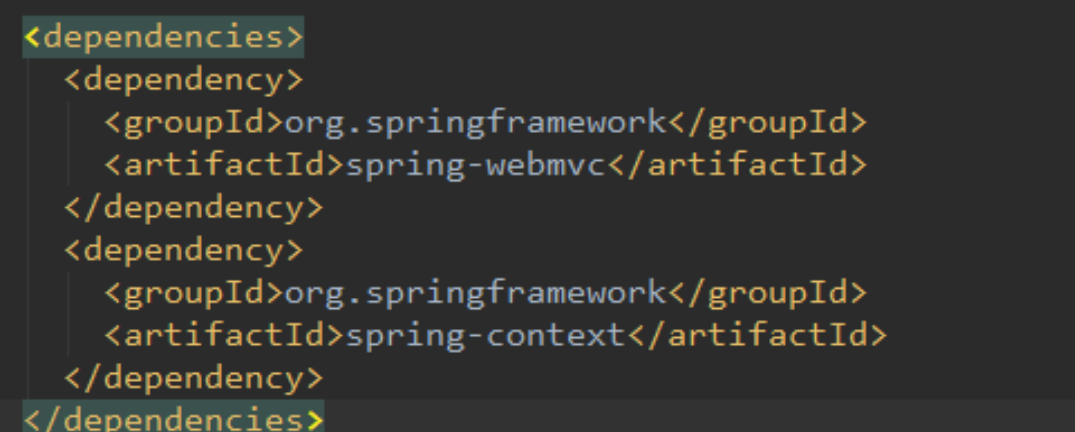
上边添加的依赖并没有指定版本,原因是已在dependencyManagement中锁定了版本,所以在dependency下不需要再指定版本。
# 8.3 完整 pom.xml
1)锁定依赖版本
2)添加依赖
 <!--maven工程要导入jar包的坐标,就必须要考虑解决jar包冲突。
      解决jar包冲突的方式一:
      第一声明优先原则:哪个jar包的坐标在靠上的位置,这个jar包就是先声明的。
      先声明的jar包坐标下的依赖包,可以优先进入项目中。

      maven导入jar包中的一些概念:
      直接依赖:项目中直接导入的jar包,就是该项目的直接依赖包。
      传递依赖:项目中没有直接导入的jar包,可以通过项目直接依赖jar包传递到项目中去。

      解决jar包冲突的方式二:
      路径近者优先原则。直接依赖路径比传递依赖路径近,那么最终项目进入的jar包会是路径近的直接依赖包。

      解决jar包冲突的方式三【推荐使用】:
      直接排除法。
      当我们要排除某个jar包下依赖包,在配置exclusions标签的时候,内部可以不写版本号。
      因为此时依赖包使用的版本和默认和本jar包一样。
      -->
  <!-- 统一管理jar包版本 -->
  <properties>
    <spring.version>5.0.2.RELEASE</spring.version>
    <slf4j.version>1.6.6</slf4j.version>
    <log4j.version>1.2.12</log4j.version>
    <shiro.version>1.2.3</shiro.version>
    <mysql.version>5.1.6</mysql.version>
    <mybatis.version>3.4.5</mybatis.version>
    <spring.security.version>5.0.1.RELEASE</spring.security.version>
  </properties>

  <!--
  maven工程是可以分父子依赖关系的。
  凡是依赖别的项目后,拿到的别的项目的依赖包,都属于传递依赖。
  比如:当前A项目,被B项目依赖。那么我们A项目中所有jar包都会传递到B项目中。
  B项目开发者,如果再在B项目中导入一套ssm框架的jar包,对于B项目是直接依赖。
  那么直接依赖的jar包就会把我们A项目传递过去的jar包覆盖掉。
  为了防止以上情况的出现。我们可以把A项目中主要jar包的坐标锁住,那么其他依赖该项目的项目中,
  即便是有同名jar包直接依赖,也无法覆盖。
  -->
  <!-- 锁定jar包版本 -->
  <dependencyManagement>
    <dependencies>
      <dependency>
        <groupId>org.springframework</groupId>
        <artifactId>spring-context</artifactId>
        <version>${spring.version}</version>
      </dependency>
      <dependency>
        <groupId>org.springframework</groupId>
        <artifactId>spring-web</artifactId>
        <version>${spring.version}</version>
      </dependency>
      <dependency>
        <groupId>org.springframework</groupId>
        <artifactId>spring-webmvc</artifactId>
        <version>${spring.version}</version>
      </dependency>
      <dependency>
        <groupId>org.springframework</groupId>
        <artifactId>spring-tx</artifactId>
        <version>${spring.version}</version>
      </dependency>
      <dependency>
        <groupId>org.springframework</groupId>
        <artifactId>spring-test</artifactId>
        <version>${spring.version}</version>
      </dependency>
      <dependency>
        <groupId>org.mybatis</groupId>
        <artifactId>mybatis</artifactId>
        <version>${mybatis.version}</version>
      </dependency>
    </dependencies>
  </dependencyManagement>

  <!-- 项目依赖jar包 -->
  <dependencies>
    <!-- spring -->
    <dependency>
      <groupId>org.aspectj</groupId>
      <artifactId>aspectjweaver</artifactId>
      <version>1.6.8</version>
    </dependency>
    <dependency>
      <groupId>org.springframework</groupId>
      <artifactId>spring-aop</artifactId>
      <version>${spring.version}</version>
    </dependency>
    <dependency>
      <groupId>org.springframework</groupId>
      <artifactId>spring-context</artifactId>
      <version>${spring.version}</version>
    </dependency>
    <dependency>
      <groupId>org.springframework</groupId>
      <artifactId>spring-context-support</artifactId>
      <version>${spring.version}</version>
    </dependency>
    <dependency>
      <groupId>org.springframework</groupId>
      <artifactId>spring-web</artifactId>
      <version>${spring.version}</version>
    </dependency>
    <dependency>
      <groupId>org.springframework</groupId>
      <artifactId>spring-orm</artifactId>
      <version>${spring.version}</version>
    </dependency>
    <dependency>
      <groupId>org.springframework</groupId>
      <artifactId>spring-beans</artifactId>
      <version>${spring.version}</version>
    </dependency>
    <dependency>
      <groupId>org.springframework</groupId>
      <artifactId>spring-core</artifactId>
      <version>${spring.version}</version>
    </dependency>
    <dependency>
      <groupId>org.springframework</groupId>
      <artifactId>spring-test</artifactId>
      <version>${spring.version}</version>
    </dependency>
    <dependency>
      <groupId>org.springframework</groupId>
      <artifactId>spring-webmvc</artifactId>
      <version>${spring.version}</version>
    </dependency>
    <dependency>
      <groupId>org.springframework</groupId>
      <artifactId>spring-tx</artifactId>
      <version>${spring.version}</version>
    </dependency>
    <dependency>
      <groupId>junit</groupId>
      <artifactId>junit</artifactId>
      <version>4.12</version>
      <scope>test</scope>
    </dependency>
    <dependency>
      <groupId>mysql</groupId>
      <artifactId>mysql-connector-java</artifactId>
      <version>${mysql.version}</version>
    </dependency>
    <dependency>
      <groupId>javax.servlet</groupId>
      <artifactId>javax.servlet-api</artifactId>
      <version>3.1.0</version>
      <scope>provided</scope>
    </dependency>
    <dependency>
      <groupId>javax.servlet.jsp</groupId>
      <artifactId>jsp-api</artifactId>
      <version>2.0</version>
      <scope>provided</scope>
    </dependency>
    <dependency>
      <groupId>jstl</groupId>
      <artifactId>jstl</artifactId>
      <version>1.2</version>
    </dependency>
    <!-- log start -->
    <dependency>
      <groupId>log4j</groupId>
      <artifactId>log4j</artifactId>
      <version>${log4j.version}</version>
    </dependency>
    <dependency>
      <groupId>org.slf4j</groupId>
      <artifactId>slf4j-api</artifactId>
      <version>${slf4j.version}</version>
    </dependency>
    <dependency>
      <groupId>org.slf4j</groupId>
      <artifactId>slf4j-log4j12</artifactId>
      <version>${slf4j.version}</version>
    </dependency>
    <!-- log end -->
    <dependency>
      <groupId>org.mybatis</groupId>
      <artifactId>mybatis</artifactId>
      <version>${mybatis.version}</version>
    </dependency>
    <dependency>
      <groupId>org.mybatis</groupId>
      <artifactId>mybatis-spring</artifactId>
      <version>1.3.0</version>
    </dependency>
    <dependency>
      <groupId>c3p0</groupId>
      <artifactId>c3p0</artifactId>
      <version>0.9.1.2</version>
      <type>jar</type>
      <scope>compile</scope>
    </dependency>
    <dependency>
      <groupId>com.github.pagehelper</groupId>
      <artifactId>pagehelper</artifactId>
      <version>5.1.2</version>
    </dependency>
    <dependency>
      <groupId>org.springframework.security</groupId>
      <artifactId>spring-security-web</artifactId>
      <version>${spring.security.version}</version>
    </dependency>
    <dependency>
      <groupId>org.springframework.security</groupId>
      <artifactId>spring-security-config</artifactId>
      <version>${spring.security.version}</version>
    </dependency>
    <dependency>
      <groupId>org.springframework.security</groupId>
      <artifactId>spring-security-core</artifactId>
      <version>${spring.security.version}</version>
    </dependency>
    <dependency>
      <groupId>org.springframework.security</groupId>
      <artifactId>spring-security-taglibs</artifactId>
      <version>${spring.security.version}</version>
    </dependency>
    <dependency>
      <groupId>com.alibaba</groupId>
      <artifactId>druid</artifactId>
      <version>1.0.9</version>
    </dependency>
    <dependency>
      <groupId>junit</groupId>
      <artifactId>junit</artifactId>
      <version>4.12</version>
    </dependency>
  </dependencies>
  <!-- 添加tomcat7插件 -->
  <build>
    <plugins>
      <plugin>
        <groupId>org.apache.tomcat.maven</groupId>
        <artifactId>tomcat7-maven-plugin</artifactId>
        <version>2.2</version>
      </plugin>
    </plugins>
  </build>
2
3
4
5
6
7
8
9
10
11
12
13
14
15
16
17
18
19
20
21
22
23
24
25
26
27
28
29
30
31
32
33
34
35
36
37
38
39
40
41
42
43
44
45
46
47
48
49
50
51
52
53
54
55
56
57
58
59
60
61
62
63
64
65
66
67
68
69
70
71
72
73
74
75
76
77
78
79
80
81
82
83
84
85
86
87
88
89
90
91
92
93
94
95
96
97
98
99
100
101
102
103
104
105
106
107
108
109
110
111
112
113
114
115
116
117
118
119
120
121
122
123
124
125
126
127
128
129
130
131
132
133
134
135
136
137
138
139
140
141
142
143
144
145
146
147
148
149
150
151
152
153
154
155
156
157
158
159
160
161
162
163
164
165
166
167
168
169
170
171
172
173
174
175
176
177
178
179
180
181
182
183
184
185
186
187
188
189
190
191
192
193
194
195
196
197
198
199
200
201
202
203
204
205
206
207
208
209
210
211
212
213
214
215
216
217
218
219
220
221
222
223
224
225
226
227
228
229
230
231
232
233
234
235
236
237
238
239
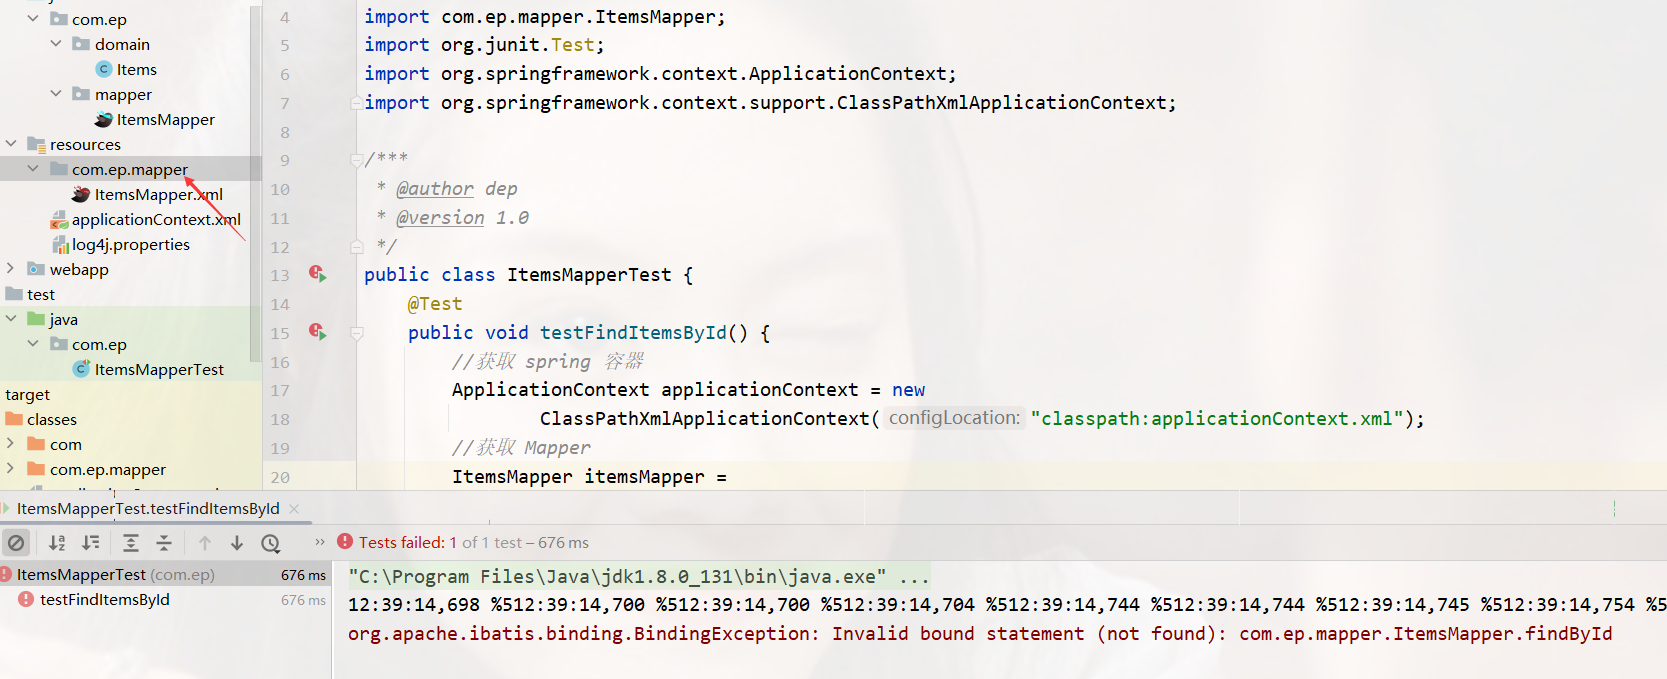
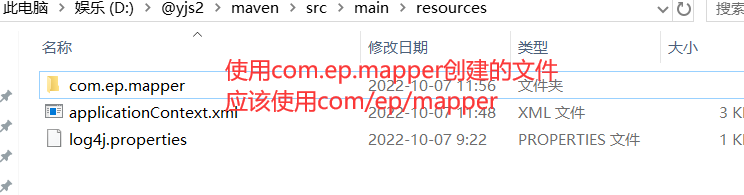
神坑:
创建mapper类对应的xml文件时,包名要一样。resources下的com.ep.mapper。不能用com.ep.mapper来创建文件夹,应该使用com/ep/mapper
# 9.分模块构建工程
将 maven工程拆分为多个模块开发:
maven_dao
maven_service
maven_web
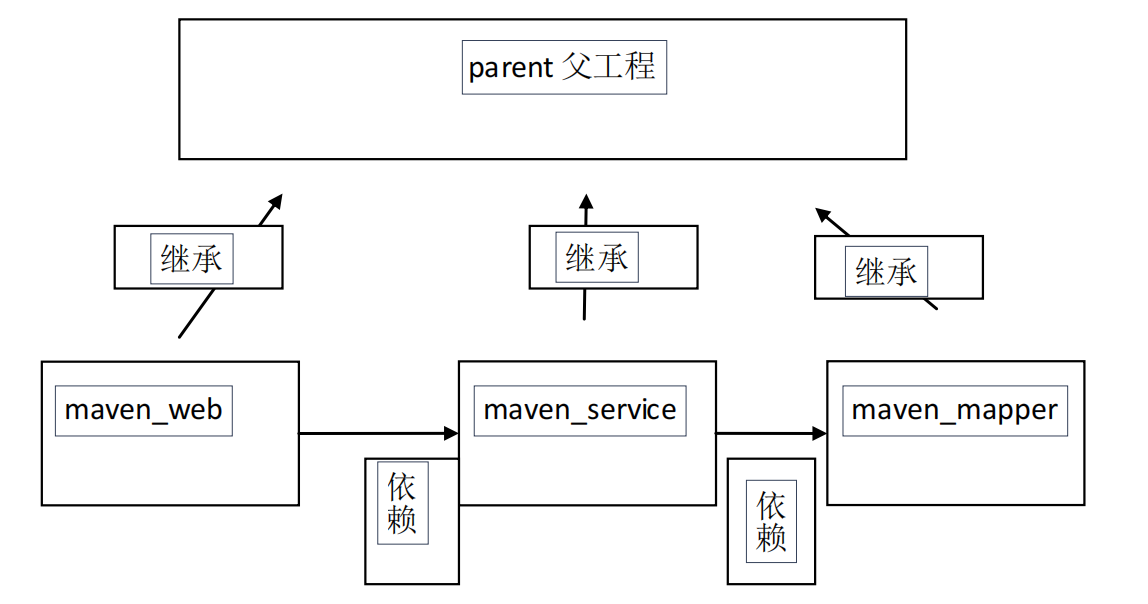
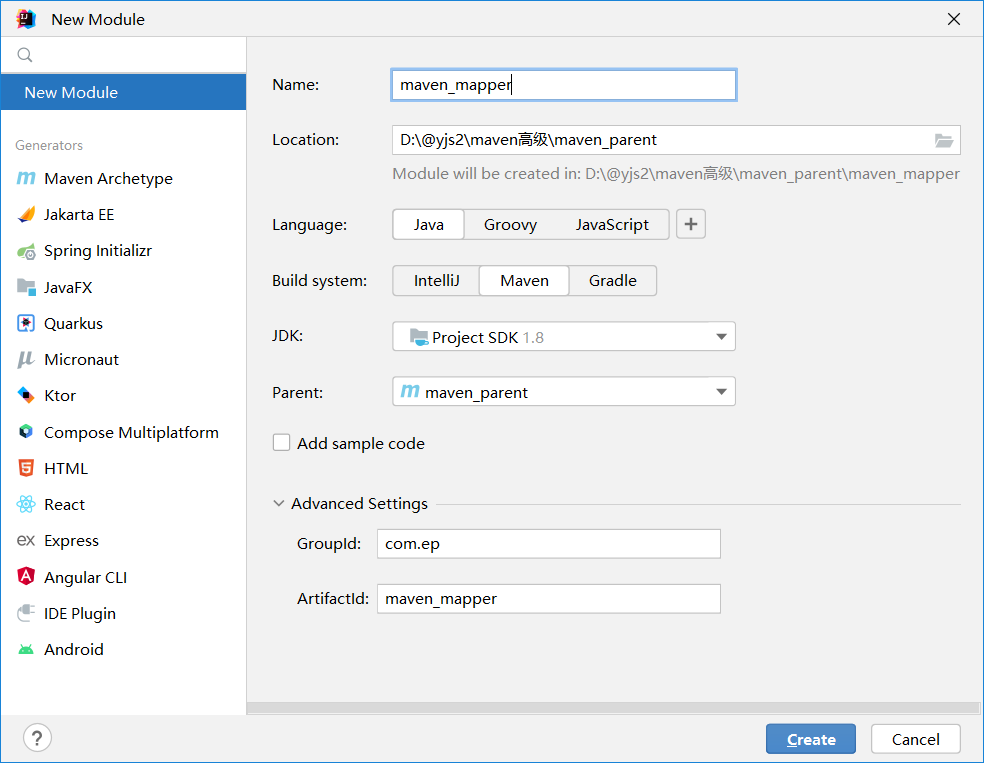
# 创建父工程
# 创建子工程
工程和模块的区别:
工程不等于完整的项目,模块也不等于完整的项目,一个完整的项目看的是代码,代码完整,就可以说这是一个完整的项目,和此项目是工程和模块没有关系。
工程天生只能使用自己内部资源,工程天生是独立的。后天可以和其他工程或模块建立关联关系。
模块天生不是独立的,模块天生是属于父工程的,模块一旦创建,所有父工程的资源都可以使用。
父子工程直接,子模块天生集成父工程,可以使用父工程所有资源。
子模块之间天生是没有任何关系的。
父子工程直接不用建立关系,继承关系是先天的,不需要手动建立。
平级直接的引用叫依赖,依赖不是先天的,依赖是需要后天建立的。
2
3
4
5
6
7
8
web中引入service.service中引入mapper
web中导入mapper和service的配置文件
# 三种启动方式
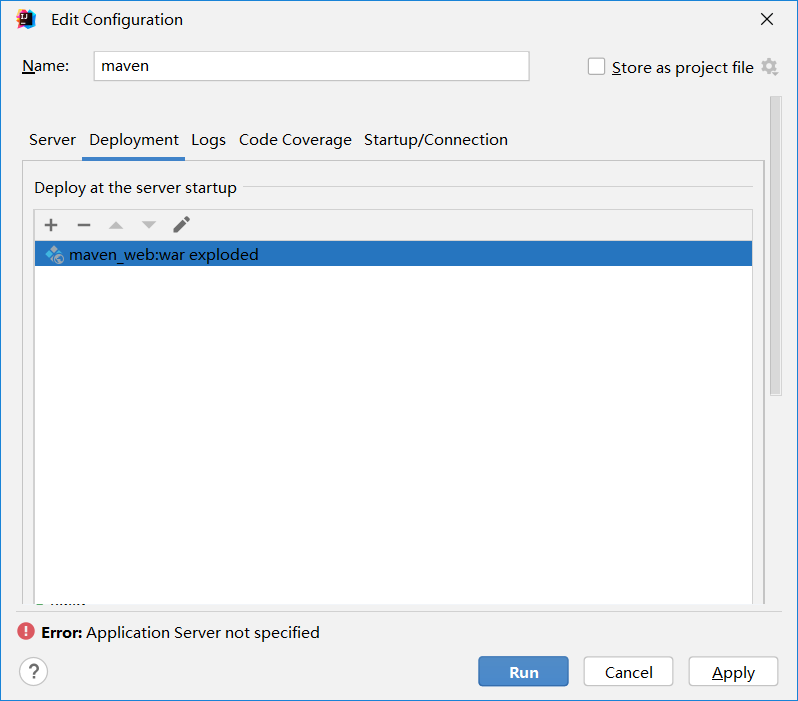
1.父工程
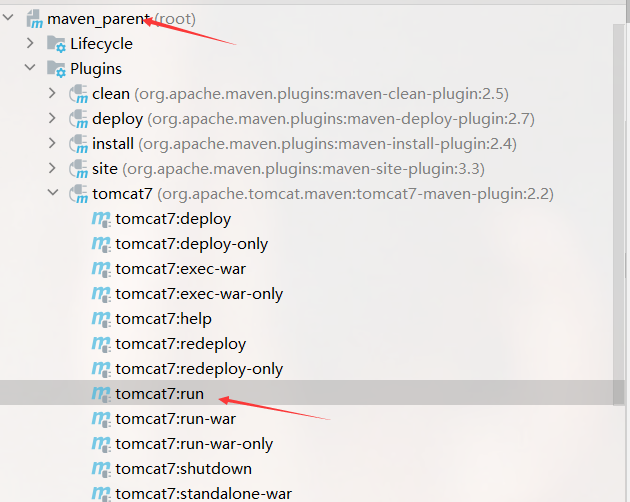
- maven_parent 中安装
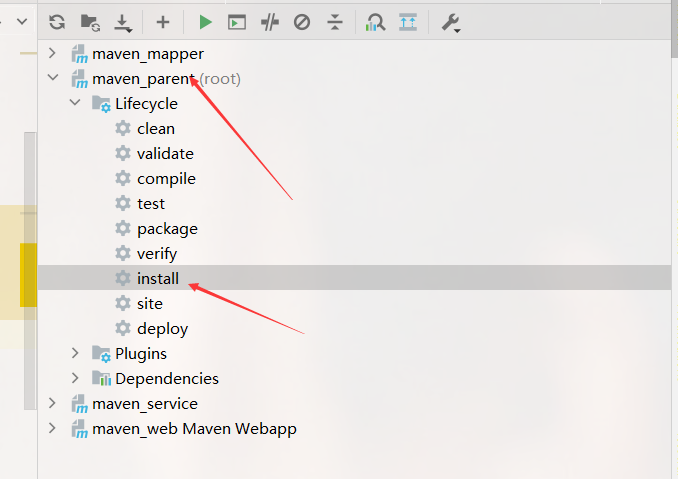
在maven_web 中运行
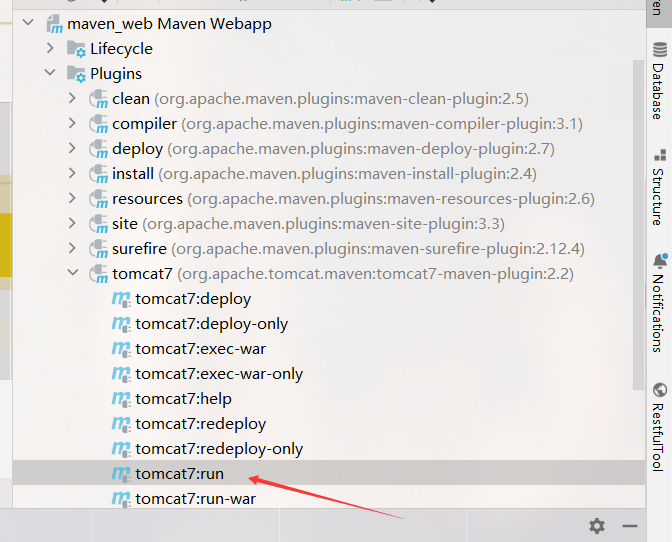
- 配置外部的tomcat
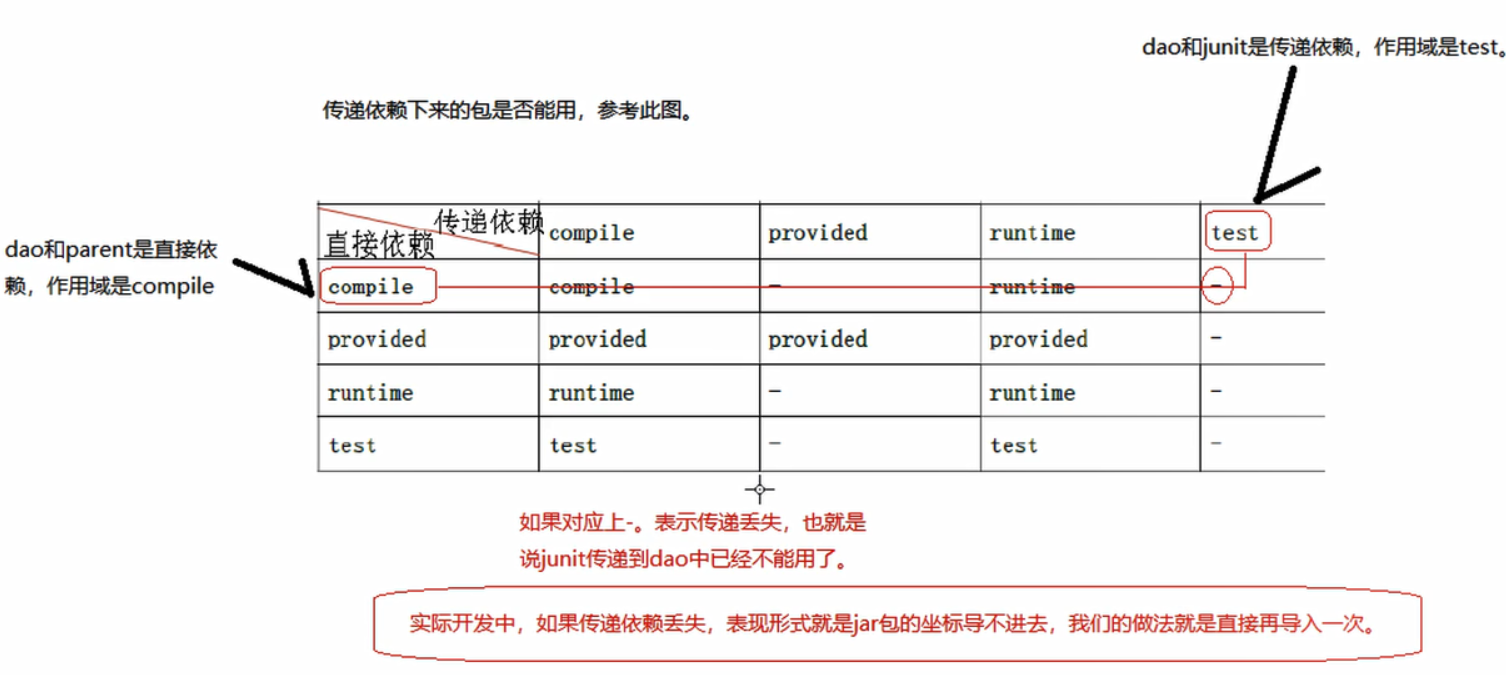
# 依赖范围对传递依赖
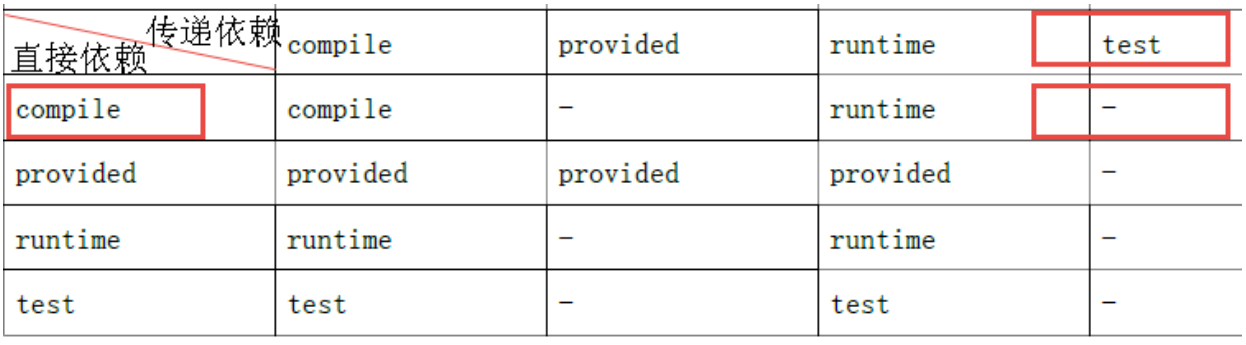
是因为依赖会有依赖范围,依赖范围对传递依赖也有影响,例如有 A、B、C,A 依赖 B、B依赖 C,C 可能是 A 的传递依赖,如下图:
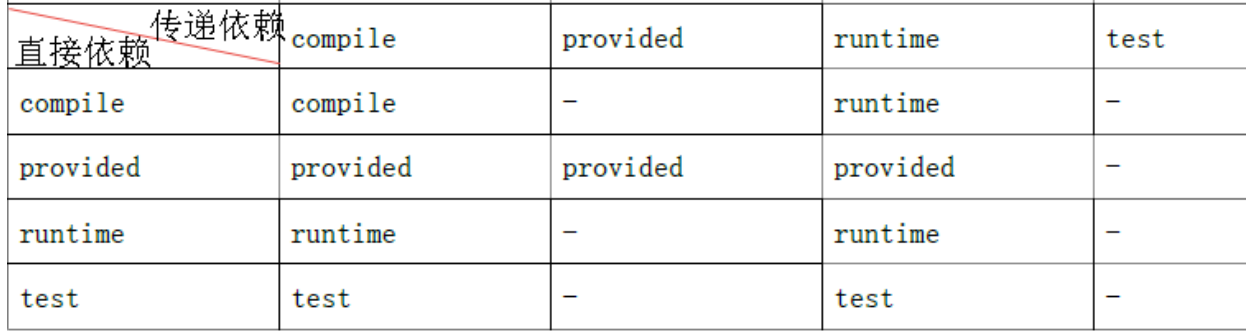
最左边一列为直接依赖,理解为 A 依赖 B 的范围,最顶层一行为传递依赖,理解为 B依赖 C 的范围,行与列的交叉即为 A 传递依赖 C 的范围。
举例 1:
比如 A 对 B 有 compile 依赖,B 对 C 有 runtime 依赖,那么根据表格所示 A 对 C 有runtime 依赖。
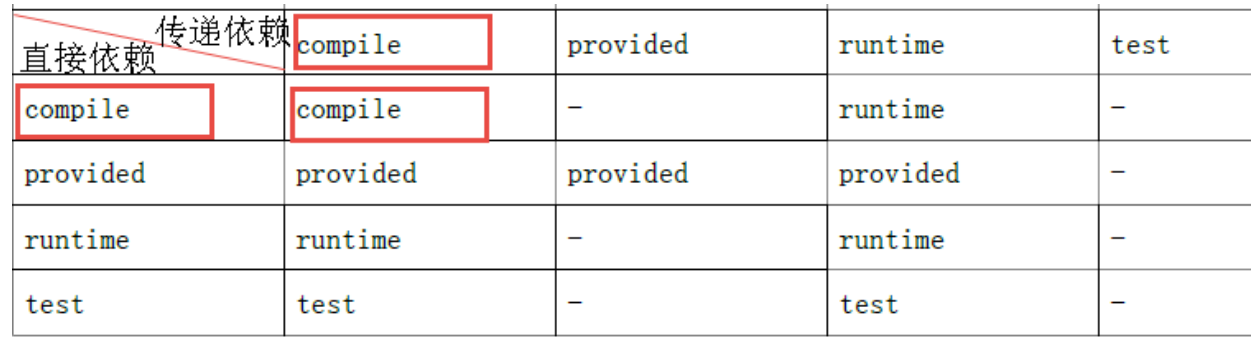
ssm_dao 依赖 junit,scop 为 test
ssm_service 依赖 ssm_dao.
查看下图红色框内所示传递依赖范围:
所以 ssm_dao 工程所依赖的 junit 的 jar 没有加入到 ssm_service 工程
举例 2:如果修改 ssm_dao 工程依赖 junit 的 scop 为 compile,ssm_dao 工程所依赖的 junit的 jar 包会加入到 ssm_service 工程中,符合上边表格所示,查看下图红色框内所示:
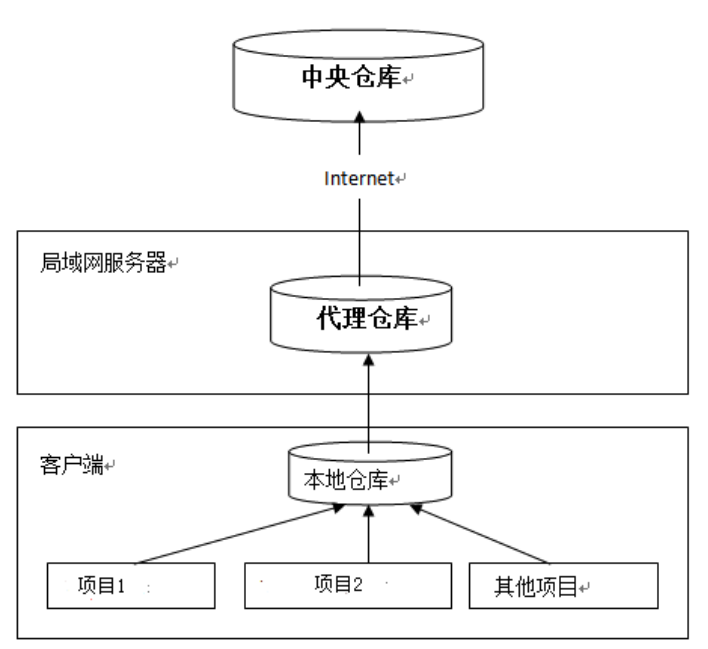
# 10.maven 私服
公司在自己的局域网内搭建自己的远程仓库服务器,称为私服,私服服务器即是公司内部的 maven 远程仓库,每个员工的电脑上安装 maven 软件并且连接私服服务器,员工将自己开发的项目打成 jar 并发布到私服服务器,其它项目组从私服服务器下载所依赖的构件(jar)。
私服还充当一个代理服务器,当私服上没有 jar 包会从互联网中央仓库自动下载,如下图:
# 搭建私服环境
Nexus 是 Maven 仓库管理器,通过 nexus 可以搭建 maven 仓库,同时 nexus 还提供强大的仓库管理功能,构件搜索功能等。
下载 Nexus, 下载地址:http://www.sonatype.org/nexus/archived/
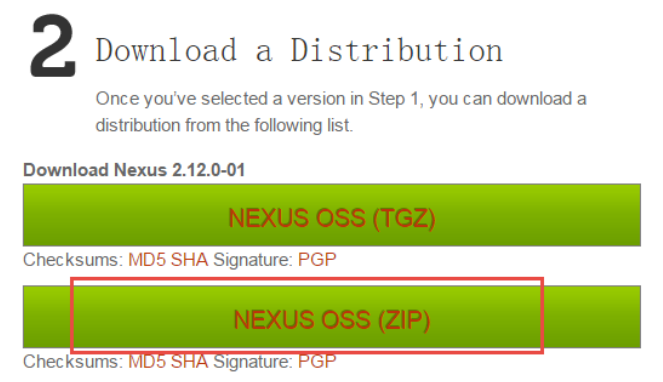
下载:nexus-2.12.0-01-bundle.zip
# 安装 nexus
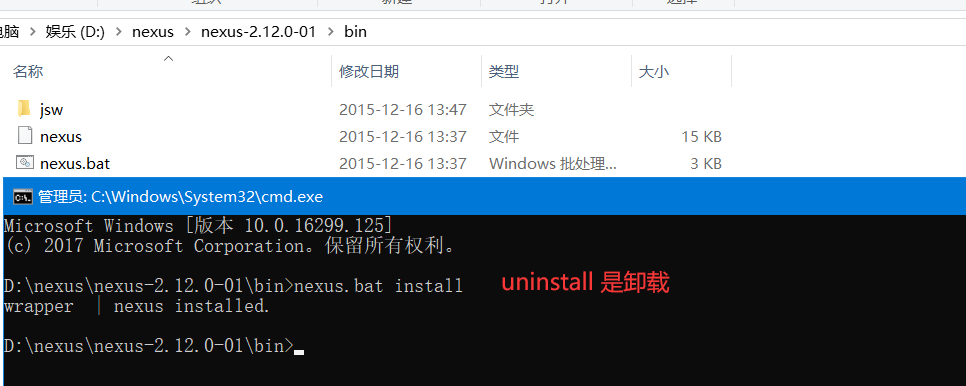
cmd 进入 bin 目录,执行 nexus.bat install
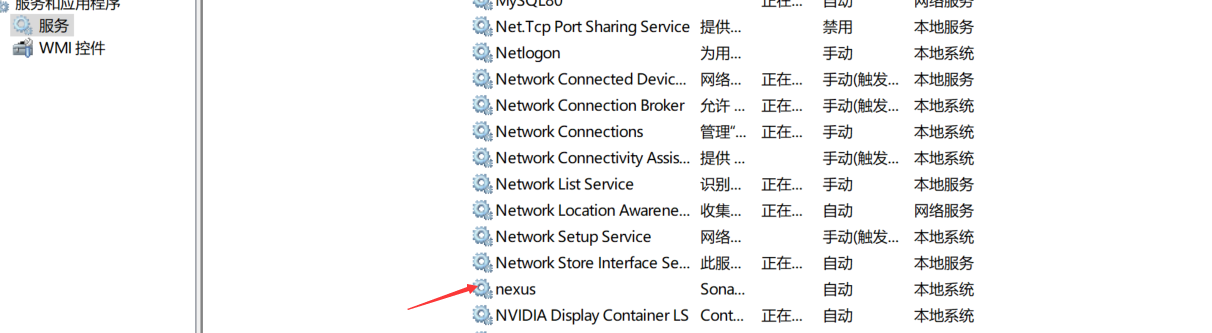
安装成功之后,可以进入服务里查看
# 卸载 nexus
cmd 进入 nexus 的 bin 目录,执行:nexus.bat uninstall
# 启动 nexus
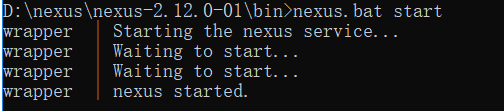
方法 1:
cmd 进入 bin 目录,执行 nexus.bat start
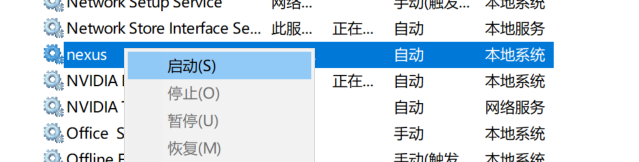
方法 2:
直接启动 nexus 服务
查看 nexus 的配置文件 conf/nexus.properties

# Jetty section
application-port=8081 # nexus 的访问端口配置
application-host=0.0.0.0 # nexus 主机监听配置(不用修改)
nexus-webapp=${bundleBasedir}/nexus # nexus 工程目录
nexus-webapp-context-path=/nexus # nexus 的 web 访问路径
# Nexus section
nexus-work=${bundleBasedir}/../sonatype-work/nexus # nexus 仓库目录
runtime=${bundleBasedir}/nexus/WEB-INF # nexus 运行程序目录
访问:
http://localhost:8081/nexus/
使用 Nexus 内置账户 admin/admin123 登陆:
点击右上角的 Log in,输入账号和密码 登陆

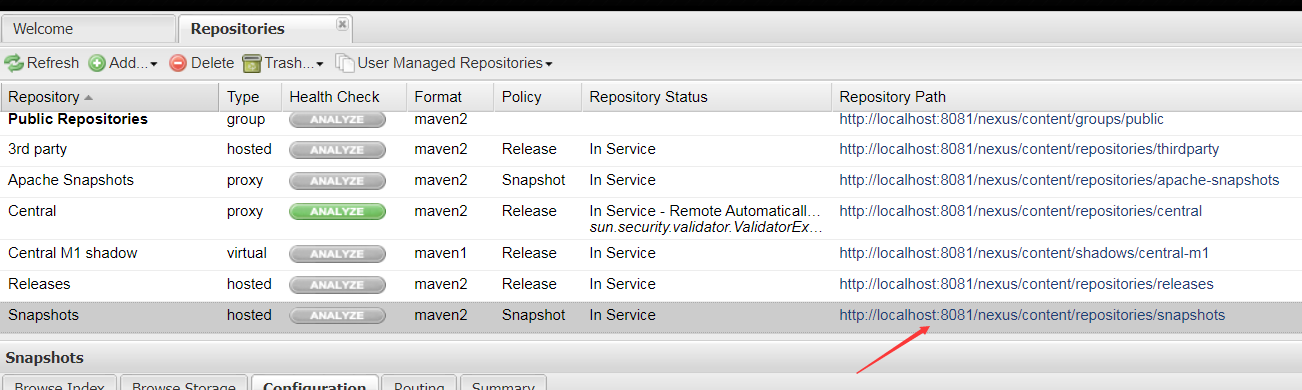
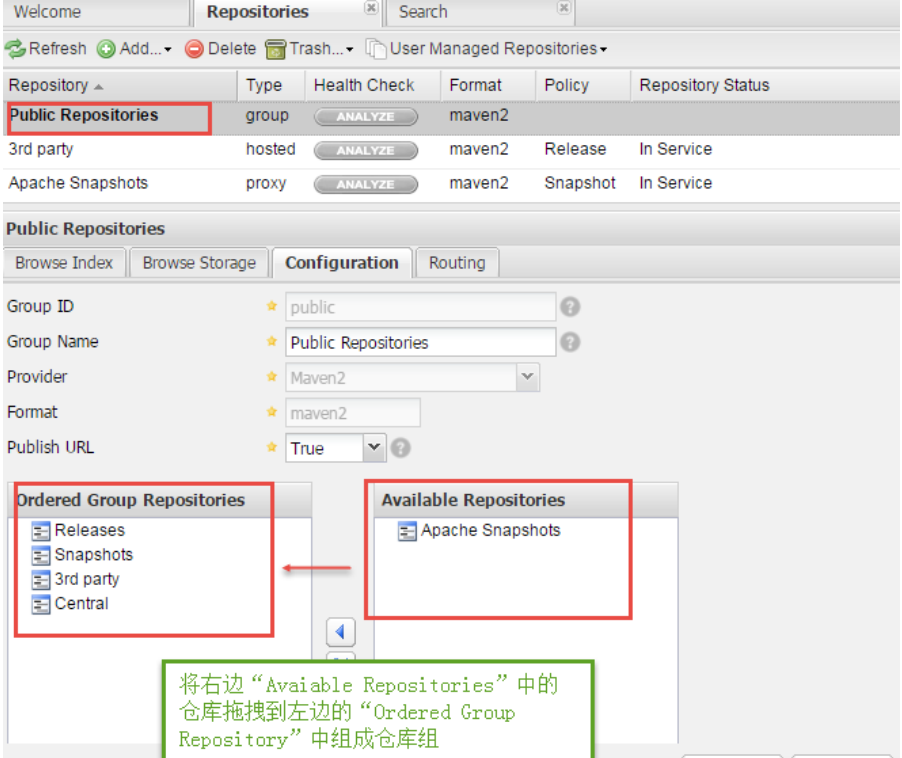
# 仓库类型
nexus
查看 nexus 的仓库:
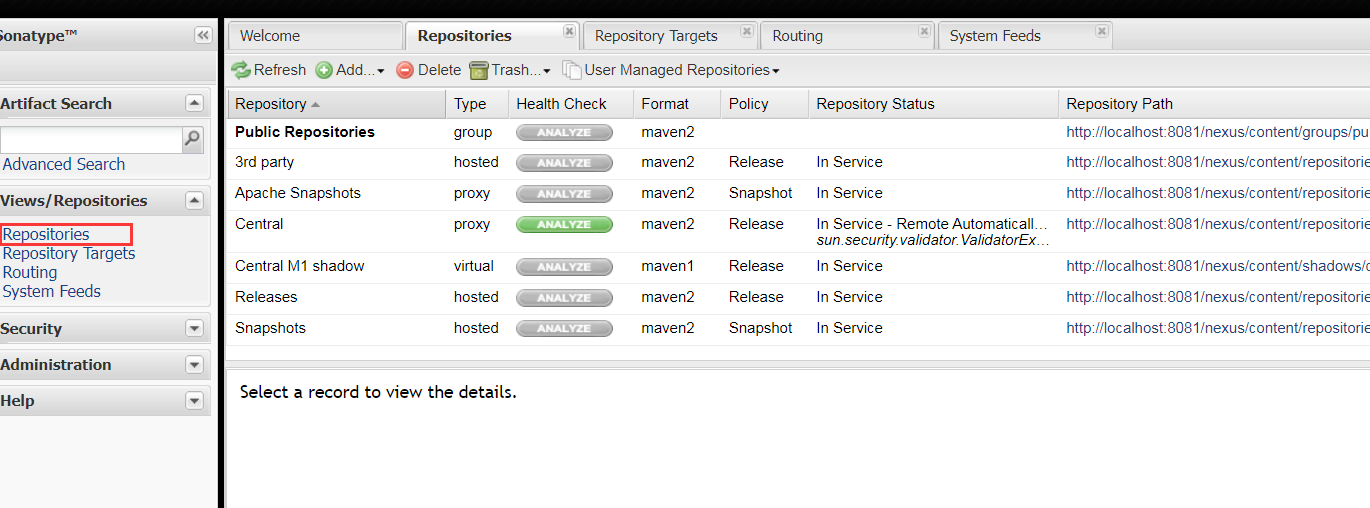
nexus 的仓库有 4 种类型:
hosted,宿主仓库,部署自己的 jar 到这个类型的仓库,包括 releases 和 snapshot 两部分,Releases 公司内部发布版本仓库、 Snapshots 公司内部测试版本仓库
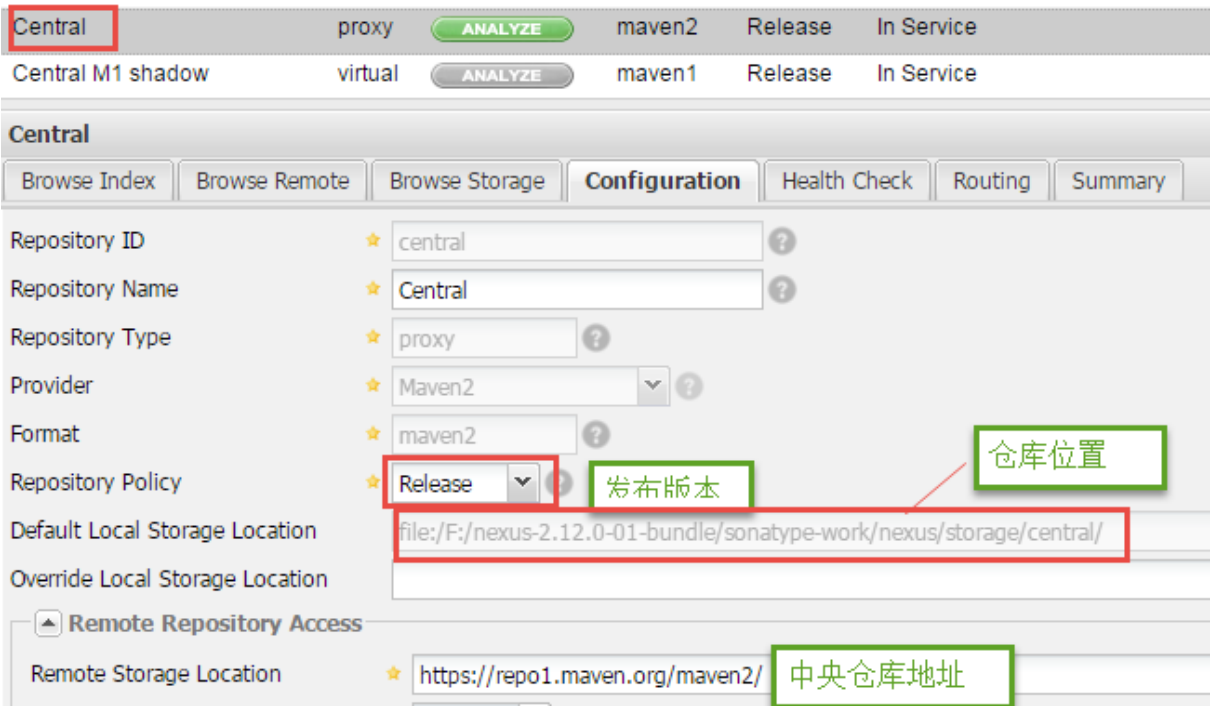
proxy,代理仓库,用于代理远程的公共仓库,如 maven 中央仓库,用户连接私服,私服自动去中央仓库下载 jar 包或者插件。
group,仓库组,用来合并多个 hosted/proxy 仓库,通常我们配置自己的 maven 连接仓库组。
virtual(虚拟):兼容 Maven1 版本的 jar 或者插件
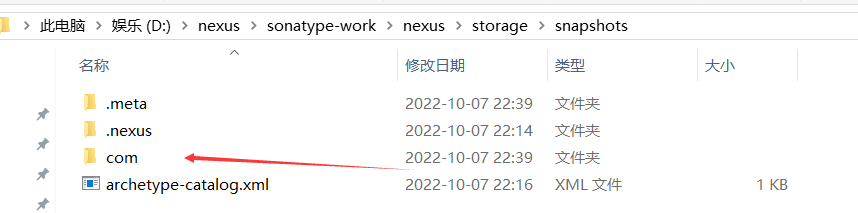
nexus 仓库默认在 sonatype-work 目录中:
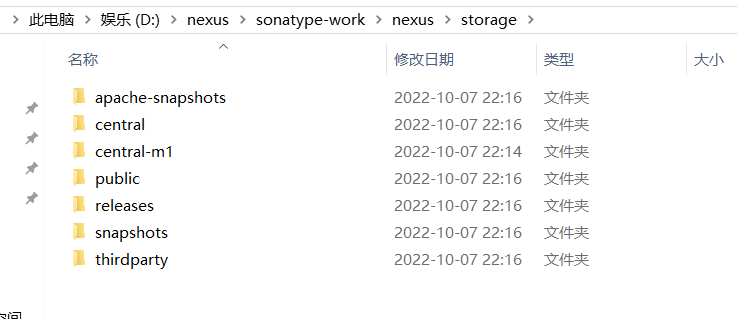
central:代理仓库,代理中央仓库
apache-snapshots:代理仓库
存储 snapshots 构件,代理地址 https://repository.apache.org/snapshots/
central-m1:virtual 类型仓库,兼容 Maven1 版本的 jar 或者插件
releases:本地仓库,存储 releases构件。
snapshots:本地仓库,存储 snapshots构件。
thirdparty:第三方仓库
public:仓库组
# 将项目发布到私服
# 配置
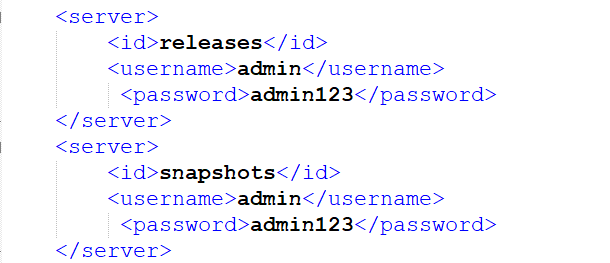
第一步:
需要在客户端即部署 ssm_dao 工程的电脑上配置 maven环境,并修改 settings.xml
文件,配置连接私服的用户和密码 。
此用户名和密码用于私服校验,因为私服需要知道上传的账号和密码是否和私服中的账号和
密码一致。
<server>
 	<id>releases</id>
 	<username>admin</username>
	 <password>admin123</password>
</server>
<server>
 	<id>snapshots</id>
	<username>admin</username>
	 <password>admin123</password>
</server>
2
3
4
5
6
7
8
9
10
releases 连接发布版本项目仓库
snapshots 连接测试版本项目仓库
第二步: 配置项目 pom.xml
配置私服仓库的地址,本公司的自己的 jar 包会上传到私服的宿主仓库,根据工程的版本号决定上传到哪个宿主仓库,如果版本为 release 则上传到私服的 release 仓库,如果版本为snapshot 则上传到私服的 snapshot 仓库
maven_mapper下的pom.xml(因为要上传maven_mapper到私服)
    <distributionManagement>
        <repository>
            <id>releases</id>
            <url>http://localhost:8081/nexus/content/repositories/releases/</url>
        </repository>
        <snapshotRepository>
            <id>snapshots</id>
            <url>http://localhost:8081/nexus/content/repositories/snapshots/</url>
        </snapshotRepository>
    </distributionManagement>
2
3
4
5
6
7
8
9
10
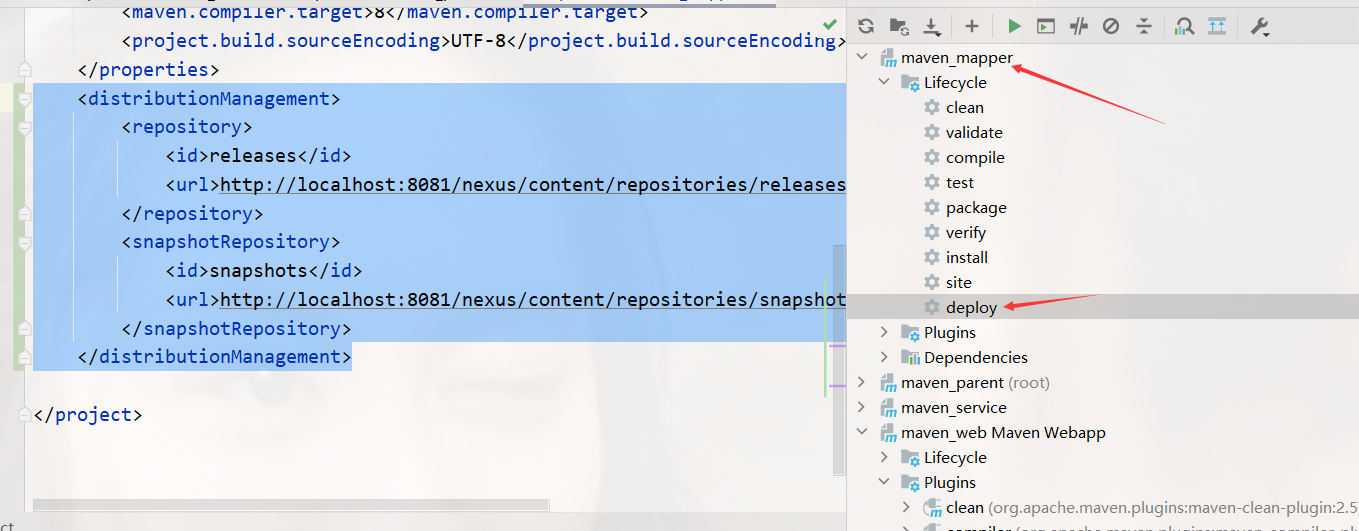
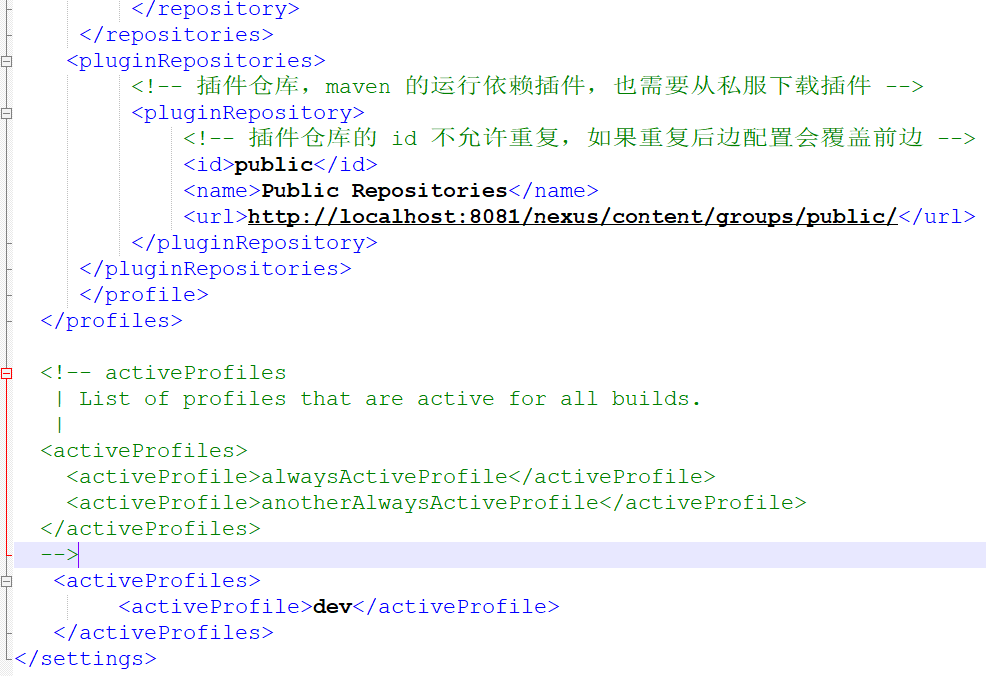
注意:pom.xml 这里id和 settings.xml 配置id 对应!
执行deploy命令上传到私服
也可以点击这里查看
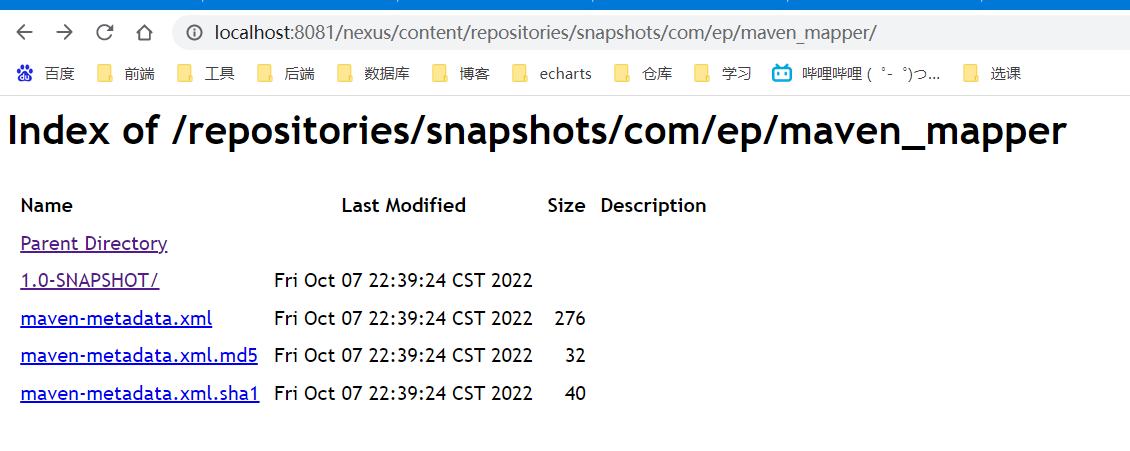
# 从私服下载 jar 包
没有配置 nexus 之前,如果本地仓库没有,去中央仓库下载,通常在企业中会在局域网内部署一台私服服务器,有了私服本地项目首先去本地仓库找 jar,如果没有找到则连接私服从私服下载 jar 包,如果私服没有 jar 包私服同时作为代理服务器从中央仓库下载 jar 包,这样做的好处是一方面由私服对公司项目的依赖 jar 包统一管理,一方面提高下载速度,项目连接私服下载 jar 包的速度要比项目连接中央仓库的速度快的多。
nexus中包括很多仓库,hosted中存放的是企业自己发布的jar包及第三方公司的jar包,proxy 中存放的是中央仓库的 jar,为了方便从私服下载 jar 包可以将多个仓库组成一个仓库组,每个工程需要连接私服的仓库组下载 jar 包。
打开 nexus 配置仓库组,如下图:
# 在 setting.xml 中配置仓库
在客户端的 setting.xml 中配置私服的仓库,由于 setting.xml 中没有 repositories 的配置标签需要使用 profile 定义仓库。
	<profile>
	<!--profile 的 id-->
	 <id>dev</id>
	 <repositories>
		 <repository>
			<!--仓库 id,repositories 可以配置多个仓库,保证 id 不重复-->
			 <id>nexus</id>
				 <!--仓库地址,即 nexus 仓库组的地址-->
			 <url>http://localhost:8081/nexus/content/groups/public/</url>
			<!--是否下载 releases 构件-->
			 <releases>
				<enabled>true</enabled>
			 </releases>
			<!--是否下载 snapshots 构件-->
			 <snapshots>
				<enabled>true</enabled>
			 </snapshots>
		 </repository>
	 </repositories>
	<pluginRepositories>
		 <!-- 插件仓库,maven 的运行依赖插件,也需要从私服下载插件 -->
		 <pluginRepository>
			 <!-- 插件仓库的 id 不允许重复,如果重复后边配置会覆盖前边 -->
			 <id>public</id>
			 <name>Public Repositories</name>
			 <url>http://localhost:8081/nexus/content/groups/public/</url>
		 </pluginRepository>
	 </pluginRepositories>
	 </profile>
2
3
4
5
6
7
8
9
10
11
12
13
14
15
16
17
18
19
20
21
22
23
24
25
26
27
28
29
使用 profile 定义仓库需要激活才可生效。
   <activeProfiles>
		<activeProfile>dev</activeProfile>
   </activeProfiles>
2
3
# 第三方 jar 包放入本地仓库
--安装第三方jar包到本地仓库

----进入jar包所在目录运行
mvn install:install-file -DgroupId=com.alibaba -DartifactId=fastjson -Dversion=1.1.37 -Dfile=fastjson-1.1.37.jar -Dpackaging=jar
----打开cmd直接运行
mvn install:install-file -DgroupId=com.alibaba -DartifactId=fastjson -Dversion=1.1.37 -Dpackaging=jar -Dfile=D:\@黑马java\黑马JavaEE 57期\00 讲义+笔记+资料\主流框架\35.会员版(2.0)-就业课(2.0)-Maven高级\maven高级\资料\安装第三方jar包\fastjson-1.1.37.jar
2
3
4
5
6
# 第三方 jar 包放入私服
--在settings配置文件中添加登录私服第三方登录信息
<server>
    <id>thirdparty</id>
    <username>admin</username>
    <password>admin123</password>
</server>
2
3
4
5
6
--安装第三方jar包到私服

----进入jar包所在目录运行
mvn deploy:deploy-file -DgroupId=com.alibaba -DartifactId=fastjson -Dversion=1.1.37 -Dpackaging=jar -Dfile=fastjson-1.1.37.jar -Durl=http://localhost:8081/nexus/content/repositories/thirdparty/ -DrepositoryId=thirdparty
----打开cmd直接运行
mvn deploy:deploy-file -DgroupId=com.alibaba -DartifactId=fastjson -Dversion=1.1.37 -Dpackaging=jar -Dfile=D:\@黑马java\黑马JavaEE 57期\00 讲义+笔记+资料\主流框架\35.会员版(2.0)-就业课(2.0)-Maven高级\maven高级\资料\安装第三方jar包\fastjson-1.1.37.jar -Durl=http://localhost:8081/nexus/content/repositories/thirdparty/ -DrepositoryId=thirdparty
2
3
4
5
6