 Mock
Mock
# Mock.js
mockjs官网:http://mockjs.com/

# 1.安装依赖
# 使用axios发送ajax请求
cnpm install axios --save
# 使用mockjs产生随机数据
cnpm install mockjs --save-dev
# 使用json5解决json文件,无法加注释问题
cnpm install json5 --save-dev
2
3
4
5
6
const Mock = require('mockjs')
let id = Mock.mock('@id')  // 得到随机的id,字符串


console.log(id, typeof id)

var obj = Mock.mock({
    id: "@id()",//得到随机的id,对象
    username: "@cname()",//随机生成中文名字
    date: "@date()",//随机生成日期
    avatar: "@image('200x200','red','#fff','avatar')",//生成图片,参数:size, background, foreground, text
    description: "@paragraph()",//描述
    ip: "@ip()",//IP地址
    email: "@email()"//email
})
console.log(obj)
2
3
4
5
6
7
8
9
10
11
12
13
14
15
16
vscode安装json5插件(json5 syantax)

const fs = require('fs')
const path = require('path')
const JSON5 = require('json5')

// 读取json文件
function getJsonFile(fileParh) {
    // 读取指定json文件
    var json = fs.readFileSync(path.resolve(__dirname, fileParh), 'utf-8')
    // 解析并返回
    return JSON5.parse(json)
}
// var json = fs.readFileSync(path.join(__dirname, './userinfo.json5'), 'utf-8')
// var obj = JSON5.parse(json)

console.log(path.resolve(__dirname))

var json = getJsonFile('./userinfo.json5')
console.log(json)
2
3
4
5
6
7
8
9
10
11
12
13
14
15
16
17
18
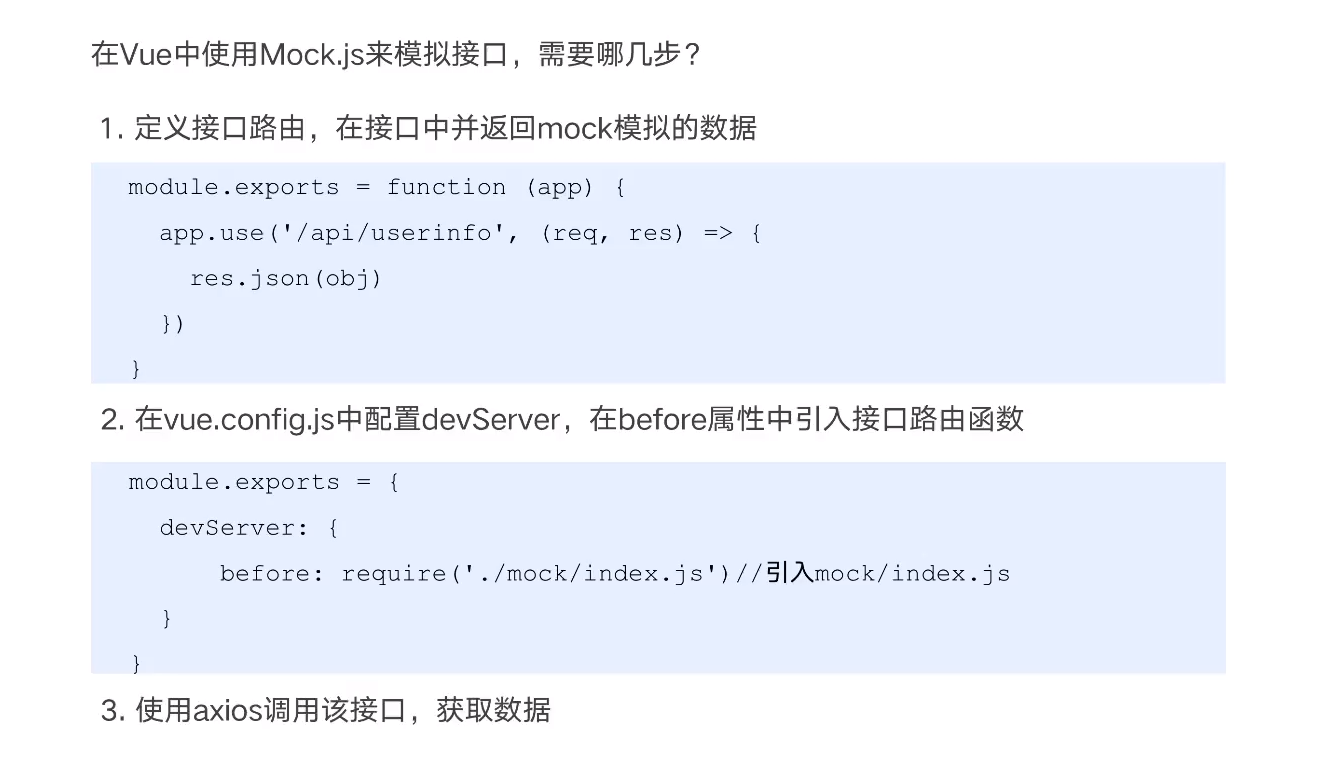
# Mock和VueCli结合
# 0.创建json文件
用于设置获取的文件类型
{
    id: "@id()",//得到随机的id,对象
    username: "@cname()",//随机生成中文名字
    date: "@date()",//随机生成日期
    avatar: "@image('200x200','red','#fff','avatar')",//生成图片,参数:size, background, foreground, text
    description: "@paragraph()",//描述
    ip: "@ip()",//IP地址
    email: "@email()", //email
}
2
3
4
5
6
7
8
9
# 1.在mock下创建index.js文件
(和src同级目录)mock->index.js
const fs = require('fs');
const path = require('path');
const Mock = require('mockjs');//mockjs 导入依赖模块
const JSON5 = require('json5');
//读取json文件
function getJsonFile(filePath) {
    //读取指定json文件
    var json = fs.readFileSync(path.resolve(__dirname,filePath), 'utf-8');
    //解析并返回
    return JSON5.parse(json);
}

//返回一个函数
module.exports = function(app){
    //监听http请求
    app.get('/user/userinfo', function (rep, res) {
        //每次响应请求时读取mock data的json文件
        //getJsonFile方法定义了如何读取json文件并解析成数据对象
        var json = getJsonFile('./userInfo.json5');
        //将json传入 Mock.mock 方法中,生成的数据返回给浏览器
        res.json(Mock.mock(json));
    });
}
2
3
4
5
6
7
8
9
10
11
12
13
14
15
16
17
18
19
20
21
22
23
# 2.配合vue.config.js文件
vue.config.js
module.exports = {
    devServer: {
        before: require('./mock/index.js')//引入mock/index.js
    }
}
2
3
4
5
# 3.发送ajax请求
在.vue组件中发送ajax请求
import axios from 'axios'
export default {
  name: 'HelloWorld',
  mounted() {
    axios.get('/user/userinfo')
    .then(res => {
      console.log(res)
    })
    .catch(err => {
      console.log(err)
    })
  }
}
2
3
4
5
6
7
8
9
10
11
12
13
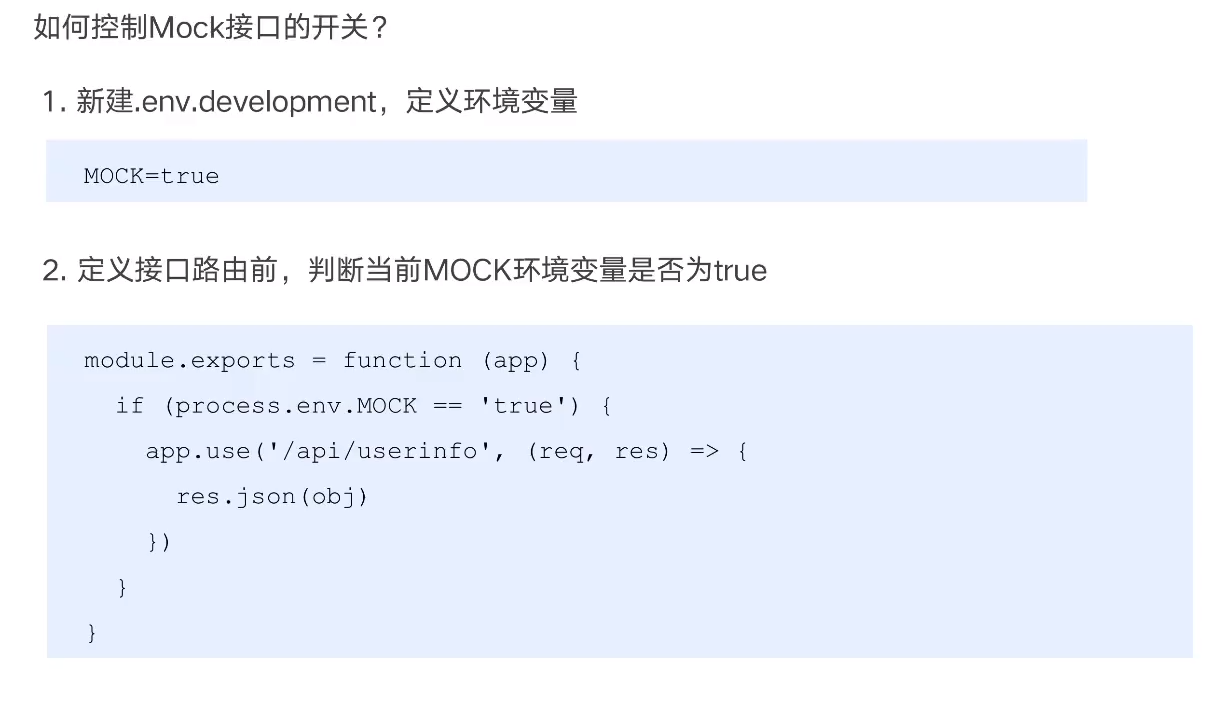
# 4.移除mock
当后端接口开发出来,需要移除mock
项目根目录创建.env.development(记住有点)(不使用mock的话需要置为false)
MOCK=true
在mock下的index文件中添加一下代码
module.exports = function(app){
    if(process.env.MOCK == 'true'){  // 添加的代码
        //监听http请求
        app.get('/user/userinfo', function (rep, res) {
            //每次响应请求时读取mock data的json文件
            //getJsonFile方法定义了如何读取json文件并解析成数据对象
            var json = getJsonFile('./userInfo.json5');
            //将json传入 Mock.mock 方法中,生成的数据返回给浏览器
            res.json(Mock.mock(json));
        });
    }
}
2
3
4
5
6
7
8
9
10
11
12

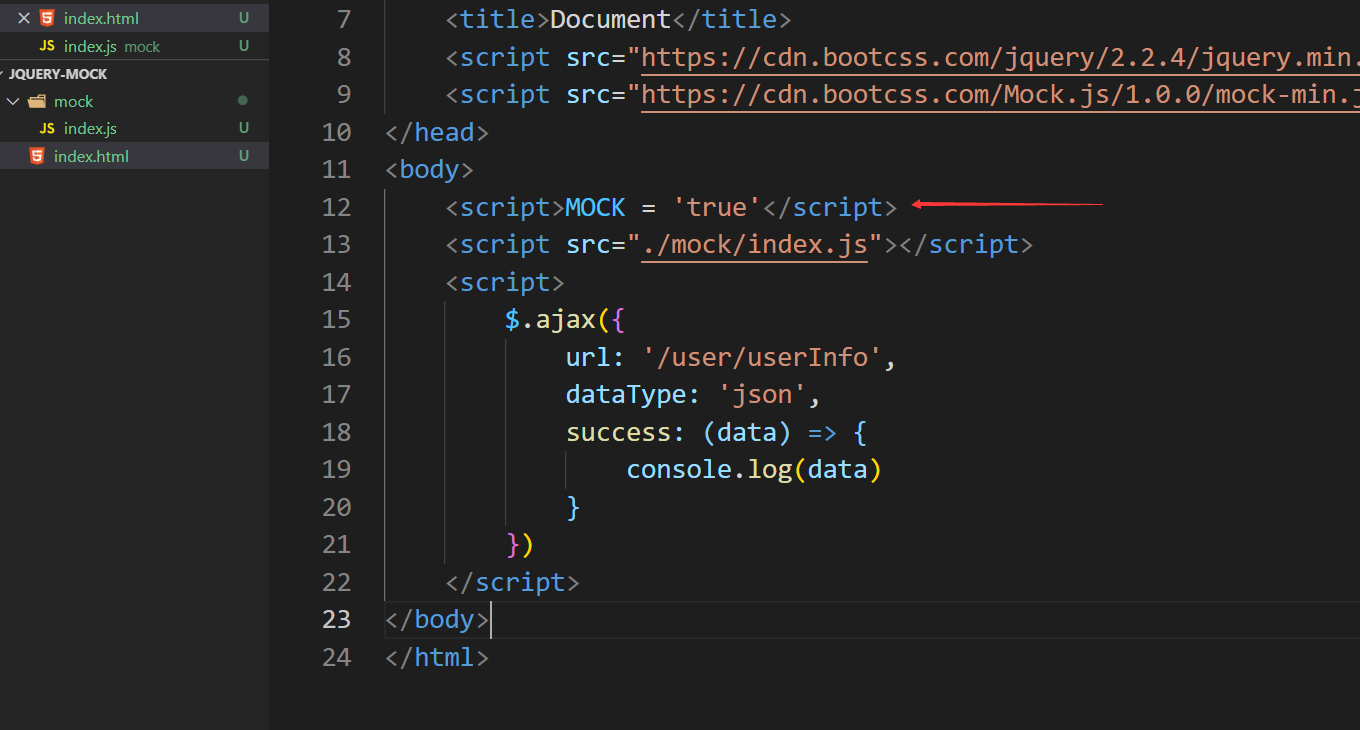
# 在jquery中使用mock.js
# 1.新建index.html,引入jquery.js和mock.js
<!DOCTYPE html>
<html>
	<head>
		<meta charset="utf-8">
		<title></title>
		<script src="https://cdn.bootcss.com/jquery/2.2.4/jquery.min.js"></script>
		<script src="https://cdn.bootcss.com/Mock.js/1.0.0/mock-min.js"></script>
	</head>

	<body>


	</body>
</html>
2
3
4
5
6
7
8
9
10
11
12
13
14
# 2.mock->index.js
Mock.mock('/user/userInfo', 'get', {
	id: "@id()", //得到随机的id
	username: "@cname()", //随机生成中文名字
	date: "@date()", //随机生成日期
	avator: "@image('200x200','#50B347','#fff','avatar')", //生成图片,参数:size,background,foreground,text
	description: "@paragraph()", //描述
	ip: "@ip()", //IP地址
	email: "@email()" //email
})
2
3
4
5
6
7
8
9
# 3.使用jquery发送ajax请求
index.html
<script src="./mock/index.js"></script>
	<script>
		$.ajax({
			url: '/user/userInfo',
			dataType: 'json',
			success: (data) => {
				console.log(data)
			}
		})
	</script>
2
3
4
5
6
7
8
9
10
# 4.移除mock
通过添加全局变量ENV来判断
修改index.html,增加全局变量ENV
更改index.js
if (MOCK == 'true') {
    Mock.mock('/user/userInfo', 'get', {
        id: "@id()", //得到随机的id
        username: "@cname()", //随机生成中文名字
        date: "@date()", //随机生成日期
        avator: "@image('200x200','#50B347','#fff','avatar')", //生成图片,参数:size,background,foreground,text
        description: "@paragraph()", //描述
        ip: "@ip()", //IP地址
        email: "@email()" //email
    })
}
2
3
4
5
6
7
8
9
10
11
12
当MOCK = 'false'时就不再使用mock
<script>MOCK = 'false'</script>
# 补充:
// 引入 Mock
import Mock from 'mockjs'
export default {
// 支持值为 Object 和 Array
'GET /api/users': { users: [1, 2] },
// GET POST 可省略
'/api/users/1': { id: 1 },
// 支持自定义函数,API 参考 express@4
'POST /api/users/create': (req, res) => {
res.end('ok');
},
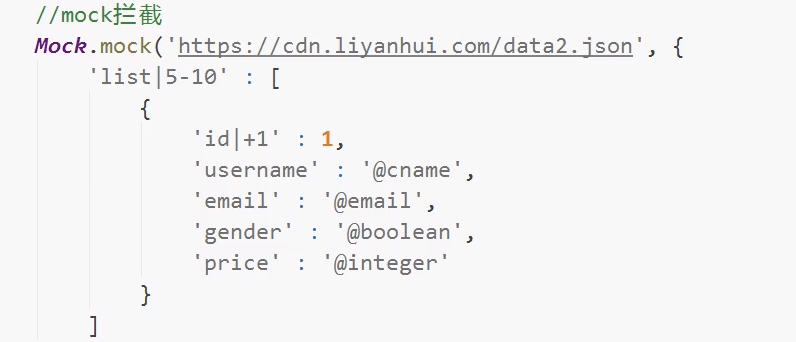
"GET /login/users": Mock.mock({
//生成list数组,数组中有50条数据,
"list|50":[
{
name:'@city', //随机城市
"value|1-100": 50 //1-100位之间,随机生成50个
}
]
})
};
2
3
4
5
6
7
8
9
10
11
12
13
14
15
16
17
18
19
20
21
22
23
24
25
26
登陆接口的例子:https://blog.csdn.net/m0_37825704/article/details/120527140
# 使用:

vue.config.js
module.exports = {
    devServer: {
        // devServe在发送请求时,会走到before指定的函数中进行处理,如果before中没有对应的接口,才会请求外网等
        before: require('./mock/index.js')//引入mock/index.js
    }
}
2
3
4
5
6
mock->index.js
const Mock = require('mockjs');
var data = Mock.mock({
    id: "@id()",//得到随机的id,对象
    username: "@cname()",//随机生成中文名字
    date: "@date()",//随机生成日期
    avatar: "@image('200x200','red','#fff','avatar')",//生成图片,参数:size, background, foreground, text
    description: "@paragraph()",//描述
    ip: "@ip()",//IP地址
    email: "@email()", //email
})

module.exports = function (app) {
  // 参数1:参数接口地址,参数2:服务器处理函数
  app.use('api/userinfo', (req, res) => {

    // 将模拟的数据转换成json格式返回给浏览器
    res.json(data)
  })
}
2
3
4
5
6
7
8
9
10
11
12
13
14
15
16
17
18
19
# Mock.mock()
# Mock.mock( rurl?, rtype?, template|function( options ) )
根据数据模板生成模拟数据。
# Mock.mock( template )
根据数据模板生成模拟数据。
# Mock.mock( rurl, template )
记录数据模板。当拦截到匹配 rurl 的 Ajax 请求时,将根据数据模板 template 生成模拟数据,并作为响应数据返回。
# Mock.mock( rurl, function( options ) )
记录用于生成响应数据的函数。当拦截到匹配 rurl 的 Ajax 请求时,函数 function(options) 将被执行,并把执行结果作为响应数据返回。
# Mock.mock( rurl, rtype, template )
记录数据模板。当拦截到匹配 rurl 和 rtype 的 Ajax 请求时,将根据数据模板 template 生成模拟数据,并作为响应数据返回。
# Mock.mock( rurl, rtype, function( options ) )
记录用于生成响应数据的函数。当拦截到匹配 rurl 和 rtype 的 Ajax 请求时,函数 function(options) 将被执行,并把执行结果作为响应数据返回。
# rurl
可选。
表示需要拦截的 URL,可以是 URL 字符串或 URL 正则。例如 /\/domain\/list\.json/、'/domian/list.json'。
# rtype
可选。
表示需要拦截的 Ajax 请求类型。例如 GET、POST、PUT、DELETE 等。
# template
可选。
表示数据模板,可以是对象或字符串。例如 { 'data|1-10':[{}] }、'@EMAIL'。
# function(options)
可选。
表示用于生成响应数据的函数。
# options
指向本次请求的 Ajax 选项集,含有 url、type 和 body 三个属性,参见 XMLHttpRequest 规范 (opens new window)。
# Mock.setup( settings )
- Mock.setup( settings )
配置拦截 Ajax 请求时的行为。支持的配置项有:timeout。
# settings
必选。
配置项集合。
# timeout
可选。
指定被拦截的 Ajax 请求的响应时间,单位是毫秒。值可以是正整数,例如 400,表示 400 毫秒 后才会返回响应内容;也可以是横杠 '-' 风格的字符串,例如 '200-600',表示响应时间介于 200 和 600 毫秒之间。默认值是'10-100'。
Mock.setup({
    timeout: 400
})
Mock.setup({
    timeout: '200-600'
})
2
3
4
5
6
目前,接口
Mock.setup( settings )仅用于配置 Ajax 请求,将来可能用于配置 Mock 的其他行为。