跨域
跨域
# 跨域是什么?
MDN:浏览器的同源策略 (opens new window)
# 同源策略
跨域问题其实就是浏览器的同源策略 (opens new window)所导致的。
**「同源策略」**是一个重要的安全策略,它用于限制一个origin的文档或者它加载的脚本如何能与另一个源的资源进行交互。
它能帮助阻隔恶意文档,减少可能被攻击的媒介。例如,它可以防止互联网上的恶意网站在浏览器中运行 JS 脚本,从第三方网络邮件服务(用户已登录)或公司内网(因没有公共 IP 地址而受到保护,不会被攻击者直接访问)读取数据,并将这些数据转发给攻击者。
--来源 MDN
只有当**「protocol(协议)、domain(域名)、port(端口)三者一致。」**
下表给出了与 URL http://store.company.com/dir/page.html 的源进行对比的示例:
| URL | 结果 | 原因 |
|---|---|---|
http://store.company.com/dir2/other.html | 同源 | 只有路径不同 |
http://store.company.com/dir/inner/another.html | 同源 | 只有路径不同 |
https://store.company.com/secure.html | 失败 | 协议不同 |
http://store.company.com:81/dir/etc.html | 失败 | 端口不同(http:// 默认端口是 80) |
http://news.company.com/dir/other.html | 失败 | 主机不同 |
# 跨域解决方案
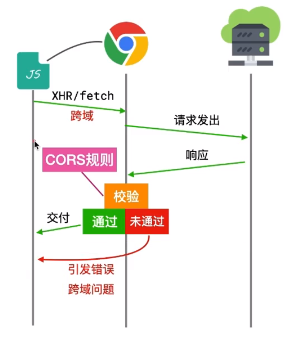
CORS是一套机制,用于浏览器校验跨域请求它的基本理念是:
只要服务器明确表示允许,则校验通过
服务器明确拒绝或没有表示,则校验不通过
# CORS
跨域资源共享(CORS) 是一种机制,它使用额外的 HTTP 头来告诉浏览器 让运行在一个 origin (domain) 上的 Web 应用被准许访问来自不同源服务器上的指定的资源。当一个资源从与该资源本身所在的服务器**「不同的域、协议或端口」请求一个资源时,资源会发起一个「跨域 HTTP 请求」**。
而在 cors 中会有 简单请求 和 复杂请求的概念。
「浏览器支持情况」
当你使用 IE<=9, Opera<12, or Firefox<3.5 或者更加老的浏览器,这个时候请使用 JSONP 。
# 简单请求
不会触发 CORS 预检请求。这样的请求为“简单请求”,请注意,该术语并不属于 Fetch (其中定义了 CORS)规范。若请求满足所有下述条件,则该请求可视为“简单请求”:

情况一: 使用以下方法(意思就是以下请求意外的都是非简单请求)
GETHEADPOST
情况二: 人为设置以下集合外的请求头
AcceptAccept-LanguageContent-LanguageContent-Type(需要注意额外的限制)DPRDownlinkSave-DataViewport-WidthWidth
情况三:Content-Type的值仅限于下列三者之一:(例如 application/json 为非简单请求)
text/plainmultipart/form-dataapplication/x-www-form-urlencoded
情况四:
请求中的任意XMLHttpRequestUpload 对象均没有注册任何事件监听器;XMLHttpRequestUpload 对象可以使用 XMLHttpRequest.upload 属性访问。
情况五:
请求中没有使用 ReadableStream 对象。

# 非简单请求
也就是预检请求
除以上情况外的。


发送请求前,会先发送一个预检请求,告诉服务器要请求的方法和请求头中修改了哪些字段,让服务器自行判断要不要让他过

# Node 中的解决方案
# 原生方式
直接使用express生成项目
npx express-generator --view ejs
express可以使用中间件cors (opens new window)来配置,这里选择原生的方式
app.use(async (req, res, next) => {
  res.set("Access-Control-Allow-Origin", req.headers.origin);
  res.set("Access-Control-Allow-Credentials", true);
  res.set("Access-Control-Request-Method", "PUT,POST,GET,DELETE,OPTIONS");
  res.set(
    "Access-Control-Allow-Headers",
    "Origin, X-Requested-With, Content-Type, Accept, cc"
  );
  if (res.method === "OPTIONS") {
    res.status = 204;
    return;
  }
  await next();
})
2
3
4
5
6
7
8
9
10
11
12
13
14
# 第三方中间件
const cors = require("koa-cors");

app.use(cors());
2
3
# 关于 cors 的 cookie 问题
1.web 请求设置withCredentials
这里默认情况下在跨域请求,浏览器是不带 cookie 的。但是我们可以通过设置 withCredentials 来进行传递 cookie.
// 原生 xml 的设置方式
var xhr = new XMLHttpRequest();
xhr.withCredentials = true;
// axios 设置方式
axios.defaults.withCredentials = true;
2
3
4
5
2.Access-Control-Allow-Credentials 为 true
3.Access-Control-Allow-Origin为非 *
测试代码
  <script src="https://cdn.bootcss.com/axios/0.19.2/axios.min.js"></script>
  <script>
    // axios 设置携带cookie
    axios.defaults.withCredentials = true;
    axios.get("http://127.0.0.1:3000/test");
  </script>
2
3
4
5
6

# Node 正向代理
代理的思路为,利用服务端请求不会跨域的特性,让接口和当前站点同域。
# cli 工具中的代理
Webpack (4.x)
在
webpack中可以配置proxy来快速获得接口代理的能力。module.exports = { ... devServer: { port: 8000, proxy: { "/api": { target: "http://localhost:8080" } } }, ... };1
2
3
4
5
6
7
8
9
10
11
12Vue-cli 2.x
项目根目录下的
config/index.js文件(如果没有该文件则创建)dev: { // ...其他配置... proxyTable: { '/api': { target: 'http://example.com', // 设置要转发到的API地址 changeOrigin: true, pathRewrite: { '^/api': '' // 将路径重写为空字符串,这样就不需要再次指定'/api'了 } } }, }1
2
3
4
5
6
7
8
9
10
11
12Vue-cli 3.x
// 跨域配置
module.exports = {
  devServer: {                //记住,别写错了devServer//设置本地默认端口  选填
    proxy: {                 //设置代理,必须填
      '/api': {              //设置拦截器  拦截器格式   斜杠+拦截器名字,名字可以自己定
        target: 'http://example.com',     //代理的目标地址
        changeOrigin: true,              //是否设置同源,输入是的
        pathRewrite: {                   //路径重写
          '^/api': ''                     //选择忽略拦截器里面的内容
        }
      }
    }
  }
}
1
2
3
4
5
6
7
8
9
10
11
12
13
14
15Parcel (2.x)
.proxyrc{
    "/api": {
        "target": "http://localhost:8080"
    }
}
1
2
3
4
5
以上所有配置都是有着共同的底层包 http-proxy-middleware .里面需要用到的各种 websocket ,rewrite 等功能
# 使用自己的代理工具
cors-anywhere (opens new window)
后端代码
// Listen on a specific host via the HOST environment variable
var host = process.env.HOST || '0.0.0.0';
// Listen on a specific port via the PORT environment variable
var port = process.env.PORT || 8080;

var cors_proxy = require('cors-anywhere');
cors_proxy.createServer({
    originWhitelist: [], // Allow all origins
    requireHeader: ['origin', 'x-requested-with'],
    removeHeaders: ['cookie', 'cookie2']
}).listen(port, host, function() {
    console.log('Running CORS Anywhere on ' + host + ':' + port);
});
2
3
4
5
6
7
8
9
10
11
12
13
前端代码
<script src="https://cdn.bootcss.com/axios/0.19.2/axios.min.js"></script>
<script>
    axios.defaults.withCredentials = true;
    getlist.onclick = () => {
        axios.get("http://127.0.0.1:7777/http://127.0.0.1:8080/api/corslist")
            .then(res => { console.log(res.data);});
    };
    login.onclick = () => {
        axios.post("http://127.0.0.1:7777/http://127.0.0.1:8080/api/login");
    };
</script>
2
3
4
5
6
7
8
9
10
11
「缺点」
无法专递 cookie,原因是因为这个是一个代理库,作者觉得中间传递 cookie 太不安全了。https://github.com/Rob--W/cors-anywhere/issues/208#issuecomment-575254153
# charles
相关文章推荐:Charles 功能介绍和使用教程 (opens new window)
利用 charles 进行跨域,本质就是请求的拦截与代理。
# Nginx 反向代理
Nginx 则是通过反向代理的方式,(这里也需要自定义一个域名)这里就是保证我当前域,能获取到静态资源和接口,不关心是怎么获取的。
配置下 hosts
127.0.0.1 local.test
配置 nginx
server {
    listen 80;
    server_name local.test;
    location /api {
        proxy_pass http://localhost:8080;
    }
    location / {
        proxy_pass http://localhost:8000;
    }
}
2
3
4
5
6
7
8
9
10
# JSONP
JSONP 主要就是利用了 script 标签没有跨域限制的这个特性来完成的。
「使用限制」
仅支持 GET 方法,如果想使用完整的 REST 接口,请使用 CORS 或者其他代理方式。
「流程解析」
前端定义解析函数(例如 jsonpCallback=function(){....})
通过 params 形式包装请求参数,并且声明执行函数(例如 cb=jsonpCallback)
- 后端获取前端声明的执行函数(jsonpCallback),并以带上参数并调用执行函数的方式传递给前端。
「使用示例」
后端实现
const Koa = require("koa");
const fs = require("fs");
const app = new Koa();
app.use(async (ctx, next) => {
    if (ctx.path === "/api/jsonp") {
        const { cb, msg } = ctx.query;
        ctx.body = `${cb}(${JSON.stringify({ msg })})`;
        return;
    }
});
app.listen(8080);
2
3
4
5
6
7
8
9
10
11
普通 js 示例
<script type="text/javascript">
    window.jsonpCallback = function(res) {
        console.log(res);
    };
</script>
<script  src="http://localhost:8080/api/jsonp?msg=hello&cb=jsonpCallback"  type="text/javascript"></script>
2
3
4
5
6
JQuery Ajax 示例
<script src="https://cdn.bootcss.com/jquery/3.5.0/jquery.min.js"></script>
<script>
    $.ajax({
        url: "http://localhost:8080/api/jsonp",
        dataType: "jsonp",
        type: "get",
        data: {      msg: "hello"    },
        jsonp: "cb",
        success: function(data) {      console.log(data);    }
    });
</script>
2
3
4
5
6
7
8
9
10
11
「原理解析」
其实这就是 js 的魔法
我们先来看最简单的 js 调用。嗯,很自然的调用。
<script>
    window.jsonpCallback = function(res) {
        console.log(res);
    };
</script>
<script>  jsonpCallback({ a: 1 });</script>
2
3
4
5
6
我们稍稍改造一下,外链的形式。
<script>
  window.jsonpCallback = function(res) {
    console.log(res);
  };
</script>
<script src="http://localhost:8080/api/a.js"></script>

// http://localhost:8080/api/a.js jsonpCallback({a:1});
2
3
4
5
6
7
8
我们再改造一下,我们把这个外链的 js 就当做是一个动态的接口,因为本身资源和接口一样,是一个请求,也包含各种参数,也可以动态化返回。
<script>
  window.jsonpCallback = function(res) {
    console.log(res);
  };
</script>
<script src="http://localhost:8080/api/a.js?a=123&cb=sonpCallback"></script>

// http://localhost:8080/api/a.js jsonpCallback({a:123});
2
3
4
5
6
7
8
# Websocket
WebSocket 规范定义了一种 API,可在网络浏览器和服务器之间建立“套接字”连接。简单地说:客户端和服务器之间存在持久的连接,而且双方都可以随时开始发送数据。详细教程可以看 https://www.html5rocks.com/zh/tutorials/websockets/basics/
这种方式本质没有使用了 HTTP, 因此也没有跨域的限制,没有什么过多的解释直接上代码吧。
前端部分
<script>
  let socket = new WebSocket("ws://localhost:8080");
  socket.onopen = function() {
    socket.send("秋风的笔记");
  };
  socket.onmessage = function(e) {
    console.log(e.data);
  };
</script>
2
3
4
5
6
7
8
9
后端部分
const express = require('express');
const http = require('http');
const WebSocket = require('ws');

const app = express();
const server = http.createServer(app);
const wss = new WebSocket.Server({ server });

wss.on('connection', (ws) => {
  console.log('Client connected');

  // 监听来自客户端的消息
  ws.on('message', (message) => {
    console.log(`Received: ${message}`);

    // 向客户端发送消息
    ws.send(`Server received: ${message}`);
  });

  // 监听连接断开事件
  ws.on('close', () => {
    console.log('Client disconnected');
  });
});

app.get('/', (req, res) => {
  res.send('WebSocket Server is running!');
});

const port = 8080;
server.listen(port, () => {
  console.log(`Server is running on port ${port}`);
});
2
3
4
5
6
7
8
9
10
11
12
13
14
15
16
17
18
19
20
21
22
23
24
25
26
27
28
29
30
31
32
33
# window.postMessage
「window.postMessage()」 方法可以安全地实现跨源通信。通常,对于两个不同页面的脚本,只有当执行它们的页面位于具有相同的协议(通常为 https),端口号(443 为 https 的默认值),以及主机 (两个页面的模数 Document.domain设置为相同的值) 时,这两个脚本才能相互通信。「window.postMessage()」 方法提供了一种受控机制来规避此限制,只要正确的使用,这种方法就很安全。
# 用途
1.页面和其打开的新窗口的数据传递
2.多窗口之间消息传递
3.页面与嵌套的 iframe 消息传递
# 用法
详细用法看 https://developer.mozilla.org/zh-CN/docs/Web/API/Window/postMessage
otherWindow.postMessage(message, targetOrigin, [transfer]);
- otherWindow: 其他窗口的一个引用,比如 iframe 的 contentWindow 属性、执行window.open返回的窗口对象、或者是命名过或数值索引的window.frames。
- message: 将要发送到其他 window 的数据。
- targetOrigin: 通过窗口的 origin 属性来指定哪些窗口能接收到消息事件.
- transfer(可选) : 是一串和 message 同时传递的
Transferable对象. 这些对象的所有权将被转移给消息的接收方,而发送一方将不再保有所有权
# 示例
index.html
<iframe
  src="http://localhost:8080"
  frameborder="0"
  id="iframe"
  onload="load()"
></iframe>
<script>
  function load() {
    iframe.contentWindow.postMessage("发送给服务器端的数据", "http://localhost:8080");
    window.onmessage = e => {
      console.log("客户端接收到的数据", e.data);
    };
  }
</script>
2
3
4
5
6
7
8
9
10
11
12
13
14
server.js
const Koa = require("koa");
const fs = require("fs");
const path = require('path');
const app = new Koa();

app.use(async (ctx, next) => {
  if (ctx.method === "GET" && ctx.path === "/") {
    ctx.body = fs.readFileSync(path.join(__dirname, "./other.html")).toString();
  }
});

app.listen(8080);
2
3
4
5
6
7
8
9
10
11
12
other.html
<div>hello</div>
<script>
  window.onmessage = e => {
    console.log("服务器端接收到的数据:", e.data);
    e.source.postMessage(e.data + "---服务端处理", e.origin);
  };
</script>
2
3
4
5
6
7

# document.domain + Iframe
「该方式只能用于二级域名相同的情况下,比如 a.test.com 和 b.test.com 适用于该方式」。只需要给页面添加 document.domain ='test.com' 表示二级域名都相同就可以实现跨域。
www.   baidu.  com     .
三级域  二级域   顶级域   根域
// a.test.com
<body>
  helloa
  <iframe
    src="http://b.test.com/b.html"
    frameborder="0"
    onload="load()"
    id="frame"
  ></iframe>
  <script>
    document.domain = "test.com";
    function load() {
      console.log(frame.contentWindow.a);
    }
  </script>
</body>
// b.test.com
<body>
  hellob
  <script>
    document.domain = "test.com";
    var a = 100;
  </script>
</body>
2
3
4
5
6
7
8
9
10
11
12
13
14
15
16
17
18
19
20
21
22
23
24
25
26
# window.location.hash + Iframe
# 实现原理
原理就是通过 url 带 hash ,通过一个非跨域的中间页面来传递数据。
# 实现流程
一开始 a.html 给 c.html 传一个 hash 值,然后 c.html 收到 hash 值后,再把 hash 值传递给 b.html,最后 b.html 将结果放到 a.html 的 hash 值中。同样的,a.html 和 b.htm l 是同域的,都是 http://localhost:8000,而 c.html 是http://localhost:8080
// a.html
<iframe src="http://localhost:8080/hash/c.html#name1"></iframe>
<script>
  console.log(location.hash);
  window.onhashchange = function() {
    console.log(location.hash);
  };
</script>
// b.html
<script>
  window.parent.parent.location.hash = location.hash;
</script>
// c.html
<body></body>
<script>
  console.log(location.hash);
  const iframe = document.createElement("iframe");
  iframe.src = "http://localhost:8000/hash/b.html#name2";
  document.body.appendChild(iframe);
</script>
2
3
4
5
6
7
8
9
10
11
12
13
14
15
16
17
18
19
20
# window.name + Iframe
window 对象的 name 属性是一个很特别的属性,当该 window 的 location 变化,然后重新加载,它的 name 属性可以依然保持不变。
其中 a.html 和 b.html 是同域的,都是http://localhost:8000,而 c.html 是http://localhost:8080
// a.html
<iframe
  src="http://localhost:8080/name/c.html"
  frameborder="0"
  onload="load()"
  id="iframe"
></iframe>
<script>
  let first = true;
  // onload事件会触发2次,第1次加载跨域页,并留存数据于window.name
  function load() {
    if (first) {
      // 第1次onload(跨域页)成功后,切换到同域代理页面
      iframe.src = "http://localhost:8000/name/b.html";
      first = false;
    } else {
      // 第2次onload(同域b.html页)成功后,读取同域window.name中数据
      console.log(iframe.contentWindow.name);
    }
  }
</script>
2
3
4
5
6
7
8
9
10
11
12
13
14
15
16
17
18
19
20
21
b.html 为中间代理页,与 a.html 同域,内容为空。
// b.html
<div></div>
// c.html
<script>
  window.name = "秋风的笔记";
</script>
2
3
4
5
6
通过 iframe 的 src 属性由外域转向本地域,跨域数据即由 iframe 的 window.name 从外域传递到本地域。这个就巧妙地绕过了浏览器的跨域访问限制,但同时它又是安全操作。
# 浏览器开启跨域(终极方案)
其实讲下其实跨域问题是浏览器策略,源头是他,那么能否能关闭这个功能呢?
其实讲下其实跨域问题是浏览器策略,源头是他,那么能否能关闭这个功能呢?
答案是肯定的。
「注意事项: 因为浏览器是众多 web 页面入口。我们是否也可以像客户端那种,就是用一个单独的专门宿主浏览器,来打开调试我们的开发页面。例如这里以 chrome canary 为例,这个是我专门调试页面的浏览器,不会用它来访问其他 web url。因此它也相对于安全一些。当然这个方式,只限于当你真的被跨域折磨地崩溃的时候才建议使用以下。使用后,请以正常的方式将他打开,以免你不小心用这个模式干了其他的事。」
# Windows
找到你安装的目录
.\Google\Chrome\Application\chrome.exe --disable-web-security --user-data-dir=xxxx
2
# Mac
~/Downloads/chrome-data 这个目录可以自定义.
/Applications/Google\ Chrome\ Canary.app/Contents/MacOS/Google\ Chrome\ Canary --disable-web-security --user-data-dir=~/Downloads/chrome-data
# 为什么要同源限制
浏览器限制跨域是出于安全考虑,主要是为了实施同源策略(Same-Origin Policy)。同源策略是一种安全协议,它规定了一个网页上的脚本只能访问和修改与该脚本同源的资源,而不能访问或修改其他源的资源。这里的“源”指的是协议、域名和端口号的组合。同源策略的目的是防止以下安全问题:
- CSRF(跨站请求伪造)攻击: 如果浏览器不限制跨域请求,恶意网站可以在用户不知情的情况下,利用用户的登录状态向其他网站发送请求,执行不安全的操作,如转账、修改密码等。
- XSS(跨站脚本攻击): 虽然XSS攻击的防御不完全依赖于同源策略,但限制脚本跨域访问可以减少攻击的风险。例如,防止恶意脚本读取另一个源上的敏感信息。
- 数据泄露: 如果没有同源策略的限制,恶意网站可能通过脚本访问并窃取其他网站上的敏感数据,如用户个人信息、财务信息等。
同源策略通过限制不同源之间的交互,为Web提供了一种基本的安全保障。然而,随着Web应用变得越来越复杂,需要从多个源加载资源和数据,因此跨域资源共享(CORS)等技术应运而生,它们在不牺牲安全的前提下,允许跨源资源的有限访问。
# 参考文章
10 种跨域解决方案(附终极方案) (opens new window)
解决跨域问题的8种方案(最新最全) (opens new window)