 SpringSecurity
# SpringSecurity
# 1.概述
Spring 是非常流行和成功的 Java 应用开发框架,Spring Security 正是 Spring 家族中的成员。Spring Security 基于 Spring 框架,提供了一套 Web 应用安全性的完整解决方案。
正如你可能知道的关于安全方面的两个主要区域是“认证”和“授权”(或者访问控制),一般来说,Web 应用的安全性包括**用户认证(Authentication)和用户授权(Authorization)**两个部分,这两点也是 Spring Security 重要核心功能。
(1)用户认证指的是:验证某个用户是否为系统中的合法主体,也就是说用户能否访问该系统。用户认证一般要求用户提供用户名和密码。系统通过校验用户名和密码来完成认证过程。通俗点说就是系统认为用户是否能登录
(2)用户授权指的是验证某个用户是否有权限执行某个操作。在一个系统中,不同用户所具有的权限是不同的。比如对一个文件来说,有的用户只能进行读取,而有的用户可以进行修改。一般来说,系统会为不同的用户分配不同的角色,而每个角色则对应一系列的权限。通俗点讲就是系统判断用户是否有权限去做某些事情。
SpringSecurity 特点:
和 Spring 无缝整合。
全面的权限控制。
专门为 Web 开发而设计。
旧版本不能脱离 Web 环境使用。
新版本对整个框架进行了分层抽取,分成了核心模块和 Web 模块。单独引入核心模块就可以脱离 Web 环境。
重量级。
Shiro
Apache 旗下的轻量级权限控制框架。
特点:
轻量级。Shiro 主张的理念是把复杂的事情变简单。针对对性能有更高要求的互联网应用有更好表现。
通用性。
好处:不局限于 Web 环境,可以脱离 Web 环境使用。
缺陷:在 Web 环境下一些特定的需求需要手动编写代码定制。
因此,一般来说,常见的安全管理技术栈的组合是这样的:
• SSM + Shiro
• Spring Boot/Spring Cloud + Spring Security
# 2.入门程序


如果没有选择可以手动导入包
<!--web依赖包-->
<dependency>
    <groupId>org.springframework.boot</groupId>
    <artifactId>spring-boot-starter-web</artifactId>
    <version>2.7.1</version>
</dependency>
		<!--SpringSecurity依赖包-->
<dependency>
    <groupId>org.springframework.boot</groupId>
    <artifactId>spring-boot-starter-security</artifactId>
     <version>2.4.1</version>
</dependency>
2
3
4
5
6
7
8
9
10
11
12
编写controller
import org.springframework.web.bind.annotation.GetMapping;
import org.springframework.web.bind.annotation.RequestMapping;
import org.springframework.web.bind.annotation.RestController;

@RestController
@RequestMapping("/test")
public class TestController {

    @GetMapping("/hello")
    public String hello() {
        return "hello";
    }
}
2
3
4
5
6
7
8
9
10
11
12
13
访问:localhost:8080/test/hello,自动跳转到登录页面,默认用户名user,密码在控制台


登陆成功之后才会跳转

# 3.详解
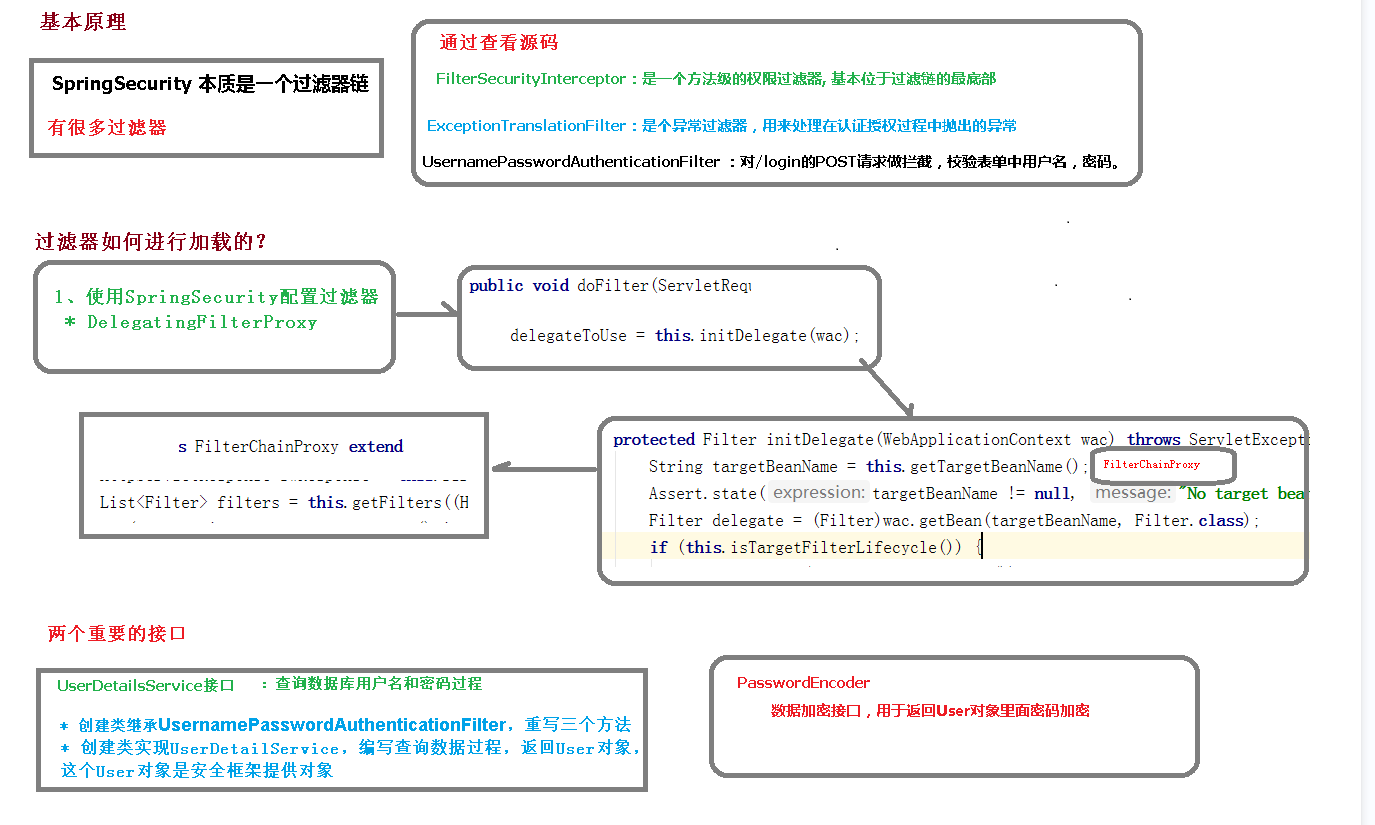
# 3.1SpringSecurity 基本原理
SpringSecurity 本质是一个过滤器链:
重点看三个过滤器:
FilterSecurityInterceptor:是一个方法级的权限过滤器, 基本位于过滤链的最底部。
ExceptionTranslationFilter:是个异常过滤器,用来处理在认证授权过程中抛出的异常
UsernamePasswordAuthenticationFilter :对/login 的 POST 请求做拦截,校验表单中用户名,密码。
# 3.2设置登陆的用户名和密码
# 3.2.1方式一:通过配置文件
application.properties
spring.security.user.name=admin
spring.security.user.password=123456
2
# 3.2.2方式二:通过配置类
config/SecurityConfig
import org.springframework.context.annotation.Bean;
import org.springframework.context.annotation.Configuration;
import org.springframework.security.config.annotation.authentication.builders.AuthenticationManagerBuilder;
import org.springframework.security.config.annotation.web.configuration.WebSecurityConfigurerAdapter;
import org.springframework.security.crypto.bcrypt.BCryptPasswordEncoder;
import org.springframework.security.crypto.password.PasswordEncoder;

@Configuration
public class SecurityConfig extends WebSecurityConfigurerAdapter {

    @Override
    protected void configure(AuthenticationManagerBuilder auth) throws Exception{
        BCryptPasswordEncoder passwordEncoder = new BCryptPasswordEncoder();
        String password = passwordEncoder.encode("123");
        auth.inMemoryAuthentication().withUser("admin").password(password).roles("admin");

    }

    @Bean
    PasswordEncoder password() {
        return new BCryptPasswordEncoder();
    }
}
2
3
4
5
6
7
8
9
10
11
12
13
14
15
16
17
18
19
20
21
22
23
24
# 3.2.3方式三:自定义实现类设置
第一步:创建配置类,设置使用哪个userDetailsService实现类
import org.springframework.beans.factory.annotation.Autowired;
import org.springframework.context.annotation.Bean;
import org.springframework.context.annotation.Configuration;
import org.springframework.security.config.annotation.authentication.builders.AuthenticationManagerBuilder;
import org.springframework.security.config.annotation.web.configuration.WebSecurityConfigurerAdapter;
import org.springframework.security.core.userdetails.UserDetailsService;
import org.springframework.security.crypto.bcrypt.BCryptPasswordEncoder;
import org.springframework.security.crypto.password.PasswordEncoder;

@Configuration
public class SecurityConfig extends WebSecurityConfigurerAdapter {

    @Autowired
    private UserDetailsService userDetailsService;

    @Override
    protected void configure(AuthenticationManagerBuilder auth) throws Exception {
        auth.userDetailsService(userDetailsService).passwordEncoder(password());
    }

    @Bean
    PasswordEncoder password() {
        return new BCryptPasswordEncoder();
    }
}
2
3
4
5
6
7
8
9
10
11
12
13
14
15
16
17
18
19
20
21
22
23
24
25
第二步:编写实现类,返回user对象,user对象有用户名密码和操作权限
service/UserService
@Service("userDetailsService")
public class UserService implements UserDetailsService {
    @Override
    public UserDetails loadUserByUsername(String username) throws UsernameNotFoundException {
        List<GrantedAuthority> auths = AuthorityUtils.commaSeparatedStringToAuthorityList("roles");
        return new User("admin",new BCryptPasswordEncoder().encode("123456"),auths);
    }
}
2
3
4
5
6
7
8
# 3.3 UserDetailsService 接口讲解
当什么也没有配置的时候,账号和密码是由 Spring Security 定义生成的。而在实际项目中账号和密码都是从数据库中查询出来的。 所以我们要通过自定义逻辑控制认证逻辑。
如果需要自定义逻辑时,只需要实现 UserDetailsService 接口即可。接口定义如下:
Ctrl+shift+n搜索即可查看该接口
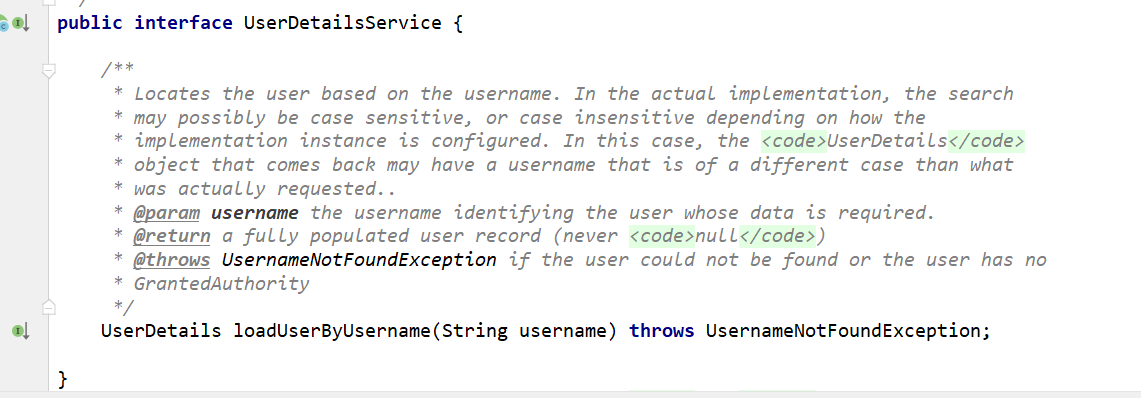
返回值 UserDetails
这个类是系统默认的用户“主体
UserDetails:
// 表示获取登录用户所有权限
Collection<? extends GrantedAuthority> getAuthorities();
// 表示获取密码
String getPassword();
// 表示获取用户名
String getUsername();
// 表示判断账户是否过期
boolean isAccountNonExpired();
// 表示判断账户是否被锁定
boolean isAccountNonLocked();
// 表示凭证{密码}是否过期
boolean isCredentialsNonExpired();
// 表示当前用户是否可用
boolean isEnabled();
2
3
4
5
6
7
8
9
10
11
12
13
14
User
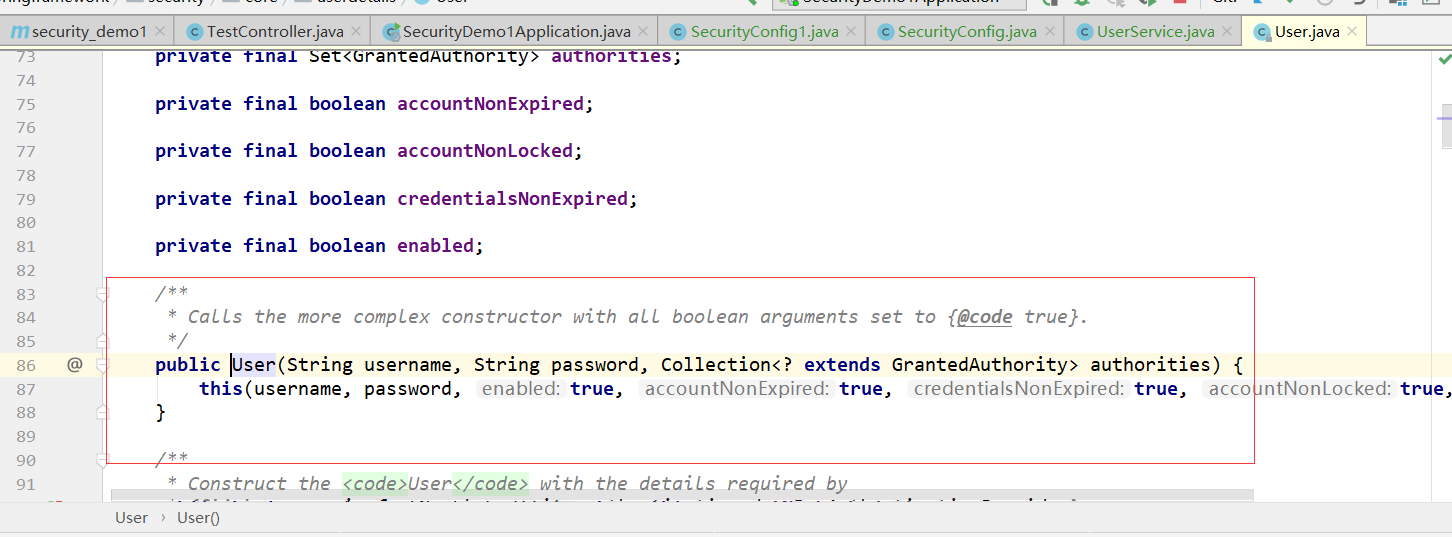
方法参数 username表示用户名。此值是客户端表单传递过来的数据。默认情况下必须叫 username,否则无法接收。
# 3.4PasswordEncoder 接口讲解
// 表示把参数按照特定的解析规则进行解析
String encode(CharSequence rawPassword);
// 表示验证从存储中获取的编码密码与编码后提交的原始密码是否匹配。如果密码匹配,则返回 true;如果不匹配,则返回 false。第一个参数表示需要被解析的密码。第二个参数表示存储的密码。
boolean matches(CharSequence rawPassword, String encodedPassword);
// 表示如果解析的密码能够再次进行解析且达到更安全的结果则返回 true,否则返回false。默认返回 false。
default boolean upgradeEncoding(String encodedPassword) {
return false; }
2
3
4
5
6
7
BCryptPasswordEncoder 是 Spring Security 官方推荐的密码解析器,平时多使用这个解析器。
BCryptPasswordEncoder 是对 bcrypt 强散列方法的具体实现。是基于 Hash 算法实现的单向加密。可以通过 strength 控制加密强度,默认 10.
查用方法演示:
    @Test
    void testBCrypt() {
        // 创建密码解析器
        BCryptPasswordEncoder passwordEncoder = new BCryptPasswordEncoder();
        // 对密码进行加密
        String password = passwordEncoder.encode("abcdef");
        // 打印加密后的密码
        System.out.println(password);

        // 判断原字符和加密后的字符是否匹配
        boolean isTrue = passwordEncoder.matches("abcdef", password);

        System.out.println(isTrue);
    }
2
3
4
5
6
7
8
9
10
11
12
13
14
# 4.WEB方案案例
# 4.1创建数据库
CREATE TABLE users(
	id BIGINT PRIMARY KEY AUTO_INCREMENT,
	username VARCHAR(20) UNIQUE NOT NULL,
	PASSWORD VARCHAR(100)
);
-- 密码 123456
INSERT INTO users VALUES(1,'admin','$2a$10$lZBiG.A2qM5XjMaQgrs6Hee6cnP1Ba4zw.AJ6cLyBcaDoZBz674sa');
-- 密码 123456
INSERT INTO users VALUES(2,'lisi','$2a$10$lZBiG.A2qM5XjMaQgrs6Hee6cnP1Ba4zw.AJ6cLyBcaDoZBz674sa');
CREATE TABLE role(
	id BIGINT PRIMARY KEY AUTO_INCREMENT,
	NAME VARCHAR(20)
);
INSERT INTO role VALUES(1,'管理员');
INSERT INTO role VALUES(2,'普通用户');
CREATE TABLE role_user(
	uid BIGINT,
	rid BIGINT
);
INSERT INTO role_user VALUES(1,1);
INSERT INTO role_user VALUES(2,2);
CREATE TABLE menu(
	id BIGINT PRIMARY KEY AUTO_INCREMENT,
	NAME VARCHAR(20),
	url VARCHAR(100),
	parentid BIGINT,
	permission VARCHAR(20)
);
INSERT INTO menu VALUES(1,'系统管理','',0,'menu:system');
INSERT INTO menu VALUES(2,'用户管理','',0,'menu:user');
CREATE TABLE role_menu(
	MID BIGINT,
	rid BIGINT
);
INSERT INTO role_menu VALUES(1,1);
INSERT INTO role_menu VALUES(2,1);
INSERT INTO role_menu VALUES(2,2);
2
3
4
5
6
7
8
9
10
11
12
13
14
15
16
17
18
19
20
21
22
23
24
25
26
27
28
29
30
31
32
33
34
35
36
37
# 4.2添加依赖
        <dependency>
            <groupId>org.springframework.boot</groupId>
            <artifactId>spring-boot-starter-web</artifactId>
        </dependency>

        <dependency>
            <groupId>org.springframework.boot</groupId>
            <artifactId>spring-boot-starter-test</artifactId>
            <scope>test</scope>
        </dependency>

        <!--SpringSecurity-->
        <dependency>
            <groupId>org.springframework.boot</groupId>
            <artifactId>spring-boot-starter-security</artifactId>
            <version>2.4.1</version>
        </dependency>

        <!--Mybatis-Plus-->
        <dependency>
            <groupId>com.baomidou</groupId>
            <artifactId>mybatis-plus-boot-starter</artifactId>
            <version>3.5.1</version>
        </dependency>

        <!--lombok用于简化实体类开发-->
        <dependency>
            <groupId>org.projectlombok</groupId>
            <artifactId>lombok</artifactId>
            <optional>true</optional>
        </dependency>
        <!--mysql驱动-->
        <dependency>
            <groupId>mysql</groupId>
            <artifactId>mysql-connector-java</artifactId>
            <scope>runtime</scope>
        </dependency>
2
3
4
5
6
7
8
9
10
11
12
13
14
15
16
17
18
19
20
21
22
23
24
25
26
27
28
29
30
31
32
33
34
35
36
37
# 4.3编写实体类,mapper和配置数据库连接信息
pojo/Users
import lombok.Data;

@Data
public class Users {

    private Integer id;

    private String username;

    private String password;
}
2
3
4
5
6
7
8
9
10
11
mapper/UserMapper
import com.baomidou.mybatisplus.core.mapper.BaseMapper;
import com.ep.pojo.Users;
import org.springframework.stereotype.Repository;

@Repository
public interface UserMapper extends BaseMapper<Users> {
}
2
3
4
5
6
7
8
配置数据库连接信息
spring.datasource.driver-class-name=com.mysql.cj.jdbc.Driver
spring.datasource.url=jdbc:mysql://localhost:3306/spring_security?serverTimezone=GMT%2B8
spring.datasource.username=root
spring.datasource.password=root
2
3
4
配置springboot要扫描的包
@SpringBootApplication
@MapperScan("com.ep.mapper")
public class SecurityDemo1Application {

    public static void main(String[] args) {
        SpringApplication.run(SecurityDemo1Application.class, args);
    }

}
2
3
4
5
6
7
8
9
import com.baomidou.mybatisplus.core.conditions.query.QueryWrapper;
import com.ep.mapper.UserMapper;
import com.ep.pojo.Users;
import org.springframework.beans.factory.annotation.Autowired;
import org.springframework.security.core.GrantedAuthority;
import org.springframework.security.core.authority.AuthorityUtils;
import org.springframework.security.core.userdetails.User;
import org.springframework.security.core.userdetails.UserDetails;
import org.springframework.security.core.userdetails.UserDetailsService;
import org.springframework.security.core.userdetails.UsernameNotFoundException;
import org.springframework.security.crypto.bcrypt.BCryptPasswordEncoder;
import org.springframework.stereotype.Service;

import java.util.List;

@Service("userDetailsService")
public class MyUserDetailsService implements UserDetailsService {

    @Autowired
    private UserMapper userMapper;

    @Override
    public UserDetails loadUserByUsername(String username) throws UsernameNotFoundException {
        // 根据用户名查询数据库的信息
        QueryWrapper<Users> queryWrapper = new QueryWrapper<>();
        queryWrapper.eq("username",username);
        Users users = userMapper.selectOne(queryWrapper);

        //数据库中没有用户,认证失败
        if(users == null){
            throw new UsernameNotFoundException("用户名不存在");
        }
        System.out.println(users);
        List<GrantedAuthority> auths = AuthorityUtils.commaSeparatedStringToAuthorityList("role");
        //返回查询到的用户名和密码
        return new User(users.getUsername(),new BCryptPasswordEncoder().encode(users.getPassword()),auths);
    }
}
2
3
4
5
6
7
8
9
10
11
12
13
14
15
16
17
18
19
20
21
22
23
24
25
26
27
28
29
30
31
32
33
34
35
36
37
38
自定义设置登陆页面
# 1.静态页面权限
首先来了解一下Thymeleaf的知识
# 1.1. Thymeleaf 简介
Thymeleaf 是一款用于渲染 XML/XHTML/HTML5 内容的模板引擎。它与 JSP,Velocity,FreeMaker 等模板引擎类似,也可以轻易地与 Spring MVC 等 Web 框架集成。与其它模板引擎相比,Thymeleaf 最大的特点是,即使不启动 Web 应用,也可以直接在浏览器中打开并正确显示模板页面 。
Thymeleaf 是新一代 Java 模板引擎,与 Velocity、FreeMarker 等传统 Java 模板引擎不同,Thymeleaf 支持 HTML 原型,其文件后缀为“.html”,因此它可以直接被浏览器打开,此时浏览器会忽略未定义的 Thymeleaf 标签属性,展示 thymeleaf 模板的静态页面效果;当通过 Web 应用程序访问时,Thymeleaf 会动态地替换掉静态内容,使页面动态显示。
# 1.2需求:
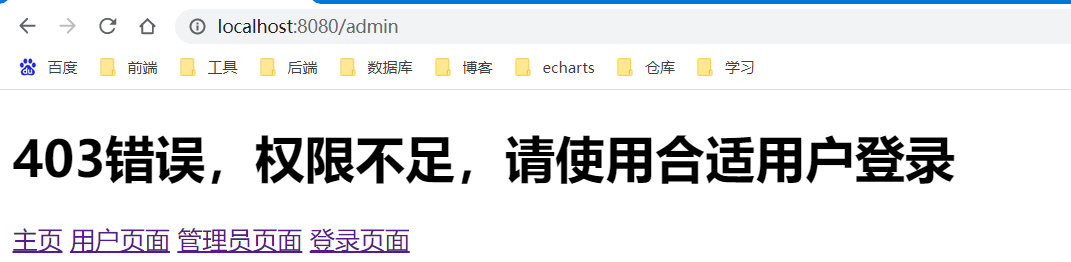
- 网站分为首页、登录页、用户页面、管理员页面和报错页面;
- 使用用户名加密码登录,登录错误要报错;
- 不同的用户拥有不同的权限,不同的权限可以访问不同的网页;
- 首页和登录页不需要任何权限;
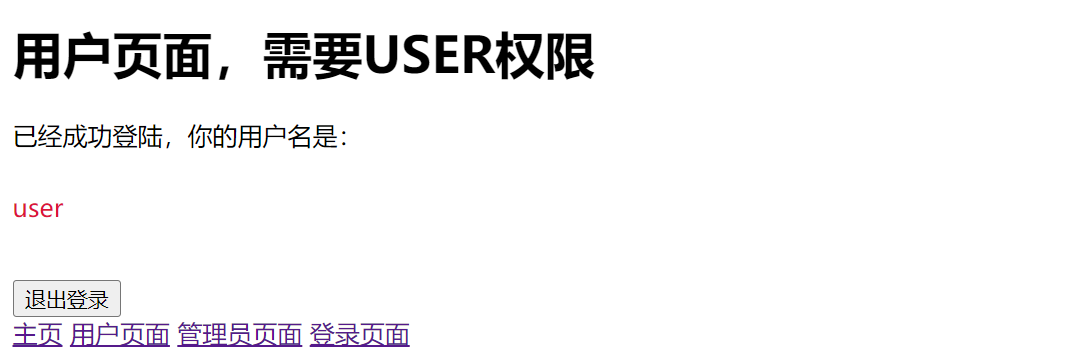
- 用户页面需要USER权限;
- 管理员页面需要ADMIN权限;
- 如果用户没有登录,则访问需要权限的页面时自动跳转登录页面。
# 1.3代码:
SpringBoot版本为2.7.2
  <properties>
        <project.build.sourceEncoding>UTF-8</project.build.sourceEncoding>
        <project.reporting.outputEncoding>UTF-8</project.reporting.outputEncoding>
        <java.version>1.8</java.version>
    </properties>

    <dependencies>
        <dependency>
            <groupId>org.springframework.boot</groupId>
            <artifactId>spring-boot-starter-security</artifactId>
        </dependency>
        <dependency>
            <groupId>org.springframework.boot</groupId>
            <artifactId>spring-boot-starter-web</artifactId>
        </dependency>

        <dependency>
            <groupId>org.springframework.boot</groupId>
            <artifactId>spring-boot-starter-test</artifactId>
            <scope>test</scope>
        </dependency>
        <dependency>
            <groupId>org.springframework.security</groupId>
            <artifactId>spring-security-test</artifactId>
            <scope>test</scope>
        </dependency>
		<!--thymeleaf依赖包-->
        <dependency>
            <groupId>org.springframework.boot</groupId>
            <artifactId>spring-boot-starter-thymeleaf</artifactId>
        </dependency>
    </dependencies>
2
3
4
5
6
7
8
9
10
11
12
13
14
15
16
17
18
19
20
21
22
23
24
25
26
27
28
29
30
31
32
33
config/SecurityConfiguration
package com.ep.config;

import org.springframework.security.config.annotation.authentication.builders.AuthenticationManagerBuilder;
import org.springframework.security.config.annotation.web.builders.HttpSecurity;
import org.springframework.security.config.annotation.web.configuration.EnableWebSecurity;
import org.springframework.security.config.annotation.web.configuration.WebSecurityConfigurerAdapter;
import org.springframework.security.crypto.bcrypt.BCryptPasswordEncoder;

@EnableWebSecurity
public class SecurityConfiguration extends WebSecurityConfigurerAdapter {
    @Override
    protected void configure(AuthenticationManagerBuilder auth) throws Exception {
        /**
         * 在内存中创建一个名为 "user" 的用户,密码为 "123456",拥有 "USER" 权限,密码使用BCryptPasswordEncoder加密
         */
        auth.inMemoryAuthentication().passwordEncoder(new BCryptPasswordEncoder())
                .withUser("user").password(new BCryptPasswordEncoder().encode("123456")).roles("USER");
        /**
         * 在内存中创建一个名为 "admin" 的用户,密码为 "123456",拥有 "USER" 和"ADMIN"权限
         */
        auth.inMemoryAuthentication().passwordEncoder(new BCryptPasswordEncoder())
                .withUser("admin").password(new BCryptPasswordEncoder().encode("123456")).roles("USER", "ADMIN");
    }

    /**
     * 匹配 "/","/index" 路径,不需要权限即可访问
     * 匹配 "/user" 及其以下所有路径,都需要 "USER" 权限
     * 匹配 "/admin" 及其以下所有路径,都需要 "ADMIN" 权限
     * 登录地址为 "/login",登录成功默认跳转到页面 "/user"
     * 退出登录的地址为 "/logout",退出成功后跳转到页面 "/login"
     */
    @Override
    protected void configure(HttpSecurity http) throws Exception {
        http
                .authorizeRequests()
                .antMatchers("/", "/index", "/error").permitAll()
                .antMatchers("/user/**").hasRole("USER")
                .antMatchers("/admin/**").hasRole("ADMIN")
                .and()
                .formLogin().loginPage("/login").defaultSuccessUrl("/user")
                .and()
                .logout().logoutUrl("/logout").logoutSuccessUrl("/login");
    }
}
2
3
4
5
6
7
8
9
10
11
12
13
14
15
16
17
18
19
20
21
22
23
24
25
26
27
28
29
30
31
32
33
34
35
36
37
38
39
40
41
42
43
44
45
controller/UserController
/**
 * 定义用户相关网址映射的Controller
 */
@Controller
public class UserController {

    @RequestMapping("/user")
    public String user(Authentication user, Model model) {
        // user.getName获取用户名
        model.addAttribute("username", user.getName());
        return "user/user";
    }

    @RequestMapping("/admin")
    public String admin(Authentication user, Model model) {
        model.addAttribute("username", user.getName());
        return "admin/admin";
    }
}
2
3
4
5
6
7
8
9
10
11
12
13
14
15
16
17
18
19
controller/HomeController
@Controller
public class HomeController {
    @RequestMapping({"/", "/index"})
    public String index() {
        return "index";
    }

    @RequestMapping("/login")
    public String login() {
        return "login";
    }
}
2
3
4
5
6
7
8
9
10
11
12
从SpringSecurity5.0以后,这种方式的密码都要使用passwordEncoder进行加密,否则就会报错。
其他静态页面:
最终实现效果:


增加三个功能:
- 修改用户名密码的参数名称
- 通过自定义一个AuthenticationProvider在系统中加入一个后门
- 将验证身份信息展示到前端
三更:
# 1.认证
# 1.1.登录校验流程:
# 1.2.SpringSecurity完整流程
SpringSecurity的原理其实就是一个过滤器链,内部包含了提供各种功能的过滤器。这里我们可以看看入门案例中的过滤器。
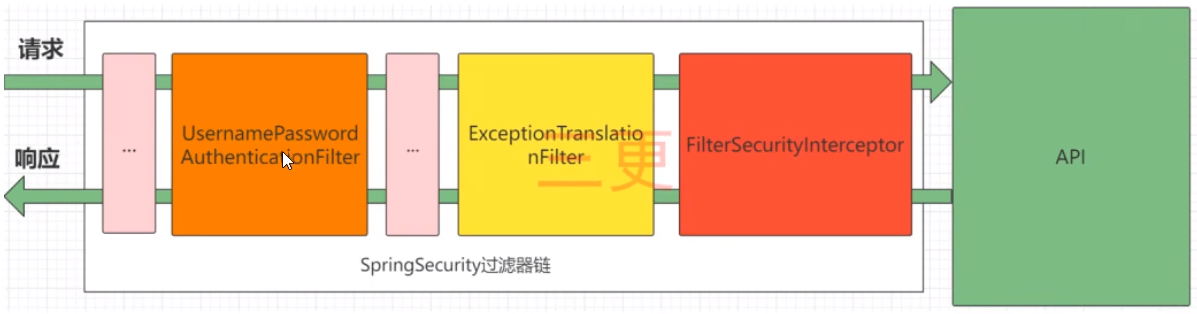
UsernamePasswordAuthenticationFilter:负责处理我们在登陆页面填写了用户名密码后的登陆请求。入门案例的认证工作主要有它负责。
ExceptionTranslationFilter:处理过滤器链中抛出的任何AccessDeniedException和AuthenticationException.FilterSecuritylnterceptor:负责权限校验的过滤器。
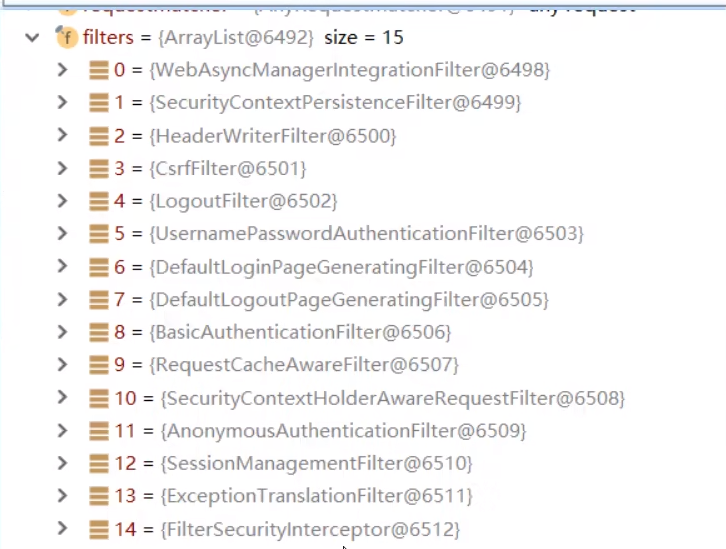
SpringSecurity中有哪些过滤器以及顺序?
# 1.3认证流程图
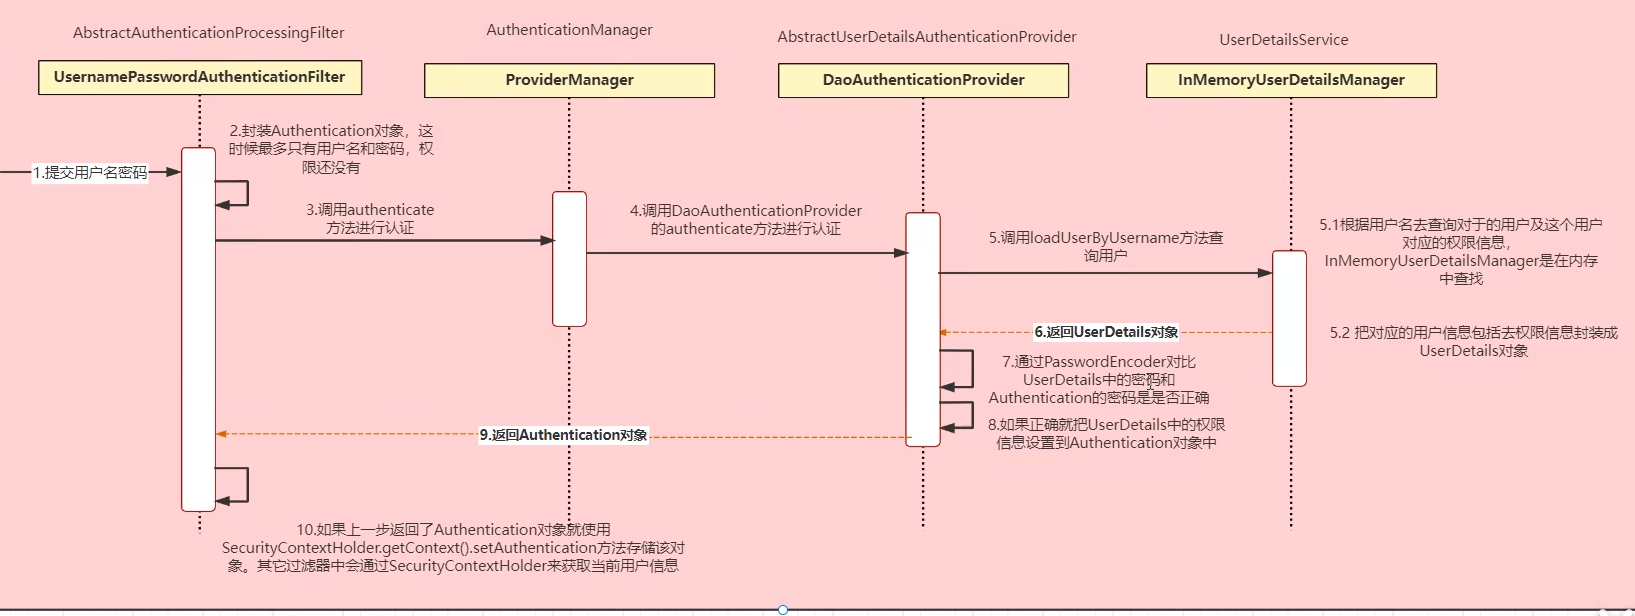
Authentication接口:它的实现类,表示当前访问系统的用户,封装了用户相关信息。AuthenticationManager接口:定义了认证Authentication的方法
UserDetailsService接口:加载用户特定数据的核心接口。里面定义了一个根据用户名查询用户信息的方法。
UserDetals接口:提供核心用户信息。通过UserDetailService根据用户名获取处理的用户信息要封装成UserDetails对象返回。然后将这些信息封装到Authentication对象中。
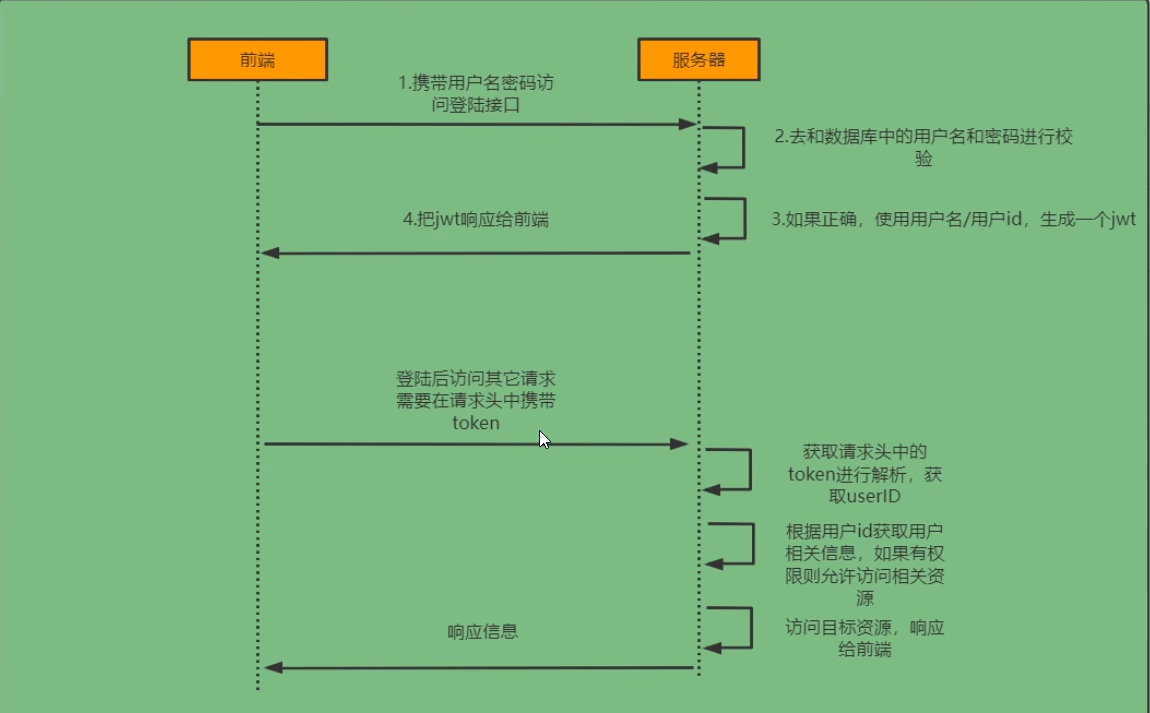
# 1.4思路分析
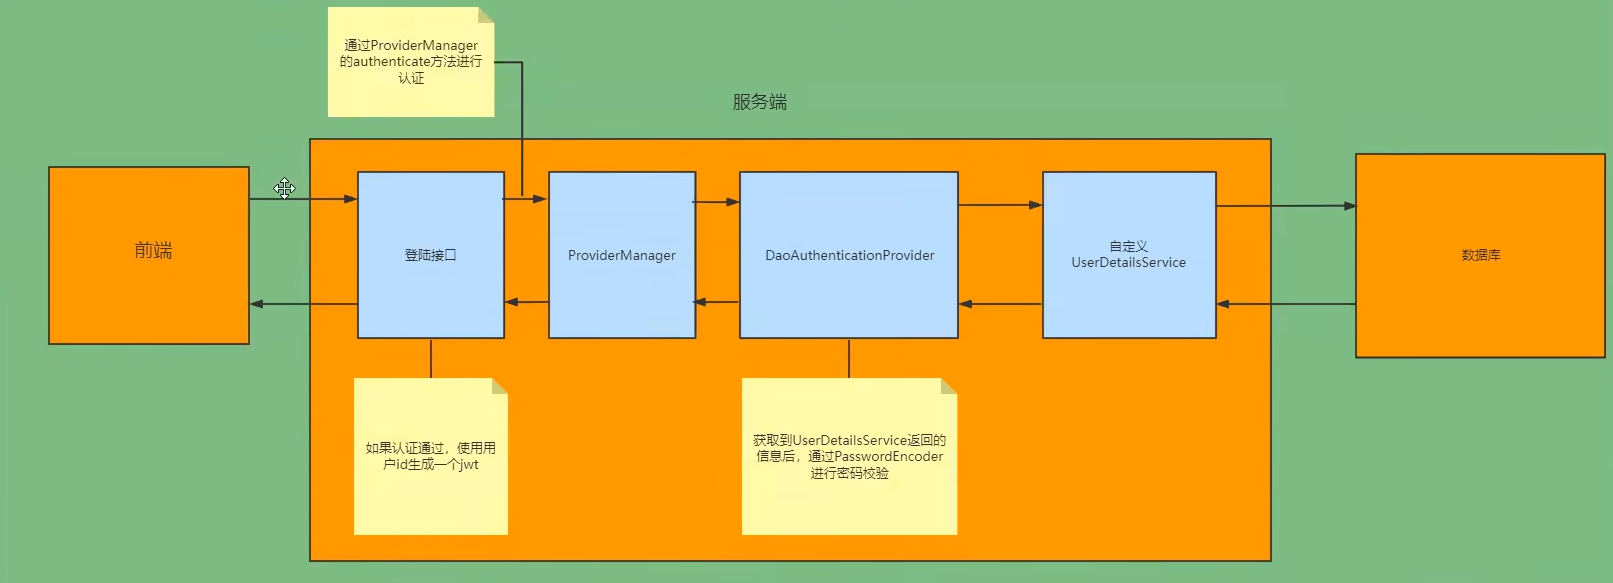
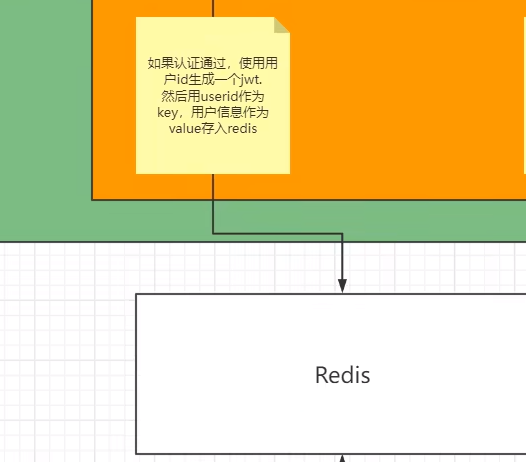
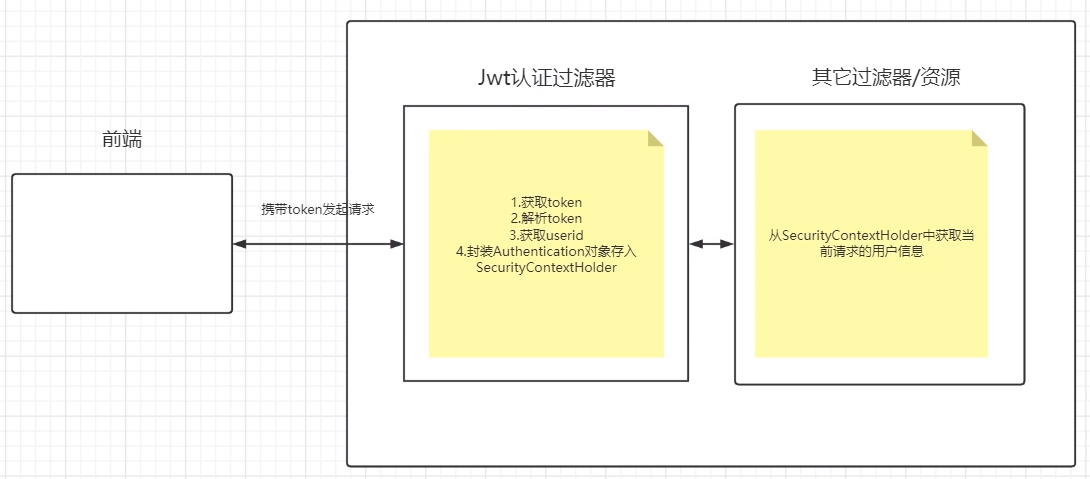
登录: ①自定义登录接口 调用ProviderManager的方法进行认证如果认证通过生成jwt 把用户信息存入redis中 ②自定义UserDetailsService 在这个实现类中去查询数据库 校验: ①定义Jwt认证过滤器 获取token 解析token获取其中的userid 从redis中获取用户信息存入SecurityContextHolder
1.5准备工作
建项目,勾选SpringWeb和SpringSecurity
导入依赖