 TypeScript
# 快速入门
参考:https://juejin.cn/column/7028956693232877605
# TypeScript简介
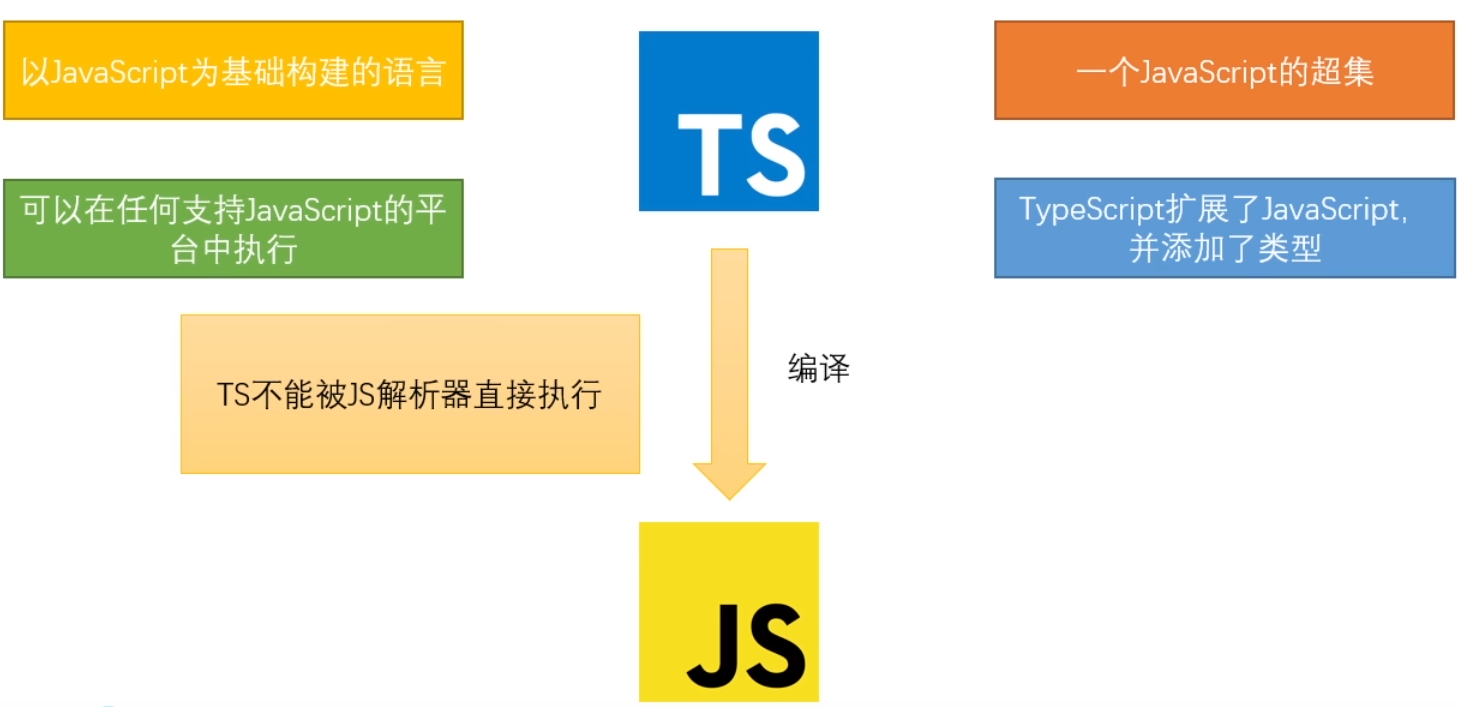
- TypeScript是JavaScript的超集。
- 它对JS进行了扩展,向JS中引入了类型的概念,并添加了许多新的特性。
- TS代码需要通过编译器编译为JS,然后再交由JS解析器执行。
- TS完全兼容JS,换言之,任何的TS代码都可以直接当成JS使用。
- 相较于JS而言,TS拥有了静态类型,更加严格的语法,更强大的功能;TS可以在代码执行前就完成代码的检查,减小了运行时异常的出现的几率;TS代码可以编译为任意版本的JS代码,可有效解决不同JS运行环境的兼容问题;同样的功能,TS的代码量要大于JS,但由于TS的代码结构更加清晰,变量类型更加明确,在后期代码的维护中TS却远远胜于JS。
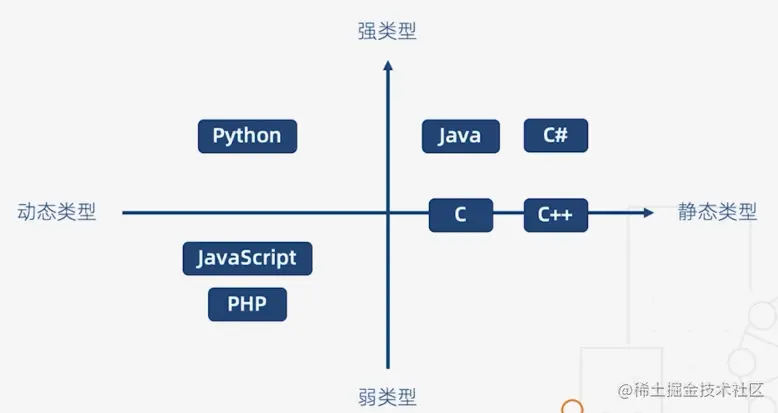
强类型语言的特点就是不允许改变变量的数据类型,除非进行强制类型转换
弱类型的一个特点就是在计算时,不同类型之间对使用者透明地对变量进行隐式转换。 也就是说变量可以被赋予不同的数据类型
JavaScript是一门弱类型的语言,动态语言
一门语言在编译时报错,那么是静态语言,如果在运行时报错,那么是动态语言。
# TypeScript 开发环境搭建
安装Node.js
使用npm全局安装typescript
- 进入命令行
- 输入:
npm i -g typescript
输入
tsc查看是否安装成功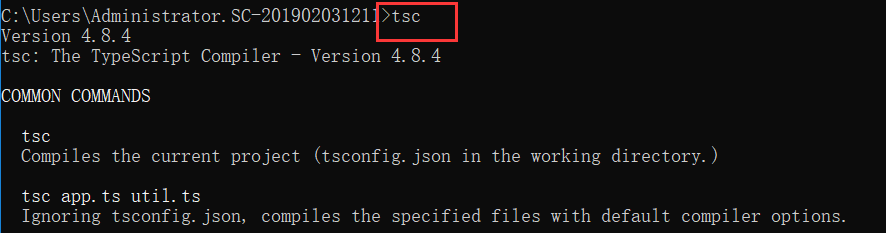
创建一个ts文件
使用tsc对ts文件进行编译
进入命令行
进入ts文件所在目录
执行命令:tsc xxx.ts
D:\@yjs2\TypeScript\ts>tsc 01_HelloTS.ts # 编译
D:\@yjs2\TypeScript\ts>node 01_HelloTS.js # 执行
Hello TS
1
2
3
# 基本类型
类型声明
类型声明是TS非常重要的一个特点
通过类型声明可以指定TS中变量(参数、形参)的类型
指定类型后,当为变量赋值时,TS编译器会自动检查值是否符合类型声明,符合则赋值,否则报错
简而言之,类型声明给变量设置了类型,使得变量只能存储某种类型的值
语法:
 let 变量: 类型;

 let 变量: 类型 = 值;

 function fn(参数: 类型, 参数: 类型): 类型{
     ...
 }
1
2
3
4
5
6
7
自动类型判断
- TS拥有自动的类型判断机制
- 当对变量的声明和赋值是同时进行的,TS编译器会自动判断变量的类型
- 所以如果你的变量的声明和赋值时同时进行的,可以省略掉类型声明
类型:
类型 例子 描述 number 1, -33, 2.5 任意数字 string 'hi', "hi", hi任意字符串 boolean true、false 布尔值true或false 字面量 其本身 限制变量的值就是该字面量的值 any * 任意类型 unknown * 类型安全的any void 空值(undefined) 没有值(或undefined) never 没有值 不能是任何值 object {name:'孙悟空'} 任意的JS对象 array [1,2,3] 任意JS数组 tuple [4,5] 元素,TS新增类型,固定长度数组 enum enum{A, B} 枚举,TS中新增类型 number
 let decimal: number = 6;
 let hex: number = 0xf00d;
 let binary: number = 0b1010;
 let octal: number = 0o744;
 let big: bigint = 100n;

 let a:number // 指定a的类型为number
 a = 10
 // a = 'hello';
1
2
3
4
5
6
7
8
9boolean
let isDone: boolean = false;1string
 let color: string = "blue";
 color = 'red';

 let fullName: string = `Bob Bobbington`;
 let age: number = 37;
 let sentence: string = `Hello, my name is ${fullName}.

 I'll be ${age + 1} years old next month.`;

 let str:string

 str = "hello"
1
2
3
4
5
6
7
8
9
10
11
12字面量
- 也可以使用字面量去指定变量的类型,通过字面量可以确定变量的取值范围
 let color: 'red' | 'blue' | 'black';
 let num: 1 | 2 | 3 | 4 | 5;
1
2any
  let d: any = 4;
  d = 'hello';
  d = true;
1
2
3unknown
  let notSure: unknown = 4;
  notSure = 'hello';
1
2void
let unusable: void = undefined;1never
  function error(message: string): never {
    throw new Error(message);
  }
1
2
3object(没啥用)
let obj: object = {};1array
  let list: number[] = [1, 2, 3];
  let list: Array<number> = [1, 2, 3];
1
2tuple
  let x: [string, number];
  x = ["hello", 10];
1
2enum
  enum Color {
    Red,
    Green,
    Blue,
  }
  let c: Color = Color.Green;

  enum Color {
    Red = 1,
    Green,
    Blue,
  }
  let c: Color = Color.Green;

  enum Color {
    Red = 1,
    Green = 2,
    Blue = 4,
  }
  let c: Color = Color.Green;
1
2
3
4
5
6
7
8
9
10
11
12
13
14
15
16
17
18
19
20类型断言
有些情况下,变量的类型对于我们来说是很明确,但是TS编译器却并不清楚,此时,可以通过类型断言来告诉编译器变量的类型,断言有两种形式:
- 第一种
  let someValue: unknown = "this is a string";
  let strLength: number = (someValue as string).length;
1
2- 第二种
    let someValue: unknown = "this is a string";
    let strLength: number = (<string>someValue).length;
1
2
代码:
let f = false
// f = 1 // 会自动进行类型识别,这里会报错

let b:boolean = true

function sum(a:number, b:number) { // 指定形参类型
    return a + b
}

console.log(sum(1, 2));

function sum1(a:number,b:number):number { // 指定返回的数据类型
    return a + b
}

console.log(sum1(1, 3));


// 也可以直接使用字面量进行类型声明
let a: 10;
// a = 11; 错误,值不能被修改

// 可以使用 | 来连接多个类型(联合类型)
let b: "male" | "female";
b = "male";
b = "female";

let c: boolean | string;
c = true;
c = "hello";

// any 表示的是任意类型,一个变量设置类型为any后相当于对该变量关闭了TS的类型检测
// 使用TS时,不建议使用any类型
// let d: any;

// 声明变量如果不指定类型,则TS解析器会自动判断变量的类型为any (隐式的any)
let d;
d = 10;
d = "hello";
d = true;

// unknown 表示未知类型的值
let e: unknown;
e = 10;
e = "hello";
e = true;

// d的类型是any,它可以赋值给任意变量
// s = d;
let s: string;

s = d;
// unknown 实际上就是一个类型安全的any
// unknown类型的变量,不能直接赋值给其他变量
if(typeof e === "string"){
    s = e;
}

// 类型断言,可以用来告诉解析器变量的实际类型
/*
* 语法:
*   变量 as 类型
*   <类型>变量
*
* */
s = e as string;
s = <string>e;

// void 用来表示空,以函数为例,就表示没有返回值的函数
function fn(): void{
}

// never 表示永远不会返回结果
function fn2(): never{
    throw new Error('报错了!');
}

// object表示一个js对象
let a: object;
a = {}
a = function () {
}

// {} 用来指定对象中可以包含哪些属性
// 语法:{属性名:属性值,属性名:属性值}
// 在属性名后边加上?,表示属性是可选的
let b: {name: string, age?:number};
b = {
    name: "张三",
    age: 18
}
// [propName: string]: any 表示任意类型的属性
let c: {name: string, [propName: string]: any};
c = {
    name: "张三",
    age: 18,
    gender: "男"
}

/*
*   设置函数结构的类型声明:
*       语法:(形参:类型, 形参:类型 ...) => 返回值
* */
let d: (a:number, b:number) => number;
d= function (n1: number,n2:number) :number {
    return n1 + n2;
}

/*
*   数组的类型声明:
*       类型[]
*       Array<类型>
* */
// string[] 表示字符串数组
let e: string[];
e = ['a','b','c'];

// number[] 表示数值数值
let f: number[];
let g: Array<number>;
g = [1, 2, 3];

/*
*   元组,元组就是固定长度的数组
*       语法:[类型, 类型, ....]
*  */
let h: [string, number];
h = ["张三", 1];

/*
* enum 枚举
*
* */
enum Gender {
    Male,
    Female
}

let i: {name: string, gender: Gender};
i = {
    name: "张三",
    gender: Gender.Female
}

// 类型的别名
type myType = 1 | 2 | 3 | 4 | 5;
let k: myType;
let l: myType;
let m: myType;

k = 2;
2
3
4
5
6
7
8
9
10
11
12
13
14
15
16
17
18
19
20
21
22
23
24
25
26
27
28
29
30
31
32
33
34
35
36
37
38
39
40
41
42
43
44
45
46
47
48
49
50
51
52
53
54
55
56
57
58
59
60
61
62
63
64
65
66
67
68
69
70
71
72
73
74
75
76
77
78
79
80
81
82
83
84
85
86
87
88
89
90
91
92
93
94
95
96
97
98
99
100
101
102
103
104
105
106
107
108
109
110
111
112
113
114
115
116
117
118
119
120
121
122
123
124
125
126
127
128
129
130
131
132
133
134
135
136
137
138
139
140
141
142
143
144
145
146
147
148
149
150
151
152
# void类型详解
当函数没有返回值的时候,定义函数的返回值类型就是void
在JavaScript中,如果定义一个函数不写返回值,那么它默认是返回 undefined 的~
什么都不返回
function fn(): void {
}
1
2只写一个return
function fn(): void {
    return
}
1
2
3返回一个
undefinedfunction fn(): void { return undefined }1
2
3返回
nullfunction fn: void { return null }1
2
3
也就是说只有null和undefined可以赋给void
其实在JS中void是一种操作符,可以让任何表达式返回undefined
void 0 // undefined
# any类型详解
any 表示的是任意类型,一个变量设置类型为 any 后,相当于对该变量关闭了TS的类型检测。
隐式any:如果只声明变量不指定类型也不给变量赋值,变量就是any类型的
当把any类型的变量可以赋值给其他类型的变量,不会报错
let a
let b: any
a = 1
a = '1'
b = '1'
b = 1

let c:string = '123'
c = b
2
3
4
5
6
7
8
9
any类型是多人协作项目的大忌,很可能把Typescript变成AnyScript,通常在不得已的情况下,不应该首先考虑使用此类型。
# unknown
开发的时候有些变量就是事先不知道的类型怎么办呢?可以使用unknown
unknown与any的区别就是,将unknown类型变量赋值给其他任意类型的变量时,会报错
let a
let b: unknown
a = 1
a = '1'
b = '1'
b = 1

let c:string = '123'
c = b  // 会报错 不能将类型“unknown”分配给类型“string”。

export {}
2
3
4
5
6
7
8
9
10
11
unknown类型的变量就是类型安全的any,不能直接赋值给其他类型的变量
需要在赋值之前做好类型判断 (这叫缩小类型范围)
let a
let b: unknown
a = 1
a = '1'
b = '1'
b = 1

let c:string = '123'
// c = b  // 会报错 不能将类型“unknown”分配给类型“string”。

// 需要在赋值之前做好类型判断 (这叫缩小类型范围)
if (typeof b === 'string') {
    c = b
}
// 或者
c = b as string
// 或者
c = <string>b
export {}
2
3
4
5
6
7
8
9
10
11
12
13
14
15
16
17
18
19
# never类型详解
never 表示永远不会返回结果
报错
function error(): never{
    throw new Error('报错了!')
}
1
2
3死循环
function endless(): never{
    while(true) {}
}
1
2
3
# 对象类型详解
一般来说,我们对于对象的类型检查一般是检查对象中有哪些属性,属性是什么类型。
可以用{} 来指定对象中可以包含哪些属性 语法:{属性名: 属性类型, ...}
let obj: {name: string}

// obj = {} // 类型 "{}" 中缺少属性 "name",但类型 "{ name: string; }" 中需要该属性。
// obj = {age: 123} // 不能将类型“{ age: number; }”分配给类型“{ name: string; }”。
obj = {name: '123'}
2
3
4
5
可选属性,在属性名后面加一个 ?
let obj1 : {name: string, age?: number}

obj1 = {name: '张三'}
obj1 = {name: '张三', age: 14}
2
3
4
如果后续属性不确定叫什么名字,也不确定是什么类型,那么可以这样写[propName: string]: unknown
// 如果后续属性不确定叫什么名字,也不确定是什么类型,那么可以这样写[propName: string]: unknown
let obj2 : {name: string, [propName : string] : unknown}
obj2 = {name: '张三'}
obj2 = {name: '张三', age: 14}
obj2 = {name: '张三', age: 14, gender: '男'}
2
3
4
5
# 函数详解
因为function是关键字,所有这里用Function来声明函数
let fn: Function

fn = function() {
    return 1
}
2
3
4
5
和对象一样,我们一般会限制函数有几个参数,参数的类型,返回值的类型,所以就可以以一种类似箭头函数的方式来声明一个函数类型的变量
可选参数必须放在必选参数之后
剩余参数 ...rest : number[]
// 定义函数结构
let fn2: (a: number, b: number) => number

fn2 = function sum(a, b) {
    return a+b
}
2
3
4
5
6
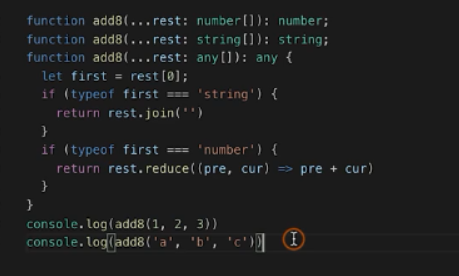
函数重载
最容易匹配的定义要写在最前面
# 数组详解
比较常用的就是这种方式: 在元素类型后面接上 []:
let arr: number[] = [1, 2, 3]
let arr2: string[] = ['y', 'k']
2
泛型
// 使用泛型
let list: Array<number> = [1, 2, 3]
let list2: Array<string> = ['y', 'k']
let list3: Array<number | string> = [1, 2, 3, 'yk']
2
3
4
# 元组 Tuple详解
元组是TS新出的类型,表示固定长度的array
元组中包含的元素,必须与声明的类型一致,而且不能多、不能少,甚至顺序都不能不一样
let x : [string, number]

x = ['aa', 1]
// x = [1, 'aa'] // 会报错
2
3
4
# 字面量
也可以使用字面量去指定变量的类型,这相当于给他设置成了一个常量
let a: 10
a = 10 // 不能再被重新赋值
2
# 联合类型
可以给一个变量定义一个联合类型,类型名之间用 | 隔开
let gender : "male" | "female"

gender = "male"
// gender = "男" // 不能将类型“"男"”分配给类型“"male" | "female"”。ts(2322)

let age : string | number

age = 16
age= '11'
2
3
4
5
6
7
8
9
# 类型别名
这个时候,如果一个类型的字面量类型选择过多,重复编写就比较麻烦,这就可以使用类型别名
type myType = 1 | 2 | 3 | 4 | 5
let i: myType
let j: myType
let k: myType

k = 2
2
3
4
5
6
可以通过类型别名来定义函数参数类型结构
type fn = (x: number, y:number) => number // 这里fn表示类型
let fn: (x: number, y:number) => number // 这里fn表示值
// 使用类型别名对上面的函数进行重新定义
let fun: fn = (x, y) => x + y
2
3
4
# 类型断言
let someValue : unknown = "abcedefg"
let someLength : number = (someValue as string).length

let someValue2 : unknown = "abcedefg"
let someLength2 : number = (<string>someValue2).length
2
3
4
5
# 枚举
ts代码
enum Gender {
    'male',
    'female'
}
2
3
4
转换为的js代码 tsc enum.ts
var Gender;
(function (Gender) {
    Gender[Gender["male"] = 0] = "male";
    Gender[Gender["female"] = 1] = "female";
})(Gender || (Gender = {}));
console.log(Gender) // { '0': 'male', '1': 'female', male: 0, female: 1 }
2
3
4
5
6
不但可以通过Gender.male取到0 还可以通过Gender[0]取到male
# 自定义枚举【字符串枚举】
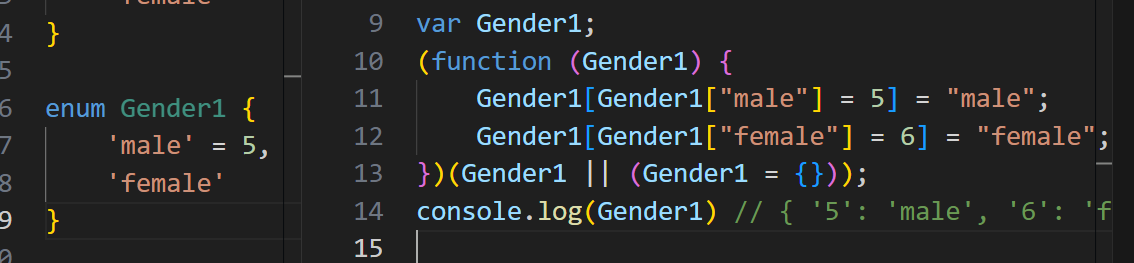
默认的枚举类型的值都是数字类型的,所以我们称之为数字枚举,默认是从0开始递增的,我们也可以自定义数字,如果只定义第一个,后面的数字就依据你定义的递增
enum.ts
enum Gender1 {
    'male' = 5,
    'female'
}
2
3
4
var Gender1;
(function (Gender1) {
    Gender1[Gender1["male"] = 5] = "male";
    Gender1[Gender1["female"] = 6] = "female";
})(Gender1 || (Gender1 = {}));
console.log(Gender1) // { '5': 'male', '6': 'female', male: 5, female: 6 }
2
3
4
5
6
当然不止数字类型,也可以定义成字符串类型
enum.ts
enum Gender2 {
    'male' = 'this is a male',
    'female' = 'this is a female'
}
2
3
4
编译后的js文件
var Gender2;
(function (Gender2) {
    Gender2["male"] = "this is a male";
    Gender2["female"] = "this is a female";
})(Gender2 || (Gender2 = {}));
console.log(Gender2) // { male: 'this is a male', female: 'this is a female' }
2
3
4
5
6
当然也可以将两种类型混合定义【异构枚举】
enum Gender {
  'male'= 'this is male.',
  'female' = 1
}
2
3
4
# 常量枚举
在enum前面加上const,表示常量枚举
我们先看普通的枚举类型转义之后是什么
const enum Gender3 {
    'male',
    'female'
}

let g = Gender.male
2
3
4
5
6
编译后的js
var g = 0 /* Gender3.male */;
可以看到,代码一下子精简了很多。定义的枚举类编译之后直接以值(常量)的形式来使用
# 编译选项
# 自动编译文件
编译文件时,使用 -w 指令后,TS编译器会自动监视文件的变化,并在文件发生变化时对文件进行重新编译。
示例:
tsc xxx.ts -w
# 自动编译整个项目
- 如果直接使用tsc指令,则可以自动将当前项目下的所有ts文件编译为js文件。
- 但是能直接使用tsc命令的前提时,要先在项目根目录下(
tsc --init)生成一个ts的配置文件 ==tsconfig.json== - tsconfig.json是一个JSON文件,添加配置文件后,只需只需 tsc 命令即可完成对整个项目的编译
{
  "compilerOptions": {
    /* Visit https://aka.ms/tsconfig to read more about this file */

    /* Projects */
    // "incremental": true,                              /* Save .tsbuildinfo files to allow for incremental compilation of projects. */
    // "composite": true,                                /* Enable constraints that allow a TypeScript project to be used with project references. */
    // "tsBuildInfoFile": "./.tsbuildinfo",              /* Specify the path to .tsbuildinfo incremental compilation file. */
    // "disableSourceOfProjectReferenceRedirect": true,  /* Disable preferring source files instead of declaration files when referencing composite projects. */
    // "disableSolutionSearching": true,                 /* Opt a project out of multi-project reference checking when editing. */
    // "disableReferencedProjectLoad": true,             /* Reduce the number of projects loaded automatically by TypeScript. */

    /* Language and Environment */
    "target": "es2016",                                  /* Set the JavaScript language version for emitted JavaScript and include compatible library declarations. */
    // "lib": [],                                        /* Specify a set of bundled library declaration files that describe the target runtime environment. */
    // "jsx": "preserve",                                /* Specify what JSX code is generated. */
    // "experimentalDecorators": true,                   /* Enable experimental support for TC39 stage 2 draft decorators. */
    // "emitDecoratorMetadata": true,                    /* Emit design-type metadata for decorated declarations in source files. */
    // "jsxFactory": "",                                 /* Specify the JSX factory function used when targeting React JSX emit, e.g. 'React.createElement' or 'h'. */
    // "jsxFragmentFactory": "",                         /* Specify the JSX Fragment reference used for fragments when targeting React JSX emit e.g. 'React.Fragment' or 'Fragment'. */
    // "jsxImportSource": "",                            /* Specify module specifier used to import the JSX factory functions when using 'jsx: react-jsx*'. */
    // "reactNamespace": "",                             /* Specify the object invoked for 'createElement'. This only applies when targeting 'react' JSX emit. */
    // "noLib": true,                                    /* Disable including any library files, including the default lib.d.ts. */
    // "useDefineForClassFields": true,                  /* Emit ECMAScript-standard-compliant class fields. */
    // "moduleDetection": "auto",                        /* Control what method is used to detect module-format JS files. */

    /* Modules */
    "module": "commonjs",                                /* Specify what module code is generated. */
    // "rootDir": "./",                                  /* Specify the root folder within your source files. */
    // "moduleResolution": "node",                       /* Specify how TypeScript looks up a file from a given module specifier. */
    // "baseUrl": "./",                                  /* Specify the base directory to resolve non-relative module names. */
    // "paths": {},                                      /* Specify a set of entries that re-map imports to additional lookup locations. */
    // "rootDirs": [],                                   /* Allow multiple folders to be treated as one when resolving modules. */
    // "typeRoots": [],                                  /* Specify multiple folders that act like './node_modules/@types'. */
    // "types": [],                                      /* Specify type package names to be included without being referenced in a source file. */
    // "allowUmdGlobalAccess": true,                     /* Allow accessing UMD globals from modules. */
    // "moduleSuffixes": [],                             /* List of file name suffixes to search when resolving a module. */
    // "resolveJsonModule": true,                        /* Enable importing .json files. */
    // "noResolve": true,                                /* Disallow 'import's, 'require's or '<reference>'s from expanding the number of files TypeScript should add to a project. */

    /* JavaScript Support */
    // "allowJs": true,                                  /* Allow JavaScript files to be a part of your program. Use the 'checkJS' option to get errors from these files. */
    // "checkJs": true,                                  /* Enable error reporting in type-checked JavaScript files. */
    // "maxNodeModuleJsDepth": 1,                        /* Specify the maximum folder depth used for checking JavaScript files from 'node_modules'. Only applicable with 'allowJs'. */

    /* Emit */
    // "declaration": true,                              /* Generate .d.ts files from TypeScript and JavaScript files in your project. */
    // "declarationMap": true,                           /* Create sourcemaps for d.ts files. */
    // "emitDeclarationOnly": true,                      /* Only output d.ts files and not JavaScript files. */
    // "sourceMap": true,                                /* Create source map files for emitted JavaScript files. */
    // "outFile": "./",                                  /* Specify a file that bundles all outputs into one JavaScript file. If 'declaration' is true, also designates a file that bundles all .d.ts output. */
    // "outDir": "./",                                   /* Specify an output folder for all emitted files. */
    // "removeComments": true,                           /* Disable emitting comments. */
    // "noEmit": true,                                   /* Disable emitting files from a compilation. */
    // "importHelpers": true,                            /* Allow importing helper functions from tslib once per project, instead of including them per-file. */
    // "importsNotUsedAsValues": "remove",               /* Specify emit/checking behavior for imports that are only used for types. */
    // "downlevelIteration": true,                       /* Emit more compliant, but verbose and less performant JavaScript for iteration. */
    // "sourceRoot": "",                                 /* Specify the root path for debuggers to find the reference source code. */
    // "mapRoot": "",                                    /* Specify the location where debugger should locate map files instead of generated locations. */
    // "inlineSourceMap": true,                          /* Include sourcemap files inside the emitted JavaScript. */
    // "inlineSources": true,                            /* Include source code in the sourcemaps inside the emitted JavaScript. */
    // "emitBOM": true,                                  /* Emit a UTF-8 Byte Order Mark (BOM) in the beginning of output files. */
    // "newLine": "crlf",                                /* Set the newline character for emitting files. */
    // "stripInternal": true,                            /* Disable emitting declarations that have '@internal' in their JSDoc comments. */
    // "noEmitHelpers": true,                            /* Disable generating custom helper functions like '__extends' in compiled output. */
    // "noEmitOnError": true,                            /* Disable emitting files if any type checking errors are reported. */
    // "preserveConstEnums": true,                       /* Disable erasing 'const enum' declarations in generated code. */
    // "declarationDir": "./",                           /* Specify the output directory for generated declaration files. */
    // "preserveValueImports": true,                     /* Preserve unused imported values in the JavaScript output that would otherwise be removed. */

    /* Interop Constraints */
    // "isolatedModules": true,                          /* Ensure that each file can be safely transpiled without relying on other imports. */
    // "allowSyntheticDefaultImports": true,             /* Allow 'import x from y' when a module doesn't have a default export. */
    "esModuleInterop": true,                             /* Emit additional JavaScript to ease support for importing CommonJS modules. This enables 'allowSyntheticDefaultImports' for type compatibility. */
    // "preserveSymlinks": true,                         /* Disable resolving symlinks to their realpath. This correlates to the same flag in node. */
    "forceConsistentCasingInFileNames": true,            /* Ensure that casing is correct in imports. */

    /* Type Checking */
    "strict": true,                                      /* Enable all strict type-checking options. */
    // "noImplicitAny": true,                            /* Enable error reporting for expressions and declarations with an implied 'any' type. */
    // "strictNullChecks": true,                         /* When type checking, take into account 'null' and 'undefined'. */
    // "strictFunctionTypes": true,                      /* When assigning functions, check to ensure parameters and the return values are subtype-compatible. */
    // "strictBindCallApply": true,                      /* Check that the arguments for 'bind', 'call', and 'apply' methods match the original function. */
    // "strictPropertyInitialization": true,             /* Check for class properties that are declared but not set in the constructor. */
    // "noImplicitThis": true,                           /* Enable error reporting when 'this' is given the type 'any'. */
    // "useUnknownInCatchVariables": true,               /* Default catch clause variables as 'unknown' instead of 'any'. */
    // "alwaysStrict": true,                             /* Ensure 'use strict' is always emitted. */
    // "noUnusedLocals": true,                           /* Enable error reporting when local variables aren't read. */
    // "noUnusedParameters": true,                       /* Raise an error when a function parameter isn't read. */
    // "exactOptionalPropertyTypes": true,               /* Interpret optional property types as written, rather than adding 'undefined'. */
    // "noImplicitReturns": true,                        /* Enable error reporting for codepaths that do not explicitly return in a function. */
    // "noFallthroughCasesInSwitch": true,               /* Enable error reporting for fallthrough cases in switch statements. */
    // "noUncheckedIndexedAccess": true,                 /* Add 'undefined' to a type when accessed using an index. */
    // "noImplicitOverride": true,                       /* Ensure overriding members in derived classes are marked with an override modifier. */
    // "noPropertyAccessFromIndexSignature": true,       /* Enforces using indexed accessors for keys declared using an indexed type. */
    // "allowUnusedLabels": true,                        /* Disable error reporting for unused labels. */
    // "allowUnreachableCode": true,                     /* Disable error reporting for unreachable code. */

    /* Completeness */
    // "skipDefaultLibCheck": true,                      /* Skip type checking .d.ts files that are included with TypeScript. */
    "skipLibCheck": true                                 /* Skip type checking all .d.ts files. */
  }
}
2
3
4
5
6
7
8
9
10
11
12
13
14
15
16
17
18
19
20
21
22
23
24
25
26
27
28
29
30
31
32
33
34
35
36
37
38
39
40
41
42
43
44
45
46
47
48
49
50
51
52
53
54
55
56
57
58
59
60
61
62
63
64
65
66
67
68
69
70
71
72
73
74
75
76
77
78
79
80
81
82
83
84
85
86
87
88
89
90
91
92
93
94
95
96
97
98
99
100
101
102
103
# 配置选项
{
  "compilerOptions": {
    "target": "es5",   // 指定 ECMAScript 目标版本: 'ES5'
    "module": "commonjs",  // 指定使用模块: 'commonjs', 'amd', 'system', 'umd' or 'es2015'
    "moduleResolution": "node",     // 选择模块解析策略
    "experimentalDecorators": true,  // 启用实验性的ES装饰器
    "allowSyntheticDefaultImports": true,   // 允许从没有设置默认导出的模块中默认导入。
    "sourceMap": true,   // 把 ts 文件编译成 js 文件的时候,同时生成对应的 map 文件
    "strict": true,  // 启用所有严格类型检查选项
    "noImplicitAny": true,  // 在表达式和声明上有隐含的 any类型时报错
    "alwaysStrict": true,  // 以严格模式检查模块,并在每个文件里加入 'use strict'
    "declaration": true,   // 生成相应的.d.ts文件
    "removeComments": true,   // 删除编译后的所有的注释
    "noImplicitReturns": true,  // 不是函数的所有返回路径都有返回值时报错
    "importHelpers": true,  // 从 tslib 导入辅助工具函数
    "lib": ["es6", "dom"],  // 指定要包含在编译中的库文件
    "typeRoots": ["node_modules/@types"],
    "outDir": "./dist",
    "rootDir": "./src"
  },
  "include": [
    "./src/**/*.ts"
  ],
  "exclude": [
    "node_modules",
    "dist",
    "**/*.test.ts",
  ]
}
2
3
4
5
6
7
8
9
10
11
12
13
14
15
16
17
18
19
20
21
22
23
24
25
26
27
28
29
# include
定义希望被编译文件所在的目录
- 是一个数组,用来指定需要编译的ts文件,其中
*表示任意文件**表示任意目录 - 默认值:
["**/*"]
示例:
"include":["src/**/*", "tests/**/*"]
上述示例中,所有src目录和tests目录下的文件都会被编译
# exclude
定义需要排除在外的目录
默认值:
["node_modules", "bower_components", "jspm_packages"]示例:
"exclude": ["./src/hello/**/*"]1- 上述示例中,src下hello目录下的文件都不会被编译
# extends
定义被继承的配置文件
示例:
"extends": "./configs/base"1- 上述示例中,当前配置文件中会自动包含config目录下base.json中的所有配置信息
# files
指定被编译文件的列表,只有需要编译的文件少时才会用到
示例:
  "files": [
      "core.ts",
      "sys.ts",
      "types.ts",
      "scanner.ts",
      "parser.ts",
      "utilities.ts",
      "binder.ts",
      "checker.ts",
      "tsc.ts"
    ]
1
2
3
4
5
6
7
8
9
10
11- 列表中的文件都会被TS编译器所编译
# compilerOptions
编译选项是配置文件中非常重要也比较复杂的配置选项
在compilerOptions中包含多个子选项,用来完成对编译的配置
项目选项
# target
设置ts代码编译的目标版本
可选值:
ES3(默认)、ES5、ES6/ES2015、ES7/ES2016、ES2017、ES2018、ES2019、ES2020、ESNext示例:
 "compilerOptions": {
     "target": "ES6"
 }
1
2
3如上设置,我们所编写的ts代码将会被编译为ES6版本的js代码
# lib
指定代码运行时所包含的库(宿主环境)
可选值:
ES5、ES6/ES2015、ES7/ES2016、ES2017、ES2018、ES2019、ES2020、ESNext、DOM、WebWorker、ScriptHost ......示例:
 "compilerOptions": {
     "target": "ES6",
     "lib": ["ES6", "DOM"],
     "outDir": "dist",
     "outFile": "dist/aa.js"
 }
1
2
3
4
5
6
# module
设置编译后代码使用的模块化系统
可选值:
CommonJS、UMD、AMD、System、ES2020、ESNext、None示例:
  "compilerOptions": {
      "module": "CommonJS"
  }
1
2
3
# outDir
编译后文件的所在目录
默认情况下,编译后的js文件会和ts文件位于相同的目录,设置outDir后可以改变编译后文件的位置
示例:
  "compilerOptions": {
      "outDir": "dist"
  }
1
2
3设置后编译后的js文件将会生成到dist目录
# outFile
将所有的文件编译为一个js文件
默认会将所有的编写在全局作用域中的代码合并为一个js文件,如果module制定了None、System或AMD则会将模块一起合并到文件之中
示例:
  "compilerOptions": {
      "outFile": "dist/app.js"
  }
1
2
3
# rootDir
指定代码的根目录,默认情况下编译后文件的目录结构会以最长的公共目录为根目录,通过rootDir可以手动指定根目录
示例:
  "compilerOptions": {
      "rootDir": "./src"
  }
1
2
3
allowJs
- 是否对js文件编译
checkJs
是否对js文件进行检查
示例:
  "compilerOptions": {
      "allowJs": true,
      "checkJs": true
  }
1
2
3
4
⑦ 其他配置
| 标题 | 功能 |
|---|---|
| allowJs | 是否对js文件编译,默认值:false |
| checkJs | 是否对js文件进行语法检查,默认值:false |
| removeComments | 是否删除注释,默认值:false |
| noEmit | 不生成编译后的文件,默认值:false |
| noEmitOnError | 当有错误的时候不生成编译后的文件,默认值:false |
| sourceMap | 是否生成sourceMap,默认值:false |
⑧严格检查
| 标题 | 功能 |
|---|---|
| strict | 启用所有的严格检查,设置后相当于开启了所有的严格检查,默认值:false |
| alwaysStrict | 总是以严格模式对代码进行编译,默认值:false |
| noImplicitAny | 禁止隐式的any类型,默认值:false |
| noImplicitThis | 禁止类型不明确的this,默认值:false |
| strictBindCallApply | 严格检查bind、call和apply的参数列表,默认值:false |
| strictFunctionTypes | 严格检查函数的类型,默认值:false |
| strictNullChecks | 严格的空值检查,默认值:false |
| strictPropertyInitialization | 严格检查属性是否初始化,默认值:false |
⑨ 额外检查
| 标题 | 功能 |
|---|---|
| noFallthroughCasesInSwitch | 检查switch语句包含正确的break |
| noImplicitReturns | 检查函数没有隐式的返回值 |
| noUnusedLocals | 检查未使用的局部变量 |
| noUnusedParameters | 检查未使用的参数 |
| allowUnreachableCode | 检查不可达代码;true:忽略不可达代码,false:不可达代码将引起错误 |
| noEmitOnError | 有错误的情况下不进行编译,默认值:false |
完整代码配置:
{
  /*
  tsconfig.json是ts编译器的配置文件,ts编译器可以根据它的信息来对代码进行编译
    "include" 用来指定哪些ts文件需要被编译
      路径:** 表示任意目录
            * 表示任意文件
    "exclude" 不需要被编译的文件目录
        默认值:["node_modules", "bower_components", "jspm_packages"]
  */
  "include": [
    "./src/**/*"
  ],
  "exclude": [
    "./src/hello/**/*"
  ],
  /*
    compilerOptions 编译器的选项
  */
  "compilerOptions": {
    // target 用来指定ts被编译为的ES的版本
    // 'es3', 'es5', 'es6', 'es2015', 'es2016', 'es2017', 'es2018', 'es2019', 'es2020', 'esnext'
    "target": "ES2015",

    // module 指定要使用的模块化的规范
    // 'none', 'commonjs', 'amd', 'system', 'umd', 'es6', 'es2015', 'es2020', 'esnext'
    "module": "ES2015",

    // lib用来指定项目中要使用的库
    //'es5', 'es6', 'es2015', 'es7', 'es2016', 'es2017', 'es
    //2018', 'es2019', 'es2020', 'esnext', 'dom', 'dom.iterable', 'webworker', 'webworker.importscripts', 'webworker.iterable', 'scri
    //pthost', 'es2015.core', 'es2015.collection', 'es2015.generator', 'es2015.iterable', 'es2015.promise', 'es2015.proxy', 'es2015.r
    //eflect', 'es2015.symbol', 'es2015.symbol.wellknown', 'es2016.array.include', 'es2017.object', 'es2017.sharedmemory', 'es2017.st
    //ring', 'es2017.intl', 'es2017.typedarrays', 'es2018.asyncgenerator', 'es2018.asynciterable', 'es2018.intl', 'es2018.promise', '
    //es2018.regexp', 'es2019.array', 'es2019.object', 'es2019.string', 'es2019.symbol', 'es2020.bigint', 'es2020.promise', 'es2020.s
    //haredmemory', 'es2020.string', 'es2020.symbol.wellknown', 'es2020.intl', 'esnext.array', 'esnext.symbol', 'esnext.asynciterable
    //', 'esnext.intl', 'esnext.bigint', 'esnext.string', 'esnext.promise', 'esnext.weakref'
    //    "lib": ["es6", "dom"]

    // outDir 用来指定编译后文件所在的目录
    "outDir": "./dist",

    // 将代码合并为一个文件
    // 设置outFile后,所有的全局作用域中的代码会合并到同一个文件中
    //"outFile": "./dist/app.js"

    // 是否对js文件进行编译,默认是false
    //    "allowJs": true,
    // 是否检查js代码是否符合语法规范,默认是false
    //    "checkJs": true,

    // 是否移除注释
    "removeComments": true,
    // 不生成编译后的文件
    "noEmit": false,

    // 当有错误时不生成编译后的文件
    "noEmitOnError": true,
    // 所有严格检查的总开关
    "strict": true,

    // 用来设置编译后的文件是否使用严格模式,默认false
    "alwaysStrict": true,

    // 不允许隐式的any类型
    "noImplicitAny": true,

    // 不允许不明确类型的this
    "noImplicitThis": true,

    // 严格的检查空值
    "strictNullChecks": true
  }
}
2
3
4
5
6
7
8
9
10
11
12
13
14
15
16
17
18
19
20
21
22
23
24
25
26
27
28
29
30
31
32
33
34
35
36
37
38
39
40
41
42
43
44
45
46
47
48
49
50
51
52
53
54
55
56
57
58
59
60
61
62
63
64
65
66
67
68
69
70
71
72
73
# webpack配置TS项目
通常情况下,实际开发中我们都需要使用构建工具对代码进行打包,TS同样也可以结合构建工具一起使用,下边以webpack为例介绍一下如何结合构建工具使用TS。
步骤:
# 初始化项目
进入项目根目录,执行命令
npm init -y主要作用:创建package.json文件
下载构建工具
npm i -D webpack webpack-cli webpack-dev-server typescript ts-loader clean-webpack-plugin html-webpack-plugin共安装了7个包
- webpack
- 构建工具webpack
- webpack-cli
- webpack的命令行工具
- webpack-dev-server
- webpack的开发服务器
- typescript
- ts编译器
- ts-loader
- ts加载器,用于在webpack中编译ts文件
- html-webpack-plugin
- webpack中html插件,用来自动创建html文件
- clean-webpack-plugin
- webpack中的清除插件,每次构建都会先清除目录
- webpack
# webpack相关配置
根目录下创建webpack的配置文件webpack.config.js
const path = require("path");
const HtmlWebpackPlugin = require("html-webpack-plugin");
const { CleanWebpackPlugin } = require("clean-webpack-plugin");
module.exports = {
optimization:{
minimize: false // 关闭代码压缩,可选
},
entry: "./src/index.ts",
devtool: "inline-source-map",
devServer: {
contentBase: './dist'
},
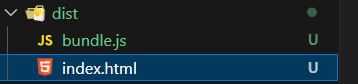
output: {
path: path.resolve(__dirname, "dist"),
filename: "bundle.js",
environment: {
arrowFunction: false // 关闭webpack的箭头函数,可选
}
},
resolve: {
extensions: [".ts", ".js"]
},
module: {
rules: [
{
test: /\.ts$/,
use: {
loader: "ts-loader"
},
exclude: /node_modules/
}
]
},
plugins: [
new CleanWebpackPlugin(),
new HtmlWebpackPlugin({
title:'TS测试'
}),
]
}
2
3
4
5
6
7
8
9
10
11
12
13
14
15
16
17
18
19
20
21
22
23
24
25
26
27
28
29
30
31
32
33
34
35
36
37
38
39
40
41
42
43
44
45
46
47
48
49
以上是一些基本的配置,但是在实际开发中,webpack在配置开发环境与生产环境时,配置的有些东西不太相同,所以我们应该分开写我们生产环境和开发环境的webpack配置

所以我们就在根目录下创建build文件夹存放我们的webpack配置文件
安装
npm i -D webpack-merge
基本配置webpack.base.config.js
const path = require("path");
const HtmlWebpackPlugin = require("html-webpack-plugin");

module.exports = {
  entry: "./src/index.ts",
  output: {
    path: path.resolve(__dirname, "dist"),
    filename: "bundle.js",
    environment: {
      arrowFunction: false, // 关闭webpack的箭头函数,可选
    },
  },
  resolve: {
    extensions: [".js", ".ts"],
  },
  module: {
    rules: [
      {
        test: /.ts$/,
        use: [
          {
            loader: "ts-loader",
          },
        ],
        exclude: /node_modules/,
      },
    ],
  },
  plugins: [
    new HtmlWebpackPlugin({
      template: "./src/index.html",
    }),
  ]
};
2
3
4
5
6
7
8
9
10
11
12
13
14
15
16
17
18
19
20
21
22
23
24
25
26
27
28
29
30
31
32
33
34
35
开发环境配置webpack.dev.config.js
module.exports = {
    devtool: "inline-source-map",
};
2
3
生产环境配置webpack.pro.config.js
const { CleanWebpackPlugin } = require("clean-webpack-plugin");

module.exports = {
  plugins: [new CleanWebpackPlugin()],
};
2
3
4
5
配置主文件webpack.config.js
const { merge } = require("webpack-merge");
const baseConfig = require("./webpack.base.config");
const devConfig = require("./webpack.dev.config");
const proConfig = require("./webpack.pro.config");

module.exports = (env, argv) => {
  let config = argv.mode === "development" ? devConfig : proConfig;
  return merge(baseConfig, config);
};
2
3
4
5
6
7
8
9
# 配置ts.config.json
根目录下创建tsconfig.json,配置可以根据自己需要
  {
      "compilerOptions": {
          "target": "ES2015",
          "module": "ES2015",
          "strict": true
      }
  }
2
3
4
5
6
7
# 编写代码
src/index.html(模版)
<!DOCTYPE html>
<html lang="en">
<head>
    <meta charset="UTF-8">
    <meta name="viewport" content="width=device-width, initial-scale=1.0">
    <title>Document</title>
</head>
<body>
    <div id="app"></div>
</body>
</html>
2
3
4
5
6
7
8
9
10
11
src/index.ts
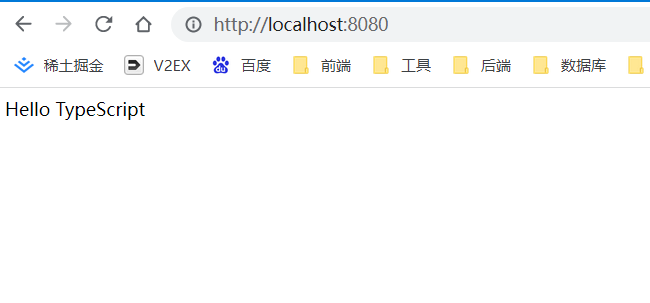
let content: string = "Hello TypeScript"
const app = document.getElementById("app")

if(app != null) {
    app.innerHTML = content
}
2
3
4
5
6
# 修改package.json
修改package.json添加如下配置
  "scripts": {
    "start": "webpack-dev-server --mode=development --config ./build/webpack.config.js",
    "build": "webpack --mode=production --config ./build/webpack.config.js"
  },
2
3
4
启动项目:npm run start
打包项目: npm run build
# 配置Babel
经过一系列的配置,使得TS和webpack已经结合到了一起,除了webpack,开发中还经常需要结合babel来对代码进行转换以使其可以兼容到更多的浏览器,在上述步骤的基础上,通过以下步骤再将babel引入到项目中。
安装依赖包:
npm i -D @babel/core @babel/preset-env babel-loader core-js
- 共安装了4个包,分别是:
- @babel/core
- babel的核心工具
- @babel/preset-env
- babel的预定义环境
- @babel-loader
- babel在webpack中的加载器
- core-js
- core-js用来使老版本的浏览器支持新版ES语法
- @babel/core
修改webpack.config.js配置文件
  ...略...
  module: {
      rules: [
          {
              test: /\.ts$/,
              use: [
                  {
                      loader: "babel-loader",
                      options:{
                          presets: [
                              [
                                  "@babel/preset-env",
                                  {
                                      "targets":{
                                          "chrome": "58",
                                          "ie": "11"
                                      },
                                      "corejs":"3",
                                      "useBuiltIns": "usage"
                                  }
                              ]
                          ]
                      }
                  },
                  {
                      loader: "ts-loader",

                  }
              ],
              exclude: /node_modules/
          }
      ]
  }
  ...略...
2
3
4
5
6
7
8
9
10
11
12
13
14
15
16
17
18
19
20
21
22
23
24
25
26
27
28
29
30
31
32
33
34
如此一来,使用ts编译后的文件将会再次被babel处理,使得代码可以在大部分浏览器中直接使用,可以在配置选项的targets中指定要兼容的浏览器版本。
# 面向对象
面向对象是程序中一个非常重要的思想,它被很多同学理解成了一个比较难,比较深奥的问题,其实不然。面向对象很简单,简而言之就是程序之中所有的操作都需要通过对象来完成。
- 举例来说:
- 操作浏览器要使用window对象
- 操作网页要使用document对象
- 操作控制台要使用console对象
一切操作都要通过对象,也就是所谓的面向对象,那么对象到底是什么呢?这就要先说到程序是什么,计算机程序的本质就是对现实事物的抽象,抽象的反义词是具体,比如:照片是对一个具体的人的抽象,汽车模型是对具体汽车的抽象等等。程序也是对事物的抽象,在程序中我们可以表示一个人、一条狗、一把枪、一颗子弹等等所有的事物。一个事物到了程序中就变成了一个对象。
在程序中所有的对象都被分成了两个部分数据和功能,以人为例,人的姓名、性别、年龄、身高、体重等属于数据,人可以说话、走路、吃饭、睡觉这些属于人的功能。数据在对象中被成为属性,而功能就被称为方法。所以简而言之,在程序中一切皆是对象。
传统的面向对象编程(OOP
Object-Oriented Programming)语言(例如Java)基本都是基于类的,而JavaScript是通过原型与构造函数来模拟实现类。好在 ES6 出现一些新语法糖,使得 JavaScript 拥有了class关键字。虽然本质依然是构造函数,但是这使得开发者可以更加方便的定义类和使用继承。但是 ES6 的class语法依然有一些比如修饰符和抽象类的特性还没有加入。
不使用class关键字,你可以使用其他方式来创建对象和实现面向对象编程的特性。以下是一些可用的方法:
对象字面量法:你可以使用对象字面量来创建和初始化一个对象。对象字面量语法是使用花括号
{}并可以在其中定义属性和方法。let person = { name: "Alice", age: 25, sayHello: function() { console.log(`Hello, my name is ${this.name} and I am ${this.age} years old.`); } }; // 调用方法 person.sayHello(); // 输出:Hello, my name is Alice and I am 25 years old.1
2
3
4
5
6
7
8
9
10构造函数法:你可以使用函数来定义一个构造函数,并通过
new操作符来创建对象实例。function Person(name, age) { this.name = name; this.age = age; this.sayHello = function() { console.log(`Hello, my name is ${this.name} and I am ${this.age} years old.`); }; } // 创建对象实例 const person1 = new Person("Alice", 25); person1.sayHello(); // 输出:Hello, my name is Alice and I am 25 years old.1
2
3
4
5
6
7
8
9
10
11
12原型法:你可以使用函数的原型来定义共享的属性和方法。通过在构造函数中使用
prototype属性,你可以为所有对象实例共享一组属性和方法。function Person(name, age) { this.name = name; this.age = age; } // 在原型上定义共享的方法 Person.prototype.sayHello = function() { console.log(`Hello, my name is ${this.name} and I am ${this.age} years old.`); }; // 创建对象实例 const person1 = new Person("Alice", 25); person1.sayHello(); // 输出:Hello, my name is Alice and I am 25 years old.1
2
3
4
5
6
7
8
9
10
11
12
13
# 类(class)
要想面向对象,操作对象,首先便要拥有对象,那么下一个问题就是如何创建对象。要创建对象,必须要先定义类,所谓的类可以理解为对象的模型,程序中可以根据类创建指定类型的对象,举例来说:可以通过Person类来创建人的对象,通过Dog类创建狗的对象,通过Car类来创建汽车的对象,不同的类可以用来创建不同的对象。
定义类:
  class 类名 {
  	属性名: 类型;

  	constructor(参数: 类型){
  		this.属性名 = 参数;
  	}

  	方法名(){
  		....
  	}

  }
1
2
3
4
5
6
7
8
9
10
11
12示例:
  class Person{
      name: string;
      age: number;

      constructor(name: string, age: number){
          this.name = name;
          this.age = age;
      }

      sayHello(){
          console.log(`大家好,我是${this.name}`);
      }
  }
1
2
3
4
5
6
7
8
9
10
11
12
13使用类:
  const p = new Person('孙悟空', 18);
  p.sayHello();
1
2
// 使用class关键字来定义一个类
/*
*   对象中主要包含了两个部分:
*       属性
*       方法
* */
class Person {
    /*
    *   直接定义的属性是实例属性,需要通过对象的实例去访问:
    *       const per = new Person();
    *       per.name
    *
    *   使用static开头的属性是静态属性(类属性),可以直接通过类去访问
    *       Person.age
    *
    *   readonly开头的属性表示一个只读的属性无法修改
    * */

    // 定义实例属性
     readonly name: string = '孙悟空';

    // 在属性前使用static关键字可以定义类属性(静态属性)
    // static readonly age: number = 18;
    age = 10;

    static id: number = 123;

    sayHelo() {
        console.log("hello ts")
    }
    static say() {
        console.log("你好,ts,我是静态方法")
    }
}

const person = new Person();
console.log(person);
// person.name = "张三"; readonly修饰的属性不可以被修改
console.log(person.name);
console.log(Person.id); // 静态属性通过类名来访问

person.sayHelo()
Person.say()
2
3
4
5
6
7
8
9
10
11
12
13
14
15
16
17
18
19
20
21
22
23
24
25
26
27
28
29
30
31
32
33
34
35
36
37
38
39
40
41
42
43
44
# 面向对象的特点
# 封装
对象实质上就是属性和方法的容器,它的主要作用就是存储属性和方法,这就是所谓的封装
默认情况下,对象的属性是可以任意的修改的,为了确保数据的安全性,在TS中可以对属性的权限进行设置
只读属性(readonly):
- 如果在声明属性时添加一个readonly,则属性便成了只读属性无法修改
TS中属性具有三种修饰符:
- public(默认值),可以在类、子类和对象中修改
- protected ,可以在类、子类中修改
- private ,可以在类中修改
示例:
# public
  class Person{
      public name: string; // 写或什么都不写都是public
      public age: number;

      constructor(name: string, age: number){
          this.name = name; // 可以在类中修改
          this.age = age;
      }

      sayHello(){
          console.log(`大家好,我是${this.name}`);
      }
  }

  class Employee extends Person{
      constructor(name: string, age: number){
          super(name, age);
          this.name = name; //子类中可以修改
      }
  }

  const p = new Person('孙悟空', 18);
  p.name = '猪八戒';// 可以通过对象修改
2
3
4
5
6
7
8
9
10
11
12
13
14
15
16
17
18
19
20
21
22
23
# protected
  class Person{
      protected name: string;
      protected age: number;

      constructor(name: string, age: number){
          this.name = name; // 可以修改
          this.age = age;
      }

      sayHello(){
          console.log(`大家好,我是${this.name}`);
      }
  }

  class Employee extends Person{

      constructor(name: string, age: number){
          super(name, age);
          this.name = name; //子类中可以修改
      }
  }

  const p = new Person('孙悟空', 18);
  p.name = '猪八戒';// 不能修改
2
3
4
5
6
7
8
9
10
11
12
13
14
15
16
17
18
19
20
21
22
23
24
# private
  class Person{
      private name: string;
      private age: number;

      constructor(name: string, age: number){
          this.name = name; // 可以修改
          this.age = age;
      }

      sayHello(){
          console.log(`大家好,我是${this.name}`);
      }
  }

  class Employee extends Person{

      constructor(name: string, age: number){
          super(name, age);
          this.name = name; //子类中不能修改
      }
  }

  const p = new Person('孙悟空', 18);
  p.name = '猪八戒';// 不能修改
2
3
4
5
6
7
8
9
10
11
12
13
14
15
16
17
18
19
20
21
22
23
24
# 属性存取器
对于一些不希望被任意修改的属性,可以将其设置为private
直接将其设置为private将导致无法再通过对象修改其中的属性
我们可以在类中定义一组读取、设置属性的方法,这种对属性读取或设置的属性被称为属性的存取器
读取属性的方法叫做setter方法,设置属性的方法叫做getter方法
示例:
 class Person{
     private _name: string;

     constructor(name: string){
         this._name = name;
     }

     get name(){
         return this._name;
     }

     set name(name: string){
         this._name = name;
     }

 }

 const p1 = new Person('孙悟空');
 console.log(p1.name); // 通过getter读取name属性
 p1.name = '猪八戒'; // 通过setter修改name属性
1
2
3
4
5
6
7
8
9
10
11
12
13
14
15
16
17
18
19
20静态属性
静态属性(方法),也称为类属性。使用静态属性无需创建实例,通过类即可直接使用
静态属性(方法)使用static开头
示例:
 class Tools{
     static PI = 3.1415926;

     static sum(num1: number, num2: number){
         return num1 + num2
     }
 }

 console.log(Tools.PI);
 console.log(Tools.sum(123, 456));
1
2
3
4
5
6
7
8
9
10
this
- 在类中,使用this表示当前对象
# 继承
继承时面向对象中的又一个特性
通过继承可以将其他类中的属性和方法引入到当前类中
示例:
  class Animal{
      name: string;
      age: number;

      constructor(name: string, age: number){
          this.name = name;
          this.age = age;
      }
  }

  class Dog extends Animal{

      bark(){
          console.log(`${this.name}在汪汪叫!`);
      }
  }

  const dog = new Dog('旺财', 4);
  dog.bark();
1
2
3
4
5
6
7
8
9
10
11
12
13
14
15
16
17
18
19
通过继承可以在不修改类的情况下完成对类的扩展
# 重写
发生继承时,如果子类中的方法会替换掉父类中的同名方法,这就称为方法的重写
示例:
  class Animal{
      name: string;
      age: number;

      constructor(name: string, age: number){
          this.name = name;
          this.age = age;
      }

      run(){
          console.log(`父类中的run方法!`);
      }
  }

  class Dog extends Animal{

      bark(){
          console.log(`${this.name}在汪汪叫!`);
      }

      run(){
          console.log(`子类中的run方法,会重写父类中的run方法!`);
      }
  }

  const dog = new Dog('旺财', 4);
  dog.bark();
1
2
3
4
5
6
7
8
9
10
11
12
13
14
15
16
17
18
19
20
21
22
23
24
25
26
27- 在子类中可以使用super来完成对父类的引用
抽象类(abstract class)
- 抽象类是专门用来被其他类所继承的类,它只能被其他类所继承不能用来创建实例
  abstract class Animal{
      abstract run(): void;
      bark(){
          console.log('动物在叫~');
      }
  }

  class Dog extends Animals{
      run(){
          console.log('狗在跑~');
      }
  }
1
2
3
4
5
6
7
8
9
10
11
12- 使用abstract开头的方法叫做抽象方法,抽象方法没有方法体只能定义在抽象类中,继承抽象类时抽象方法必须要实现
# 多态
多态,是指一个类的同名方法,在不同情况下的实现细节不同。多态机制实现不同的内部实现结构共用同一个外部接口
也就是说,多态有以下目的:
- 一个外部接口可被多个同类使用。
- 不同对象调用同个方法,可有不同实现。
在父类中定义一个方法,在多个子类中进行不同的实现。在程序运行时,会根据不同的对象执行不同的操作,实现了运行时的绑定。
abstract class Animal {
  abstract sleep(): void // 抽象方法,让子类实现
}
2
3
class Dog extends Animal {
  sleep() {
    console.log('dog sleep')
  }
}
class Cat extends Animal {
  sleep() {
    console.log('cat sleep')
  }
}

let dog = new Dog()
let cat = new Cat()
2
3
4
5
6
7
8
9
10
11
12
13
多态的实际含义是:同一操作作用于不同的对象上面,可以产生不同的解释和不同的执行结果。
// 定义一个动物数组
let animals: Animal[] = [dog, cat]

animals.forEach(animal => {
  animal.sleep() // 同一操作作用于不同的对象上面,可以产生不同的解释和不同的执行结果
})
2
3
4
5
6
# This类型
类的成员方法可以直接返回 this,这样可以方便的实现链式调用
class WorkFlow {
  step1() {
    return this
  }
  step2() {
    return this
  }
}

new WorkFlow().step1().step2()

// 可以实现多态
class MyFlow extends WorkFlow {
  next() {
    return this
  }
}

new MyFlow().next().step1().next().step2()
2
3
4
5
6
7
8
9
10
11
12
13
14
15
16
17
18
19
# 接口(Interface)
接口的作用类似于抽象类,不同点在于接口中的所有方法和属性都是没有实值的,换句话说接口中的所有方法都是抽象方法。接口主要负责定义一个类的结构,接口可以去限制一个对象的接口,对象只有包含接口中定义的所有属性和方法时才能匹配接口。同时,可以让一个类去实现接口,实现接口时类中要保护接口中的所有属性。
示例(检查对象类型):
  interface Person{
      name: string;
      sayHello():void;
  }

  function fn(per: Person){
      per.sayHello();
  }

  fn({name:'孙悟空', sayHello() {console.log(`Hello, 我是 ${this.name}`)}});
1
2
3
4
5
6
7
8
9
10
11示例(实现)
  interface Person{
      name: string;
      sayHello():void;
  }

  class Student implements Person{
      constructor(public name: string) {
      }

      sayHello() {
          console.log('大家好,我是'+this.name);
      }
  }
1
2
3
4
5
6
7
8
9
10
11
12
13
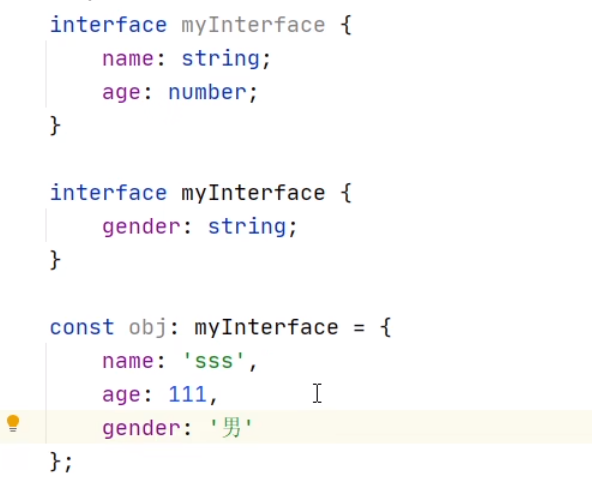
接口可以写多个,会合并
# 约束对象的结构
对象作为函数的参数,使用接口进行约束
interface Person {
    name: string;
    sayHello(): void;
}

function fn(per: Person){
    per.sayHello();
}

fn({name:'孙悟空', sayHello() {console.log(`Hello, 我是 ${this.name}`)}});
2
3
4
5
6
7
8
9
10
约束对象时还可以定义可选成员、只读成员、动态成员
interface Post {
    title: string
    content: string
    subtitle?: string        // 可选成员
    readonly summary: string // 只读成员
    [prop: string]: string   // 动态成员 【可索引类型】
}

const hello: Post = {
    title: 'yk',
    content: 'ykjun nb',
    summary: 'ykjun',
    yk: 'ykyk'
}

hello.kk = 'kk'
2
3
4
5
6
7
8
9
10
11
12
13
14
15
16
# 可索引类型
不确定对象中属性的个数时,可以使用可索引类型的接口
可索引类型具有一个索引签名,它描述了对象索引的类型,还有相应的索引返回值类型
比如:约束字符串数组
interface StringArr {
    [index: number]: string
}

let stringArr: StringArr = ['a', 'b', 'c']


interface stringArray {
    [index: number] : string
}
let arr : stringArray = ['aaa', 'bbb']
console.log(arr[0]) // aaa
2
3
4
5
6
7
8
9
10
11
12
# 约束函数的结构
interface Add {
    (a:number, b:number): number // 约束函数的类型结构
}

let add: Add = function(a,b){
    return a + b
}
2
3
4
5
6
7
比如对象中有一个字段是一个函数,使用接口约束就比较方便
interface Obj {
    name: string
    add: Add
}
2
3
4
# 约束对象数组
interface List {
    readonly id: string // 只读属性
    name: string // 末尾可以用逗号,其实应该用分号,所以可以省略符号
    sex?: string // 可选属性
    [x: string]: any // 字符串索引签名,让List可以支持多个属性
}

interface Result {
    data: List[]
}

function render(result: Result) {
    result.data.forEach((value)=>{
        console.log(value.id, value.name)
    })
}

let result: Result = {
    data: [
        { id: 1, name: 'YK', sex: 'male' },
        { id: 2, name: 'yk', phone: 1234 }
    ]
}

render(result)
2
3
4
5
6
7
8
9
10
11
12
13
14
15
16
17
18
19
20
21
22
23
24
25
# 接口与类
# 类可以实现接口
用接口来约束类成员,使用implements实现接口,约束类的属性和方法的类型。类实现接口,必须要实现接口定义所有的属性。接口只能约束类的公有成员,不能约束类的构造函数。
interface Human {
  name: string
  eat(): void
}

class Asian implements Human {
  name: string
  constructor(name: string) {
    this.name = name
  }
  eat() {}
}
2
3
4
5
6
7
8
9
10
11
12
一个类还可以实现多个接口
interface Eat{
    eat(food: string): void
}

interface Run{
    run(distance: number): void
}


class Person implements Eat, Run {
    eat(food: string):void{
      console.log(`坐着吃饭: ${food}`)
    }

    run(distance: number) {
        console.log(`直立行走:${distance}`)
    }
}

class Animal implements Eat, Run {
    eat(food: string):void{
      console.log(`啃着吃: ${food}`)
    }

    run(distance: number) {
        console.log(`爬行:${distance}`)
    }
}
2
3
4
5
6
7
8
9
10
11
12
13
14
15
16
17
18
19
20
21
22
23
24
25
26
27
28
# 接口继承
对接口使用 extends关键字允许我们有效的从其他声明过的类型中拷贝成员,并且随意添加新成员。接口也可以继承多个类型。
interface Human {
  name: string
  eat(): void
}

interface Man extends Human {
  run(): void
}
interface Child {
  cry(): void
}

// 继承多个接口
interface Boy extends Man, Child {}

let boy: Boy = {
  name: '',
  run() {},
  eat() {},
  cry() {},
}
2
3
4
5
6
7
8
9
10
11
12
13
14
15
16
17
18
19
20
21
接口还可以继承类,相当于把类的成员抽象出来(只有类的成员结构,没有具体实现)
class Auto {
  state = 1
  private state2 = 0
}

// 接口继承类
interface AutoInterface extends Auto {

}

// 类实现接口
class C implements AutoInterface {
  state = 1
}

类继承父类实现接口
class Bus extends Auto implements AutoInterface {

}
2
3
4
5
6
7
8
9
10
11
12
13
14
15
16
17
18
19
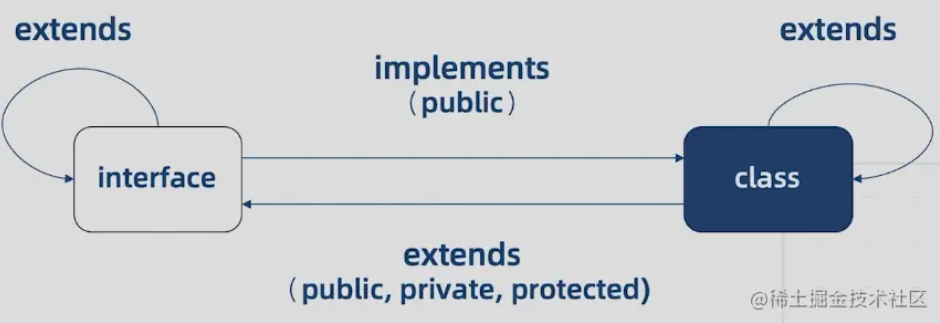
- 接口之间可以相互继承,这样能够实现接口的复用
- 类之间可以相互继承,可以实现属性和方法的复用
- 类可以实现接口,接口只能约束类的公有成员
- 接口可以继承类的成员,包括公有、私有和受保护成员
# 接口与抽象类的区别
抽象类做为其它派生类的基类使用,它们一般不会直接被实例化,不同于接口,抽象类可以包含成员的实现细节.
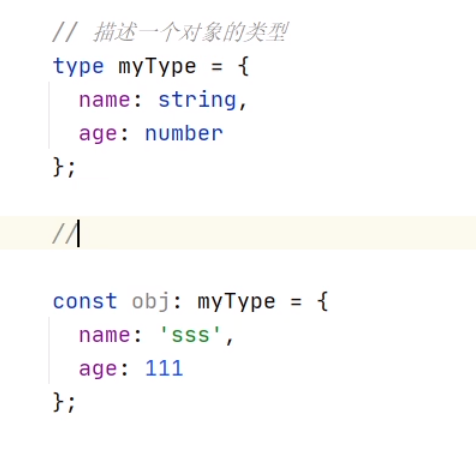
# 接口与类型别名
类型别名和接口非常相似,大部分时候,你可以任意选择使用。接口的几乎所有特性都可以在 type 中使用,两者最关键的差别在于类型别名本身无法添加新的属性,而接口是可以扩展的。
// Interface
// 通过继承扩展类型
interface Animal {
  name: string
}

interface Bear extends Animal {
  honey: boolean
}

const bear = getBear()
bear.name
bear.honey

// Type
// 通过交集扩展类型
type Animal = {
  name: string
}

type Bear = Animal & {
  honey: boolean
}

const bear = getBear();
bear.name;
bear.honey;
2
3
4
5
6
7
8
9
10
11
12
13
14
15
16
17
18
19
20
21
22
23
24
25
26
27
# 添加新的属性
// Interface
// 对一个已经存在的接口添加新的字段
interface Window {
  title: string
}

interface Window {
  ts: TypeScriptAPI
}

const src = 'const a = "Hello World"';
window.ts.transpileModule(src, {});

// Type
// 创建后不能被改变
type Window = {
  title: string
}

type Window = {
  ts: TypeScriptAPI
}

// Error: Duplicate identifier 'Window'.
2
3
4
5
6
7
8
9
10
11
12
13
14
15
16
17
18
19
20
21
22
23
24
接口可能只会被用于声明对象的形状,不能重命名原始类型
interface AnObject1 {
    value: string
}

type AnObject2 = {
    value: string
}

// Using type we can create custom names
// for existing primitives:

type SanitizedString = string
type EvenNumber = number

// This isn't feasible with interfaces
interface X extends string {

}
2
3
4
5
6
7
8
9
10
11
12
13
14
15
16
17
18
# 泛型(Generic)
定义一个函数或类时,有些情况下无法确定其中要使用的具体类型(返回值、参数、属性的类型不能确定),此时泛型便能够发挥作用。
举个例子:
  function test(arg: any): any{
  	return arg;
  }
1
2
3上例中,test函数有一个参数类型不确定,但是能确定的时其返回值的类型和参数的类型是相同的,由于类型不确定所以参数和返回值均使用了any,但是很明显这样做是不合适的,首先使用any会关闭TS的类型检查,其次这样设置也不能体现出参数和返回值是相同的类型
使用泛型:
  function test<T>(arg: T): T{
  	return arg;
  }
1
2
3这里的
<T>就是泛型,T是我们给这个类型起的名字(不一定非叫T),设置泛型后即可在函数中使用T来表示该类型。所以泛型其实很好理解,就表示某个类型。那么如何使用上边的函数呢?
方式一(直接使用):
test(10)1- 使用时可以直接传递参数使用,类型会由TS自动推断出来,但有时编译器无法自动推断时还需要使用下面的方式
方式二(指定类型):
test<number>(10)1- 也可以在函数后手动指定泛型
可以同时指定多个泛型,泛型间使用逗号隔开:
  function test<T, K>(a: T, b: K): K{
      return b;
  }

  test<number, string>(10, "hello");
1
2
3
4
5- 使用泛型时,完全可以将泛型当成是一个普通的类去使用
类中同样可以使用泛型:
 class MyClass<T>{
     prop: T;

     constructor(prop: T){
         this.prop = prop;
     }
 }
1
2
3
4
5
6
7除此之外,也可以对泛型的范围进行约束
 interface MyInter{
     length: number;
 }

 function test<T extends MyInter>(arg: T): number{
     return arg.length;
 }
1
2
3
4
5
6
7- 使用T extends MyInter表示泛型T必须是MyInter的子类,不一定非要使用接口类和抽象类同样适用。
# 极客时间
# 基础篇
# 搭建环境
初始化项目
npm i typescript -g # 如果没有安装typescript要全局安装
npm init -y
tsc --init # 生成ts.config.json
2
3
安装
npm i webpack webpack-cli webpack-dev-server -D
npm i webpack-merge -D # 把两个webpack配置项合并
npm i ts-loader typescript -D
npm i html-webpack-plugin -D
npm i clean-webpack-plugin -D
2
3
4
5
build/webpack.base.config.js
const HtmlWebpackPlugin = require('html-webpack-plugin')

module.exports = {
  entry: {
    app: './src/index.ts'
  },
  output: {
    filename: 'app.js'
  },
  resolve: {
    extensions: ['.js', '.tsx', '.ts']
  },
  module: {
    rules: [
      {
        test: /\.tsx?$/i,
        use: [
          {
            loader: 'ts-loader'
          }
        ],
        exclude: /node_modules/
      },
    ],
  },
  plugins: [
    new HtmlWebpackPlugin({
      template: './src/index.html'
    })
  ]
}
2
3
4
5
6
7
8
9
10
11
12
13
14
15
16
17
18
19
20
21
22
23
24
25
26
27
28
29
30
31
build/webpack.dev.config.js
- cheap 忽略 source-map 的链信息
- module 定位到 ts 源码
- eval-source-map 将 source-map 以 url 形式打包到文件中
module.exports = {
    devtool: 'inline-source-map'
    // devtool: 'cheap-module-eval-source-map',
}
2
3
4
build/webpack.pro.config.js
const { CleanWebpackPlugin } = require('clean-webpack-plugin')

module.exports = {
  plugins: [new CleanWebpackPlugin()]
}
2
3
4
5
build/webpack.config.js
const { merge } = require("webpack-merge");
const baseConfig = require("./webpack.base.config");
const devConfig = require("./webpack.dev.config");
const proConfig = require("./webpack.pro.config");

module.exports = (env, argv) => {
  let config = argv.mode === "development" ? devConfig : proConfig;
  return merge(baseConfig, config);
};
2
3
4
5
6
7
8
9
# 数据类型
# ES6的数据类型
• Boolean
• Number
• String
• Array(引用数据类型)
• Function(引用数据类型)
• Object(引用数据类型)
• Symbol
• undefined
• null
# TypeScript数据类型
在上面的基础上增加了一下6个
• void
• any
• never
• 元组
• 枚举
• 高级类型
// 元组补充
let triple : [number, string] = [1, 'abc'];
triple.push(2) // 这样不会报错
console.log(triple) // [ 1, 'abc', 2 ]
console.log(triple[2]) // 这样是会报错的,访问不到
2
3
4
5
let unde : undefined = undefined
let nu : null = null
// 下面会报错,如果不想让报错,将这个属性置为false
// "strictNullChecks": false,
unde = null // 不能将undefined赋值给null
nu = undefined // 不能将null赋值给undefined
2
3
4
5
6
# 枚举类型
枚举成员只读,无法修改
数字枚举 (实现原理--反向映射)
字符串枚举 (不做反向映射)
异构枚举(字符串枚举不做反向映射)
异构枚举的元素同时包含数字枚举和字符串枚举,在实现过程中数字枚举元素会进行反向映射,字符串枚举元素保持不变
常量枚举 (编译时候会被移除掉)
# 接口
# 可索引的类型
“通过索引得到”的类型,比如a[10]或ageMap["daniel"]。 可索引类型具有一个 索引签名,它描述了对象索引的类型,还有相应的索引返回值类型。
interface stringArray {
    [index: number] : string
}
let arr : stringArray = ['aaa', 'bbb']
console.log(arr[0]) // aaa
2
3
4
5
TypeScript支持两种索引签名:字符串和数字。 可以同时使用两种类型的索引,但是数字索引的返回值必须是字符串索引返回值类型的子类型。 这是因为当使用 number来索引时,JavaScript会将它转换成string然后再去索引对象。 也就是说用 100(一个number)去索引等同于使用"100"(一个string)去索引,因此两者需要保持一致。
// 数字索引和字符串索引混用
// 数字索引的返回值必须是字符串索引返回值的子类型
// javascript会进行类型转换,将number转换为string,这样类型就一致,这样索引类型就都是string
interface myType {
    [a: number] : number,
    [b: string] : any
}
let arr2 : myType = [123, 222, 333]
console.log(arr2[0])
console.log(arr2) // [ 123, 222, 333 ]
2
3
4
5
6
7
8
9
10
# 泛型
# 泛型函数和泛型接口
函数重载:使用相同名称或不同参数数量或类型创建多个方法
联合类型:取值可以为多钟类型中的一个
泛型:不预先确定的数据类型,具体的类型在使用的时候才能确定
// 函数重载
function log(value: string): string
function log(value: string[]): string[] {
  return value
}

// 联合类型
function log(value: string | string[]): string | string[] {
  return value
}

// 泛型
function log<T>(value: T): T {
  console.log(value)
  return value
}
// 调用时指定T的类型
log<string[]>(['a', 'b'])
// 使用类型推断
log(['a', 'b'])
2
3
4
5
6
7
8
9
10
11
12
13
14
15
16
17
18
19
20
不仅可以用泛型定义一个函数,也可以定义一个函数类型
function log<T>(value: T): T {
  console.log(value)
  return value
}

type Log = <T>(value: T) => T
let myLog: Log = log
2
3
4
5
6
7
泛型接口
function log<T>(value: T): T {
  console.log(value)
  return value
}

interface Log<T> {
  <T>(value: T): T
}
2
3
4
5
6
7
8
# 泛型类和泛型约束
- 泛型不能应用类的静态成员(static)
class Log<T> {
  run(value: T) {
    return value
  }
}
let log1 = new Log<number>()
log1.run(1)
let log2 = new Log()
log2.run({ a: 1 })
log2.run('1')
2
3
4
5
6
7
8
9
10
- 不仅需要打印参数还需要打印参数的属性
interface Length {
  length: number
}
function log<T extends Length>(value: T): T {
  console.log(value, value.length)
  return value
}
log([1])
log('123')
log({ length: 1 })
2
3
4
5
6
7
8
9
10
# 泛型好处
- 函数和类可以轻松地支持多种类型,增强程序的扩展性
- 不比写多余函数重载,冗长的联合声明,增强代码可读性
- 灵活控制类型之间的约束
# 类型检查机制
TypeScript 编译器在做类型检查时,所秉承的一些原则,以及表现出的一些行为 作用:辅助开发,提高开发效率
# 类型推断
**类型推断:**不需要指定变量的类型(函数的返回值类型),TypeScript 可以根据某些规则自动地为其推断出一个类型
let a = 1
let b = [1, null]
let c = (x = 1) => x + 1
window.onkeydown = event => {
  // console.log(event.button)
}

interface Foo {
  bar: number
}
// let foo = {} as Foo
// foo.bar = 1
// 上面如果把foo.bar注释掉,不会报错,所以建议把对象指定为接口类型(这样就会有提示了)
let foo: Foo = {
  bar: 1,
}
2
3
4
5
6
7
8
9
10
11
12
13
14
15
16
# 类型兼容性
- 源类型具备目标类型的必要属性(可以进行赋值)
- 两个接口类型兼容性【成员少的能兼容成员多的]】[鸭式辨型法] 只要 y 接口具备 x 接口的所有属性,即使有额外的属性,y 仍然可以被认为是 x 类型
- 两个函数类型兼容性【参数多的能兼容参数少的】 注意:这个规则是和接口兼容性规则相反
// 接口兼容性
interface X {
  a: any
  b: any
}
interface Y {
  a: any
  b: any
  c: any
}
let x: X = { a: 1, b: 2 }
let y: Y = { a: 1, b: 2, c: 3 }
x = y // x能兼容y
// y = x // y不能赋值给x

// 接口参数类型兼容性
interface Point3D {
  x: number
  y: number
  z: number
}

interface Point2D {
  x: number
  y: number
}
let p3d = (point: Point3D) => {}
let p2d = (point: Point2D) => {}
p3d = p2d // p3d能兼容p2d
// p2d = p3d // p3d不能赋值给p2d
2
3
4
5
6
7
8
9
10
11
12
13
14
15
16
17
18
19
20
21
22
23
24
25
26
27
28
29
30
Handler 目标类型,传入的参数是 源类型,如果让目标函数兼容源函数:
目标函数参数个数多余源函数参数个数
固定参数是可以兼容可选参数 / 剩余参数
可选参数是不兼容固定参数 / 剩余参数
参数类型必须要匹配
目标函数返回值类型必须与源函数返回值类型相同或为其子类型
// 函数兼容性
type Handler = (a: number, b: number) => void
// 高阶函数:直接返回handler
function hof(handler: Handler) {
  return handler
}

// 1.参数个数(固定参数)
let handler1 = (a: number) => {}
hof(handler1)
let handler2 = (a: number, b: number, c: number) => {}
// hof(handler2) // 参数是3个,目标函数是2个

// 可选参数和剩余参数
let a = (p1: number, p2: number) => {}
let b = (p1?: number, p2?: number) => {}
let c = (...args: number[]) => {}
a = b // 固定参数可以兼容 可选参数
a = c // 固定参数可以兼容 剩余参数
// strictFunctionTypes: false
// b = a // 可选参数不兼容 固定参数
// b = c // 可选参数不兼容 剩余参数
c = a // 剩余参数可以兼容 固定参数
c = b // 剩余参数可以兼容 可选参数

// 2.参数类型
let handler3 = (a: string) => {}
// hof(handler3)

// 3.返回值类型
let f = () => ({
  name: 'Alice',
})
let g = () => ({
  name: 'Alice',
  location: 'BeiJing',
})
f = g
// g = f // f返回值类型是g类型的子类型

function overload(a: number, b: number): number
function overload(a: string, b: string): string
function overload(a: any, b: any): any {}
2
3
4
5
6
7
8
9
10
11
12
13
14
15
16
17
18
19
20
21
22
23
24
25
26
27
28
29
30
31
32
33
34
35
36
37
38
39
40
41
42
43
枚举、类、泛型的兼容性:
- 枚举和 number 是完全兼容的,枚举之间是完全不兼容的
- 在比较两个类是否兼容时,静态成员和构造函数是不参与比较的 如果两个类具有相同的实例成员,实例就可以完全相互兼容 如果两个类中有私有成员,两个类就不兼容了 父类和子类的实例是可以相互兼容的
- 如果泛型接口内没有任何成员是兼容的,如果有成员是不兼容的 如果泛型函数定义相同,没有指定泛型参数是相互兼容的
// 枚举兼容性
enum Fruit {
  Apple,
  Banana,
}
enum Color {
  Red,
  Yellow,
}
let fruit: Fruit.Apple = 3
let no: number = Fruit.Apple
// let color: Color.Red = Fruit.Apple // 枚举之间完全不兼容

// 类兼容性(和接口相似只比较结构)
class A {
  constructor(p: number, q: number) {}
  id: number = 1
  private name: string = ''
}
class B {
  static s = 1
  constructor(p: number) {}
  id: number = 2
  private name: string = ''
}
let aa = new A(1, 2)
let bb = new B(1)
// aa = bb // 构造函数和静态成员是不做比较的在没加private之前
// bb = aa
class C extends A {}
let cc = new C(1, 2)
aa = cc // 父类和子类相互兼容
cc = aa

// 泛型兼容性 只有类型接口T在使用时才会影响接口兼容性
interface Empty<T> {
  value: T
}
// let obj1: Empty<number> = {}
// let obj2: Empty<string> = {}
// obj1 = obj2
// obj2 = obj1

// 如果两个泛型函数定义相同但没有指定类型参数也是相互兼容的
let log1 = <T>(x: T): T => {
  return x
}
let log2 = <U>(y: U): U => {
  return y
}
log1 = log2
2
3
4
5
6
7
8
9
10
11
12
13
14
15
16
17
18
19
20
21
22
23
24
25
26
27
28
29
30
31
32
33
34
35
36
37
38
39
40
41
42
43
44
45
46
47
48
49
50
51
当一个类型 Y 可以被赋值给另一个类型 X 时,我们就可以说类型 X 兼容类型 Y X 兼容 Y: X(目标类型) = Y(源类型)
口诀:
- 结构之间兼容:成员少的兼容成员多的 (接口)
- 函数之间兼容:参数多的兼容参数少的
# 类型保护
TypeScript 能够在特定的区块中保证变量属于某种确定的类型。可以在这个区块中放心地引用次类型的属性,或者调用此类型的方法
- instanceof 判断实例是否属于某个类
- in 判断一个属性是否属于某个对象
- typeof 判断基本类型
- 创建类型保护函数判断类型(参数是联合类型,函数值是 参数 is xxx【类行为词】)
enum Type {
  Strong,
  Week,
}

class Java {
  helloJava() {
    console.log('Hello Java')
  }
  java: any
}

class JavaScript {
  helloJavaScript() {
    console.log('Hello JavaScript')
  }
  javascript: any
}

// 类型保护函数
function isJava(lang: Java | JavaScript): lang is Java {
  return (lang as Java).helloJava !== undefined
}
function getLanguage(type: Type, x: string | number) {
  let lang = type === Type.Strong ? new Java() : new JavaScript()
  // 加类型断言,但是可读性差
  /* if ((lang as Java).helloJava) {
    ;(lang as Java).helloJava()
  } else {
    ;(lang as JavaScript).helloJavaScript()
  } */

  // 1.instanceof 判断所属类
  /* if (lang instanceof Java) {
    lang.helloJava()
  } else {
    lang.helloJavaScript()
  } */

  // 2.in 判断是否属于某个对象
  /* if ('java' in lang) {
    lang.helloJava()
  } else {
    lang.helloJavaScript()
  } */

  // 3.typeof 类型保护
  /* if (typeof x === 'string') {
    x.length
  } else {
    x.toFixed(2)
  } */

  // 4. 函数判断
  if (isJava(lang)) {
    lang.helloJava()
  } else {
    lang.helloJavaScript()
  }

  return lang
}
getLanguage(Type.Strong)
2
3
4
5
6
7
8
9
10
11
12
13
14
15
16
17
18
19
20
21
22
23
24
25
26
27
28
29
30
31
32
33
34
35
36
37
38
39
40
41
42
43
44
45
46
47
48
49
50
51
52
53
54
55
56
57
58
59
60
61
62
63
# 高级类型
keyof 操作符可以用来获取某种类型的所有键,其返回类型是联合类型
interface Person {
  name: string
  age: number
  location: string
}

type K1 = keyof Person // "name" | "age" | "location"
type K2 = keyof Person[] // number | "length" | "push" | "concat" | ...
type K3 = keyof { [x: string]: Person } // string | number
2
3
4
5
6
7
8
9
# 交叉类型和联合类型
交叉类型适合对象的混入,联合类型可以使类型具有一定的不确定性
交叉类型:从名称看是可以访问所有类成员的交集,但实际只能访问所有类成员的并集(&)
联合类型:从名称看是可以访问所有类成员的并集,但实际只能访问所有类成员的交集 (|)
// 接口交叉类型
interface DogInterface {
  run(): void
}
interface CatInterface {
  jump(): void
}
let pet: DogInterface & CatInterface = {
  run() {},
  jump() {},
}

// 数字字符串联合类型
let a: number | string = 'a'
let b: 'a' | 'b' | 'c'
let c: 1 | 2 | 3

// 只能访问所有类成员的交集
class Dog implements DogInterface {
  run() {}
  eat() {}
}
class Cat implements CatInterface {
  jump() {}
  eat() {}
}
enum Master {
  Boy,
  Girl,
}
function getPet(master: Master) {
  // pet推断为 Dog|Cat 联合类型,在类型未被确定时只能访问类的共有成员
  let pet = master === Master.Boy ? new Dog() : new Cat()
  pet.eat()
  pet.run() // 只有Dog有,是不能访问
  return pet
}
2
3
4
5
6
7
8
9
10
11
12
13
14
15
16
17
18
19
20
21
22
23
24
25
26
27
28
29
30
31
32
33
34
35
36
37
可区分的联合类型(结合联合类型和字面量类型的一种类型保护方法)
核心思想:一个类型如果是多个类型的联合类型,并且每个类型之间有一个公共的属性,那么就可以凭借这个公共属性创建类型保护区块
interface Square {
  kind: 'square'
  size: number
}
interface Rectangle {
  kind: 'rectangle'
  width: number
  height: number
}
interface Circle {
  kind: 'circle'
  r: number
}
type Shape = Square | Rectangle | Circle // 类型别名
// 方法1:让其返回值为number(过滤undefined)
// function area(s: Shape): number {
function area(s: Shape) {
  // 通过类型中的公有属性创建不同的类型保护区块
  switch (s.kind) {
    case 'square':
      return s.size * s.size
    case 'rectangle':
      return s.height * s.width
    case 'circle':
      return Math.PI * s.r ** 2
    // 方法2:定义nerver类型,检测s是不是never类型,不过不是说明有遗漏
    default:
      return ((e: never) => {
        throw new Error(e)
      })(s)
  }
}
// 如果新增了一个Circle接口,打印面积不报报错
console.log(area({ kind: 'circle', r: 1 }))
2
3
4
5
6
7
8
9
10
11
12
13
14
15
16
17
18
19
20
21
22
23
24
25
26
27
28
29
30
31
32
33
34
# 索引类型
- 索引类型的查询操作符
keyof T:表示类型 T 的所有公共属性的字面量的联合类型 - 索引访问操作符
T[K]:表示对象 T 的属性 K 所代表的类型 - 泛型约束
T extends U:表示泛型变量通过继承某个类型获得某些属性
索引类型可以实现对对象属性的查询和访问,配合泛型约束能够建立对象、对象属性、属性值之间的约束关系
let obj = {
  a: 1,
  b: 2,
  c: 3,
}

function getValues<T, K extends keyof T>(obj: T, keys: K[]): T[K][] {
  return keys.map(key => obj[key])
}
console.log(getValues(obj, ['a', 'b'])) // [1, 2]
console.log(getValues(obj, ['c', 'd'])) // [3, undefined] 此时ts类型检查机制发挥作用

// keyof T
interface Obj {
  a: number
  b: number
}
let key: keyof Obj // key类型就是a和b字面量的联合类型
// T[K]
let value: Obj['a'] // value类型就是number类型
// T extends U
2
3
4
5
6
7
8
9
10
11
12
13
14
15
16
17
18
19
20
21
# 映射类型
通过映射类型可以从一个旧类型生成新类型,比如把一个类型中的所有属性变成只读
同态(只会作用于 Object)
- Readonly
- Partial
- Pick
非同态(会创建新属性)
- Record
映射类型本质:预先定义的泛型接口,通常会结合索引类型获取对象的属性和属性值从而将对象映射成想要的结构
interface Obj {
  a: string
  b: number
  c: boolean
}

// 只读
type ReadonlyObj = Readonly<Obj>
/*
type Readonly<T> = {
  readonly [P in keyof T]: T[P];
};
*/
// 可选
type PartialObj = Partial<Obj>
/*
type Partial<T> = {
  [P in keyof T]?: T[P];
};
*/
// T代表我们要抽取的对象 K要来自所有属性字面量的联合类型
type PickObj = Pick<Obj, 'a' | 'b'>
/*
type Pick<T, K extends keyof T> = {
  [P in K]: T[P];
};
*/
// 属性的类型是已知的类型 x y
type RecordObj = Record<'x' | 'y', Obj>
/*
type Record<K extends keyof any, T> = {
  [P in K]: T;
};
*/
2
3
4
5
6
7
8
9
10
11
12
13
14
15
16
17
18
19
20
21
22
23
24
25
26
27
28
29
30
31
32
33
34
# 条件类型
条件类型是由条件表达式决定的类型
type TypeName<T> = T extends string
  ? 'string'
  : T extends number
  ? 'number'
  : T extends boolean
  ? 'boolean'
  : T extends undefined
  ? 'undefined'
  : T extends Function
  ? 'function'
  : 'object'

type T1 = TypeName<string>
type T2 = TypeName<string[]>

// (A | B) extends U ? X : Y
// (A extends U ? X : Y) | (B extends U ? X : Y)

type T3 = TypeName<string | string[]>
type Diff<T, U> = T extends U ? never : T
type T4 = Diff<'a' | 'b' | 'c', 'a' | 'e'>
// Diff<'a', 'a' | 'e'> Diff<'b', 'a' | 'e'> Diff<'c', 'a' | 'e'>
// never | 'b' | 'c'
// 'b' | 'c'

type NotNull<T> = Diff<T, undefined | null>
type T5 = NotNull<string | number | undefined | null>

// Exclude<T, U>
// NonNullable<T>
// Extract<T, U>
type T6 = Extract<'a' | 'b' | 'c', 'a' | 'e'>
// ReturnType<T>
type T7 = ReturnType<() => string>
/*
T 可以赋值给函数,函数有任意参数,返回值类型也是任意的,函数返回值是不确定的所以使用infer关键字(延迟推断)
type ReturnType<T extends (...args: any) => any> = T extends (...args: any) => infer R ? R : any;
*/
2
3
4
5
6
7
8
9
10
11
12
13
14
15
16
17
18
19
20
21
22
23
24
25
26
27
28
29
30
31
32
33
34
35
36
37
38
# 工程篇
# ES6和CommonJS的模块系统
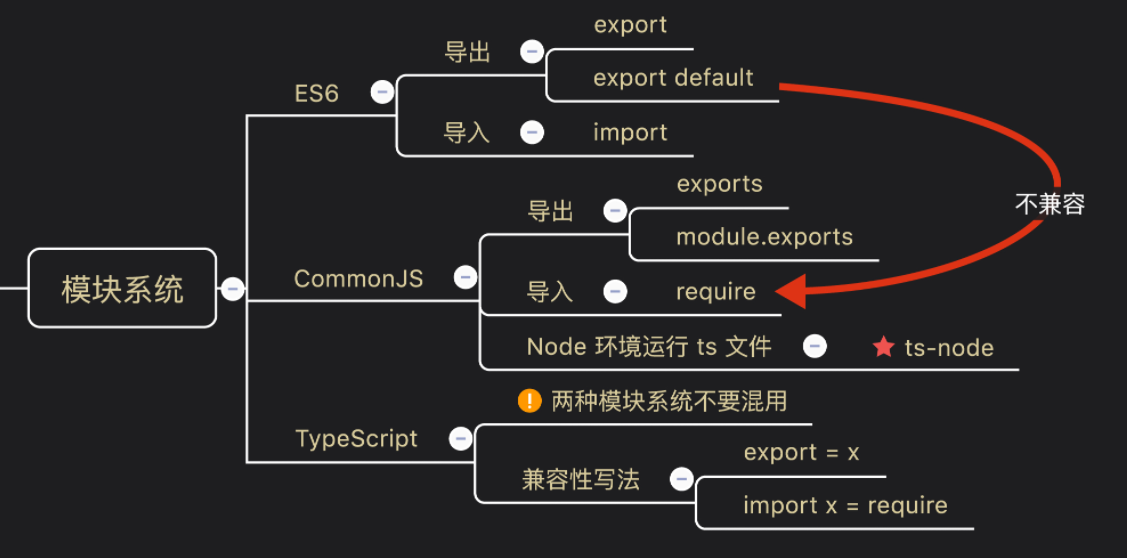
es6/a.ts
// 单独导出
export let a = 1

// 批量导出
let b = 2
let c = 3
export { b, c }

// 导出接口
export interface P {
    x: number;
    y: number;
}

// 导出函数
export function f() {}

// 导出时起别名
function g() {}
export { g as G }

// 默认导出,无需函数名
export default function () {
    console.log("I'm default")
}

// 引入外部模块,重新导出
export { str as hello } from './b'
2
3
4
5
6
7
8
9
10
11
12
13
14
15
16
17
18
19
20
21
22
23
24
25
26
27
28
es6/b.ts
// 导出常量
export const str = 'Hello'
2
es6/c.ts
import { a, b, c } from './a'; // 批量导入
import { P } from './a';       // 导入接口
import { f as F } from './a';  // 导入时起别名
import * as All from './a';    // 导入模块中的所有成员,绑定在 All 上
import myFunction from './a';  // 不加{},导入默认

console.log(a, b, c)

let p: P = {
    x: 1,
    y: 1
}

console.log(All)

myFunction()
2
3
4
5
6
7
8
9
10
11
12
13
14
15
16
es6/d.ts
export = function () {
    console.log("I'm default")
}
// export let a = 1
2
3
4
node/a.node.ts
let a = {
    x: 1,
    y: 2
}

// 整体导出
module.exports = a
2
3
4
5
6
7
node/b.node.ts
// exports === module.exports
// 导出多个变量
// 两个同时出现module.exports会覆盖exports
// module.exports = {}
exports.c = 3
exports.d = 4
2
3
4
5
6
node/c.node.ts
let c1 = require('./a.node')
let c2 = require('./b.node')
let c3 = require('../es6/a')
import c4 = require('../es6/d')

console.log(c1)
console.log(c2)
// c3()
// console.log(c3)
// c3.default()
c4()
2
3
4
5
6
7
8
9
10
11
# 命名空间
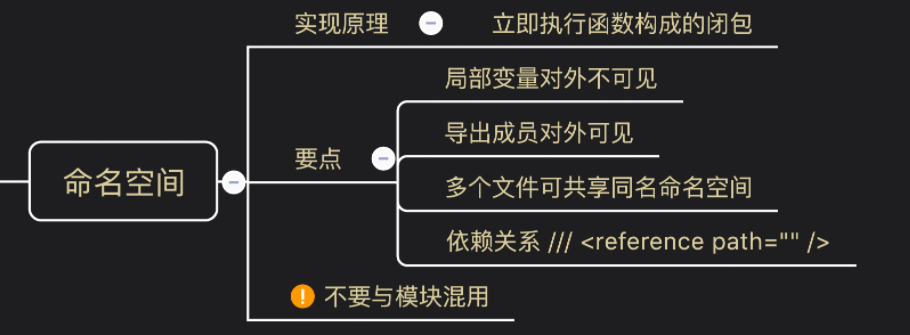
namespace Shape {
    const pi = Math.PI
    export function cricle(r: number) {
        return pi * r ** 2
    }
}
2
3
4
5
6
/// <reference path="a.ts" />
namespace Shape {
    export function square(x: number) {
        return x * x
    }
}

console.log(Shape.cricle(2))
console.log(Shape.square(2))

// 起一个别名
import cricle = Shape.cricle
console.log(cricle(2))
2
3
4
5
6
7
8
9
10
11
12
13
# 理解声明合并
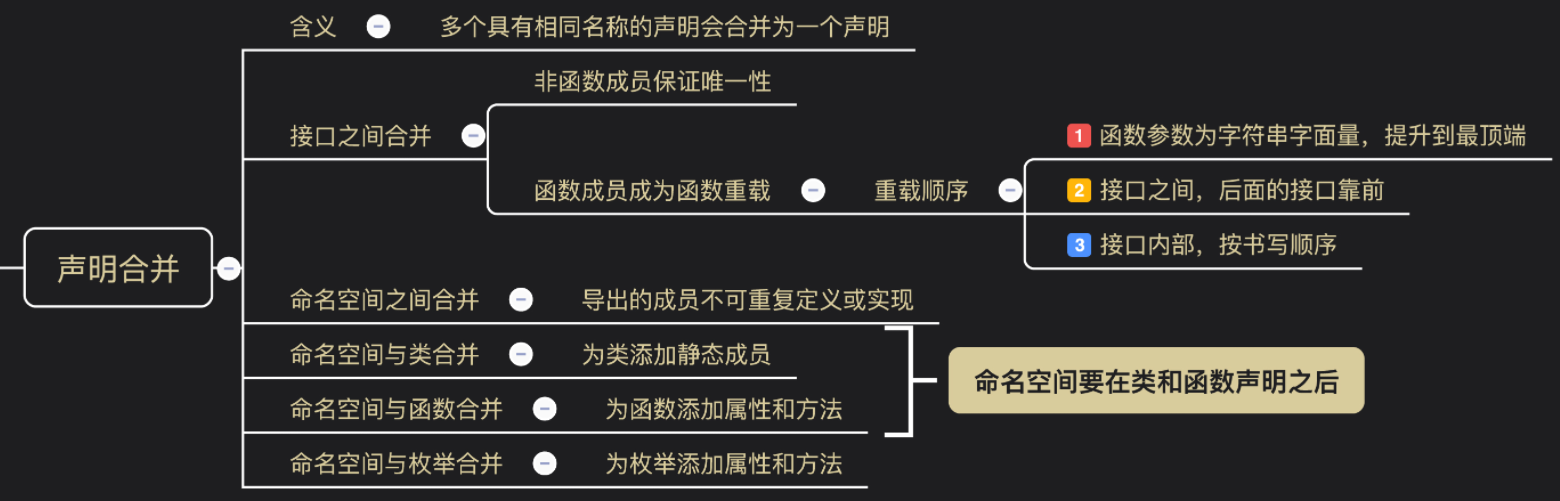
interface A {
    x: number;
    // y: string;
    foo(bar: number): number; // 5
    foo(bar: 'a'): string; // 2
}

interface A {
    y: number;
    foo(bar: string): string; // 3
    foo(bar: string[]): string[]; // 4
    foo(bar: 'b'): string; // 1
}

let a: A = {
    x: 1,
    y: 2,
    foo(bar: any) {
        return bar
    }
}

// 命名空间要放后面
class C {}
namespace C {
    export let state = 1
}
console.log(C.state)

function Lib() {}
namespace Lib {
    export let version = '1.0'
}
console.log(Lib.version)

enum Color {
    Red,
    Yellow,
    Blue
}
namespace Color {
    export function mix() {}
}
console.log(Color)
2
3
4
5
6
7
8
9
10
11
12
13
14
15
16
17
18
19
20
21
22
23
24
25
26
27
28
29
30
31
32
33
34
35
36
37
38
39
40
41
42
43
44
# 编写声明文件
关于 TypeScript 声明文件 (opens new window)
global-lib.js
function globalLib(options) {
    console.log(options);
}

globalLib.version = '1.0.0';

globalLib.doSomething = function() {
    console.log('globalLib do something');
};
2
3
4
5
6
7
8
9
声明文件
global-lib.d.ts
declare function globalLib(options: globalLib.Options): void;

declare namespace globalLib {
    const version: string;
    function doSomething(): void;
    interface Options {
        [key: string]: any
    }
}
2
3
4
5
6
7
8
9
module-lib.js
const version = '1.0.0';

function doSomething() {
    console.log('moduleLib do something');
}

function moduleLib(options) {
    console.log(options);
}

moduleLib.version = version;
moduleLib.doSomething = doSomething;

module.exports = moduleLib;
2
3
4
5
6
7
8
9
10
11
12
13
14
module-lib.d.ts
declare function moduleLib(options: Options): void

interface Options {
    [key: string]: any
}

declare namespace moduleLib {
    const version: string
    function doSomething(): void
}

export = moduleLib
2
3
4
5
6
7
8
9
10
11
12
umd-lib.js
(function (root, factory) {
    if (typeof define === "function" && define.amd) {
        define(factory);
    } else if (typeof module === "object" && module.exports) {
        module.exports = factory();
    } else {
        root.umdLib = factory();
    }
}(this, function() {
    return {
        version: '1.0.0',
        doSomething() {
            console.log('umdLib do something');
        }
    }
}));
2
3
4
5
6
7
8
9
10
11
12
13
14
15
16
umd-lib.d.ts
declare namespace umdLib {
    const version: string
    function doSomething(): void
}

export as namespace umdLib

export = umdLib
2
3
4
5
6
7
8
在ts中引用js文件,需要有声明文件
import $ from 'jquery'

$('.app').css('color', 'red')

globalLib({x: 1})
globalLib.doSomething()

import moduleLib from './module-lib'
moduleLib({y: 2})
moduleLib.doSomething()

import umdLib from './umd-lib'
umdLib.doSomething()

// 模块插件
// 为插件添加自定义的方法
import m from 'moment';
declare module 'moment' {
    export function myFunction(): void;
}
m.myFunction = () => {}

// 全局插件
declare global {
    namespace globalLib {
        function doAnyting(): void
    }
}
globalLib.doAnyting = () => {}
2
3
4
5
6
7
8
9
10
11
12
13
14
15
16
17
18
19
20
21
22
23
24
25
26
27
28
29
在 TypeScript 文件中引入外部 JavaScript 包时,通常需要类型声明文件(.d.ts 文件),以便 TypeScript 可以理解包的类型信息并执行类型检查。这对于 TypeScript 能够正确推断和验证代码非常重要,特别是当你引入的包是非 TypeScript 编写的 JavaScript 代码时。
有几种方式来处理这个问题:
https://www.typescriptlang.org/dt/search
使用已有的声明文件: 许多常见的 JavaScript 包都有相应的 TypeScript 声明文件可供使用。你可以在 DefinitelyTyped(https://definitelytyped.org/)上查找或使用包管理器(如 npm)安装这些声明文件。例如,如果你想在 TypeScript 中使用
axios这个 JavaScript 包,你可以运行以下命令来安装相关的声明文件:npm install @types/axios1这将安装
axios包的类型声明文件,使你能够在 TypeScript 文件中使用axios时获得类型提示和类型检查。自己编写声明文件: 如果你的项目中使用了自定义的或不常见的 JavaScript 包,可能需要编写自己的声明文件。声明文件是以
.d.ts扩展名结尾的文件,用来描述包的类型信息。你可以创建一个名为packageName.d.ts的文件,并在其中编写类型声明。例如,如果你有一个名为my-js-library的 JavaScript 包,你可以创建一个my-js-library.d.ts文件并在其中定义模块、类、函数等的类型信息。使用
any类型: 如果你不想或不能编写声明文件,还可以在 TypeScript 文件中将外部包的导入声明为any类型。这样做会禁用类型检查,但可以让你在不引发编译错误的情况下使用这些包。不过,这不是一个推荐的做法,因为失去了 TypeScript 提供的类型检查和类型安全性的好处。
综上所述,最佳做法是尽量使用已有的声明文件或编写自己的声明文件,以确保 TypeScript 能够正确地理解和检查外部 JavaScript 包的类型信息。这将有助于提高代码的可维护性和可靠性。
# 编译工具:从ts-loader到Babel
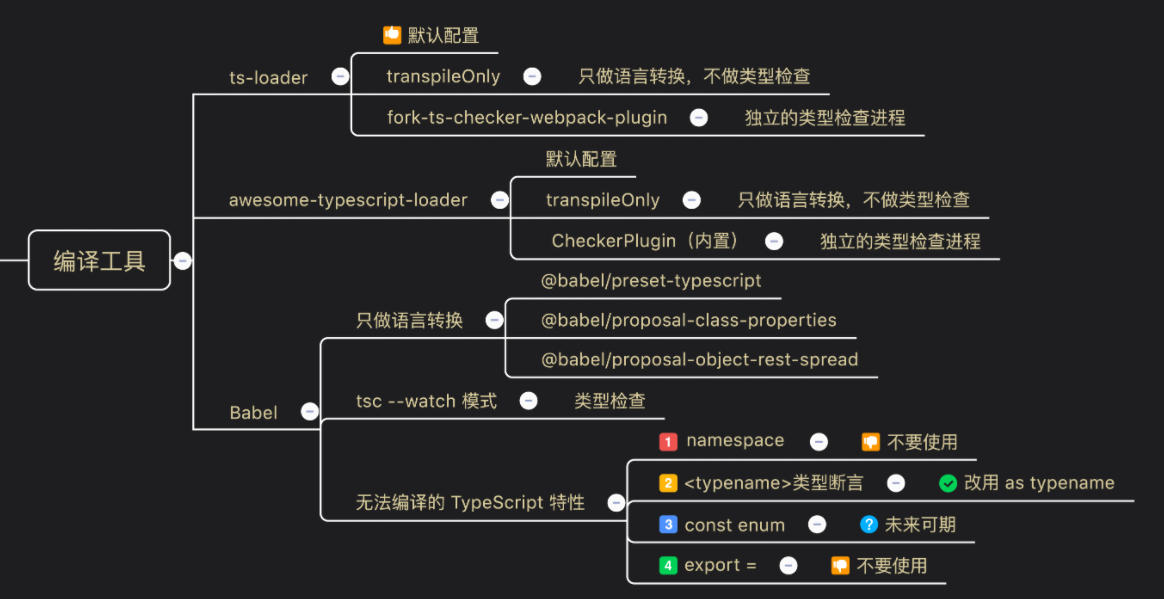
awesome-typescript-loader
与ts-loader的主要区别: 1)更适合与Babel集成,使用Babel的转义和缓存 2)不需要安装额外的插件,就可以把类型检查放在独立进程中进行
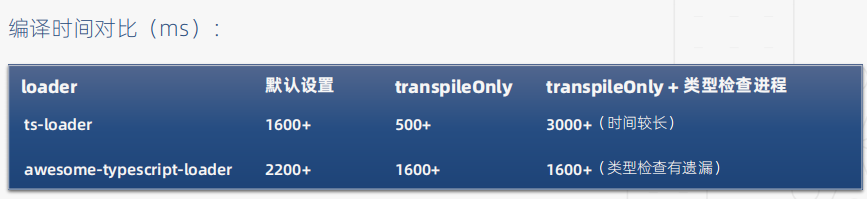
使用了TypeScript,为什么还需要 Babel?
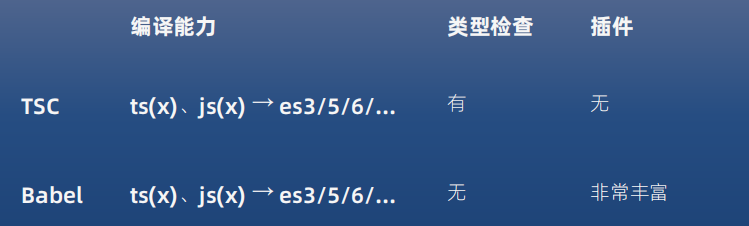
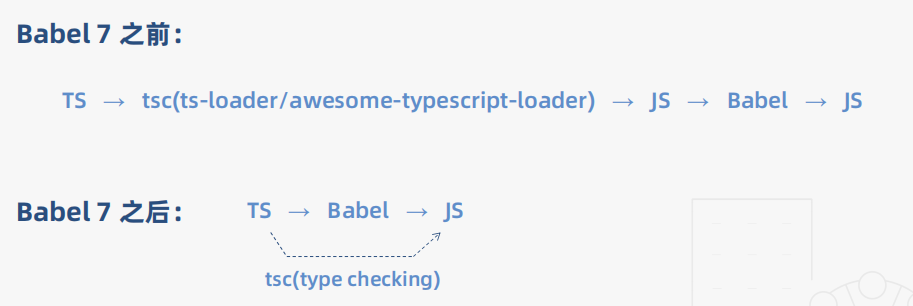
如何选择 TypeScript 编译工具?
1)如果没有使用过Babel,首选TypeScript自身的编译器(可配合ts-loader使用) 2)如果项目中已经使用了Babel,安装@bable/preset-typescript (可配合tsc做类型检查) 3)两种编译工具不要混用
# 代码检查工具∶从TSLint到ESLint

Typescript官方转向ESLint的原因:
- TSLint 执行规则的方式存在一些架构问题,从而影响了性能,而修复这些问题会破坏现有的规则;
- ESLint的性能更好,并且社区用户通常拥有ESLint的规则配置(比如针对React和Vue的规则),而不会拥有TSLint的规则配置。
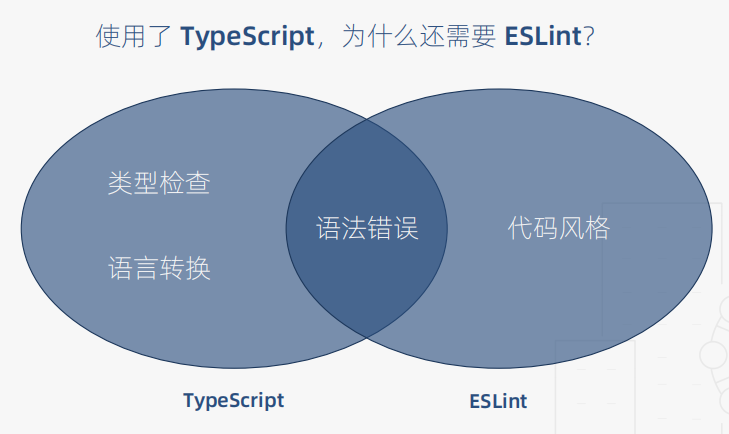
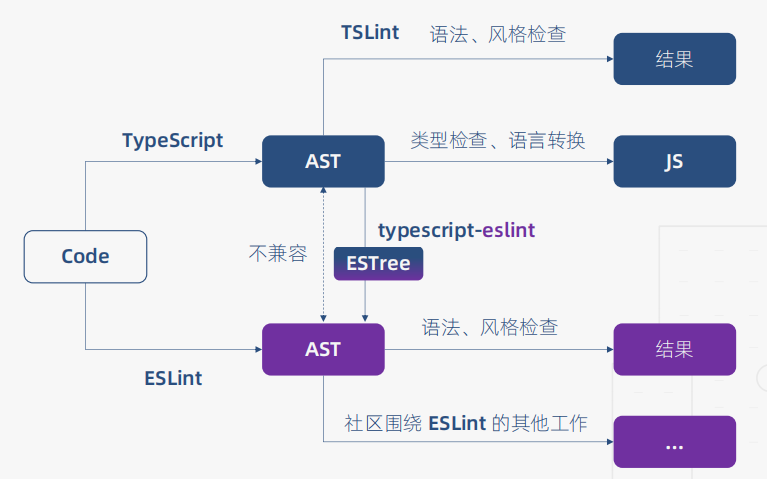
.eslintrc.json
{
  "parser": "@typescript-eslint/parser",
  "plugins": ["@typescript-eslint"],
  "parserOptions": {
      "project": "./tsconfig.json"
  },
  "extends": [
    "plugin:@typescript-eslint/recommended"
  ],
  "rules": {
    "@typescript-eslint/no-inferrable-types": "off"
  }
}
2
3
4
5
6
7
8
9
10
11
12
13
package.json
  "scripts": {
    "start": "webpack-dev-server --mode=development --config ./build/webpack.config.js",
    "build": "webpack --mode=production --config ./build/webpack.config.js",
    "lint": "eslint src --ext .js,.ts",
    "test": "jest"
  },
2
3
4
5
6
# babel-eslint 与 typescript-eslint
- babel-eslint:支持TypeScript没有的额外的语法检查,抛弃TypeScript,不支持类型检查
- typescript-eslint:基于TypeScript的 AST,支持创建基于类型信息的规则(tsconfig.json)
建议∶ 两者底层机制不一样,不要一起使用。 Babel体系建议使用babel-eslint,否则可以使用typescript-eslint。
# 使用Jest进行单元测试

npm install jest, ts-jest, @types/jest -D
jest.config.js
module.exports = {
  preset: 'ts-jest',
  testEnvironment: 'node',
};
2
3
4
test/math.test.ts
const math = require('../src/math');

test('add: 1 + 2 = 3', () => {
    expect(math.add(1, 2)).toBe(3);
});

test('sub: 1 - 2 = -1', () => {
    expect(math.sub(1, 2)).toBe(-1);
});

// let x: number = '1'
2
3
4
5
6
7
8
9
10
11
# TypeScript 工具体系
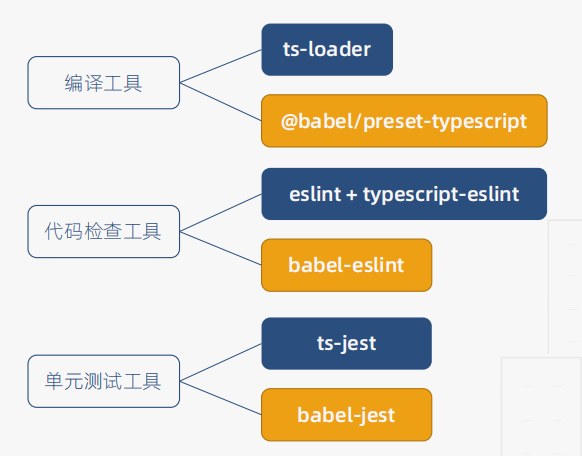
# 实战篇
学完react要来学其中的一部分
# 搭建Vue开发环境
搭建步骤参考基础篇的搭建环境
当然采用vue-cli来搭建环境就不需要配置这么多了
安装
npm i webpack webpack-cli webpack-dev-server -D
npm i webpack-merge -D # 把两个webpack配置项合并
npm i ts-loader typescript -D
npm i html-webpack-plugin -D
npm i clean-webpack-plugin -D
npm i vue@2
npm i -D vue-loader@15 vue-template-compiler css-loader
2
3
4
5
6
7
ERROR in ./src/components/Hello.vue Module build failed (from ./node_modules/vue-loader/dist/index.js): TypeError: Cannot read properties of undefined (reading 'styles') at Object.loader (D:@面试\前端\TypeScript\TypeScript\ts-vue\node_modules\vue-loader\dist\index.js:95:34) @ ./src/index.ts 7:36-69
vue-loader最新的是17的和vue2.7.14匹配有问题会报错
package.json
{
  "name": "ts-vue",
  "version": "1.0.0",
  "description": "",
  "main": "./src/index.ts",
  "scripts": {
    "start": "webpack-dev-server --mode=development --config ./build/webpack.config.js",
    "build": "webpack --mode=production --config ./build/webpack.config.js"
  },
  "keywords": [],
  "author": "",
  "license": "ISC",
  "devDependencies": {
    "clean-webpack-plugin": "^4.0.0",
    "css-loader": "^6.8.1",
    "html-webpack-plugin": "^5.5.3",
    "ts-loader": "^9.4.4",
    "typescript": "^5.2.2",
    "vue-loader": "^15.10.2",
    "vue-template-compiler": "^2.7.14",
    "webpack": "^5.88.2",
    "webpack-cli": "^5.1.4",
    "webpack-dev-server": "^4.15.1",
    "webpack-merge": "^5.9.0"
  },
  "dependencies": {
    "vue": "^2.7.14"
  }
}
2
3
4
5
6
7
8
9
10
11
12
13
14
15
16
17
18
19
20
21
22
23
24
25
26
27
28
29
build/webpack.base.config.js
const HtmlWebpackPlugin = require('html-webpack-plugin')
const { VueLoaderPlugin } = require("vue-loader");

module.exports = {
    entry: {
        app: './src/index.ts'
    },
    output: {
        filename: '[name].[chunkhash:8].js'
    },
    resolve: {
        extensions: ['.js', '.ts', '.tsx', '.vue'],
        alias: {
            'vue': 'vue/dist/vue.esm.js'
        }
    },
    module: {
        rules: [
            {
                test: /\.vue$/,
                loader: 'vue-loader'
            },
            {
                test: /\.tsx?$/,
                use: [{
                    loader: 'ts-loader',
                    options: {
                        appendTsSuffixTo: [/\.vue$/]
                    }
                }],
                exclude: /node_modules/
            },
            {
                test: /\.css$/,
                use: [
                    'vue-style-loader',
                    'css-loader'
                ]
            }
        ],
    },
    plugins: [
        new HtmlWebpackPlugin({
            template: './src/index.html'
        }),
        new VueLoaderPlugin()
    ],
    optimization: {
        splitChunks: {
            chunks: 'all'
        }
    }
}
2
3
4
5
6
7
8
9
10
11
12
13
14
15
16
17
18
19
20
21
22
23
24
25
26
27
28
29
30
31
32
33
34
35
36
37
38
39
40
41
42
43
44
45
46
47
48
49
50
51
52
53
build/webpack.config.js
const { merge } = require("webpack-merge");
const baseConfig = require("./webpack.base.config");
const devConfig = require("./webpack.dev.config");
const proConfig = require("./webpack.pro.config");

module.exports = (env, argv) => {
  let config = argv.mode === "development" ? devConfig : proConfig;
  return merge(baseConfig, config);
};
2
3
4
5
6
7
8
9
build/webpack.dev.config.js
module.exports = {
    devtool: 'inline-source-map'
    // devtool: 'cheap-module-eval-source-map',
}
2
3
4
build/webpack.pro.config.js
const { CleanWebpackPlugin } = require('clean-webpack-plugin')

module.exports = {
  plugins: [new CleanWebpackPlugin()]
}
2
3
4
5
src/components/Hello.vue
<template>
    <h1>Hello {{ name }}</h1>
</template>

<script lang="ts">
import Vue from 'vue'
export default Vue.extend({
    data() {
        return {
            name: 'TypeScript'
        }
    }
})
</script>

<style scoped>
h1 {
    color: blue
}
</style>
2
3
4
5
6
7
8
9
10
11
12
13
14
15
16
17
18
19
20
src/index.html
<!DOCTYPE html>
<html lang="en">
<head>
    <meta charset="UTF-8">
    <meta name="viewport" content="width=device-width, initial-scale=1.0">
    <title>Document</title>
</head>
<body>
    <div id="app"></div>
</body>
</html>
2
3
4
5
6
7
8
9
10
11
src/index.ts
import Vue from "vue";
import Hello from "./components/Hello.vue"
// let app1 = new Vue({
//     el: '#app',
//     data: {
//         name: 'TypeScript'
//     },
//     template: `<h1>Hello {{ name }}</h1>`
// });

let app2 = new Vue({
    el: '#app',
    components: {
        Hello
    },
    template: `<Hello/>`
});
2
3
4
5
6
7
8
9
10
11
12
13
14
15
16
17
18
增加上声明文件
src/vue-shims.d.ts
vue-shims.d.ts文件是一个用于 TypeScript 项目中的声明文件,通常用于解决使用第三方库或框架时 TypeScript 类型检查的问题。在特定于 Vue.js 的情况下,vue-shims.d.ts文件用于告诉 TypeScript 如何处理.vue单文件组件,以便在开发过程中能够正确地进行类型检查。
declare module '*.vue' {
    import Vue from 'vue'
    export default Vue
  }
2
3
4
# 组件封装与发布
# 封装
相比于上一步,需要额外安装
npm install vue-class-component vue-property-decorator
npm install webpack-node-externals -D
2
build/webpack.base.config.js
const { VueLoaderPlugin } = require("vue-loader");

module.exports = {
    output: {
        filename: 'employee-query.js'
    },
    resolve: {
        extensions: ['.js', '.ts', '.tsx', '.vue'],
        alias: {
            'vue': 'vue/dist/vue.esm.js'
        }
    },
    module: {
        rules: [
            {
                test: /\.vue$/,
                loader: 'vue-loader'
            },
            {
                test: /\.tsx?$/,
                use: [{
                    loader: 'ts-loader',
                    options: {
                        appendTsSuffixTo: [/\.vue$/]
                    }
                }],
                exclude: /node_modules/
            },
            {
                test: /\.css$/,
                use: [
                    'vue-style-loader',
                    'css-loader'
                ]
            }
        ],
    },
    plugins: [
        new VueLoaderPlugin()
    ]
}
2
3
4
5
6
7
8
9
10
11
12
13
14
15
16
17
18
19
20
21
22
23
24
25
26
27
28
29
30
31
32
33
34
35
36
37
38
39
40
41
build/webpack.config.js
const { merge } = require("webpack-merge");
const baseConfig = require("./webpack.base.config");
const devConfig = require("./webpack.dev.config");
const proConfig = require("./webpack.pro.config");

module.exports = (env, argv) => {
  let config = argv.mode === "development" ? devConfig : proConfig;
  return merge(baseConfig, config);
};
2
3
4
5
6
7
8
9
build/webpack.dev.config.js
const HtmlWebpackPlugin = require('html-webpack-plugin')
module.exports = {
    entry: './src/index.ts',
    devtool: 'inline-source-map',
    plugins: [
        new HtmlWebpackPlugin({
            template: './src/index.html'
        })
    ]
}
2
3
4
5
6
7
8
9
10
build/webpack.pro.config.js
const { CleanWebpackPlugin } = require('clean-webpack-plugin')
const nodeExternals = require('webpack-node-externals');

module.exports = {
  entry: './src/main.ts',
  output: {
    libraryTarget: 'umd',
    library: 'EmployeeQuery'
  },
  externals: [nodeExternals()],
  plugins: [
    new CleanWebpackPlugin()
  ]
}
2
3
4
5
6
7
8
9
10
11
12
13
14
src/components/EmployeeQuery.vue
<template>
    <div class="employee-query">
        <input placeholder="姓名" v-model.trim="tempName" />
        <select v-model.number="tempSelected">
            <option value="0">部门</option>
            <option
                v-for="option in department"
                :value="option.departmentId"
                :key="option.departmentId"
            >
                {{ option.department }}
            </option>
        </select>
        <button @click="query">查询</button>
    </div>
</template>

<script>
import Vue from 'vue';

export default Vue.extend({
    props: {
        name: {
            type: String,
            default: '',
        },
        selected: {
            type: Number,
            default: 0,
        },
        department: {
            type: Array,
            default: () => [],
        },
    },
    data() {
        return {
            tempName: this.name,
            tempSelected: this.selected,
        };
    },
    methods: {
        query() {
            this.$emit('query', {
                name: this.tempName,
                departmentId: this.tempSelected,
            });
        },
    },
});
</script>

<style scoped>
.employee-query {
    display: flex
}
input, select {
    margin-right: 10px
}
</style>
2
3
4
5
6
7
8
9
10
11
12
13
14
15
16
17
18
19
20
21
22
23
24
25
26
27
28
29
30
31
32
33
34
35
36
37
38
39
40
41
42
43
44
45
46
47
48
49
50
51
52
53
54
55
56
57
58
59
60
src/index.html
<!DOCTYPE html>
<html lang="en">
<head>
    <meta charset="UTF-8">
    <meta name="viewport" content="width=device-width, initial-scale=1.0">
    <title>Document</title>
</head>
<body>
    <div id="app"></div>
</body>
</html>
2
3
4
5
6
7
8
9
10
11
src/index.ts (开发环境测试使用)
import Vue from "vue";
import EmployeeQuery from './components/EmployeeQuery.vue';

let app = new Vue({
    el: '#app',
    components: {
        EmployeeQuery
    },
    template: `<employee-query @query="getParam" :department="department" />`,
    data: {
        department: [
            { department: '技术部', departmentId: 1 },
            { department: '产品部', departmentId: 2 },
            { department: '市场部', departmentId: 3 },
            { department: '运营部', departmentId: 4 }
        ]
    },
    methods: {
        getParam: function(param: any) {
            console.log(param)
        }
    }
});
2
3
4
5
6
7
8
9
10
11
12
13
14
15
16
17
18
19
20
21
22
23
24
src/main.ts (生产环境)
import EmployeeQuery from './components/EmployeeQuery.vue';
export default EmployeeQuery;
2
vue-shims.d.ts
declare module '*.vue' {
  import Vue from 'vue';
  export default Vue
}
2
3
4
发布要用,并且要在package.json中配置
types/employee-query.d.ts
import Vue from 'vue';

declare class EmployeeQuery extends Vue {
    name: string
    selected: number
    department: { department: string, departmentId: number }[]
    query(): void
}

export as namespace EmployeeQuery

export = EmployeeQuery
2
3
4
5
6
7
8
9
10
11
12
package.json
{
  "name": "dep-ts-vue-component",
  "version": "1.0.0",
  "description": "",
  "main": "./dist/employee-query.js",
  "scripts": {
    "start": "webpack-dev-server --mode=development --config ./build/webpack.config.js",
    "build": "webpack --mode=production --config ./build/webpack.config.js"
  },
  "keywords": [],
  "author": "",
  "license": "ISC",
  "devDependencies": {
    "clean-webpack-plugin": "^4.0.0",
    "css-loader": "^6.8.1",
    "html-webpack-plugin": "^5.5.3",
    "ts-loader": "^9.4.4",
    "typescript": "^5.2.2",
    "vue-loader": "^15.10.2",
    "vue-template-compiler": "^2.7.14",
    "webpack": "^5.88.2",
    "webpack-cli": "^5.1.4",
    "webpack-dev-server": "^4.15.1",
    "webpack-merge": "^5.9.0",
    "webpack-node-externals": "^3.0.0"
  },
  "dependencies": {
    "vue": "^2.7.14",
    "vue-class-component": "^7.2.6",
    "vue-property-decorator": "^9.1.2"
  },
  "types": "./types/employee-query.d.ts"
}
2
3
4
5
6
7
8
9
10
11
12
13
14
15
16
17
18
19
20
21
22
23
24
25
26
27
28
29
30
31
32
33
# 发布
先登陆
npm login --registry https://registry.npmjs.org/
因为配置了淘宝的镜像源,所以这里就用临时登陆

发布
报错因为报名重复
npm publish --registry https://registry.npmjs.org/
测试是否可用,在ts-vue文件中进行测试
npm i dep-ts-vue-component
index.ts
import Vue from "vue";
import EmployeeQuery from 'dep-ts-vue-component';


let app = new Vue({
    el: '#app',
    components: {
        EmployeeQuery
    },
    template: `<employee-query @query="getParam" :department="department" />`,
    data: {
        department: [
            { department: '技术部', departmentId: 1 },
            { department: '产品部', departmentId: 2 },
            { department: '市场部', departmentId: 3 },
            { department: '运营部', departmentId: 4 }
        ]
    },
    methods: {
        getParam: function(param: any) {
            console.log(param)
        }
    }
});
2
3
4
5
6
7
8
9
10
11
12
13
14
15
16
17
18
19
20
21
22
23
24
运行后测试可以使用
