 React全家桶
# 初始化构建项目
安装create-react-app
npm i create-react-app -g 「mac需要加sudo」
# 新建项目
基于脚手架创建项目「项目名称需要符合npm包规范」
create-react-app xxx
|- node_modules  包含安装的模块
|- public  页面模板和IconLogo
    |- favicon.ico
    |- index.html
|- src  我们编写的程序
    |- index.jsx  程序入口「jsx后缀名可以让文件支持jsx语法」
|- package.json
|- ...
2
3
4
5
6
7
8
package.json
{
...
"dependencies": {
...
"react": "^18.2.0", //核心
"react-dom": "^18.2.0", //视图编译
"react-scripts": "5.0.1", //对打包命令的集成
"web-vitals": "^2.1.4" //性能检测工具
},
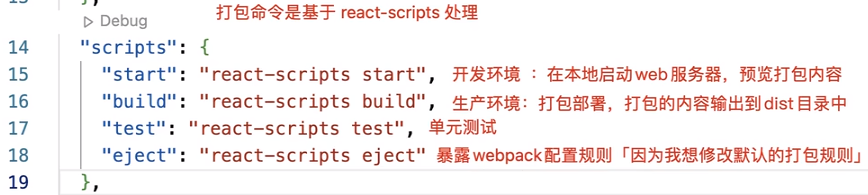
"scripts": {
"start": "react-scripts start", //开发环境启动web服务进行预览
"build": "react-scripts build", //生产环境打包部署
"test": "react-scripts test", //单元测试
"eject": "react-scripts eject" //暴露配置项
},
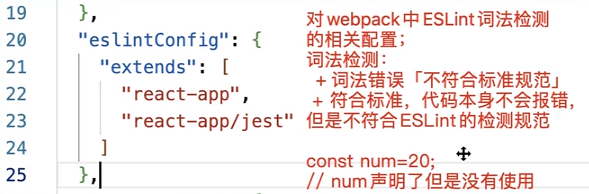
"eslintConfig": { //ESLint词法检测
"extends": [
"react-app",
"react-app/jest"
]
},
"browserslist": { //浏览器兼容列表
"production": [
">0.2%",
"not dead",
"not op_mini all"
],
"development": [
"last 1 chrome version",
"last 1 firefox version",
"last 1 safari version"
]
}
}
2
3
4
5
6
7
8
9
10
11
12
13
14
15
16
17
18
19
20
21
22
23
24
25
26
27
28
29
30
31
32
33
34

# 暴露配置项
npm run eject
该操作是不可逆的,一旦执行了就不能再恢复了

# 常见的配置修改
# 配置less
默认安装和配置的是sass,如果需要使用less,则需要:
安装
yarn add less less-loader@8
修改webpack.config.js
// 72~73
const lessRegex = /\.less$/;
const lessModuleRegex = /\.module\.less$/;

//507~545
{
  test: lessRegex,
  exclude: lessModuleRegex,
  use: getStyleLoaders(
    ...
    'less-loader'
  )
},
{
  test: lessModuleRegex,
  use: getStyleLoaders(
    ...
    'less-loader'
  ),
}
2
3
4
5
6
7
8
9
10
11
12
13
14
15
16
17
18
19
20
测试
src/index.less
@B: #ccc;

html, body {
  height: 100%;
  background-color: @B;
}
2
3
4
5
6
在index.js中引入
import React from 'react';
import ReactDOM from 'react-dom/client';
import "./index.less"

const root = ReactDOM.createRoot(document.getElementById('root'));
root.render(
  <div>
    首页
  </div>
);
2
3
4
5
6
7
8
9
10
11

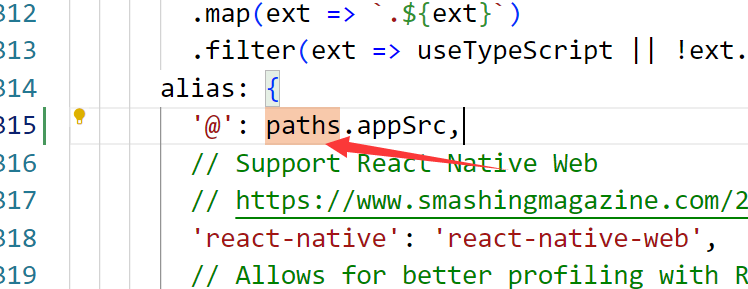
# 配置别名
config\webpack.config.js
//313
resolve: {
  ...
  alias: {
    '@': paths.appSrc,
    ...
  }
}
2
3
4
5
6
7
8
# 配置预览域名
scripts/start.js
// 47 - 48
const DEFAULT_PORT = parseInt(process.env.PORT, 10) || 8080;
const HOST = process.env.HOST || '127.0.0.1';
2
3
也可以基于 cross-env 设置环境变量
如果想基于环境变量来修改,需要安装下面的插件
npm install cross-env

  "scripts": {
    "start": "cross-env PORT=8000 HOST=0.0.0.0 node scripts/start.js",
    "build": "node scripts/build.js",
    "test": "node scripts/test.js"
  },
2
3
4
5
补充内容:
cross-env和dot-env
cross-env 和 dotenv 的使用 (opens new window)
cross-env和dotenv是两个在Node.js项目中常用的工具,它们分别用于处理环境变量的设置,但在功能和使用方式上有一些区别。
# cross-env
cross-env 是一个用于设置跨平台环境变量的工具。它的主要作用是确保在不同操作系统上,设置环境变量的语法是一致的。在使用 Node.js 脚本或 npm 脚本时,你可能会在不同的操作系统上面临一些语法差异,例如在 Windows 上使用 set 和在类 Unix 系统上使用 export。
cross-env 可以帮助你规遍这个问题,无论你在哪个平台上运行脚本,都可以使用相同的语法设置环境变量。它不仅可以用于设置 Node.js 环境变量,还可以用于设置其他类型的环境变量。
使用方法:
全局安装
cross-env:npm install -g cross-env1在 package.json 的脚本中使用
cross-env:{ "scripts": { "start": "cross-env NODE_ENV=development node server.js" } }1
2
3
4
5
# dotenv
dotenv 是一个用于从文件中加载环境变量的工具。它允许你将环境变量存储在一个名为 .env 的文件中,然后在应用程序中加载这些变量。这对于将敏感信息(如 API 密钥)从代码中分离出来,以及在不同环境中配置不同的变量非常有用。
使用方法:
安装
dotenv:npm install dotenv1在应用程序的入口文件(通常是你的主文件,如
app.js或index.js)的顶部加载dotenv:require('dotenv').config();1在项目根目录下创建一个名为
.env的文件,其中包含你的环境变量:NODE_ENV=development PORT=3000 API_KEY=your-api-key1
2
3在代码中可以直接使用
process.env来访问这些环境变量:const port = process.env.PORT || 3000; const apiKey = process.env.API_KEY;1
2
总体而言,cross-env 主要用于解决跨平台的环境变量设置问题,而 dotenv 用于从文件中加载环境变量,方便在不同环境中配置和管理。在实际项目中,你可能会同时使用这两个工具来更好地管理环境变量。
# 配置跨域代理
yarn add http-proxy-middleware
http-proxy-middleware:实现跨域代理的模块「webpack-dev-server的跨域代理原理,也是基于它完成的」
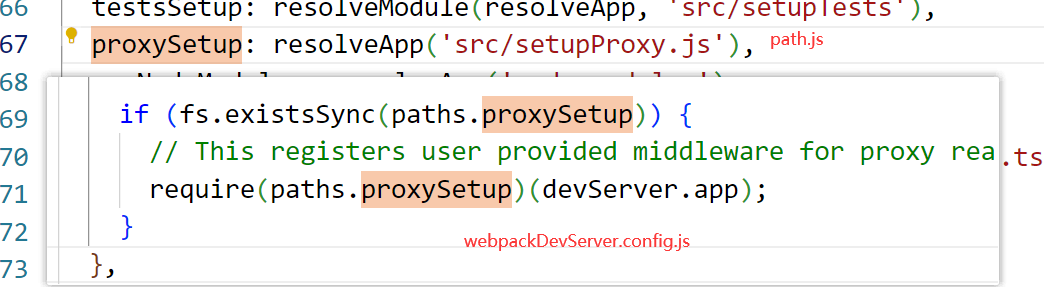
在src目录中,新建setupProxy.js

proxySetup: resolveApp('src/setupProxy.js'),
上述就是为什么要创建在src下创建setupProxy.js的原因
src\setupProxy.js
const { createProxyMiddleware } = require("http-proxy-middleware");

module.exports = function (app) {
  app.use(
      createProxyMiddleware("/api", {
          target: "http://127.0.0.1:7100",
          changeOrigin: true,
          ws: true,
          pathRewrite: { "^/api": "" }
      })
  );
  // 下面两个配置测试使用
  app.use(
    createProxyMiddleware("/jianshu", {
        target: "https://www.jianshu.com",
        changeOrigin: true,
        ws: true,
        pathRewrite: { "^/jianshu": "" }
    })
  );
  app.use(
    createProxyMiddleware("/zhihu", {
        target: "https://news-at.zhihu.com/api/4",
        changeOrigin: true,
        ws: true,
        pathRewrite: { "^/zhihu": "" }
    })
  );
};
2
3
4
5
6
7
8
9
10
11
12
13
14
15
16
17
18
19
20
21
22
23
24
25
26
27
28
29
src/index.js调用测试
//测试地址:
//https://www.jianshu.com/asimov/subscriptions/recommended_collections
//https://news-at.zhihu.com/api/4/news/latest
// 跨域测试
fetch("/jianshu/asimov/subscriptions/recommended_collections")
.then(res => res.json())
.then(data => console.log(data))

fetch("/zhihu/news/latest")
.then(res => res.json())
.then(data => console.log(data))
2
3
4
5
6
7
8

# 配置浏览器兼容
//package.json
//https://github.com/browserslist/browserslist
"browserslist": {
  "production": [
    ">0.2%",
    "not dead",
    "not op_mini all"
  ],
  "development": [
    "last 1 chrome version",
    "last 1 firefox version",
    "last 1 safari version"
  ]
}
2
3
4
5
6
7
8
9
10
11
12
13
14
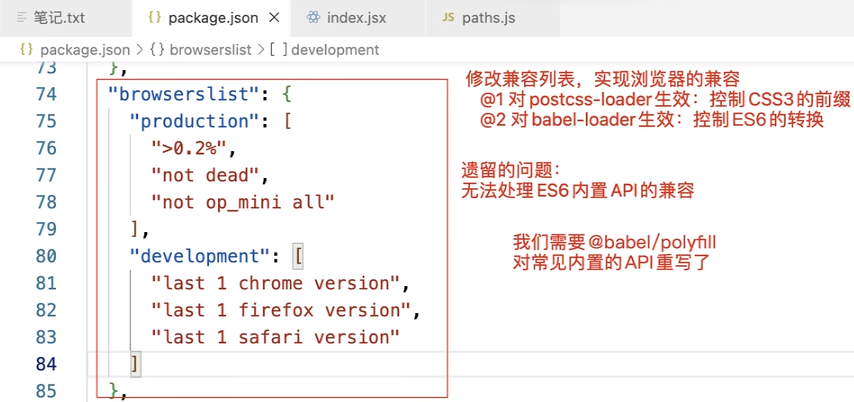
# CSS兼容处理:设置前缀
autoprefixer + postcss-loader + browserslist
# JS兼容处理:ES6语法转换为ES5语法
babel-loader + babel-preset-react-app(@babel/preset-env) + browserslist
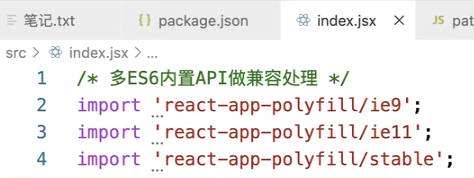
# JS兼容处理:内置API
正常情况下是使用
@babel/polyfill来处理内置API兼容性问题然后在入口中
import '@babel/polyfill'脚手架中不需要我们自己去安装:
react-app-polyfill「对@babel/polyfill的重写」
入口配置react-app-polyfill
src/index.js
// ES6内置API做兼容处理
import 'react-app-polyfill/ie9';
import 'react-app-polyfill/ie11';
import 'react-app-polyfill/stable';
2
3
4
# MVC模式和MVVM模式
# 操作DOM方式
  <span id="textBox">0</span><br>
  <button id="submit">累加</button>

  <script>
    //想操作谁,就先获取谁
    let textBox = document.querySelector('#textBox'),
    submit = document.querySelector('#submit');
    // 事件绑定
    let num = 0;
    submit.addEventListener('click' , function () {
      num++;
      textBox.innerHTML = num;
    });
  </script>
2
3
4
5
6
7
8
9
10
11
12
13
14
# React数据驱动格式
import React from 'react';
import ReactDOM from 'react-dom/client';
import "@/index.less"

const root = ReactDOM.createRoot(document.getElementById('root'));

class Count extends React.Component{
  state = {num: 0};
  render() {
    let { num } = this.state;
    return <>
      <span>{num}</span><br/>
      <button onClick={() => {
        num++;
        this.setState({
          num
        })
      }}>累加</button>
    </>
  }
}

root.render(
  <div>
    首页
    <Count/>
  </div>
);
2
3
4
5
6
7
8
9
10
11
12
13
14
15
16
17
18
19
20
21
22
23
24
25
26
27
28
# Dom思想和数据驱动思想
主流的思想:不在直接去操作DOM,而是改为“数据驱动思想”操作
# DOM思想
- 操作DOM比较消耗性能「主要原因就是︰可能会导致DOM重排(回流)/重绘J
- 操作起来也相对来讲麻烦一些
# 数据驱动思想
- 我们不会在直接操作DOM
- 我们去操作数据「当我们修改了数据,框架会按照相关的数据,让页面重新渲染」
- 框架底层实现视图的渲染,也是基于操作DOM完成的
- 构建了一套虚拟DOM->真实DOM的渲染体系
- 有效避免了DOM的重排/重绘
- 开发效率更高、最后的性能也相对较好
# MVC模式和MVVM模式
React框架采用的是MVC体系;
Vue框架采用的是NVVM体系:
# MVC

- model数据层
- view视图层
- controller控制层
- 我们需要按照专业的语法去构建视图〔页面): React中是基于jsx语法来构建视图的
- 构建数据层: 但凡在视图中,需要"动态"处理的(需要变化的,不论是样式还是内容),我们都要有对应的数据模型
- 控制层: 当我们在视图中(或者根据业务需求)进行某些操作的时候,都是去修改相关的数据,然后React枢架会按照最新的数据,重新渲染视图。以此让用户看到最新的效果!
数据驱动视图的渲染!!
视图中的表单内容改变,想要修改数据。需要开发者自己去写代码实观!!
“单向驱动”
# MVVM
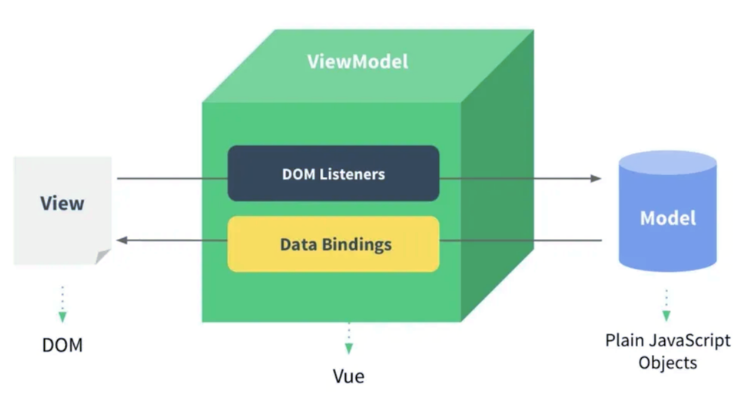
- model数据层
- view视图层
- viewModel数据/视图监听层
- 数据驱动视图的渲染: 监听数据的更新,让视图重新渲染
- 视图驱动数据的更改: 监听页面中表单元素内容改变。自动去修改相关的数据
双向驱动
# JSX
JSX:javascript and xml(html)
最外层只能有一个根元素节点
<></>fragment空标记,即能作为容器把一堆内容包裹起来,还不占层级结构动态绑定数据使用
{},大括号中存放的是JS表达式 => 可以直接放数组:把数组中的每一项都呈现出来
=> 一般情况下不能直接渲染对象
=> 但是如果是JSX的虚拟DOM对象,是直接可以渲染的
设置行内样式,必须是
style={{color:'red'...}};1 设置样式类名需要使用的是
classNameJSX中进行的判断一般都要基于三元运算符来完成
JSX中遍历数组中的每一项,动态绑定多个JSX元素,一般都是基于数组中的map来实现的
=>和vue一样,循环绑定的元素要设置key值(作用:用于DOM-DIFF差异化对比)
JSX语法具备过滤效果(过滤非法内容),有效防止XSS攻击(扩展思考:总结常见的XSS攻击和预防方案?)
在ReactDON.createRoot()的时候,不能直接把HTML/BODY做为根容器,需要指定一个额外的盒子「例如:#root
每一个构建的视图,只能有一个“根节点”
出现多个根节点则报错Adjacent Jsx elements must be wrapped in an enclosing tag.
React给我们提供了一个特殊的节点(标签): React.Fragment空文档标记标签
<></>既保证了可以只有一个根节点。又不新增一个HTML层级结构!!JS表达式
- 变量/值
{text}- 数学运算
{1+1} -> {2} {x+y}- 判断: 三元运算符
{1===1? 'OK':'NO'}- 循环:借助于数组的迭代方法处理[
map]表达式中不可以使用
if,else,for, for/in, for/of, while
# JSX基本使用
- number/string: 值是啥,就渲染出来啥
- boolean/null/undefined/Symbol/BigInt︰渲染的内容是空
- 除数组对象外,其余对象一般都不支持在
{}中进行渲染,但是也有特殊情况:- JSX虚拟DOM对象
- 给元素设置style行内样式,要求必须写成一个对象格式
- 数组对象:把数组的每一项都分别拿出来渲染「并不是变为字符串渲染,中间没有逗号」
- 函数对象:不支持在身中渲染,但是可以作为函数组件,用
<Component/>方式渲染!!
import React from 'react';
import ReactDOM from 'react-dom/client';

const root = ReactDOM.createRoot(document.getElementById('root'));
let text = "首页"
let num = 123
let flag = true
let a = null
let b = undefined
let c = Symbol("1")
let arr = [1,2,3]
let Fun = function() {}
root.render(
  <>
    <span>number/string: 值是啥,就渲染出来啥---{text}, {num}</span><br/>
    <span>boolean/null/undefined/Symbol/BigInt---{flag}, {a}, {b}, {c}</span><br/>
    <span>数组对象:把数组的每一项都分别拿出来渲染---{arr}</span><br/>
    <span>函数对象:不支持在身中渲染,但是可以作为函数组件---<Fun/></span><br/>
  </>
);
2
3
4
5
6
7
8
9
10
11
12
13
14
15
16
17
18
19
20
21
给元素设置样式
行内样式:需要基于对象的格式处理,直接写样式字符串会报错
设置样式类名: 需要把class替换为className
    <h2 className='abc' style={{
      color: 'red',
      fontSize: '24px' // 样式属性要用驼峰命名法
      }}>
      首页
    </h2>
2
3
4
5
6
# 判断元素的显示与隐藏
import React from 'react';
import ReactDOM from 'react-dom/client';

const root = ReactDOM.createRoot(document.getElementById('root'));
let flag = false
root.render(
  <>
    {/* 控制元素的display样式:不论显示还是隐藏,元素本身都渲染出来了 */}
    <button style={{
      display: flag ? 'block': 'none'
    }}>控制显示</button>
    <br/>
    {/* 控制元素渲染或者不渲染 */}
    {flag ? <button>控制显示</button> : null}
    <br/>
    {flag && <button>控制显示</button>}
  </>
);
2
3
4
5
6
7
8
9
10
11
12
13
14
15
16
17
18
# 数组循环创建元素
import React from 'react';
import ReactDOM from 'react-dom/client';
const root = ReactDOM.createRoot(document.getElementById('root'));
let arr = [
{
id: 1,
title: '1111111111111'
},
{
id: 2,
title: '222222222222'
},
{
id: 3,
title: '3333333333333333'
},
]
root.render(
<>
<ul>
{arr.map((item, index) => {
// 循环创建的元素一定设置key属性,属性值是本次循环中的“唯一值”「优化DOM-DIFF
return <li key={item.id}>
<em>{index}</em>:
<span>{item.title}</span>
</li>
})}
</ul>
<ol>
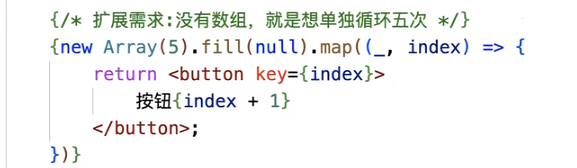
{/* 要用密集数组,而不能用稀疏数组 */}
{new Array(5).fill(null).map((_,index) => {
return <li key={index}>列表{index}</li>
})}
</ol>
</>
);
2
3
4
5
6
7
8
9
10
11
12
13
14
15
16
17
18
19
20
21
22
23
24
25
26
27
28
29
30
31
32
33
34
35
36
37

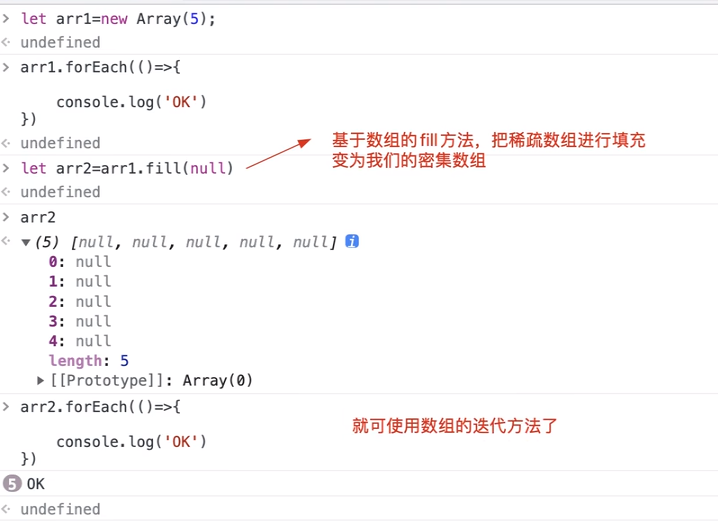
JavaScript中的稀疏数组与密集数组 (opens new window)
# JSX底层渲染机制

关于JSX底层处理机制
第一步:把我们编写的JSX语法,编译为虚拟DOM对象「virtualDoM」
虚揪DOM对象∶框架自己内部构建的一套对象体系(对象的相关成员都是React内部规定的),基于这些属性描述出,我们所构建视图中的,D节点的相关特征!!
基于
babel-preset-react-app把JSX编译为React.createElement(...)这种格式!! 只要是元素节点,必然会基于createElement进行处理!React.createElement(ele,props,. ..children)- ele: 元素标签名「或组件」
- props: 元素的属性集合(对象)「如果没有设置过任何的属性,则此值是null」
- children: 第三个及以后的参数,都是当前元素的子节点
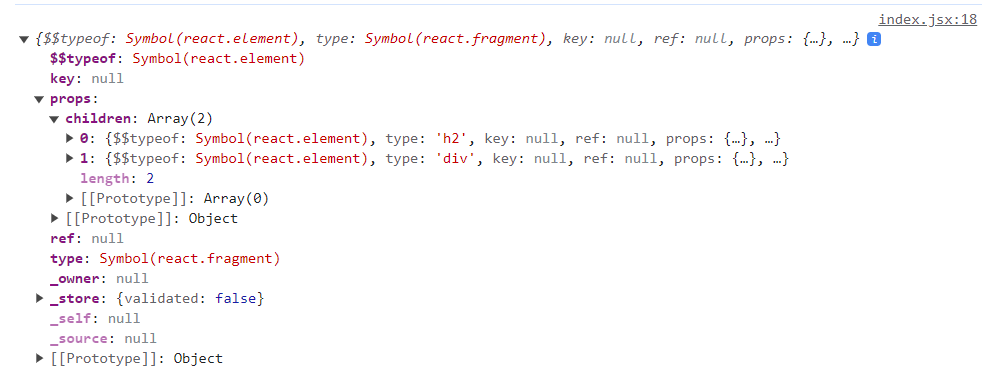
再把
createElement方法执行,创建出virtualDOM虚拟DOM对象「也有称之为:JSX元素、JSX对象、ReactChild对象...」virtualDOM = { $$typeof: Symbol( react.element), ref: null, key: null, type: 标签名「或组件」, // 存储了元素的相关属性&&子节点信息 props: { 元素的相关属性, children:子节点信息「没有子节点则没有这个属性、属性值可能是一个值、也可能是一个数组」 } }1
2
3
4
5
6
7
8
9
10
11
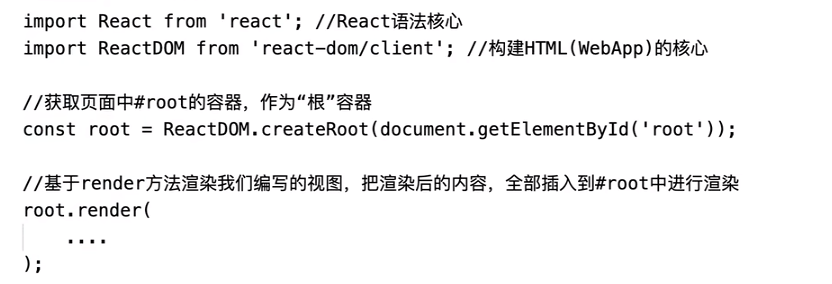
第二步:把构建的virtualDOM渲染为真实DOM
真实DOM: 浏览器页面中,最后渲染出来,让用户看见的DOM元素! !
// v16
ReactDOM.render(
    <>...</>,
	document.getElementById('root')
);
// v18
const root = ReactDOM.createRoot(document.getElementById('root'));
root.render(
	<>...</>
);
2
3
4
5
6
7
8
9
10
11
babel-preset-react-app
对原有@babel/preset-env的重写
目的:让其支持JSX语法的编译
补充说明∶第一次渲染页面是直接从virtualDOM->真实DOM;但是后期视图更新的时候,需要经过一个DOM-DIFF的对比,计算出补丁包PATCH:(两次视图差异的部分),把PATCH补丁包进行渲染!!
进入这个网站:https://babeljs.io/,选择react可以看到jsx编译后的代码
源代码
import React from 'react';
import ReactDOM from 'react-dom/client';

const root = ReactDOM.createRoot(document.getElementById('root'));
let styleObj = {
  color: 'red',
  fontSize: '18px'
}
root.render(
  <>
    <h2 className='abc' style={styleObj}>标题</h2>
    <div className='aaa'>
      <span>a</span>
      <span>b</span>
    </div>
  </>
);
2
3
4
5
6
7
8
9
10
11
12
13
14
15
16
17
编译后的代码
import React from 'react';
import ReactDOM from 'react-dom/client';
import { jsx as _jsx } from "react/jsx-runtime";
import { jsxs as _jsxs } from "react/jsx-runtime";
import { Fragment as _Fragment } from "react/jsx-runtime";
const root = ReactDOM.createRoot(document.getElementById('root'));
let styleObj = {
  color: 'red',
  fontSize: '18px'
};
root.render( /*#__PURE__*/_jsxs(_Fragment, {
  children: [/*#__PURE__*/_jsx("h2", {
    className: "abc",
    style: styleObj,
    children: "\u6807\u9898"
  }), /*#__PURE__*/_jsxs("div", {
    className: "aaa",
    children: [/*#__PURE__*/_jsx("span", {
      children: "a"
    }), /*#__PURE__*/_jsx("span", {
      children: "b"
    })]
  })]
}));
2
3
4
5
6
7
8
9
10
11
12
13
14
15
16
17
18
19
20
21
22
23
24

下图是视频中编译后的结果,与现在已经有点不太相同了。

console.log(
  React.createElement(
    React.Fragment,null,
    React.createElement(
      "h2",
      { className: "abc", style: styleObj },
      "标题"
    ),
    React.createElement(
      "div" ,
      { className: "aaa" },
      React.createElement("span", null, 'a'),
      React.createElement("span", null, 'b')
    )
  )
)
2
3
4
5
6
7
8
9
10
11
12
13
14
15
16
# 创建虚拟DOM
/**
 * 创建虚拟DOM对象
 * @param {*} ele 元素
 * @param {*} props 属性
 * @param  {...any} children 子节点
 */
export function createElement(ele, props, ...children) {
  let virtualDOM = {
    $$typeof: Symbol('react.element'),
    key: null,
    ref: null,
    type: null,
    props: {}
  };
  let len = children.length;
  virtualDOM.type = ele;
  if(props != null) {
    virtualDOM.props = {
      ...props
    }
  }
  if(len === 1) virtualDOM.props.children = children[0];
  if(len > 0) virtualDOM.props.children = children;
  return virtualDOM;
}
2
3
4
5
6
7
8
9
10
11
12
13
14
15
16
17
18
19
20
21
22
23
24
25
# 虚拟DOM渲染为真实DOM

封装一个对象迭代的方法
/*
封装一个对象迭代的方法
  + 基于传统的for/in循环,会存在一些弊端「性能较差(既可以迭代私有的,也可以迭代公有的);只能迭代“可枚举、非Symbol类型的”属性...」
  + 解决思路:获取对象所有的私有属性「私有的、不论是否可枚举、不论类型」
    + Object.getOwnPropertyNames(arr) -> 获取对象非Symbol类型的私有属性「无关是否可枚举」
    + Object.getOwnPropertySymbols(arr) -> 获取Symbol类型的私有属性
    获取所有的私有属性:
      let keys = Object.getOwnPropertyNames(arr).concat(Object.getOwnPropertySymbols(arr));
    可以基于ES6中的Reflect.ownKeys代替上述操作「弊端:不兼容IE」
      let keys = Reflect.ownKeys(arr);
*/
const each = function each(obj, callback) {
  if(obj == null || typeof obj !== "object") throw new TypeError("obj is not a object");
  if(typeof callback !== "function") throw new TypeError("callback is not a function");
  let keys = Reflect.ownKeys(obj);
  keys.forEach(key => {
    let value = obj[key];
    // 每一次迭代,都把回调函数执行
    callback(value, key);
  })
}
2
3
4
5
6
7
8
9
10
11
12
13
14
15
16
17
18
19
20
21
虚拟DOM渲染为真实DOM
/**
 * 虚拟DOM渲染为真实DOM
 * @param {*} virtualDOM
 * @param {*} container 容器
 */
export function render(virtualDOM, container) {
  let {type, props} = virtualDOM;
  if(typeof type === "string") {
    // 动态创建标签
    let element = document.createElement(type);
    each(props, (value, key) => {
      // className的处理:value存储的是样式类名
      if(key === 'className') {
        element.className = value;
        return;
      }
      // style的处理:value存储的是样式对象
      if(key === 'style') {
        let styleObj = value;
        each(styleObj, (val, attr) => {
          element.style[attr] = val;
        })
        return;
      }
      // 子节点的处理:value存储的children属性值
      if(key === 'children') {
        let children = value;
        if(!Array.isArray(children)) children = [children];
        children.forEach(child => {
          // 子节点是文本节点:直接插入即可
          if(/^(string|number)$/.test(typeof child)) {
            element.appendChild(document.createTextNode(child));
            return;
          }
          // 子节点又是一个virtualDOM:递归处理
          render(child, element);
        });
        return;
      }
      element.setAttribute(key, value);
    })
    // 把新增的标签,增加到指定容器中
    container.appendChild(element);
  }
}
2
3
4
5
6
7
8
9
10
11
12
13
14
15
16
17
18
19
20
21
22
23
24
25
26
27
28
29
30
31
32
33
34
35
36
37
38
39
40
41
42
43
44
45

使用
import { createElement, render } from './jsxHandle'

let styleObj = {
  color: 'red',
  fontSize: '18px'
}
let virtualDom =   createElement(
  "div",
  {className: "container"},
  createElement(
    "h2",
    { className: "abc", style: styleObj },
    "标题"
  ),
  createElement(
    "div" ,
    { className: "aaa" },
    createElement("span", null, 'a'),
    createElement("span", null, 'b')
  )
)
console.log(virtualDom)
render(virtualDom, document.getElementById("root"));
2
3
4
5
6
7
8
9
10
11
12
13
14
15
16
17
18
19
20
21
22
23
# 组件化开发
组件化开发的优势
- 利于团队协作开发
- 利于组件复用
- 利于SPA单页面应用开发
- ……
Vue中的组件化开发:
http://fivedodo.com/upload/html/vuejs3/guide/migration/functional-components.html
- 全局组件和局部组件
- 函数组件(functional)和类组件「Vue3不具备functional函数组件」
React中的组件化开发:
没有明确全局和局部的概念「可以理解为都是局部组件,不过可以把组件注册到React上,这样每个组件中只要导入React即可使用」
- 函数组件
- 类组件
- Hooks组件:在函数组件中使用React Hooks函数
# 函数组件
创建一个函数返回jsx元素
src\views\FunctionComponent.jsx
const FunComponent = function (props) {
  console.log("父传子数据", props)
  return <div>
    我是函数组件
  </div>;
}
export default FunComponent;
2
3
4
5
6
7
调用组件
src\index.jsx
import React from 'react';
import ReactDOM from 'react-dom/client';
import FunComponent from './views/FunctionComponent'

const root = ReactDOM.createRoot(document.getElementById('root'));

root.render(
  <>
    <FunComponent title="我是标题" x={10} y="10" data={[100,200]} className="box" style={{ fontSize: '20px'}}/>
    <FunComponent></FunComponent>
  </>
);
2
3
4
5
6
7
8
9
10
11
12
调用组件的时候,我们可以给调用的组件设置(传递)各种各样的属性
<DemoOne title="我是标题"x={10} data={[100,200]} className="box" style={{ fontSize: '20px'}}/>1如果设置的属性值不是字符串格式,需要基于{}“胡子语法"进行嵌套
# 渲染机制
基于babel-preset-react-app把调用的组件转换为createElement格式

import { jsx as _jsx } from "react/jsx-runtime";
/*#__PURE__*/_jsx(FunComponent, {
  title: "\u6211\u662F\u6807\u9898",
  x: 10,
  y: "10",
  data: [100, 200],
  className: "box",
  style: {
    fontSize: '20px'
  }
});
1
2
3
4
5
6
7
8
9
10
11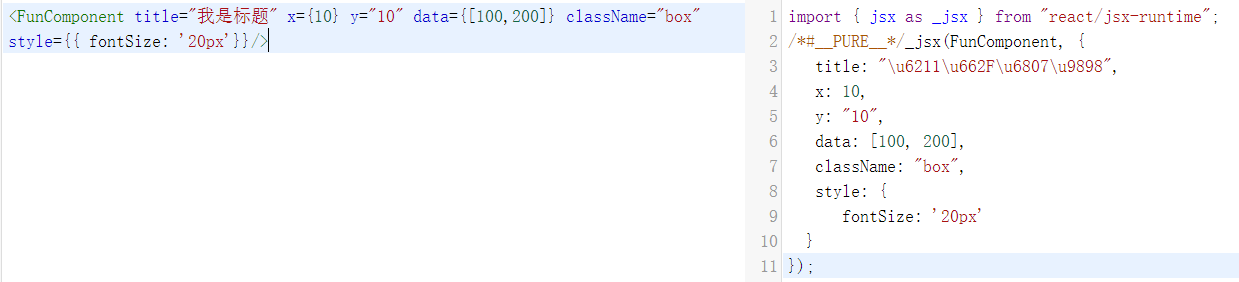
把createElement方法执行,创建出一个virtualDOM对象!!
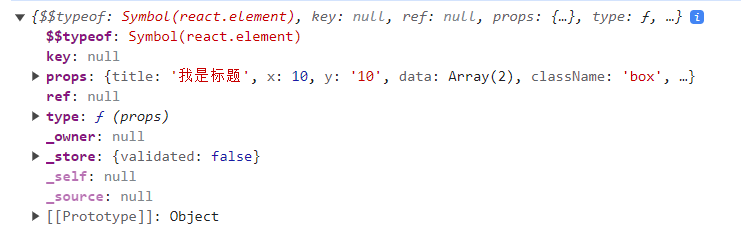
{
    "key": null,
    "ref": null,
    "props": {
        "title": "我是标题",
        "x": 10,
        "y": "10",
        "data": [
            100,
            200
        ],
        "className": "box",
        "style": {
            "fontSize": "20px"
        }
    },
    "_owner": null,
    "_store": {}
}
1
2
3
4
5
6
7
8
9
10
11
12
13
14
15
16
17
18
19基于root.render把virtualDOM变为真实的DOM
type值不再是一个字符串,而是一个函数了,此时:
- 把函数执行-> Demo0ne( )
- 把virtualDOM中的props,作为实参传递给函数-> DemoOne(props)
- 接收函数执行的返回结果「也就是当前组件的virtualDOM对象」
- 最后基于render把组件返回的虚拟DOM变为真实DOM,插入到#root容器中!!
# 扩展:对象规则设置
import React from 'react';
import ReactDOM from 'react-dom/client';
import FunComponent from './views/FunctionComponent'

const root = ReactDOM.createRoot(document.getElementById('root'));

root.render(
  <>
    <FunComponent title="我是标题" x={10} y="10" data={[100,200]} className="box" style={{ fontSize: '20px'}}/>
    <FunComponent></FunComponent>
  </>
);

// 对象规则
const obj = {x: 1, y: 2, z: 3};
// Object.freeze(obj)
// console.log(Object.isFrozen(obj)) // 判断一个对象是否被冻结
// 冻结后,不能新增,不能修改,不能删除,不能劫持
// obj.x = 1111;
// obj.a = 2222;
// delete obj.z;
// Object.defineProperty(obj, 'x', {
//   get() {},
//   set() {}
// })

// 密封对象
// Object.seal(obj);
// // 密封后,可以修改,不能新增,不能删除
// obj.x = 15; // 可修改
// obj.a = 2222; // 不能新增
// delete obj.z; // 不能删除
// Object.defineProperty(obj, 'x', { // 不可以被重新定义
//   get() {},
//   set() {}
// })

// 不可扩展
Object.preventExtensions(obj);
// 可修改,可删除,不可新增,不可以被重新定义
obj.x = 1111; // 可修改
// obj.a = 333;  // 不可新增
delete obj.y; // 可删除
Object.defineProperty(obj, 'x', { // 可以被重新定义
  get() {},
  set() {}
})

console.log(obj);
2
3
4
5
6
7
8
9
10
11
12
13
14
15
16
17
18
19
20
21
22
23
24
25
26
27
28
29
30
31
32
33
34
35
36
37
38
39
40
41
42
43
44
45
46
47
48
49
扫盲知识点:关于对象的规则设置
- 冻结
- 冻结对象:
0bject.freeze(obj) - 检测是否被冻结:
0bject.isFrozen(obj) =>true/false - 被冻结的对象︰不能修改成员值、不能新增成员、不能删除现有成员、不能给成员做劫持「Object.defineProperty
- 冻结对象:
- 密封
- 密封对象:
0bject.seal(obj) - 检测是否被密封:
0bject.isSealed(obj) - 被密封的对象∶可以修改成员的值,但也不能删、不能新增、不能劫持!!
- 密封对象:
- 扩展
- 把对象设置为不可扩展:
0bject.preventExtensions(obj) - 检测是否可扩展:
0bject.isExtensible(obj) - 被设置不可扩展的对象: 除了不能新增成员、其余的操作都可以处理!!
- 把对象设置为不可扩展:
被冻结的对象,即是不可扩展的,也是密封的! !同理,被密封的对象,也是不可扩展的! !'
# 属性props处理
调用组件,传递进来的属性是“只读"的「原理: props对象被冻结了」object.isFrozen(props) -> true
- 获取:props.xxX
- 修改:props.xxX=xxx=→>报错
作用:父组件(index.jsx)调用子组件(DemoOne. jsx)的时候,可以基于属性,把不同的信息传递给子组件;
子组件接收相应的属性值,呈现出不同的效果,让组件的复用性更强!!
# 规则校验
虽然对于传递进来的属性,我们不能直接修改,但是可以做一些规则校验
- 设置默认值
// 设置默认值
函数组件名称.defaultProps = {
  x: 1,
  y: 1,
  title: "默认标题"
}
2
3
4
5
6
设置其他规则
需要依赖于一个插件
prop-typesnpm install prop-types1使用说明:https://github.com/facebook/prop-types
import PropTypes from 'prop-types';
// 设置其他校验规则
函数组件名称.propTypes = {
  // 类型字符串,必传
  title: PropTypes.string.isRequired,
  // 类型是数字
  x: PropTypes.number,
  // 类型是字符串
  y: PropTypes.string,
  // 几种类型中的一种
  z: PropTypes.oneOfType([
    PropTypes.number,
    PropTypes.string
  ]),
  data: PropTypes.arrayOf(PropTypes.number)
}
1
2
3
4
5
6
7
8
9
10
11
12
13
14
15
16传递进来的属性,首先会经历规则的校验,不管校验成功还是失败,最后都会把属性给形参props,只不过如果不符合设定的规则,控制台会抛出警告错误[不影响属性值的获取]!!
如果就想把传递的属性值进行修改,我们可以:
- 把props中的某个属性赋值给其他内容「例如:变量、状态...J
- 我们不直接操作props.xxX=XXx,但是我们可以修改变量/状态值!!
// 可以通过这种方式实现对传过来的数据值的修改
`let z = props.z`
z = 123
# 属性children

  // 要对children的类型做处理
  // 可以基于React.Children对象中提供的方法,对props.children做处理:count\forEach\map\toArray...
  // 好处:在这些方法的内部,已经对children的各种形式做了处理
  children = React.Children.toArray(children);
  // if(!children) {
  //   children = []
  // } else if (!Array.isArray(children)) {
  //   children = [children]
  // }
2
3
4
5
6
7
8
9
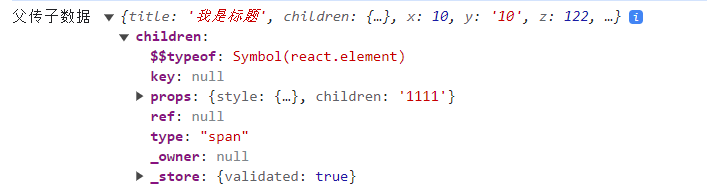
如果组件上面也传递了chidren属性,并且组件内部也传递了children,组件内部传递的数据会覆盖组件上面传递的
 <FunComponent title="我是标题" children={[100,200]} x={10} y="10" z={122} data={[100,200]} className="box" style={{ fontSize: '20px'}}>
   <span style={{color: "red"}}>1111</span>
 </FunComponent>
1
2
3
如果注释掉`<span style={{color: "red"}}>1111</span>`
,则children输出为`[100,200]`
1
2
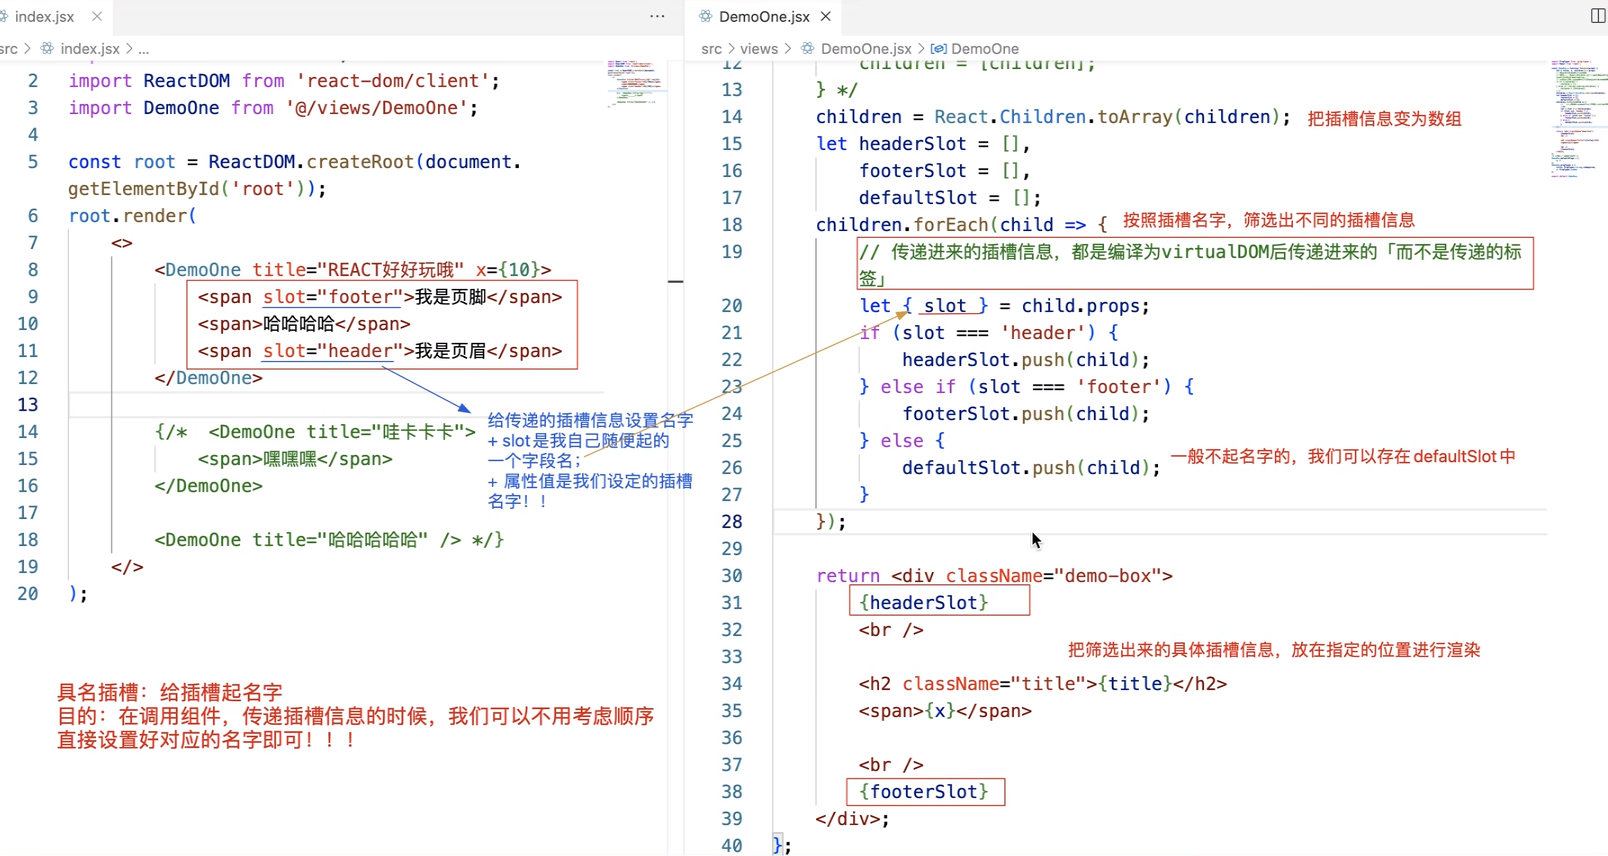
# 具名插槽
import React from 'react';

const SlotComponent = function (props) {
  let {children} = props;
  children = React.Children.toArray(children);
  let headerSlot = [],
  contentSlot = [],
  footerSlot = [];
  // headSlots = children.filter(item => item.props.slot === 'head'),
  // footSlots = children.filter(item => item.props.slot === 'foot');
  children.forEach(child => {
    // 传递进来的插槽信息,都是编译为virtualDOM后传递进来的「签」
    let {slot} = child.props;
    if(slot === 'header') {
      headerSlot.push(child)
    } else if (slot === 'content') {
      contentSlot.push(child);
    } else {
      footerSlot.push(child);
    }
  })
  return <div>
    {headerSlot}
    <hr/>
    {contentSlot}
    <br />
    {footerSlot}
  </div>;
}
export default SlotComponent;
2
3
4
5
6
7
8
9
10
11
12
13
14
15
16
17
18
19
20
21
22
23
24
25
26
27
28
29
30
调用
import React from 'react';
import ReactDOM from 'react-dom/client';
import SlotComponent from './views/SlotComponent';

const root = ReactDOM.createRoot(document.getElementById('root'));

root.render(
  <>
    {/* 具名插槽使用 */}
    <SlotComponent>
      <h2 slot="header">我是标题</h2>
      <p slot="footer">我是页脚</p>
      <div slot='content'>
        <div style={{width: 300, height: 300, border: '1px solid red'}}>
          我是内容区域
        </div>
      </div>
    </SlotComponent>
  </>
);
2
3
4
5
6
7
8
9
10
11
12
13
14
15
16
17
18
19
20
# 封装组件Dialog
Dialog.jsx
import React from 'react';
import Style from './css/styles.module.scss';
import PropTypes from 'prop-types'
const Dialog = function (props) {
  let {title, children} = props;
  children = React.Children.toArray(children);
  return <div className={Style.dialog_container}>
    <div className={Style.dialog_container_header}>
      <span>{title}</span>
      <span>x</span>
    </div>
    <div className={Style.dialog_container_content}>
      {children}
    </div>
    <div className={Style.dialog_container_footer}>
      <button>确定</button>
      <button>关闭</button>
    </div>
  </div>
}

Dialog.defaultProps = {
  title: '温馨提示'
}

Dialog.propTypes = {
  title: PropTypes.string
}

export default Dialog
2
3
4
5
6
7
8
9
10
11
12
13
14
15
16
17
18
19
20
21
22
23
24
25
26
27
28
29
30
src\views\css\styles.module.scss
.dialog_container {
  width: 300px;
  height: 300px;
  border: 1px solid #ccc;
  .dialog_container_header {
    height: 10%;
    display: flex;
    align-items: center;
    justify-content: space-between;
    padding: 0 5px;
    border-bottom: 1px solid #ccc;
    span:nth-child(2) {
      cursor: pointer;
    }
  }
  .dialog_container_content {
    height: 80%;
  }
  .dialog_container_footer {
    display: flex;
    align-items: center;
    justify-content: flex-end;
    height: 10%;
    border-top: 1px solid #eee;
    button {
      margin: 0 5px;
    }
  }
}
2
3
4
5
6
7
8
9
10
11
12
13
14
15
16
17
18
19
20
21
22
23
24
25
26
27
28
29

调用
import React from 'react';
import ReactDOM from 'react-dom/client';
import Dialog from './views/Dialog';

const root = ReactDOM.createRoot(document.getElementById('root'));

root.render(
  <>
    <Dialog title="提示框">
      <div style={{display: 'flex', justifyContent: 'center'}}>
        我是里面的内容
      </div>
    </Dialog>
  </>
);
2
3
4
5
6
7
8
9
10
11
12
13
14
15
# 静态组件
函数组件是静态组件
- 不具备状态、生命周期函数、ref等内容
- 第一次渲染完毕,除非父组件控制其重新渲染,否则内容不会再更新
- 优势:渲染速度快
- 弊端:静态组件,无法实现组件动态更新
/*
 函数组件是“静态组件”
   第一次渲染组件,把函数执行
     + 产生一个私有的上下文:EC(V)
     + 把解析出来的props「含children」传递进来「但是被冻结了」
     + 对函数返回的JSX元素「virtualDOM」进行渲染
   当我们点击按钮的时候,会把绑定的小函数执行:
     + 修改上级上下文EC(V)中的变量
     + 私有变量值发生了改变
     + 但是“视图不会更新”
   =>也就是,函数组件第一次渲染完毕后,组件中的内容,不会根据组件内的某些操作,再进行更新,所以称它为静态组件
   =>除非在父组件中,重新调用这个函数组件「可以传递不同的属性信息」

 真实项目中,有这样的需求:第一次渲染就不会再变化的,可以使用函数组件!!
 但是大部分需求,都需要在第一次渲染完毕后,基于组件内部的某些操作,让组件可以更新,以此呈现出不同的效果!!==> 动态组件「方法:类组件、Hooks组件(在函数组件中,使用Hooks函数)」
 */
 const Vote = function Vote(props) {
  let { title } = props;
  let supNum = 10,
      oppNum = 5;

  return <div className="vote-box">
      <div className="header">
          <h2 className="title">{title}</h2>
          <span>{supNum + oppNum}人</span>
      </div>
      <div className="main">
          <p>支持人数:{supNum}人</p>
          <p>反对人数:{oppNum}人</p>
      </div>
      <div className="footer">
          <button onClick={() => {
              supNum++;
              console.log(supNum);
          }}>支持</button>

          <button onClick={() => {
              oppNum++;
              console.log(oppNum);
          }}>反对</button>
      </div>
  </div>;
};
export default Vote;
2
3
4
5
6
7
8
9
10
11
12
13
14
15
16
17
18
19
20
21
22
23
24
25
26
27
28
29
30
31
32
33
34
35
36
37
38
39
40
41
42
43
44
# 类组件
# 类相关知识点
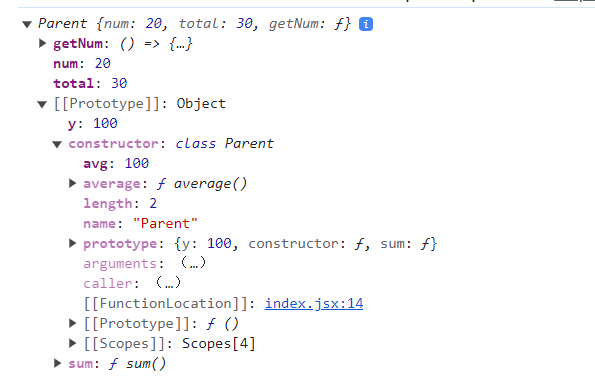
class Parent {
  constructor(x,y) {
    // new的时候,执行的构造函数「可写可不写:需要接受传递进来的实参信息,才需要设置constructor」
    this.total = x + y;
  }
  num = 20; // 等价于this.num=2000给实例, 这是私有属性
  getNum = () => {
    // 箭头函数没有自己的this,所用到的this是宿主环境中的
    console.log(this)
  }
  sum() {
    // 类似于sum=function sum(){}不是箭头函数
    // 它是给Parent.prototype上设置公共的方法「sum函数是不可枚举的」
  }
  // 把构造函数当做一个普通对象,为其设置静态的私有属性方法Parent.xxx
  static avg = 100
  static average() {

  }
}
Parent.prototype.y = 100;
let p = new Parent(10,20);
console.log(p);
p.getNum();
2
3
4
5
6
7
8
9
10
11
12
13
14
15
16
17
18
19
20
21
22
23
24
# 类组件继承
基于extends实现继承
首先基于call继承React.Component.call(this) //this->Parent类的实例p
function Component(props,context, updater){
    this.props = props;
    this.context = context;
    this.refs = emptyobject;
    this.updater = updater || ReactNoopupdateQueue;
}
// 给创建的实例p设置四个私有属性: props/context/ refs/updater
1
2
3
4
5
6
7再基于原型继承
Parent.prototype.__proto__ === React.Component.prototype实例> Parent.prototype -> React.Component.prototype -> 0bject.prototype
实例除了具备Parent.prototype提供的方法之外,还具备了React.component. prototype原型上提供的方法:
isReactComponent、setState、forceUptate只要自己设置了constructor,则内部第一句话一定要执行super( )
class Parent extends React.Component {
    constructor(props) {
        // this->p   props->获取的属性
        // super() 相当于  React.Component.call(this)
        // this.props = undefined  this.context = undefined  this.refs = {}
        super(props);
        this.props = props  this.context = undefined
    }
    x = 100;
	getX() {

    }
}
let p = new Parent();
console.log(p);
2
3
4
5
6
7
8
9
10
11
12
13
14
15
# 类组件细节
创建类组件
- 创建一个构造函数(类)
- 要求必须继承React.Component/PureComponent这个类
- 我们习惯于使用ES6中的class创建类「因为方便」
- 必须给当前类设置一个render的方法「放在其原型上」:在render方法中,返回需要渲染的视图
从调用类组件「new Vote({...})」开始,类组件内部发生的事情:
初始化属性 && 规则校验 先规则校验,校验完毕后,再处理属性的其他操作!! 方案一:
constructor(props) {
    super(props); //会把传递进来的属性挂载到this实例上
    console.log(this.props); //获取到传递的属性
}
1
2
3
4方案二:即便我们自己不再constructor中处理「或者constructor都没写」,在constructor处理完毕后,React内部也会把传递的props挂载到实例上;所以在其他的函数中,只要保证this是实例,就可以基于this.props获取传递的属性!
同样this.props获取的属性对象也是被冻结的{只读的} Object.isFrozen(this.props)->true
初始化状态 状态:后期修改状态,可以触发视图的更新 需要手动初始化,如果我们没有去做相关的处理,则默认会往实例上挂载一个state,初始值是null =>
this.state=null手动处理:state = { ... };修改状态,控制视图更新 this.state.xxx=xxx :这种操作仅仅是修改了状态值,但是无法让视图更新 想让视图更新,我们需要基于React.Component.prototype提供的方法操作:this.setState(partialState)既可以修改状态,也可以让视图更新 「推荐」// partialState:部分状态 this.setState({ xxx:xxx });1
2
3
4this.forceUpdate()强制更新
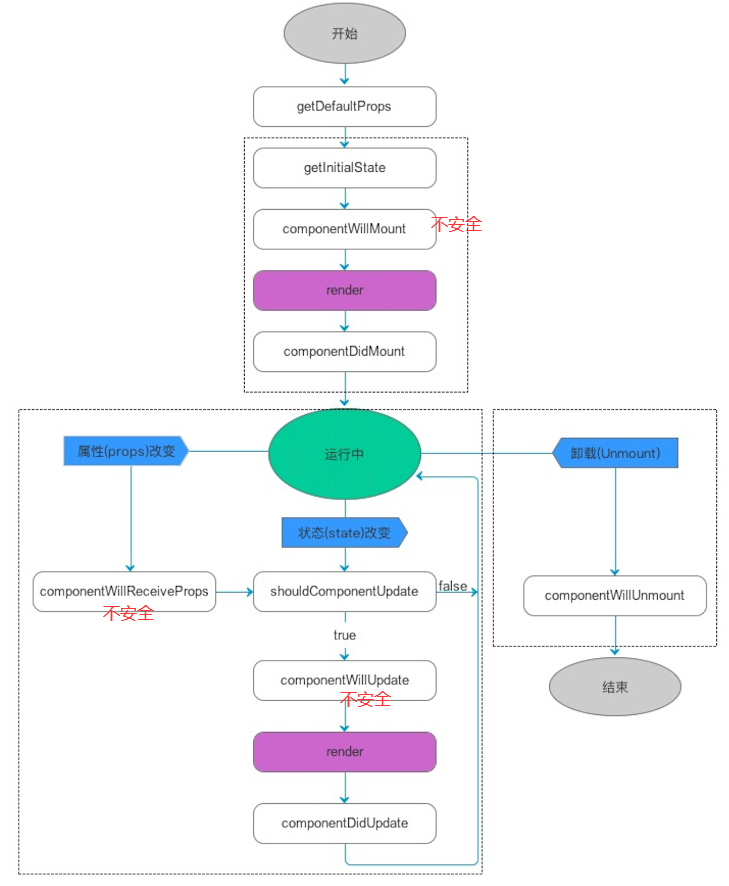
触发 componentWillMount 周期函数(钩子函数):组件第一次渲染之前 钩子函数:在程序运行到某个阶段,我们可以基于提供一个处理函数,让开发者在这个阶段做一些自定义的事情
- 此周期函数,目前是不安全的「虽然可以用,但是未来可能要被移除了,所以不建议使用」
- 控制会抛出黄色警告「为了不抛出警告,我们可以暂时用
UNSAFE_componentWillMount」
- 控制会抛出黄色警告「为了不抛出警告,我们可以暂时用
- 如果开启了
React.StrictMode「React的严格模式」,则我们使用 UNSAFE_componentWillMount 这样的周期函数,控制台会直接抛出红色警告错误!! React.StrictMode VS "use strict"- "use strict":JS的严格模式
- React.StrictMode:React的严格模式,它会去检查React中一些不规范的语法、或者是一些不建议使用的API等!!
- 此周期函数,目前是不安全的「虽然可以用,但是未来可能要被移除了,所以不建议使用」
触发 render 周期函数:渲染
触发 componentDidMount 周期函数:第一次渲染完毕
已经把virtualDOM变为真实DOM了「所以我们可以获取真实DOM了」
Vue中,我们直接修改状态值,视图自己就会更新「原理:我们对状态做了数据劫持,我们修改值的时候,会触发set劫持函数,在这个函数中,会通知视图更新」
import React from 'react';
import PropTypes from 'prop-types'
class ClassComponent extends React.Component {
  // 属性规则校验
  static defaultProps = {
    num: 0
  };
  static propTypes = {
    title: PropTypes.string.isRequired,
    num: PropTypes.number
  }
  // 初始化状态
  state = {
    supNum: 20,
    oppNum: 10
  };

  render() {
    let {title} = this.props,
    { supNum, oppNum } = this.state;
    console.log("组件渲染")
    return <div className="vote-box">
            <div className="header">
              <h2 className="title">{title}</h2>
              <span>{supNum + oppNum}人</span>
            </div>
            <div className="main">
              <p>支持人数:{supNum}人</p>
              <p>反对人数:{oppNum}人</p>
            </div>
            <div className="footer">
              <button onClick={() => {
                // 修改状态,让视图更新
                this.setState({
                  supNum: supNum + 1
                });
              }}>支持</button>

              <button onClick={() => {
                this.state.oppNum++;
                // 强制让视图更新
                this.forceUpdate();
              }}>反对</button>
            </div>
          </div>;
  }

  UNSAFE_componentWillMount() {
    console.log("组件渲染前")
  }
  componentDidMount() {
    console.log("组件渲染后")
  }
}

export default ClassComponent
2
3
4
5
6
7
8
9
10
11
12
13
14
15
16
17
18
19
20
21
22
23
24
25
26
27
28
29
30
31
32
33
34
35
36
37
38
39
40
41
42
43
44
45
46
47
48
49
50
51
52
53
54
55
56
render函数在渲染的时候,如果type是:
字符串:创建一个标签
普通函数:把函数执行,并且把props传递给函数
构造函数:把构造函数基于new执行「也就是创建类的一个实例」,也会把解析出来的props传递过去 + 每调用一次类组件都会创建一个单独的实例 + 把在类组件中编写的render函数执行,把返回的jsx「virtualDOM」当做组件视图进行渲染!!
new Vote({
	title:'React其实还是很好学的!'
})
1
2
3
# 组件更新逻辑
第一种:组件内部的状态被修改,组件会更新
触发
shouldComponentUpdate周期函数:是否允许更新shouldComponentUpdate(nextProps, nextState) { // nextState:存储要修改的最新状态 // this.state:存储的还是修改前的状态「此时状态还没有改变」 console.log("shouldComponentUpdate:", this.state, nextState); // 此周期函数需要返回true/false // 返回true:允许更新,会继续执行下一个操作 // 返回false:不允许更新,接下来啥都不处理 return true; }1
2
3
4
5
6
7
8
9
10触发
componentWillUpdate周期函数:更新之前此周期函数也是不安全的
在这个阶段,状态/属性还没有被修改
UNSAFE_componentWillUpdate(nextProps, nextState) { // 此时还没有更改 console.log('componentWillUpdate:', this.state, nextState); }1
2
3
4修改状态值/属性值「让this.state.xxx改为最新的值」
触发 render 周期函数:组件更新
按照最新的状态/属性,把返回的
JSX编译为virtualDOM和上一次渲染出来的
virtualDOM进行对比「DOM-DIFF」把差异的部分进行渲染「渲染为真实的DOM」
触发
componentDidUpdate周期函数:组件更新完毕componentDidUpdate() { // 此时数据已经修改 console.log('componentDidUpdate: 组件更新完毕') }1
2
3
4

特殊说明:如果我们是基于
this.forceUpdate()强制更新视图,会跳过shouldComponentUpdate周期函数的校验,直接从WillUpdate开始进行更新「也就是:视图一定会触发更新」!
this.setState()更新视图,如果shouldComponentUpdate周期返回false就不会往下走其他的周期函数,而this.forceUpdate()会一直走下去更新逻辑:
this.setState()->shouldComponentUpdate() return true->componentWillUpdate()->修改状态值/属性值->render()->componentDidUpdate()
第二种:父组件更新,触发的子组件更新
触发 componentWillReceiveProps 周期函数:接收最新属性之前
周期函数是不安全的
UNSAFE_componentWillReceiveProps(nextProps) { // this.props:存储之前的属性 // nextProps:传递进来的最新属性值 console.log("componentWillReceiveProps:", this.props, nextProps) }1
2
3
4
5触发
shouldComponentUpdate周期函数....其他逻辑和第一种的相同

# 组件销毁逻辑
触发 componentWillUnmount 周期函数:组件销毁之前
componentWillUnmount() { // 组件销毁前周期函数 console.log("componentWillUnmount: 组件销毁前周期函数") }1
2
3
4销毁
# 组件更新销毁完整代码
import React from 'react';
import PropTypes from 'prop-types'
class ClassComponent extends React.Component {
// 属性规则校验
static defaultProps = {
num: 0
};
static propTypes = {
title: PropTypes.string.isRequired,
num: PropTypes.number
}
// 初始化状态
state = {
supNum: 20,
oppNum: 10
};
render() {
let {title} = this.props,
{ supNum, oppNum } = this.state;
console.log("组件渲染")
return <div className="vote-box">
<div className="header">
<h2 className="title">{title}</h2>
<span>{supNum + oppNum}人</span>
</div>
<div className="main">
<p>支持人数:{supNum}人</p>
<p>反对人数:{oppNum}人</p>
</div>
<div className="footer">
<button onClick={() => {
// 修改状态,让视图更新
this.setState({
supNum: supNum + 1
});
}}>支持</button>
<button onClick={() => {
this.state.oppNum++;
// 强制让视图更新
this.forceUpdate();
}}>反对</button>
</div>
</div>;
}
UNSAFE_componentWillMount() {
console.log("组件渲染前")
}
componentDidMount() {
console.log("组件渲染后")
}
UNSAFE_componentWillReceiveProps(nextProps) {
// this.props:存储之前的属性
// nextProps:传递进来的最新属性值
console.log("componentWillReceiveProps:", this.props, nextProps)
}
  shouldComponentUpdate(nextProps, nextState) {
    // nextState:存储要修改的最新状态
    // this.state:存储的还是修改前的状态「此时状态还没有改变」
    console.log("shouldComponentUpdate:", this.state, nextState);

    // 此周期函数需要返回true/false
    //   返回true:允许更新,会继续执行下一个操作
    //   返回false:不允许更新,接下来啥都不处理
    return true;
  }
  UNSAFE_componentWillUpdate(nextProps, nextState) {
    // 此时还没有更改
    console.log('componentWillUpdate:', this.state, nextState);
  }
  componentDidUpdate() {
    // 此时数据已经修改
    console.log('componentDidUpdate: 组件更新完毕')
  }
  componentWillUnmount() {
    // 组件销毁前周期函数
    console.log("componentWillUnmount: 组件销毁前周期函数")
  }
}
export default ClassComponent
2
3
4
5
6
7
8
9
10
11
12
13
14
15
16
17
18
19
20
21
22
23
24
25
26
27
28
29
30
31
32
33
34
35
36
37
38
39
40
41
42
43
44
45
46
47
48
49
50
51
52
53
54
55
56
57
58
59
60
61
62
63
64
65
66
67
68
69
70
71
72
73
74
75
76
77
78
79
80
81
82
83
84
85
86
87
# 父子组件嵌套渲染逻辑
父子组件嵌套,处理机制上遵循深度优先原则:父组件在操作中,遇到子组件,一定是把子组件处理完,父组件才能继续处理
+ 父组件第一次渲染
父 willMount -> 父 render「子 willMount -> 子 render -> 子didMount」 -> 父didMount
- 父组件更新:
父 `shouldUpdate` -> 父`willUpdate` -> 父 `render` 「子`willReceiveProps` -> 子 `shouldUpdate` -> 子`willUpdate` -> 子 `render` -> 子 `didUpdate`」-> 父 `didUpdate`
- 父组件销毁:
父
willUnmount-> 处理中「子willUnmount-> 子销毁」-> 父销毁
# 函数组件和类组件对比
函数组件是“静态组件”:
- 组件第一次渲染完毕后,无法基于“内部的某些操作”让组件更新「无法实现“自更新”」;但是,如果调用它的父组件更新了,那么相关的子组件也一定会更新「可能传递最新的属性值进来」;
- 函数组件具备:属性...「其他状态等内容几乎没有」
- 优势:比类组件处理的机制简单,这样导致函数组件渲染速度更快!!
类组件是“动态组件”:
- 组件在第一渲染完毕后,除了父组件更新可以触发其更新外,我们还可以通过:this.setState修改状态 或者 this.forceUpdate 等方式,让组件实现“自更新”!!
- 类组件具备:属性、状态、周期函数、ref...「几乎组件应该有的东西它都具备」
- 优势:功能强大!!
===>Hooks组件「推荐」:具备了函数组件和类组件的各自优势,在函数组件的基础上,基于hooks函数,让函数组件也可以拥有状态、周期函数等,让函数组件也可以实现自更新「动态化」!!
# 补充
# PureComponent
PureComponent和Component的区别:
PureComponent会给类组件默认加一个
shouldComponentUpdate周期函数
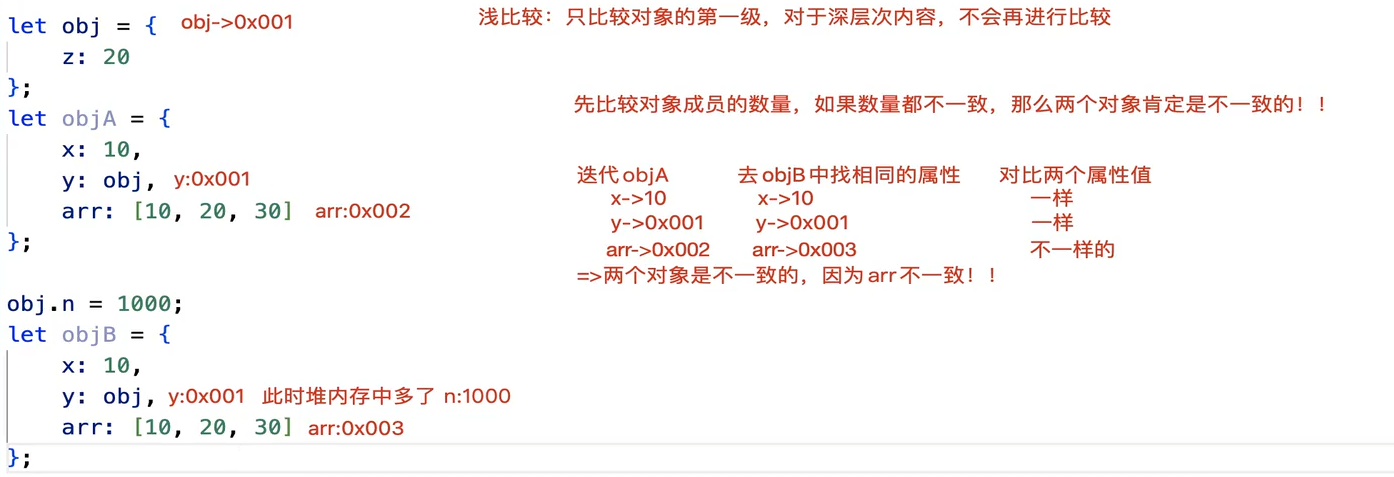
- 在此周期函数中,它对新老的属性/状态 会做一个浅比较 如果经过浅比较,发现属性和状态并没有改变,则返回false「也就是不继续更新组建」;有变化才会去更新!!
浅比较
import React from 'react'

// 检测是否为对象
const isObject = function isObject(obj) {
  return obj !== null && /^(object|function)$/.test(typeof obj);
}
// 对象浅比较的方法
const shallowEqual = function shallowEqual(objA, objB) {
  // 其中一个不是对象直接返回false
  if(!isObject(objA) || !isObject(objB)) return false;

  if(objA === objB) return true;

  // 先比较成员的数量
  let keysA = Reflect.ownKeys(objA),
      keysB = Reflect.ownKeys(objB);
  if(keysA.length !== keysB.length) return false;

  // 数量一直,再逐一比较内部的成员
  for(let i = 0; i < keysA.length; i++) {
    let key = keysA[i];
    // 这里用Object.is是为了让NaN和NaN相等
    // // 如果一个对象中有这个成员,一个对象中没有;或者,都有这个成员,但是成员值不一样;都应该被判定为不相同!!
    if(!objB.hasOwnProperty(key) || ! Object.is(objA[key], objB[key])) {
      return false;
    }
  }
  return true;
}

class Demo extends React.PureComponent{
  state = {
      arr: [10, 20, 30] //0x001
  };
  render() {
    let { arr } = this.state; //arr->0x001
    return <div>
        {arr.map((item, index) => {
            return <span key={index} style={{
                display: 'inline-block',
                width: 100,
                height: 100,
                background: 'pink',
                marginRight: 10
            }}>
                {item}
            </span>;
        })}

        <br />

        <button onClick={() => {
            arr.push(40); //给0x001堆中新增一个40
            /*
            // 无法更新的
            console.log(this.state.arr); //[10,20,30,40]
            this.setState({ arr }); //最新修改的转态地址,还是0x001「状态地址没有改」
            */
           //  this.forceUpdate(); //跳过默认加的shouldComponentUpdate,直接更新
            this.setState({
                arr: [...arr] //我们是让arr状态值改为一个新的数组「堆地址」
            })
        }}>新增SPAN</button>
    </div >;
  }

  // PureComponent内部自动加了shouldComponentUpdate生命周期函数
  // shouldComponentUpdate(nextProps, nextState) {
  //   let { props, state } = this;
  //   // props/state:修改之前的属性状态
  //   // nextProps/nextState:将要修改的属性状态
  //   return !shallowEqual(props, nextProps) || !shallowEqual(state, nextState);
  // }
}

export default Demo
2
3
4
5
6
7
8
9
10
11
12
13
14
15
16
17
18
19
20
21
22
23
24
25
26
27
28
29
30
31
32
33
34
35
36
37
38
39
40
41
42
43
44
45
46
47
48
49
50
51
52
53
54
55
56
57
58
59
60
61
62
63
64
65
66
67
68
69
70
71
72
73
74
75
76
# 获取DOM元素
受控组件:基于修改数据/状态,让视图更新,达到需要的效果 「推荐」
  // 组件渲染后的生命周期函数
  componentDidMount() {
    // 这个时候虚拟DOM已经渲染为真实DOM了,可以直接获取
    console.log(document.querySelector('#dom'));
  }
2
3
4
5
非受控组件:基于ref获取DOM元素,我们操作DOM元素,来实现需求和效果「偶尔」
基于ref获取DOM元素的语法
给需要获取的元素设置ref='xxx',后期基于this.refs.xxx去获取相应的DOM元素「不推荐使用:在React.StrictMode模式下会报错」
<h2 className="title" ref="titleBox">温馨提示</h2>
  // 组件渲染后的生命周期函数
  componentDidMount() {
    // ref方式获取元素
    console.log(this.refs.titleBox);
  }
1
2
3
4
5
6把ref属性值设置为一个函数
ref={x=>this.xxx=x}x是函数的形参:存储的就是当前DOM元素
获取的DOM元素“x”直接挂在到实例的属性"xxx"上,获取直接
this.xxx<h2 className="title" ref = {x => this.box = x}>友情提示</h2> // 组件渲染后的生命周期函数 componentDidMount() { console.log(this.box) }1
2
3
4
5基于React.createRef()方法创建一个REF对象
this.xxx=React.createRef();等价于this.xxx={current:null}使用:ref={REF对象(this.xxx)} 获取:this.xxx.currentclass Demo extends React.Component { box2 = React.createRef(); // 等价于 创建了一个对象 this.box2 = { current: null}; render() { return <div> <h2 className="title" ref={this.box2}>郑重提示</h2> </div>; } // 组件渲染后的生命周期函数 componentDidMount() { console.log(this.box2.current) } }1
2
3
4
5
6
7
8
9
10
11
12
原理:在render渲染的时候,会获取virtualDOM的ref属性
- 如果属性值是一个字符串,则会给this.refs增加这样的一个成员,成员值就是当前的DOM元素
- 如果属性值是一个函数,则会把函数执行,把当前DOM元素传递给这个函数「x->DOM元素」,而在函数执行的内部,我们一般都会把DOM元素直接挂在到实例的某个属性上
- 如果属性值是一个REF对象,则会把DOM元素赋值给对象的current属性
# 函数组件Ref
给元素标签设置ref,目的:获取对应的DOM元素
给类组件设置ref,目的:获取当前调用组件创建的实例「后续可以根据实例获取子组件中的相关信息」
给函数组件设置ref,直接报错:Function components cannot be given refs. Attempts to access this ref will fail.
但是我们让其配合
React.forwardRef实现ref的转发目的:获取函数子组件内部的某个元素
import React from 'react'

class Child1 extends React.Component {
  emBox = React.createRef()
  state = {
      x: 100,
      y: 200
  };
  render() {
      return <div>
          <span>子组件1</span>
          <em ref={this.emBox}>100</em>
      </div>;
  }
}

const Child2 = React.forwardRef(function Child2(props, ref) {
  return <>
    子组件2
    <button ref={ref}>按钮</button>
  </>
})

class Demo extends React.Component {
  render() {
    return <>
      <h1>1111</h1>
      <Child1 ref={x => this.child1 = x}></Child1>
      <Child2 ref={x => this.child2 = x}></Child2>
    </>
  }

  componentDidMount() {
    console.log(this.child1); // 存储的是:子组件的实例对象
    console.log(this.child2);
  }
}

export default Demo
2
3
4
5
6
7
8
9
10
11
12
13
14
15
16
17
18
19
20
21
22
23
24
25
26
27
28
29
30
31
32
33
34
35
36
37
38
39

# setState的进阶研究
React18中,对于setState的操作,采用了 批处理!
- 构建了队列机制
- 统一更新,提高视图更新的性能
- 处理流程更加稳健
在React 18之前,我们只在 React合成事件/周期函数期间批量更新;默认情况下,React中不会对 promise、setTimeout、原生事件处理(native event handlers)或其它React默认不进行批处理的事件进行批处理操作!
源码
// state可以是函数(传递函数可以获取先前的值)也可以是集合, callback回调函数
setState<K extends keyof S>(
            state: ((prevState: Readonly<S>, props: Readonly<P>) => Pick<S, K> | S | null) | (Pick<S, K> | S | null),
            callback?: () => void,
        ): void;
2
3
4
5
this.setState([partialState],[callback])
partialState支持部分状态更改this.setState({ x:100 //不论总共有多少状态,我们只修改了x,其余的状态不动 });1
2
3
callback在状态更改/视图更新完毕后触发执行「也可以说只要执行了setState,callback一定会执行」
- 发生在
componentDidUpdate周期函数之后「DidUpdate会在任何状态更改后都触发执行;而回调函数方式,可以在指定状态更新后处理一些事情;」- 即便我们基于
shouldComponentUpdate阻止了状态/视图的更新,DidUpdate周期函数肯定不会执行了,但是我们设置的这个callback回调函数依然会被触发执行!!- 类似于Vue框架中的
$nextTick!
代码演示
import React from 'react'

class Demo extends React.Component {
  state = {
      x: 10,
      y: 5,
      z: 0
  };
  handle = () => {
      let { x, y, z } = this.state;
      this.setState({ x: x + 1 }, () => {
          // 3
        console.log("setState回调函数:当前部分状态更新完毕后执行")
      });
  };
  shouldComponentUpdate() {
      // 1
    return true;
  }
  componentDidUpdate() {
      // 2
    console.log("componentDidUpdate,更新完毕后执行,在setState回调函数之前")
  }
  render() {
      console.log('视图渲染:RENDER');
      let { x, y, z } = this.state;
      return <div>
          x:{x} - y:{y} - z:{z}
          <br />
          <button onClick={this.handle}>按钮</button>
      </div>;
  }
}
export default Demo;
2
3
4
5
6
7
8
9
10
11
12
13
14
15
16
17
18
19
20
21
22
23
24
25
26
27
28
29
30
31
32
33
34
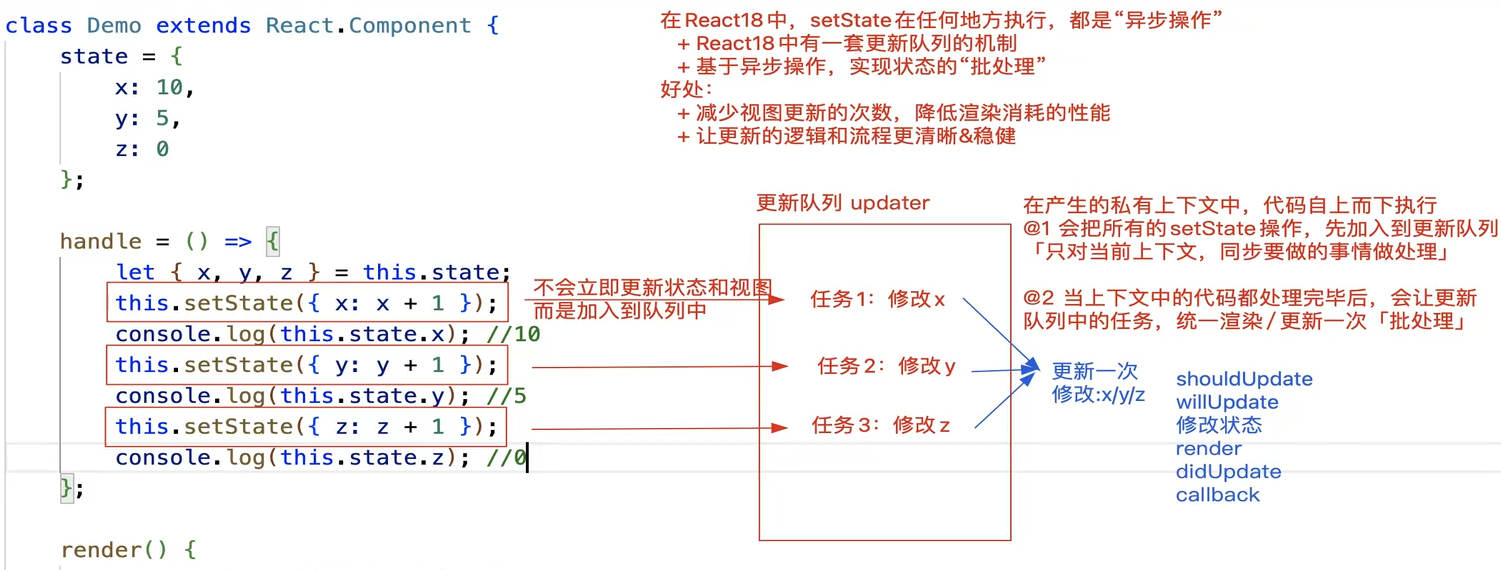
事件更新机制
      // 同时修改三个状态值,只会出发一次视图更新
      this.setState({
        x: x + 1,
        y: y + 1,
        z: z + 1
      });
2
3
4
5
6
在React18中,
setState操作都是异步的「不论是在哪执行,例如:合成事件、周期函数、定时器...」目的:实现状态的批处理「统一处理」
- 有效减少更新次数,降低性能消耗
- 有效管理代码执行的逻辑顺序
原理:利用了更新队列「updater」机制来处理的
- 在当前相同的时间段内「浏览器此时可以处理的事情中」,遇到setState会立即放入到更新队列中! 此时状态/视图还未更新
- 当所有的代码操作结束,会“刷新队列”「通知更新队列中的任务执行」:把所有放入的setState合并在一起执行,只触发一次视图更新「批处理操作」

在React18 和 React16中,关于setState是同步还是异步,是有一些区别的!
- React18中:不论在什么地方执行setState,它都是异步的「都是基于updater更新队列机制,实现的批处理」
- React16中:如果在合成事件「jsx元素中基于onXxx绑定的事件」、周期函数中,setState的操作是异步的!!但是如果setState出现在其他异步操作中「例如:定时器、手动获取DOM元素做的事件绑定等」,它将变为同步的操作「立即更新状态和让视图渲染」!!
# flushSync
flushSync:可以刷新“updater更新队列”,也就是让修改状态的任务立即批处理一次!!
import React from 'react'
import { flushSync } from 'react-dom'
// flushSync:可以刷新“updater更新队列”,也就是让修改状态的任务立即批处理一次!!
class Demo extends React.Component {
  state = {
      x: 10,
      y: 5,
      z: 0
  };

  handle = () => {
      let { x, y, z } = this.state;
      this.setState({ x: x + 1 })
      console.log(this.state); //10/5/0
      flushSync(() => {
        this.setState({ z: z + 1 });
        console.log(this.state); //10/5/0
      })
      console.log(this.state) //11/6/0
      // flushSync();可以这样直接调用

      // 在修改z之前,要保证x/y都已经更改和让视图更新了
      this.setState({ z: this.state.x + this.state.y });
  };
  shouldComponentUpdate() {
    return true;
  }
  componentDidUpdate() {
    console.log("componentDidUpdate,更新完毕后执行,在setState回调函数之前")
  }
	.....
}

export default Demo;
2
3
4
5
6
7
8
9
10
11
12
13
14
15
16
17
18
19
20
21
22
23
24
25
26
27
28
29
30
31
32
33
34

# setState传递函数
import React from "react";
class Demo extends React.Component {
    state = {
        x: 0
    };

    handle = () => {
        for (let i = 0; i < 20; i++) {
             this.setState({
                x: this.state.x + 1
            });
        }
        console.log(this.state) // 这个时候打印this.state.x 还是为0
        // 这样最后循环20次,只会触发一次render渲染,并且x渲染在页面上的值为1,因为循环20次都没改
    };
	......
}

export default Demo;
2
3
4
5
6
7
8
9
10
11
12
13
14
15
16
17
18
19
setState接收的参数还可以是一个函数,在这个函数中可以拿先前的状态,并通过这个函数的返回值得到下一个状态
 this.setState((prevState)=>{
    // prevState:存储之前的状态值
    // return的对象,就是我们想要修改的新状态值「支持修改部分状态」
    return {
        xxx:xxx
    };
 })
1
2
3
4
5
6
7
想让最后变为20
import React from "react";
import { flushSync } from 'react-dom';

/*
 this.setState((prevState)=>{
    // prevState:存储之前的状态值
    // return的对象,就是我们想要修改的新状态值「支持修改部分状态」
    return {
        xxx:xxx
    };
 })
 */
class Demo extends React.Component {
    state = {
        x: 0
    };
    handle = () => {
        for (let i = 0; i < 20; i++) {
          this.setState((prevState) => {
            return {
              x: prevState.x + 1
            }
          })
        }
      };
	.....
}

export default Demo;
2
3
4
5
6
7
8
9
10
11
12
13
14
15
16
17
18
19
20
21
22
23
24
25
26
27
28
29
更新流程:
# 合成事件
Synthetic合成事件是围绕浏览器原生事件,充当跨浏览器包装器的对象;它们将不同浏览器的行为合并为一个 API,这样做是为了确保事件在不同浏览器中显示一致的属性!
# 合成事件的基本操作
在JSX元素上,直接基于 onXxx={函数} 进行事件绑定!
浏览器标准事件,在React中大部分都支持
https://developer.mozilla.org/zh-CN/docs/Web/Events#%E6%A0%87%E5%87%86%E4%BA%8B%E4%BB%B6 (opens new window)
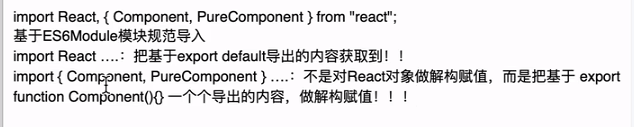
import React, { Component } from "react";
export default class App extends Component {
    state = {
        num: 0
    };
    render() {
        let { num } = this.state;
        return <div>
            {num}
            <br />
            <button onClick={(ev) => {
                // 合成事件对象 :SyntheticBaseEvent
                console.log(ev);
            }}>处理</button>
        </div>;
    }
};
2
3
4
5
6
7
8
9
10
11
12
13
14
15
16
17
# 合成事件中的this和传参处理
在类组件中,我们要时刻保证,合成事件绑定的函数中,里面的this是当前类的实例!
import React from "react";

class Demo extends React.Component {

    handle1() { //Demo.prototype => Demo.prototype.handle=function handle(){}
        console.log(this); //undefined
    }
    handle2(x, y, ev) {
        // 只要方法经过bind处理了,那么最后一个实参,就是传递的合成事件对象!!
        console.log(this, x, y, ev); //实例 10 20 合成事件对象
    }
    handle3 = (ev) => {  //实例.handle3=()=>{....}
        console.log(this); //实例
        console.log(ev); //SyntheticBaseEvent 合成事件对象「React内部经过特殊处理,把各个浏览器的事件对象统一化后,构建的一个事件对象」
    };
    handle4 = (x, ev) => {
        console.log(x, ev); //10 合成事件对象
    };

    render() {
        return <div>
            <button onClick={this.handle1}>按钮1</button>
            <button onClick={this.handle2.bind(this, 10, 20)}>按钮2</button>
            <button onClick={this.handle3}>按钮3</button>
            <button onClick={this.handle4.bind(null, 10)}>按钮4</button>
        </div>;
    }
}

export default Demo;
2
3
4
5
6
7
8
9
10
11
12
13
14
15
16
17
18
19
20
21
22
23
24
25
26
27
28
29
30
基于React内部的处理,如果我们给合成事件绑定一个“普通函数”,当事件行为触发,绑定的函数执行;方法中的this会是undefined「不好」!! 解决方案:this->实例:
- 我们可以基于JS中的bind方法:预先处理函数中的this和实参的。(apply和call会执行)
- 推荐:当然也可以把绑定的函数设置为“箭头函数”,让其使用上下文中的this
bind在React事件绑定的中运用
- 绑定的方法是一个普通函数,需要改变函数中的this是实例,此时需要用到bind「一般都是绑定箭头函数」
- 想给函数传递指定的实参,可以基于bind预先处理「bind会把事件对象以最后一个实参传递给函数」
# 合成事件对象
合成事件对象SyntheticBaseEvent:我们在React合成事件触发的时候,也可以获取到事件对象,只不过此对象是合成事件对象「React内部经过特殊处理,把各个浏览器的事件对象统一化后,构建的一个事件对象」
合成事件对象中,也包含了浏览器内置事件对象中的一些属性和方法「常用的基本都有」
- clientX/clientY
- pageX/pageY
- target
- type
- preventDefault
- stopPropagation
nativeEvent:基于这个属性,可以获取浏览器内置『原生』的事件对象

# 事件委托
事件和事件绑定
- 事件是浏览器内置行为
- 事件绑定是给事件行为绑定方法
- 元素.onxxx=function…
- 元素.addEventListener(‘xxx’,function(){},true/false)
事件的传播机制
- 捕获 CAPTURING_PHASE
- 目标 AT_TARGET
- 冒泡 BUBBLING_PHASE
阻止冒泡传播
- ev.cancelBubble=true 「<=IE8」
- ev.stopPropagation()
- ev.stopImmediatePropagation() 阻止监听同一事件的其他事件监听器被调用
el.addEventListener(type, listener, [useCapture])
type:事件类型,click、mouseenter 等
listener:事件处理函数,事件发⽣时,就会触发该函数运⾏。
useCapture:布尔值,规定是否是捕获型,默认为 false(冒泡)。因为是可选的,往往也会省略它。
<!DOCTYPE html>
<html>
<head>
<meta charset="UTF-8">
<meta http-equiv="X-UA-Compatible" content="IE=edge">
<meta name="viewport" content="width=device-width, initial-scale=1.0">
<title>事件委托</title>
<style>
* {
margin: 0;
padding: 0;
}
html,
body {
height: 100%;
overflow: hidden;
}
.center {
position: absolute;
top: 50%;
left: 50%;
transform: translate(-50%, -50%);
}
#root {
width: 300px;
height: 300px;
background: lightblue;
}
#outer {
width: 200px;
height: 200px;
background: lightgreen;
}
#inner {
width: 100px;
height: 100px;
background: lightcoral;
}
</style>
</head>
<body>
<div id="root" class="center">
<div id="outer" class="center">
<div id="inner" class="center"></div>
</div>
</div>
<!-- IMPORT JS -->
<script>
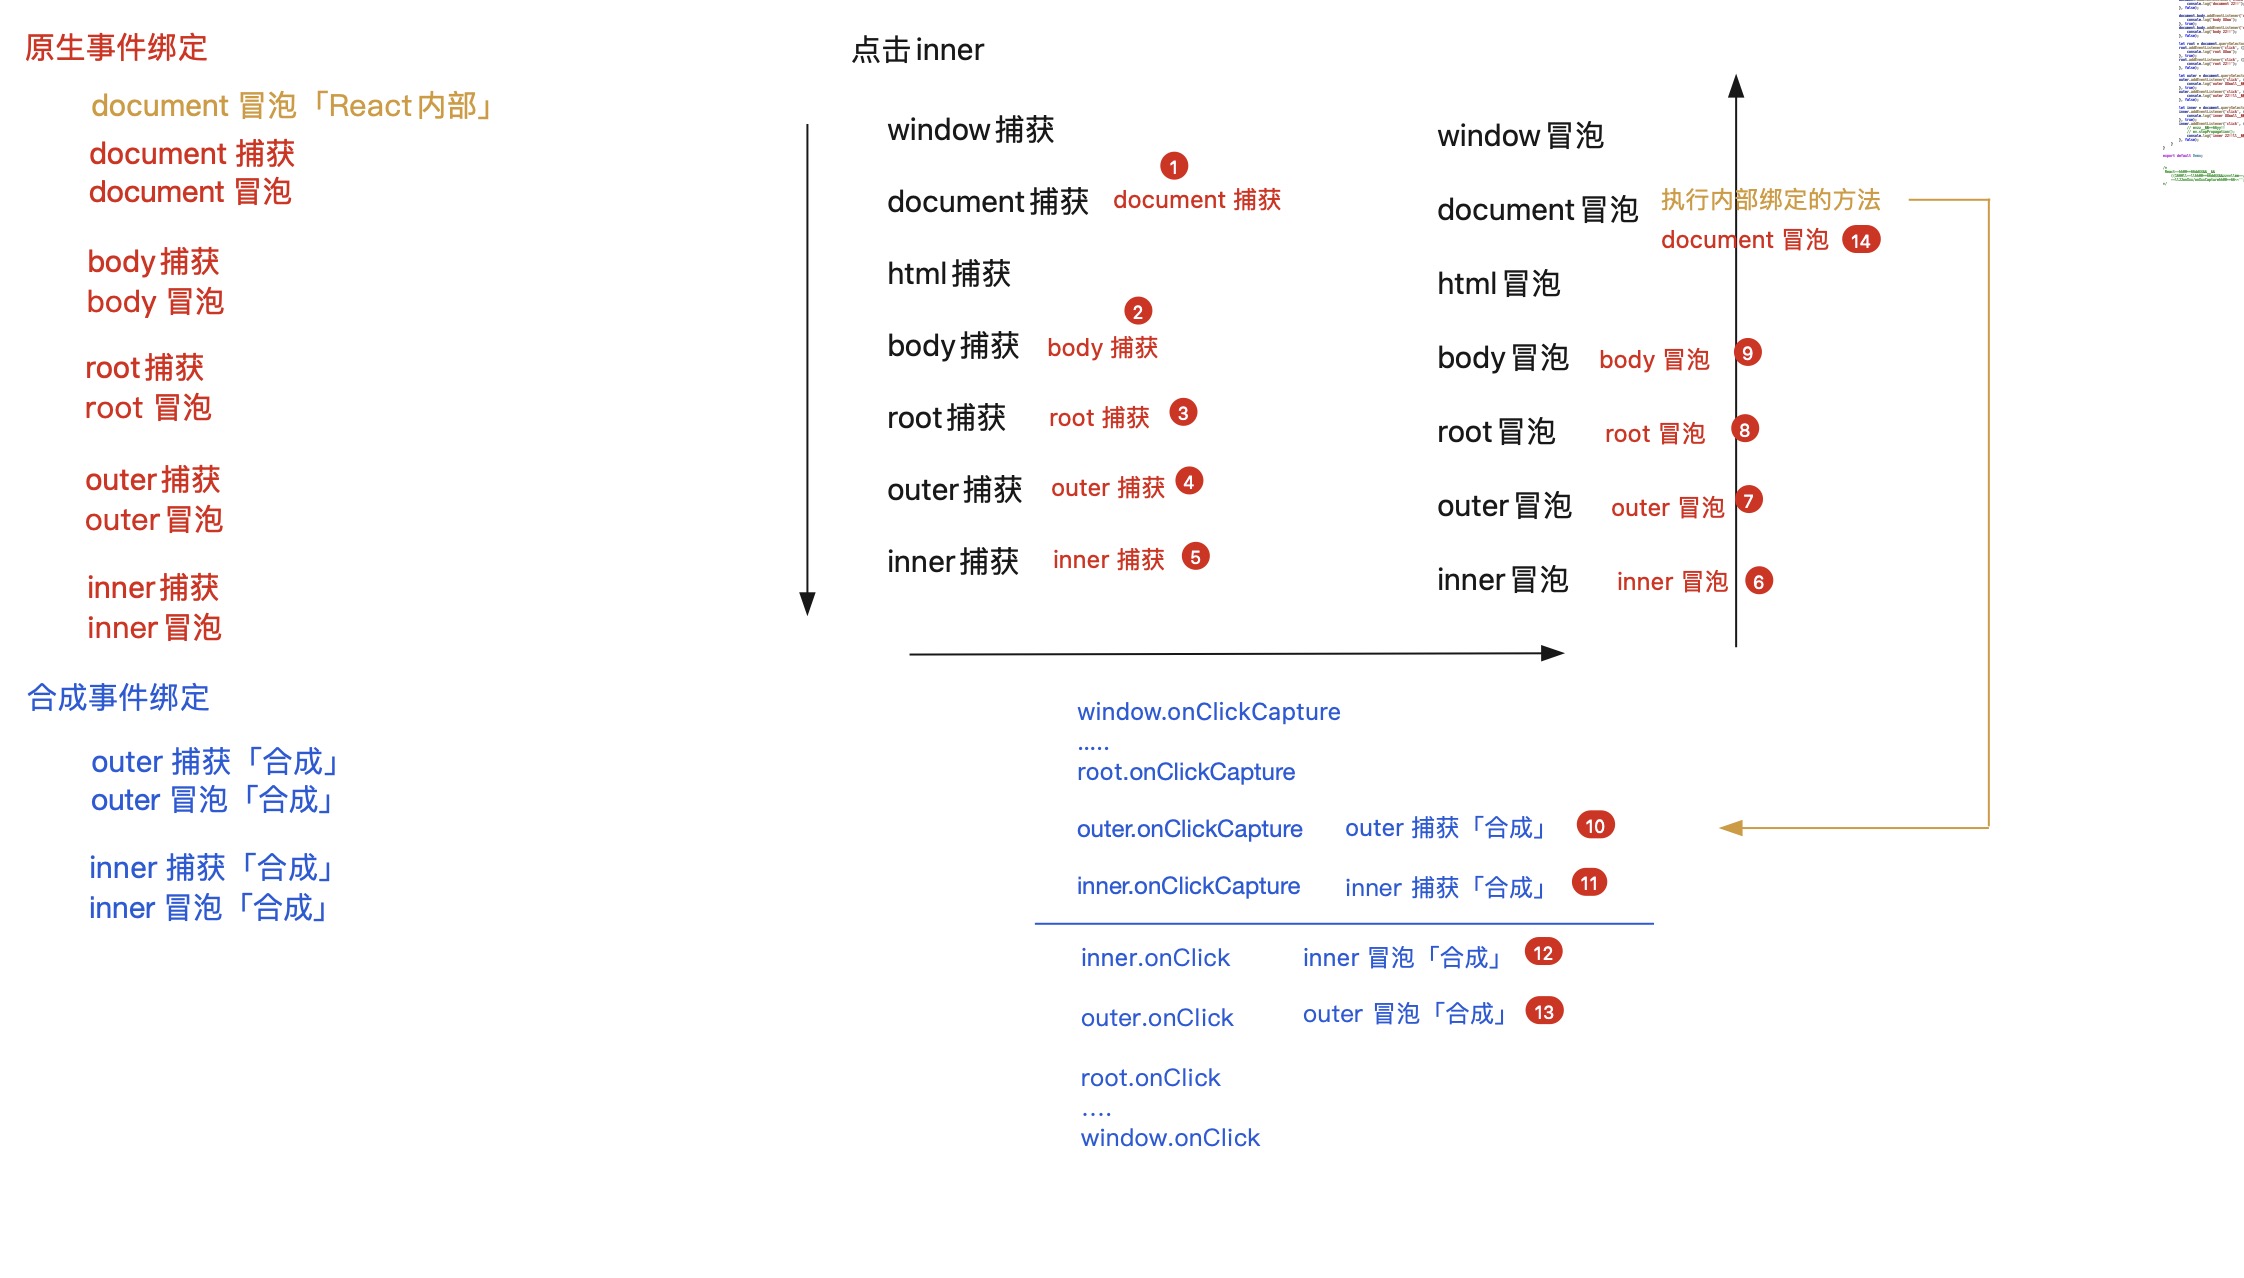
// 层级结构 window -> document -> html -> body -> root -> outer -> inner
// ev.stopPropagation:阻止事件的传播「包含捕获和冒泡」
// ev.stopImmediatePropagation:也是阻止事件传播,只不过它可以把当前元素绑定的其他方法「同级的」,如果还未执行,也不会让其再执行了!!
const html = document.documentElement,
body = document.body,
root = document.querySelector('#root'),
outer = document.querySelector('#outer'),
inner = document.querySelector('#inner');
root.addEventListener('click', function (ev) {
console.log('root 捕获');
}, true);
root.addEventListener('click', function () {
console.log('root 冒泡');
}, false);
outer.addEventListener('click', function () {
console.log('outer 捕获');
}, true);
outer.addEventListener('click', function () {
console.log('outer 冒泡');
}, false);
inner.addEventListener('click', function () {
console.log('inner 捕获');
}, true);
inner.addEventListener('click', function (ev) {
ev.stopImmediatePropagation(); // 给这个元素绑定的同样事件不会再执行了
// ev.stopPropagation();
console.log('inner 冒泡1');
}, false);
inner.addEventListener('click', function (ev) {
console.log('inner 冒泡2');
}, false);
</script>
</body>
</html>
2
3
4
5
6
7
8
9
10
11
12
13
14
15
16
17
18
19
20
21
22
23
24
25
26
27
28
29
30
31
32
33
34
35
36
37
38
39
40
41
42
43
44
45
46
47
48
49
50
51
52
53
54
55
56
57
58
59
60
61
62
63
64
65
66
67
68
69
70
71
72
73
74
75
76
77
78
79
80
81
82
83
84
85
86
87
88
89
90
91
92
93
94

事件委托
  <script>
        /*
        事件委托:利用事件的传播机制,实现的一套事件绑定处理方案
          例如:一个容器中,有很多元素都要在点击的时候做一些事情
            传统方案:首先获取需要操作的元素,然后逐一做事件绑定
            事件委托:只需要给容器做一个事件绑定「点击内部的任何元素,根据事件的冒泡传播机制,都会让容器的点击事件也触发;我们在这里,根据事件源,做不同的事情就可以了;」
          优势:
            + 提高JS代码运行的性能,并且把处理的逻辑都集中在一起!!
            + 某些需求必须基于事件委托处理,例如:除了点击xxx外,点击其余的任何东西,都咋咋咋...
            + 给动态绑定的元素做事件绑定
            + ...
          限制:
            + 当前操作的事件必须支持冒泡传播机制才可以
              例如:mouseenter/mouseleave等事件是没有冒泡传播机制的
            + 如果单独做的事件绑定中,做了事件传播机制的阻止,那么事件委托中的操作也不会生效!!
        */
        const body = document.body;
        body.addEventListener('click', function (ev) {
            // ev.target:事件源「点击的是谁,谁就是事件源」
            let target = ev.target,
                id = target.id;
            if (id === "root") {
                console.log('root');
                return;
            }
            if (id === "inner") {
                console.log('inner');
                return;
            }
            if (id === "AAA") {
                console.log('AAA');
                return;
            }
            // 如果以上都不是,我们处理啥....
        });
        const outer = document.querySelector('#outer');
        outer.addEventListener('click', function (ev) {
            console.log('outer');
            ev.stopPropagation();
        });

        /* const body = document.body,
            root = document.querySelector('#root'),
            outer = document.querySelector('#outer'),
            inner = document.querySelector('#inner');
        root.addEventListener('click', function () {
            console.log('root');
        });
        outer.addEventListener('click', function () {
            console.log('outer');
        });
        inner.addEventListener('click', function () {
            console.log('inner');
        }); */
    </script>
2
3
4
5
6
7
8
9
10
11
12
13
14
15
16
17
18
19
20
21
22
23
24
25
26
27
28
29
30
31
32
33
34
35
36
37
38
39
40
41
42
43
44
45
46
47
48
49
50
51
52
53
54
55
事件委托(代理),就是利用事件的“冒泡传播机制”实现的例如:给父容器做统一的事件绑定(点击事件),这样点击容器中的任意元素,都会传播到父容器上,触发绑定的方法!在方法中,基于不同的事件源做不同的事情!
- 性能得到很好的提高「减少内存消耗」
- 可以给动态增加的元素做事件绑定
- 某些需求必须基于其完成
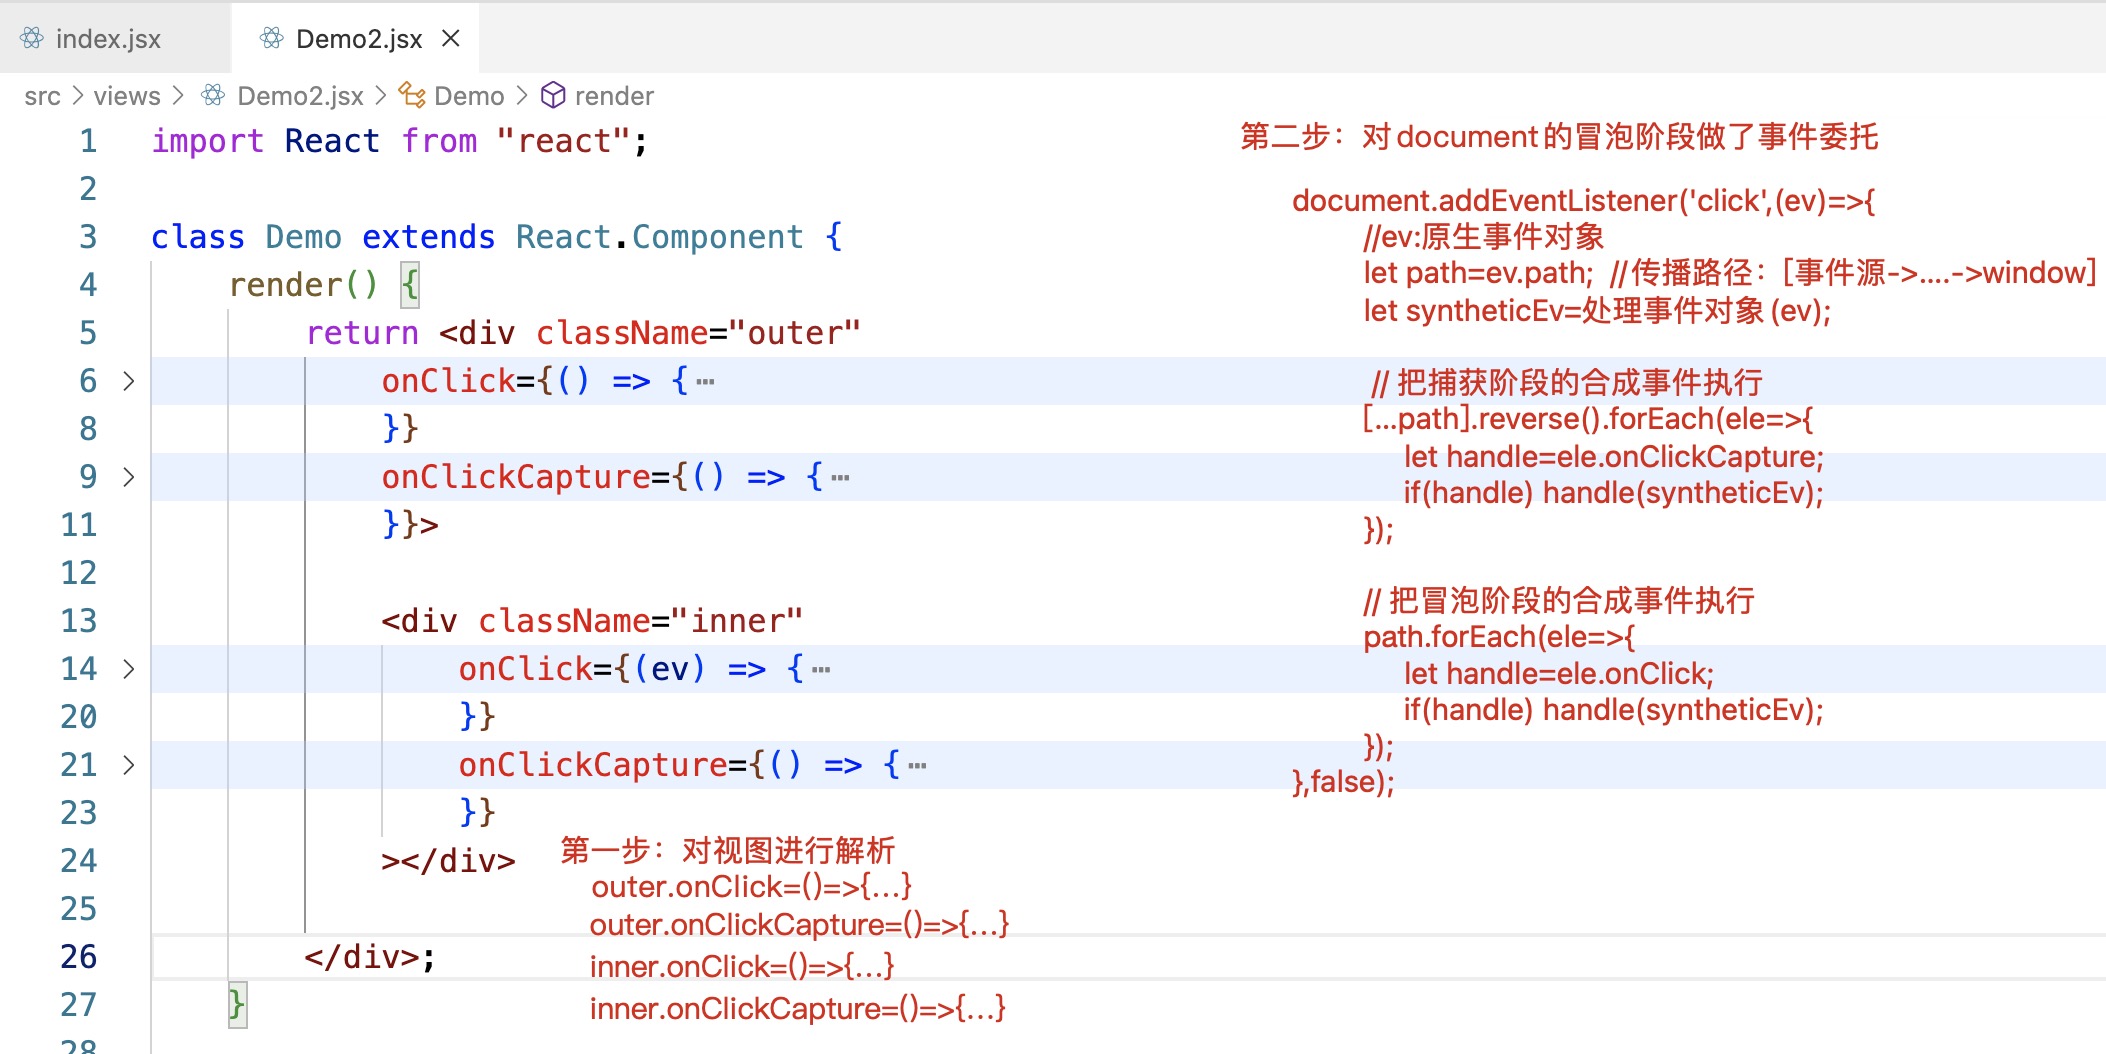
# 合成事件的底层机制
总原则:基于事件委托实现
React中合成事件的处理原理
“绝对不是”给当前元素基于addEventListener单独做的事件绑定,React中的合成事件,都是**基于“事件委托”**处理的!
- 在React17及以后版本,都是委托给#root这个容器「捕获和冒泡都做了委托」;
- 在17版本以前,都是为委托给document容器的「而且只做了冒泡阶段的委托」;
- 对于没有实现事件传播机制的事件,才是单独做的事件绑定「例如:onMouseEnter/onMouseLeave...」
在组件渲染的时候,如果发现JSX元素属性中有 onXxx/onXxxCapture 这样的属性,不会给当前元素直接做事件绑定,只是把绑定的方法赋值给元素的相关属性!!例如: outer.onClick=() => {console.log('outer 冒泡「合成」');} //这不是DOM0级事件绑定「这样才是outer.onclick」 outer.onClickCapture=() => {console.log('outer 捕获「合成」');} inner.onClick=() => {console.log('inner 冒泡「合成」');} inner.onClickCapture=() => {console.log('inner 捕获「合成」');}
然后对#root这个容器做了事件绑定「捕获和冒泡都做了」
原因:因为组件中所渲染的内容,最后都会插入到#root容器中,这样点击页面中任何一个元素,最后都会把#root的点击行为触发!! 而在给#root绑定的方法中,把之前给元素设置的onXxx/onXxxCapture属性,在相应的阶段执行!!
# React18合成事件原理
const outer = document.querySelector('.outer'),
    inner = document.querySelector('.inner');
/* 原理 */
const dispatchEvent = function dispatchEvent(ev) {
    let path = ev.path,
        target = ev.target;
    [...path].reverse().forEach(elem => {
        let handler = elem.onClickCapture;
        if (typeof handler === "function") handler(ev);
    });
    path.forEach(elem => {
        let handler = elem.onClick;
        if (typeof handler === "function") handler(ev);
    });
};
document.addEventListener('click', function (ev) {
    dispatchEvent(ev);
}, false);
2
3
4
5
6
7
8
9
10
11
12
13
14
15
16
17
18


# React16合成事件原理
React17以前,是委托给document元素,并且没有实现捕获阶段的派发
const outer = document.querySelector('.outer'),
    inner = document.querySelector('.inner');
/* 原理 */
const dispatchEvent = function dispatchEvent(ev) {
    let path = ev.path,
        target = ev.target;
    [...path].reverse().forEach(elem => {
        let handler = elem.onClickCapture;
        if (typeof handler === "function") handler(ev);
    });
    path.forEach(elem => {
        let handler = elem.onClick;
        if (typeof handler === "function") handler(ev);
    });
};
document.addEventListener('click', function (ev) {
    dispatchEvent(ev);
}, false);

......
2
3
4
5
6
7
8
9
10
11
12
13
14
15
16
17
18
19
20
# 事件对象池
16版本中,存在事件对象池
- 缓存和共享:对于那些被频繁使用的对象,在使用完后,不立即将它们释放,而是将它们缓存起来,以供后续的应用程序重复使用,从而减少创建对象和释放对象的次数,进而改善应用程序的性能!
- 使用完成之后,释放对象「每一项内容都清空」,缓存进去!
- 调用 event.persist() 可以保留住这些值!
17版本及以后,移除了事件对象池!
syntheticInnerBubble = (syntheticEvent) => {
    // syntheticEvent.persist();
    setTimeout(() => {
        console.log(syntheticEvent); //每一项都置为空
    }, 1000);
};
2
3
4
5
6

# click延迟和Vue中的事件处理机制
click事件在移动端存在300ms延迟
- pc端的click是点击事件
- 移动端的click是单击事件
连着点击两下:
PC端会触发︰两次click、一次dblclick
移动端:不会触发click,只会触发dblclick
单击事件:第一次点击后,监测300ms,看是否有第二次点击操作,如果没有就是单击,如果有就是双击
# 解决移动端300ms延迟
import React from 'react';
import ReactDOM from 'react-dom/client';
import App from './App';

// 解决移动端300ms延迟
import fastclick from 'fastclick';
fastclick.attach(document.body);

const root = ReactDOM.createRoot(document.getElementById('root'));
root.render(
  <App />
);
2
3
4
5
6
7
8
9
10
11
12
也可以自己基于touch事件模型去实现
const box = document.querySelector('.box');
box.ontouchstart = function (ev) {
    let point = ev.changedTouches[0];
    this.startX = point.pageX;
    this.startY = point.pageY;
    this.isMove = false;
};
box.ontouchmove = function (ev) {
    let point = ev.changedTouches[0];
    let changeX = point.pageX - this.startX;
    let changeY = point.pageY - this.startY;
    if (Math.abs(changeX) > 10 || Math.abs(changeY) > 10) {
        this.isMove = true;
    }
};
box.ontouchend = function (ev) {
    if (!this.isMove) {
        console.log('点击触发');
    }
};
2
3
4
5
6
7
8
9
10
11
12
13
14
15
16
17
18
19
20
# 循环给元素绑定事件
import React from 'react'
class Demo extends React.Component {
  state = {
    arr: [{
        id: 1,
        title: '新闻'
    }, {
        id: 2,
        title: '体育'
    }, {
        id: 3,
        title: '电影'
    }]
  };

  handle = (item) => {
    // item:点击这一项的数据
    console.log('我点击的是:' + item.title);
  }

  render() {
    let { arr } = this.state
    return <>
      {arr.map(item => {
        let {id, title} = item;
        return <span key={id}style={{
            padding: '5px 15px',
            marginRight: 10,
            border: '1px solid #DDD',
            cursor: 'pointer'
        }} onClick={this.handle.bind(this, item)}>
          {title}
        </span>
      })}
    </>
  }
}

export default Demo;
2
3
4
5
6
7
8
9
10
11
12
13
14
15
16
17
18
19
20
21
22
23
24
25
26
27
28
29
30
31
32
33
34
35
36
37
38
39
按照常理来讲,此类需求用事件委托处理是组好的!!!
但是在React中,我们循环给元素绑定的合成事件,本身就是基于事件委托处理的!!所以无需我们自己再单独的设置事件委托的处理机制!!!
# Vue中的事件处理机制
核心:给创建的DOM元素,单独基于
addEventListener实现事件绑定 Vue事件优化技巧:手动基于事件委托处理
<template>
  <div id="app">
    <ul class="box" @click="handler">
      <li
        class="item"
        v-for="(item, index) in arr"
        :data-item="item"
        :key="index"
      >
        {{ item }}
      </li>
    </ul>
  </div>
</template>

<script>
export default {
  name: "App",
  data() {
    return {
      arr: [10, 20, 30],
    };
  },
  methods: {
    handler(ev) {
      let target = ev.target;
      if (target.tagName === "LI") {
        console.log(target.getAttribute("data-item"));
      }
    },
  },
};
</script>
2
3
4
5
6
7
8
9
10
11
12
13
14
15
16
17
18
19
20
21
22
23
24
25
26
27
28
29
30
31
32
33
# TASK-TODO项目
# 初始化项目
create-react-app task-todo
# 暴露配置项
npm run eject
该操作是不可逆的,一旦执行了就不能再恢复了
已修改的文件要先提交git到本地,否则会报错
# 配置跨域
安装
npm install http-proxy-middleware1在src目录中,新建setupProxy.js
const { createProxyMiddleware } = require("http-proxy-middleware");

module.exports = function (app) {
  app.use(
      createProxyMiddleware("/api", {
          target: "http://127.0.0.1:9000",
          changeOrigin: true,
          ws: true,
          pathRewrite: { "^/api": "" }
      })
  );
};
1
2
3
4
5
6
7
8
9
10
11
12直接在src编写setupProxy.js,其他配置React已经写好了
# Ant Design配置
安装
npm install antd --save
# 使用icons图标要安装下面的
npm install @ant-design/icons --save
1
2
3配置国际化
index.jsx
import React from 'react';
import ReactDOM from 'react-dom/client';
import zhCN from 'antd/locale/zh_CN'
import { ConfigProvider } from 'antd';
import Task from './views/Task';


const root = ReactDOM.createRoot(document.getElementById('root'));
root.render(
  <ConfigProvider locale={zhCN}>
    <Task></Task>
  </ConfigProvider>
);
1
2
3
4
5
6
7
8
9
10
11
12
13
# 清除默认样式
src/assets/css/reset.min.css
body,h1,h2,h3,h4,h5,h6,hr,p,blockquote,dl,dt,dd,ul,ol,li,button,input,textarea,th,td{margin:0;padding:0}body{font-size:12px;font-style:normal;font-family:"\5FAE\8F6F\96C5\9ED1",Helvetica,sans-serif}small{font-size:12px}h1{font-size:18px}h2{font-size:16px}h3{font-size:14px}h4,h5,h6{font-size:100%}ul,ol{list-style:none}a{text-decoration:none;background-color:transparent}a:hover,a:active{outline-width:0;text-decoration:none}table{border-collapse:collapse;border-spacing:0}hr{border:0;height:1px}img{border-style:none}img:not([src]){display:none}svg:not(:root){overflow:hidden}html{-webkit-touch-callout:none;-webkit-text-size-adjust:100%}input,textarea,button,a{-webkit-tap-highlight-color:rgba(0,0,0,0)}article,aside,details,figcaption,figure,footer,header,main,menu,nav,section,summary{display:block}audio,canvas,progress,video{display:inline-block}audio:not([controls]),video:not([controls]){display:none;height:0}progress{vertical-align:baseline}mark{background-color:#ff0;color:#000}sub,sup{position:relative;font-size:75%;line-height:0;vertical-align:baseline}sub{bottom:-0.25em}sup{top:-0.5em}button,input,select,textarea{font-size:100%;outline:0}button,input{overflow:visible}button,select{text-transform:none}textarea{overflow:auto}button,html [type="button"],[type="reset"],[type="submit"]{-webkit-appearance:button}button::-moz-focus-inner,[type="button"]::-moz-focus-inner,[type="reset"]::-moz-focus-inner,[type="submit"]::-moz-focus-inner{border-style:none;padding:0}button:-moz-focusring,[type="button"]:-moz-focusring,[type="reset"]:-moz-focusring,[type="submit"]:-moz-focusring{outline:1px dotted ButtonText}[type="checkbox"],[type="radio"]{box-sizing:border-box;padding:0}[type="number"]::-webkit-inner-spin-button,[type="number"]::-webkit-outer-spin-button{height:auto}[type="search"]{-webkit-appearance:textfield;outline-offset:-2px}[type="search"]::-webkit-search-cancel-button,[type="search"]::-webkit-search-decoration{-webkit-appearance:none}::-webkit-input-placeholder{color:inherit;opacity:.54}::-webkit-file-upload-button{-webkit-appearance:button;font:inherit}.clearfix:after{display:block;height:0;content:"";clear:both}
src/index.css
@import './assets/css/reset.min.css';
src/index.js
import './index.css'
# 封装请求
src/api/http.js
import axios from 'axios';
import qs from 'qs';
import { message } from 'antd';
import _ from '../assets/utils/util';


const http = axios.create({
  baseURL: '/api',
  timeout: 5000
})

http.defaults.transformRequest = data => {
  // 转为urlencoded格式字符串
  if(_.isPlainObject(data)) data = qs.stringify(data);
  return data;
}

http.interceptors.response.use(response => {
  return response.data
}, err => {
  // 请求失败
  message.error(err.message);
  return Promise.reject(err)
})

export default http
2
3
4
5
6
7
8
9
10
11
12
13
14
15
16
17
18
19
20
21
22
23
24
25
26
基于post请求向服务器发送请求,需要基于请求主体把信息传递给服务器
- 普通对象→变为"[object Object]”字符串传递给服务器「不对的J
- Axios库对其做了处理,我们写的是普通对象,Axios内部会默认把其变为JSON字符串,传递给服务器!!
格式要求:
字符串
- json字符串 application/json
{"x":10,"name":"张三"}- urlencoded格式字符串application/x-www-urlencoded
"x=10&name=张三"- 普通字符串text/plain
FormData对象「用于文件上传」multipart/form-data
let fm=new FormData();
fm.append('file',file);
1
2buffer或者进制格式
# 编写代码
接口
src/api/index.js
import htpp from './http'

// 获取指定状态的任务信息
export const getTaskList = (state = 0, current = 1, pageSize = 2) => {
  return htpp.get('/getTaskList', {
    params: {
      state,
      page: current,
      limit: pageSize
    }
  })
}

// 新增任务
export const addTask = (task, time) => {
  return htpp.post('/addTask', {
    task,
    time
  })
}

// 删除任务
export const removeTask = (id) => {
  return htpp.get('/removeTask', {
    params: {
      id
    }
  })
}

// 完成任务
export const completeTask = (id) => {
  return htpp.get('/completeTask', {
    params: {
      id
    }
  })
}
2
3
4
5
6
7
8
9
10
11
12
13
14
15
16
17
18
19
20
21
22
23
24
25
26
27
28
29
30
31
32
33
34
35
36
37
38
39
页面代码:
src/views/Task.jsx
import React from 'react'
import { flushSync } from 'react-dom'
import { Button, Tag, Table, Popconfirm, Modal, Form, Input, DatePicker, message } from 'antd';
import '../assets/css/task.scss'
import { getTaskList, addTask, removeTask, completeTask } from '../api';


const zero = function zero(text) {
  text = String(text);
  return text.length < 2 ? '0' + text : text;
}
const formatTime = function formatTime(time) {
  let arr = time.match(/\d+/g);
  let [, month, day = '00', hours, minutes = '00'] = arr;
  return `${zero(month)}-${zero(day)} ${zero(hours)}:${zero(minutes)}`;
}

class Task extends React.Component {
  /* 表格列的数据 */
  columns = [
    {
      title: '编号',
      dataIndex: 'id',
      align: 'center',
      width: '8%'
    },
    {
      title: '任务描述',
      dataIndex: 'task',
      ellipsis: true,
      width: '50%'
    },
    {
      title: '状态',
      dataIndex: 'state',
      align: 'center',
      width: '10%',
      render: text => +text === 1 ? <span style={{color: 'red'}}>未完成</span> : <span style={{color: 'green'}}>已完成</span>
    },
    {
      title: '完成时间',
      dataIndex: 'time',
      align: 'center',
      width: '15%',
      render: (_, record) => {
        let { state, time, complete } = record;
        if (+state === 2) time = complete;
        return formatTime(time)
      }
    },
    {
      title: '操作',
      render: (_, record) => {
        let { id, state } = record;
        return <>
          <Popconfirm
            title="您确定要删除此任务吗"
            onConfirm={this.removeTask.bind(this, id)}
          >
            <Button type="link">删除</Button>
          </Popconfirm>

          {
            +state !== 2 ? <Popconfirm title="您确定要完成此任务吗" onConfirm={this.updateTaskState.bind(null, id)}>
              <Button type="link">完成</Button>
            </Popconfirm> : null
          }
        </>
      }
    }
  ]
  state = {
    tableData: [], // 表格数据
    modalVisible: false,  // 弹窗是否显示
    saveTaskconfirmLoading: false, // 提交任务loading
    tableLoading: false, // 表格loading
    selectIndex: 0,
    pageInfo: {
      current: 1, // 当前页数
      pageSize: 2, // 每页条数
      showSizeChanger: true, // 显示分页切换器
      showQuickJumper: true, // 显示快速跳转至某页
      pageSizeOptions: [1,2,5,10],
      total: 0,
      showTotal: (total, range) => `${range[0]}-${range[1]} 共 ${total} 条`,
      onChange: (page, pageSize) => this.pageChange(page, pageSize)
    }
  }

  // 页码切换事件
  pageChange = (page, pageSize) => {
    console.log('页码发生变化')
    flushSync(() => {
      this.setState({ pageInfo: { ...this.state.pageInfo, current: page, pageSize } });
    })
    // console.log('页码发生变化')
    this.queryData()
  }

  // 完整状态切换
  changeIndex = (index) => {
    if(this.state.selectIndex === index) return

    // this.setState({selectIndex: index})
    // 直接这样 this.state.selectIndex还是原来的值,并未及时改变
    // 如果在这个时候发送请求,获取到的selectIndex还是上一次的值

    // 解决方法1
    // this.setState({selectIndex: index}, () => {
    //   // 发送请求获取数据
    //   console.log(this.state.selectIndex)
    // })

    // 解决方法2
    flushSync(() => {
      this.setState({selectIndex: index})
    });
    // 重置当前页的参数
    flushSync(() => {
      this.setState({ pageInfo: { ...this.state.pageInfo, current: 1 } });
    })
    this.queryData();
  }

  // 获取任务列表
  queryData = async () => {
    let {selectIndex} = this.state;
    this.setState({tableLoading: true})
    try {
      let { code, list, page, total } = await getTaskList(selectIndex, this.state.pageInfo.current, this.state.pageInfo.pageSize);
      if(+code !== 0) { // 0代表获取成功
        list = []
      }
      console.log('请求获取到的数据', list)
      this.setState({
        tableData:list,
        pageInfo: {
          ...this.state.pageInfo,
          current: +page,
          total: +total
        }
      })
    } catch (error) {
      message.error('获取任务列表失败')
    }
    this.setState({tableLoading: false})
  }

  // 删除任务
  removeTask = async (id) => {
    let { code } = await removeTask(id);
    if(+code !== 0) {
      message.error('删除任务失败')
      return
    } else {
      this.queryData()
      message.success('删除任务成功')
    }
  }

  // 修改任务状态
  updateTaskState = async (id) => {
    let {code} = await completeTask(id);
    if(+code !== 0) {
      message.error('修改任务状态失败')
      return
    } else {
      this.queryData()
      message.success('修改任务状态成功')
    }
  }

  // 提交任务
  saveTask = async () => {
    try {
      // 表单校验
      await this.formRef.validateFields()
      let {task , time} = this.formRef.getFieldsValue();
      time = time.format('YYYY-MM-DD HH:mm:ss');
      this.setState({saveTaskconfirmLoading: true})
      // 向服务器端发送请求
      let { code } = await addTask(task, time);
      if(+code !== 0) {
        message.error('添加任务失败');
      } else {
        // 关闭弹框
        this.closeMode();
        // 获取最新的数据
        this.queryData();
        message.success('添加任务成功');
      }
    }catch (_) {
      message.error('请填写完整信息');
    }
    this.setState({saveTaskconfirmLoading: false})
  }

  // 关闭弹框事件
  closeMode = () => {
    this.setState({
      modalVisible: false,
      saveTaskconfirmLoading: false
    })
    this.formRef.resetFields();
  }

  componentDidMount() {
    this.queryData();
    console.log('获取到的表格数据', this.state.tableData)
  }

  render() {
    console.log('视图更新')
    let {tableData, modalVisible, saveTaskconfirmLoading, selectIndex, tableLoading, pageInfo} = this.state
    console.log('分页器的配置', pageInfo)
    return <div className='task_box'>
      <div className="task_header">
        <h1>TASK OA任务管理系统</h1>
        <Button type="primary" onClick={() => {
          this.setState({
            modalVisible: true
          })
        }}>新增任务</Button>
      </div>
      <div className='task_content'>
        <div className='task_content_header'>
          {['全部', '未完成', '已完成'].map( (item, index) => {
            return <Tag color={selectIndex === index ? '#1677ff' : ''} key={index} onClick={this.changeIndex.bind(null, index)}>{item}</Tag>
          })}
        </div>
        <div className='task_content_table'>
          <Table dataSource={tableData} loading={tableLoading} columns={this.columns}  rowKey="id" pagination={pageInfo}/>
        </div>
      </div>
      {/* 新增任务弹出框 */}
      <Modal title="新增任务窗口" open={modalVisible} maskClosable={false} okText="提交信息" onCancel={this.closeMode} onOk={this.saveTask} confirmLoading={saveTaskconfirmLoading}>
        <Form ref={x => this.formRef = x} layout="vertical" initialValues={{ task: '', time: '' }} validateTrigger="onBlur">
          <Form.Item label="任务描述" name="task" rules={[
            { required: true, message: '任务描述是必填项' },
            { min: 6, message: '输入的内容至少6位及以上' }
          ]}>
            <Input.TextArea rows={4} />
          </Form.Item>
          <Form.Item label="任务预期完成时间" name="time" rules={[
            { required: true, message: '预期完成时间是必填项' }
          ]}>
            <DatePicker showTime />
          </Form.Item>
        </Form>
      </Modal>
    </div>
  }
}

export default Task;
2
3
4
5
6
7
8
9
10
11
12
13
14
15
16
17
18
19
20
21
22
23
24
25
26
27
28
29
30
31
32
33
34
35
36
37
38
39
40
41
42
43
44
45
46
47
48
49
50
51
52
53
54
55
56
57
58
59
60
61
62
63
64
65
66
67
68
69
70
71
72
73
74
75
76
77
78
79
80
81
82
83
84
85
86
87
88
89
90
91
92
93
94
95
96
97
98
99
100
101
102
103
104
105
106
107
108
109
110
111
112
113
114
115
116
117
118
119
120
121
122
123
124
125
126
127
128
129
130
131
132
133
134
135
136
137
138
139
140
141
142
143
144
145
146
147
148
149
150
151
152
153
154
155
156
157
158
159
160
161
162
163
164
165
166
167
168
169
170
171
172
173
174
175
176
177
178
179
180
181
182
183
184
185
186
187
188
189
190
191
192
193
194
195
196
197
198
199
200
201
202
203
204
205
206
207
208
209
210
211
212
213
214
215
216
217
218
219
220
221
222
223
224
225
226
227
228
229
230
231
232
233
234
235
236
237
238
239
240
241
242
243
244
245
246
247
248
249
250
251
252
253
254
255
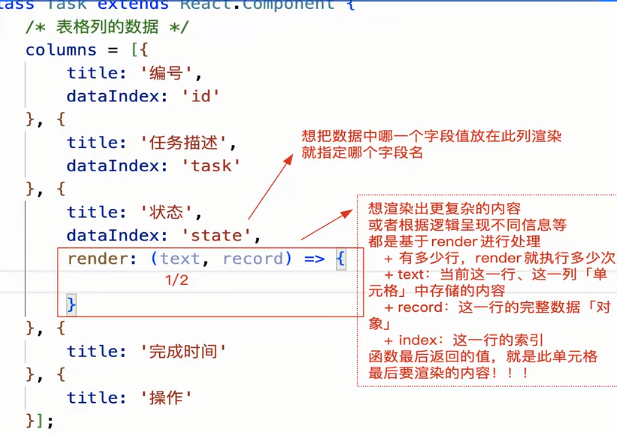
最终实现效果:
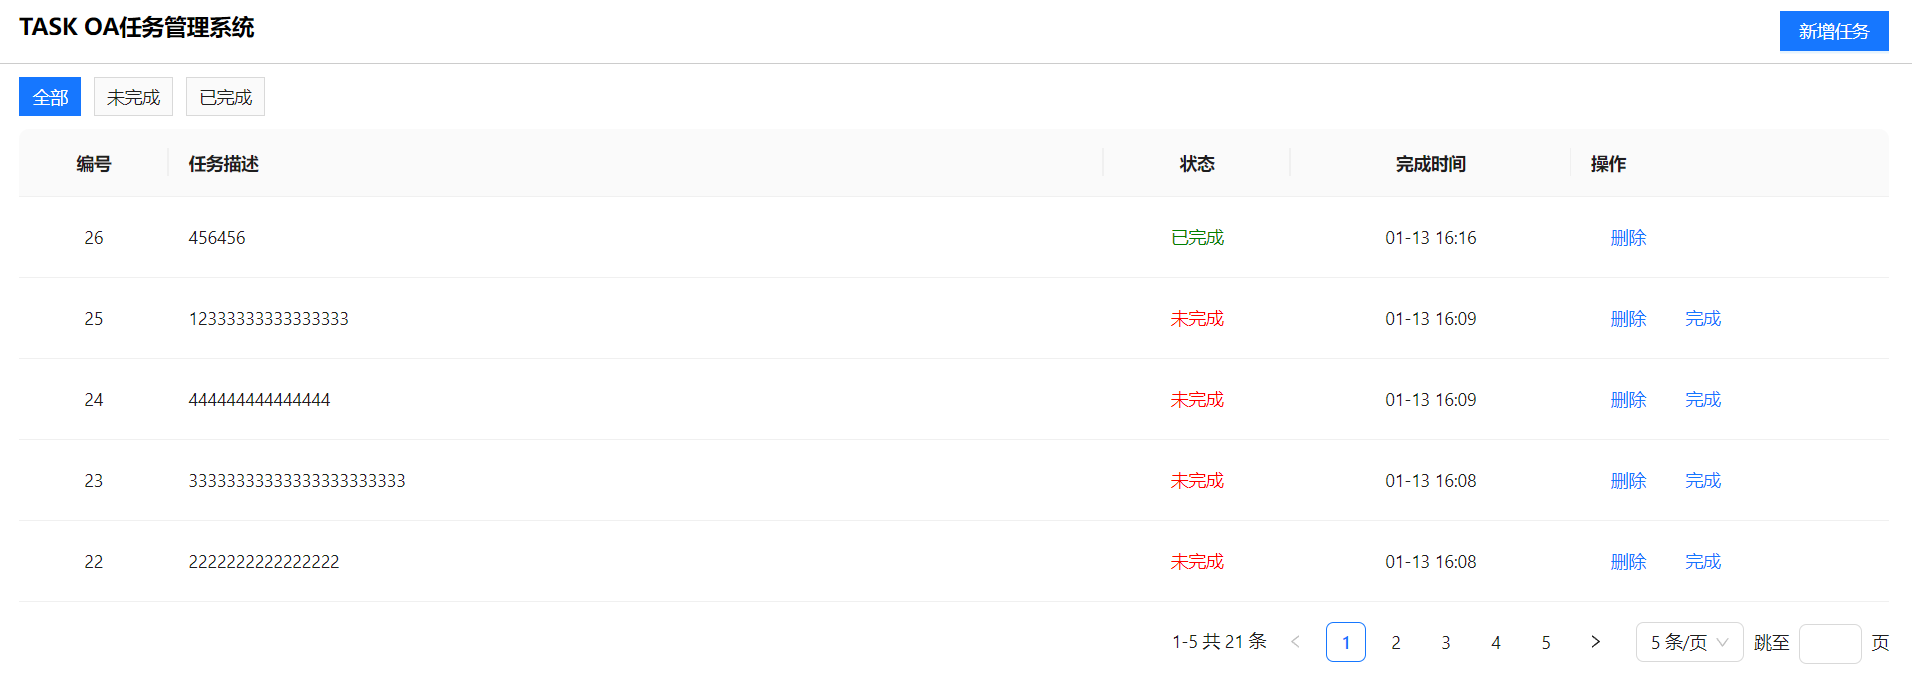
# 双向绑定
vue中是实现了双向绑定,但是React中却不是,需要我们自己实现
Vue是MVVM框架:数据驱动视图渲染、视图驱动数据更改「自动监测页面中表单元素的变化,从而修改对应的状态」 双向驱动 React是MVC框架:数据驱动视图渲染 单向驱动
需要自己手动实现,视图变化,去修改相关的状态
import React from 'react'

class Demo extends React.Component {
  state = {
    email: ''
  };

  render() {
      return <div>
          <input type="text" value={this.state.email} onChange={(ev) => {
            this.setState({
              email: ev.target.value.trim()
            })
            console.log(this.state.email)
          }}/>
      </div>;
  }
}

export default Demo
2
3
4
5
6
7
8
9
10
11
12
13
14
15
16
17
18
19
20
# 总结
# 细节注意
再修改state对象里面的对象时,要注意我们只是修改了部分值,而不是全不值,所有我们还要把之前的赋值过来
      this.setState({
        tableData:list,
        pageInfo: {
          ...this.state.pageInfo,
          current: +page,
          total: +total
        }
      })
2
3
4
5
6
7
8
由于setState是异步操作,统一处理,所以视图会存在更新不及时的情况
    // this.setState({selectIndex: index})
    // 直接这样 this.state.selectIndex还是原来的值,并未及时改变
    // 如果在这个时候发送请求,获取到的selectIndex还是上一次的值

    // 解决方法1
    // this.setState({selectIndex: index}, () => {
    //   // 发送请求获取数据
    //   console.log(this.state.selectIndex)
    // })

    // 解决方法2
    flushSync(() => {
      this.setState({selectIndex: index})
    });
2
3
4
5
6
7
8
9
10
11
12
13
14
数据请求放componentDidMount周期函数中
正常情况下,我们应该在第一次渲染之前componentWillMount开发发送异步的数据请求
- 请求发送后,不需要等到
- 继续渲染
- 在第一次渲染结束后,可能数据已经回来了「即便没回来,也快了J
- 等到数据获取后,我们修改状态,让视图更新,呈现真实的数据即可
但是componentWillMount是不安全的
# pm2服务持久化管理
安装
npm i pm2-g #mac加sudo
启动命令
pm2 start server.js --name TASK
重启命令
pm2 restart TASK
停止命令
pm2 stop TASK
删除命令
pm2 delete TASK
终端关掉,服务器也在,如果电脑重启,服务器会消失
# UI组件库
- React的UI组件库
- PC端: Anid、 AntdPro....
- 移动端: AntdMobile...
- Vue的UI组件库
- PC端: element-ui、antd for vue、iview....
- 移动端: vant、cube...
antd组件库自袱按需导入 我们安装整个antd,后期在项目中用到哪些组件,最后打包的时候,只打包用的
# Antd中Form表单处理机制
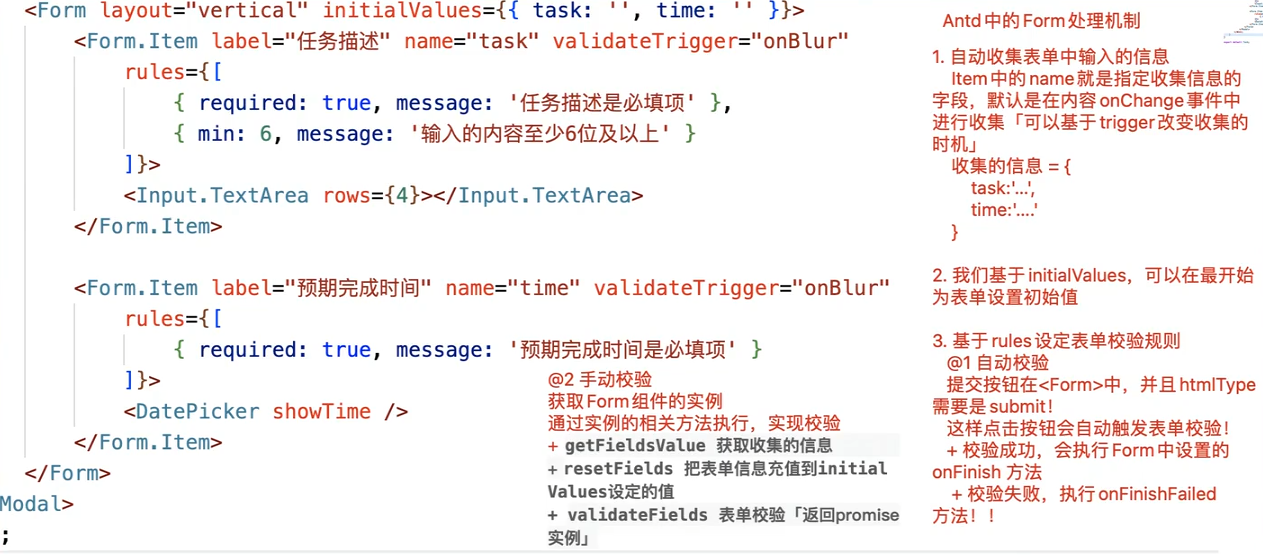
# 时间处理插件
时间日期处理插件:
moment.jsantd版本<=4dayjsantd版本>=5- 体积小「2KB,moment貌似16kb」
- 用的API方法,和moment类似
- 更符合国际化日期处理规范
- .….
# 利用Hooks组件改造

触发Form表单校验的方式:
前提:提交按钮包裹在
<Form>中,并且htmlType='submit'点击这个按钮,会自动触发Form的表单校验 表单校验通过,会执行<Form onFinish={函数}>事件- 函数执行,形参获取的就是表单收集的信息
我们获取Form组建的实例[或者是子组件内部返回的方法]
基于这些方法,触发表单校验&获取表单手机的信息等
validateFieldsgetFieldsValueresetFields
ant-designer提供的独有的获取表单ref方法 只适用于函数式组件
<Form form={formRef}></Form>
// 使用
let [formRef] = Form.useForm(); // 表单ref
2
3

函数组件中,遇到:修改某个状态后(视图更新后),想去做一些事情(而这些事情中,需要用到新修改的状态值) 此时:我们不能直接在代码的下面编写,或者把修改状态改为同步的,这些都不可以!因为只有在函数重新执行,产生的新的闭包中,才可以获取最新的状态值! !原始闭包中用的还是之前的状态值! !
解决方案:基于useEffect设置状态的依赖, 在依赖的状态发生改变后,去做要做的事情! !
修改某个状态后(视图更新后),想去做一些事情,但是要处理的事情,和新的状态值没有关系,此时可以把修改状态的操作,基于
flushSync变为同步处理即可!
完整代码:
import React, { useEffect, useState, useRef } from 'react'
import { Button, Tag, Table, Popconfirm, Modal, Form, Input, DatePicker, message } from 'antd';
import '../assets/css/task.scss'
import { getTaskList, addTask, removeTask, completeTask } from '../api';


const zero = function zero(text) {
  text = String(text);
  return text.length < 2 ? '0' + text : text;
}
const formatTime = function formatTime(time) {
  let arr = time.match(/\d+/g);
  let [, month, day = '00', hours, minutes = '00'] = arr;
  return `${zero(month)}-${zero(day)} ${zero(hours)}:${zero(minutes)}`;
}

const Task = function Task() {
  /* 表格列的数据 */
  const columns = [
    {
      title: '编号',
      dataIndex: 'id',
      align: 'center',
      width: '8%'
    },
    {
      title: '任务描述',
      dataIndex: 'task',
      ellipsis: true,
      width: '50%'
    },
    {
      title: '状态',
      dataIndex: 'state',
      align: 'center',
      width: '10%',
      render: text => +text === 1 ? <span style={{color: 'red'}}>未完成</span> : <span style={{color: 'green'}}>已完成</span>
    },
    {
      title: '完成时间',
      dataIndex: 'time',
      align: 'center',
      width: '15%',
      render: (_, record) => {
        let { state, time, complete } = record;
        if (+state === 2) time = complete;
        return formatTime(time)
      }
    },
    {
      title: '操作',
      render: (_, record) => {
        let { id, state } = record;
        return <>
          <Popconfirm
            title="您确定要删除此任务吗"
            onConfirm={deleteTask.bind(this, id)}
          >
            <Button type="link">删除</Button>
          </Popconfirm>

          {
            +state !== 2 ? <Popconfirm title="您确定要完成此任务吗" onConfirm={updateTaskState.bind(null, id)}>
              <Button type="link">完成</Button>
            </Popconfirm> : null
          }
        </>
      }
    }
  ]

   // 分页配置信息
   const pageProps = {
    current: 1, // 当前页数
    pageSize: 2, // 每页条数
    showSizeChanger: true, // 显示分页切换器
    showQuickJumper: true, // 显示快速跳转至某页
    pageSizeOptions: [1,2,5,10],
    total: 0,
    showTotal: (total, range) => `${range[0]}-${range[1]} 共 ${total} 条`,
    onChange: (page, pageSize) => pageChange(page, pageSize)
  }

  let [tableData, setTableData] = useState([]); // 表格数据
  let [pageInfo, setPageInfo] = useState(pageProps); // 分页信息
  let [modalVisible, setModalVisible] = useState(false); // 弹窗是否显示
  let [tableLoading, setTableLoading] = useState(false); // 表格loading
  let [saveTaskconfirmLoading, setSaveTaskconfirmLoading] = useState(false); // 提交任务loading
  let [selectIndex, setSelectIndex] = useState(0); // 选中项的索引


  // let formRef = useRef(null); // 表单ref
  // 这种方式ref = {formRef} 获取实例: formRef.current

  // ant-design提供的
   let [formRef] = Form.useForm(); // 表单ref


  // 页码切换事件
  const pageChange = (page, pageSize) => {
    setPageInfo({
      ...pageInfo,
      current: page,
      pageSize
    })
    // queryData()
    // console.log('页码发生变化')
  }

  useEffect(() => {
    queryData()
    // console.log('分页信息发生改变')
  }, [pageInfo.current, pageInfo.pageSize, selectIndex])


  // 完整状态切换
  const changeIndex = (index) => {
    // 这个可以不要,因为useState存在性能优化,值相同视图不更新
    // if(selectIndex === index) return

    // 这样写是错误的,因为闭包问题,queryData获取的上下文的setSelectIndex还是上次的
    // flushSync(() => {
    //   setSelectIndex(index)
    // })
    // queryData();
    setSelectIndex(index);
    setPageInfo((prev) => {
      return {
        ...prev,
        current: 1
      }
    })
  }

  // 获取任务列表
  const queryData = async () => {
    setTableLoading(true)
    try {
      let { code, list, page, total } = await getTaskList(selectIndex, pageInfo.current, pageInfo.pageSize);
      if(+code !== 0) { // 0代表获取成功
        list = []
      }
      console.log('请求获取到的数据', list)
      setTableData(list)
      setPageInfo({
        ...pageInfo,
        total: +total
      })
    } catch (error) {
      message.error('获取任务列表失败')
    }
    setTableLoading(false)
  }

  // 删除任务
  const deleteTask = async (id) => {
    let { code } = await removeTask(id);
    if(+code !== 0) {
      message.error('删除任务失败')
      return
    } else {
      queryData()
      message.success('删除任务成功')
    }
  }

  // 修改任务状态
  const updateTaskState = async (id) => {
    let {code} = await completeTask(id);
    if(+code !== 0) {
      message.error('修改任务状态失败')
      return
    } else {
      queryData()
      message.success('修改任务状态成功')
    }
  }

  // 提交任务
  const saveTask = async () => {
    try {
      // 表单校验
      await formRef.validateFields()
      let {task , time} = formRef.getFieldsValue();
      time = time.format('YYYY-MM-DD HH:mm:ss');
      setSaveTaskconfirmLoading(true)
      // 向服务器端发送请求
      let { code } = await addTask(task, time);
      if(+code !== 0) {
        message.error('添加任务失败');
      } else {
        // 关闭弹框
        closeMode();
        // 获取最新的数据
        queryData();
        message.success('添加任务成功');
      }
    }catch (_) {
      message.error('请填写完整信息');
    }
    setSaveTaskconfirmLoading(false)
  }

  // 关闭弹框事件
  const closeMode = () => {
    setModalVisible(false)
    setSaveTaskconfirmLoading(false)
    formRef.resetFields();
  }

  // 页面第一次加载,发送请求获取数据
  useEffect(() => {
    queryData();
    console.log('获取到的表格数据', tableData)
  }, [])


  return <div className='task_box'>
    <div className="task_header">
      <h1>TASK OA任务管理系统</h1>
      <Button type="primary" onClick={() => {
        setModalVisible(true)
      }}>新增任务</Button>
      </div>
      <div className='task_content'>
        <div className='task_content_header'>
          {['全部', '未完成', '已完成'].map( (item, index) => {
            return <Tag color={selectIndex === index ? '#1677ff' : ''} key={index} onClick={changeIndex.bind(null, index)}>{item}</Tag>
          })}
        </div>
        <div className='task_content_table'>
          <Table dataSource={tableData} loading={tableLoading} columns={columns}  rowKey="id" pagination={pageInfo}/>
        </div>
      </div>
      {/* 新增任务弹出框 */}
      <Modal title="新增任务窗口" open={modalVisible} maskClosable={false} okText="提交信息" onCancel={closeMode} onOk={saveTask} confirmLoading={saveTaskconfirmLoading}>
        <Form form={formRef} layout="vertical" initialValues={{ task: '', time: '' }} validateTrigger="onBlur">
          <Form.Item label="任务描述" name="task" rules={[
            { required: true, message: '任务描述是必填项' },
            { min: 6, message: '输入的内容至少6位及以上' }
          ]}>
            <Input.TextArea rows={4} />
          </Form.Item>
          <Form.Item label="任务预期完成时间" name="time" rules={[
            { required: true, message: '预期完成时间是必填项' }
          ]}>
            <DatePicker showTime />
          </Form.Item>
        </Form>
      </Modal>
  </div>
}

export default Task;
2
3
4
5
6
7
8
9
10
11
12
13
14
15
16
17
18
19
20
21
22
23
24
25
26
27
28
29
30
31
32
33
34
35
36
37
38
39
40
41
42
43
44
45
46
47
48
49
50
51
52
53
54
55
56
57
58
59
60
61
62
63
64
65
66
67
68
69
70
71
72
73
74
75
76
77
78
79
80
81
82
83
84
85
86
87
88
89
90
91
92
93
94
95
96
97
98
99
100
101
102
103
104
105
106
107
108
109
110
111
112
113
114
115
116
117
118
119
120
121
122
123
124
125
126
127
128
129
130
131
132
133
134
135
136
137
138
139
140
141
142
143
144
145
146
147
148
149
150
151
152
153
154
155
156
157
158
159
160
161
162
163
164
165
166
167
168
169
170
171
172
173
174
175
176
177
178
179
180
181
182
183
184
185
186
187
188
189
190
191
192
193
194
195
196
197
198
199
200
201
202
203
204
205
206
207
208
209
210
211
212
213
214
215
216
217
218
219
220
221
222
223
224
225
226
227
228
229
230
231
232
233
234
235
236
237
238
239
240
241
242
243
244
245
246
247
248
249
250
251
252
253
254
255
# Hooks 组件
# React组件分类
- 函数组件
- **不具备“状态、ref、周期函数”**等内容,第一次渲染完毕后,无法基于组件内部的操作来控制其更新,因此称之为静态组件!
- 但是具备属性及插槽,父组件可以控制其重新渲染!
- 渲染流程简单,渲染速度较快!
- 基于FP(函数式编程)思想设计,提供更细粒度的逻辑组织和复用!
- 类组件
- **具备“状态、ref、周期函数、属性、插槽”**等内容,可以灵活的控制组件更新,基于钩子函数也可灵活掌控不同阶段处理不同的事情!
- 渲染流程繁琐,渲染速度相对较慢!
- 基于OOP(面向对象编程)思想设计,更方便实现继承等!
React Hooks 组件,就是基于 React 中新提供的 Hook 函数,可以让函数组件动态化!
# Hook函数概览
官方文档:https://zh-hans.react.dev/learn#using-hooks
- 基础 Hook
useState使用状态管理useEffect使用周期函数useContext使用上下文信息
- 额外的 Hook
useReduceruseState的替代方案,借鉴redux处理思想,管理更复杂的状态和逻辑useCallback构建缓存优化方案useMemo构建缓存优化方案useRef使用ref获取DOMuseImperativeHandle配合forwardRef(ref转发)一起使用useLayoutEffect与useEffect相同,但会在所有的DOM变更之后同步调用effect- …
- 自定义Hook
- ……
# useState
作用:在函数组件中使用状态,修改状态值可让函数组件更新,类似于类组件中的setState 语法:
const [state, setState] = useState(initialState);返回一个 state,以及更新 state 的函数
# 基本使用
useState:React Hook函数之一,目的是在函数组件中使用状态,并且后期基于状态的修改,可以让组件更新let [num,setNum] = useState(initialValue);
执行useState,传递的initialValue是初始的状态值
- 执行这个方法,返回结果是一个数组:[状态值,修改状态的方法]
- num变量存储的是:获取的状态值
- setNum变量存储的是:修改状态的方法
执行 setNum(value)
- 修改状态值为value
- 通知视图更新
函数组件「或者Hooks组件」不是类组件,所以没有实例的概念「调用组件不再是创建类的实例,而是把函数执行,产生一个私有上下文而已」,再所以,在函数组件中不涉及this的处理!!
import React, { useState } from "react";

export default function Demo() {
  let [num, setNum] = useState(0);
  const handler = () => {
    setNum(num + 1);
  }
  return <>
    <h1>num: {num}</h1>
    <button onClick={handler}>增加</button>
  </>
}
2
3
4
5
6
7
8
9
10
11
12
# 设计原理
函数组件的更新是让函数重新执行,也就是useState会被重新执行;那么它是如何确保每一次获取的是最新状态值,而不是传递的初始值呢?
export default function Demo() {
  let [num, setNum] = useState(10);
  const handler = () => {
      setNum(100);
      setTimeout(() => {
          console.log(num); //10
      }, 1000);
  };
  return <div>
      <span>{num}</span>
      <button onClick={handler}>新增</button>
  </div>;
}
2
3
4
5
6
7
8
9
10
11
12
13

# 实现原理
var _state;
function useState(initialValue) {
  // 这样保证了初始值只会被赋值一次
  if(typeof _state === 'undefined') {
    if(typeof initialValue === "function") {
      _state = initialValue();
    } else {
      _state = initialValue;
    }
  }
  var setState = function setState(value) {
    // 两个值相同,不更新视图
    if(Object.is(value, _state)) return;
    if(typeof value === 'function') {
      _state = value(_state);
    } else {
      _state = value;
    }
    // 通知视图更新
  }
  return [_state, setState];
  // 返回一个数组,第一个是当前状态,第二个是更新状态的函数
}
let [num1, setNum] = useState(0); //num1=0  setNum=setState 0x001
setNum(100); //=>_state=100 通知视图更新
// ---
let [num2, setNum] = useState(0); //num2=100  setNum=setState 0x002
2
3
4
5
6
7
8
9
10
11
12
13
14
15
16
17
18
19
20
21
22
23
24
25
26
27

# 更新多状态
方案一:类似于类组件中一样,让状态值是一个对象(包含需要的全部状态),每一次只修改其中的一个状态值! 问题:不能像类组件的setState函数一样,支持部分状态更新!
import React, {useState} from 'react'

export default function Demo() {
  let [state, setState] = useState({
      x: 10,
      y: 20
  });
  const handler = () => {
      // setState({ x: 100 }); //state={x:100} // 这样y会丢失
      setState({
          ...state,
          x: 100
      });
  };
  return <div>
      <span>x:{state.x}</span><br/>
      <span>y:{state.y}</span>
      <button onClick={handler}>处理</button>
  </div>;
}
2
3
4
5
6
7
8
9
10
11
12
13
14
15
16
17
18
19
20
方案二:执行多次useState,把不同状态分开进行管理「推荐方案」
export default function Demo() {
  let [x, setX] = useState(10);
  let [y, setY] = useState(20);
  const handler = () => {
    setX(100);
  };
  return <div>
      <span>x:{x}</span><br/>
      <span>y:{y}</span>
      <button onClick={handler}>处理</button>
  </div>;
}
2
3
4
5
6
7
8
9
10
11
12
# 更新队列机制
和类组件中的setState一样,每次更新状态值,也不是立即更新,而是加入到更新队列中!
- React 18 全部采用批更新
- React 16 部分批更新,放在其它的异步操作中,依然是同步操作!
- 可以基于flushSync刷新渲染队列

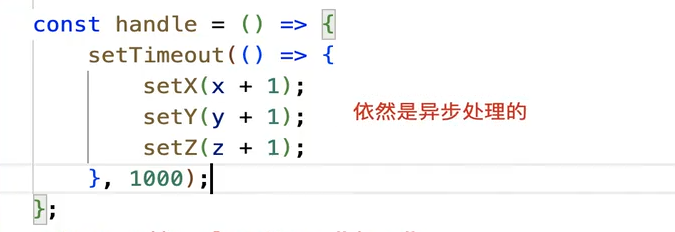
import React, { useState } from 'react'
import { flushSync } from 'react-dom'

export default function Demo() {
  console.log('RENDER渲染');
  let [x, setX] = useState(10),
      [y, setY] = useState(20),
      [z, setZ] = useState(30);

  const handle = () => {
      flushSync(() => {
          setX(x + 1);
          setY(y + 1);
      });
      setZ(z + 1);
  };
  return <div className="demo">
      <span className="num">x:{x}</span><br/>
      <span className="num">y:{y}</span><br/>
      <span className="num">z:{z}</span><br/>
      <button type="primary"
          size="small"
          onClick={handle}>
          新增
      </button>
  </div>;
}
2
3
4
5
6
7
8
9
10
11
12
13
14
15
16
17
18
19
20
21
22
23
24
25
26
27
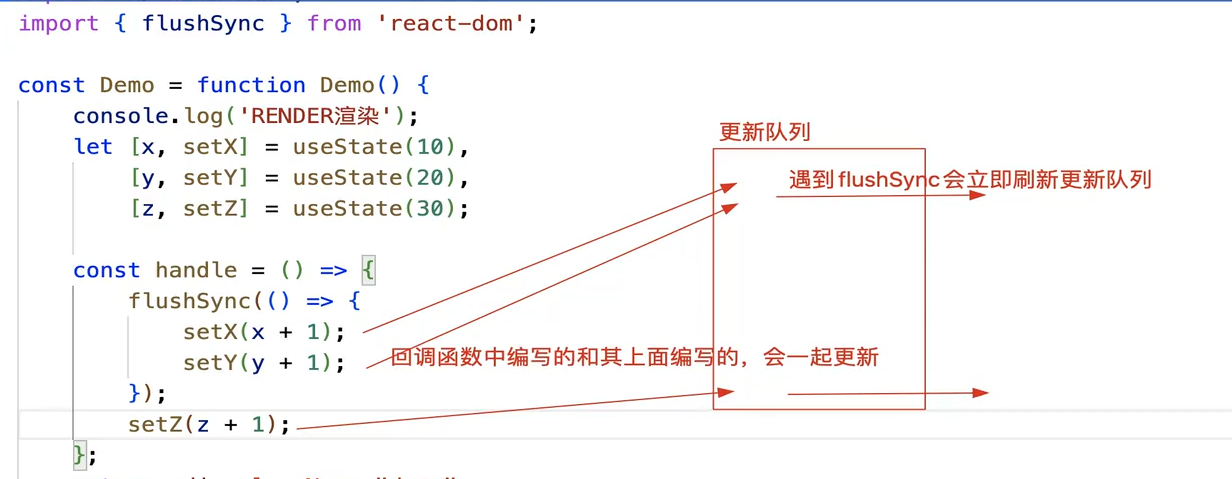
在React16中,也和this.setState一样,放在合成事件/周期函数中,其实异步的操作;但是放在其它的异步操作中「例如:定时器、手动的事件绑定等」它是同步的
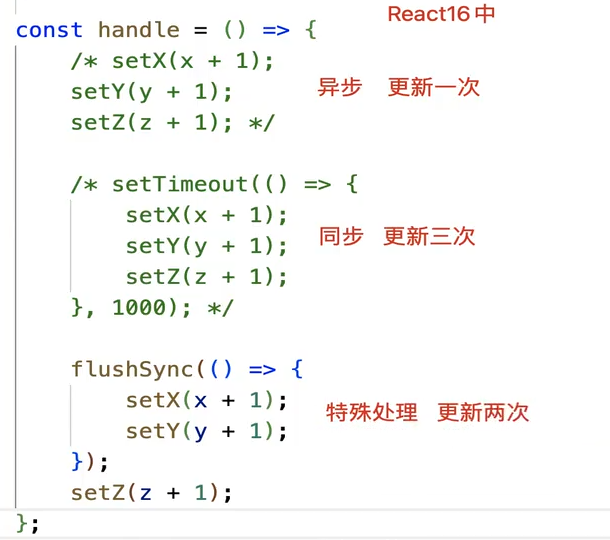
# 函数式更新
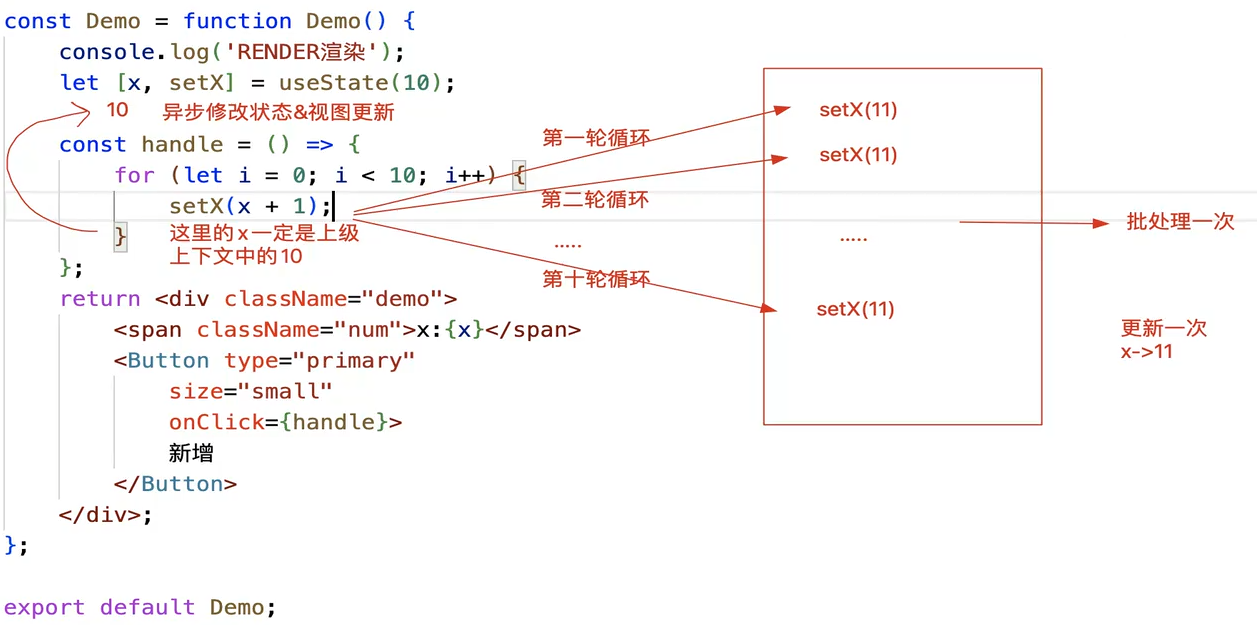
上述代码 最终只会渲染一次render, 最终x是11
如果新的 state 需要通过使用先前的 state 计算得出,那么可以将函数传递给 setState;该函数将接收先前的 state,并返回一个更新后的值!
export default function Demo() {
  console.log('RENDER渲染');
  let [x, setX] = useState(10);

  const handle = () => {
    for(let i = 0; i < 10; i++) {
      setX(prev => {
        // prev:存储上一次的状态值
        console.log(prev);
        return prev + 1; //返回的信息是我们要修改的状态值
      })
    }
  };
  return <div className="demo">
      <span>x: {x}</span>
      <button type="primary"
          size="small"
          onClick={handle}>
          执行
      </button>
  </div>;
}
2
3
4
5
6
7
8
9
10
11
12
13
14
15
16
17
18
19
20
21
22
# 性能优化
useState自带了性能优化的机制:
- 每一次修改状态值的时候,会拿最新要修改的值和之前的状态值做比较「基于Object.is作比较」
- 如果发现两次的值是一样的,则不会修改状态,也不会让视图更新「可以理解为︰类似于PureComponent,在shouldComponentUpdate中做了浅比较和优化」

# 惰性初始state
如果初始 state 需要通过复杂计算获得,则可以传入一个函数,在函数中计算并返回初始的 state,此函数只在初始渲染时被调用!
	let [num, setNum] = useState(() => {
        let { x, y } = props;
        return x + y;
    });
2
3
4
此时我们需要对初始值的操作,进行惰性化处理:只有第一次渲染组件处理这些逻辑,以后组件更新,这样的逻辑就不要再运行了!!
# useEffect
作用:在函数组件中使用生命周期函数 语法:具备很多情况
useEffect([callback],[dependencies])
useEffect:在函数组件中,使用生命周期函数
useEffect(callback):没设置依赖- 第一次渲染完毕后,执行callback,等价于 componentDidMount
- 在组件每一次更新完毕后,也会执行callback,等价于 componentDidUpdate
useEffect(callback,[]):设置了,但是无依赖 + 只有第一次渲染完毕后,才会执行callback,每一次视图更新完毕后,callback不再执行 + 类似于 componentDidMountuseEffect(callback,[依赖的状态(多个状态)]): + 第一次渲染完毕会执行callback + 当依赖的状态值(或者多个依赖状态中的一个)发生改变,也会触发callback执行 + 但是依赖的状态如果没有变化,在组件更新的时候,callback是不会执行的
useEffect(()=>{return 函数})useEffect(()=>{ return ()=>{ // 返回的小函数,会在组件释放的时候执行 // 如果组件更新,会把上一次返回的小函数执行「可以“理解为”上一次渲染的组件释放了」 }; });1
2
3
4
5
6
import React, { useEffect, useState } from 'react'

export default function Demo() {
  let [x, setX] = useState(0),
  [num, setNum] = useState(10);

  useEffect(() => {
    // 第一次渲染完成和实体更新都会触发
    // 类似 componentDidMount && componentDidUpdate
    console.log('@1', num)
  })

  useEffect(() => {
    // 第一次渲染完成触发
    // 类似 componentDidMount
    console.log('@2', num)
  }, [])

  useEffect(() => {
    // 所依赖的num状态发生改变触发
    console.log('@3', num)
  }, [num])

  useEffect(() => {
    return () => {
    // 组件释放执行
      // 获取的值还是上一次的
      console.log('@4', num);
    }
  })

  const handle = () => {
    setNum(num + 1);
  };
  const handle2 = () => {
    setX(x + 1);
  }
  return <>
      <span>{num}</span>
      <button onClick={handle}>新增num</button>
      <button onClick={handle2}>新增x</button>
  </>;
}
2
3
4
5
6
7
8
9
10
11
12
13
14
15
16
17
18
19
20
21
22
23
24
25
26
27
28
29
30
31
32
33
34
35
36
37
38
39
40
41
42
43
# useEffect的原理
函数组件在渲染(或更新)期间,遇到useEffect操作,会基于MountEffect方法把callback(和依赖项)加入到effect链表中!
在视图渲染完毕后,基于UpdateEffect方法,通知链表中的方法执行! 1、按照顺序执行期间,首先会检测依赖项的值是否有更新「有容器专门记录上一次依赖项的值」;有更新则把对应的callback执行,没有则继续处理下一项!! 2、遇到依赖项是空数组的,则只在第一次渲染完毕时,执行相应的callback 3、遇到没有设置依赖项的,则每一次渲染完毕时都执行相应的callback
……

# 注意事项
只能在函数最外层调用 Hook,不要在循环、条件判断或者子函数中调用。
import React, {useEffect, useState} from 'react'

// 模拟从服务器端获取数据
const queryData = () => {
  return new Promise(resolve => {
    setTimeout(() => {
      resolve([10, 20, 30])
    }, 2000)
  })
}

export default function Demo() {
  let [num, setNum] = useState(0);

  // 这样会报错
  // if(num >= 5) {
  //   useEffect(() => {
  //     console.log('执行');
  //   })
  // }

  useEffect(() => {
    if(num >= 5) {
      console.log('执行');
    }
  })

  // 这样会报错, 加了async后,返回的是一个promise函数
  // useEffect如果设置返回值,则返回值必须是一个函数「代表组件销毁时触发」;
  // 下面案例中,callback经过async的修饰,返回的是一个promise实例,不符合要求!!
  // useEffect(async () => {
  //   let res = await queryData();
  //   console.log(res)
  // }, [])

  // 推荐用下面的方法
  useEffect(() => {
    queryData().then(res => {
      console.log(res)
    })
  }, [])

  // 或者这种方式也行
  useEffect(() => {
    const next = async () => {
      let res = await queryData()
      console.log(res)
    }
    next()
  })

  const handle = () => {
    setNum(num + 1); // 更新num的值
  }
  return <>
    <span>{num}</span>
    <button onClick={handle}>新增num</button>
  </>;
}
2
3
4
5
6
7
8
9
10
11
12
13
14
15
16
17
18
19
20
21
22
23
24
25
26
27
28
29
30
31
32
33
34
35
36
37
38
39
40
41
42
43
44
45
46
47
48
49
50
51
52
53
54
55
56
57
58
59
# 异步获取数据
不能直接对[callback]设置async,因为它只能返回一个函数(或者不设置返回值)
import React, { useState, useEffect } from "react";
const queryData = () => {
    return fetch('/api/subscriptions/recommended_collections')
        .then(response => {
            return response.json();
        });
};
export default function Demo() {
    let [data, setData] = useState([]);
    /* // Warning: useEffect must not return anything besides a function, which is used for clean-up.
    useEffect(async () => {
        let result = await queryData();
        setData(result);
        console.log(result);
    }, []); */
    useEffect(() => {
        const next = async () => {
            let result = await queryData();
            setData(result);
            console.log(result);
        };
        next();
    }, []);
    return <div>
        ...
    </div>;
};
2
3
4
5
6
7
8
9
10
11
12
13
14
15
16
17
18
19
20
21
22
23
24
25
26
27
# useLayoutEffect
- 其函数签名与 useEffect 相同,但它会在所有的 DOM 变更之后同步调用 effect。
- 可以使用它来读取 DOM 布局并同步触发重渲染。
- 在浏览器执行绘制之前,useLayoutEffect 内部的更新计划将被同步刷新。
- 尽可能使用标准的 useEffect 以避免阻塞视图更新。
import React, { useState, useEffect, useLayoutEffect } from "react";


const Demo = function Demo() {
    // console.log('RENDER');
    let [num, setNum] = useState(0);

    // useLayoutEffect(() => {
    //     if (num === 0) {
    //         setNum(10);
    //     }
    // }, [num]);

    useLayoutEffect(() => {
        console.log('useLayoutEffect'); //第一个输出
    }, [num]);
    useEffect(() => {
        console.log('useEffect'); //第二个输出
    }, [num]);

    return <div
        style={{
            backgroundColor: num === 0 ? 'red' : 'green'
        }}>
        <span>{num}</span>
        <button onClick={() => {
                setNum(0);
            }}>
            新增
        </button>
    </div>;
};

export default Demo;
2
3
4
5
6
7
8
9
10
11
12
13
14
15
16
17
18
19
20
21
22
23
24
25
26
27
28
29
30
31
32
33
34

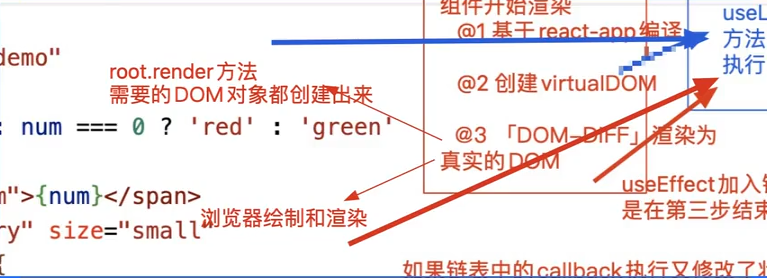
useLayoutEffect会阻塞浏览器渲染真实DOM,优先执行Effect链表中的callback;
useEffect不会阻塞浏览器渲染真实DOM,在渲染真实DOM的同时,去执行Effect链表中的callback;
useLayoutEffect设置的callback要优先于useEffect去执行!!- 两者设置的callback中,依然可以获取DOM元素「原因:真实DOM对象已经创建了,区别只是浏览器是否渲染」
- 如果在callback函数中又修改了状态值「视图又要更新」
- useEffect:浏览器肯定是把第一次的真实已经绘制了,再去渲染第二次真实DOM
- useLayoutEffect:浏览器是把两次真实DOM的渲染,合并在一起渲染的
视图更新的步骤:
第一步:基于babel-preset-react-app把JSX编译为createElement格式
第二步:把createElement执行,创建出virtualDOM
第三步:基于root.render方法把virtualDOM变为真实DOM对象「DOM-DIFF」
- useLayoutEffect阻塞第四步操作,先去执行Effect链表中的方法「同步操作」
- useEffect第四步操作和Effect链表中的方法执行,是同时进行的「异步操作」
第四步:浏览器渲染和绘制真实DOM对象
# useRef
类组件中,我们基于ref可以做的事情:
- 赋值给一个标签︰获取DOM元素
- 赋值给一个类子组件:获取子组件实例「可以基于实例调用子组件中的属性和方法等」
- 赋值给一个函数子组件:报错「需要配合React.forwardRet实现ref转发,获取子组件中的摸一个DOM元素」
# 类组件中ref的使用
ref的使用方法:
ref='box'this.refs.box 获取{不推荐使用}
ref={x=>this.box=x}this.box获取
this.box=React.createRef()创建一个ref对象<h2 ref={this.box}></h2>this.box.current获取DOM元素
# Hooks函数组件
在函数组件中,可以基于useRef获取DOM元素!类似于类组件中的 :
ref={x=>thix.box=x}React.createRef
useRef只能在函数组件中用「所有的ReactHook函数,都只能在函数组件中时候用,在类组件中使用会报错」
function Demo() {
  let x = useRef(null);
  let y = React.createRef();
  let z;
  useEffect(() => {
    console.log(x.current, y.current, z)
  }, [])
  return <>
  {/* // Function components cannot have string refs. We recommend using useRef() instead.
  <span ref="box"></span> */}
    <ChildDemo1 ref={x}></ChildDemo1>
    <p ref={y}>父组件的内容</p>
    <div ref={x => z = x}>这样也可以获取ref</div>
  </>
}

// 基于forwardRef实现ref转发,目的:获取子组件内部的某个元素
const ChildDemo1 = React.forwardRef(function ChildDemo1(props, ref) {
  // console.log(ref)
  return <>
    <span ref={ref}>子组件1</span>
  </>
})

export default Demo
2
3
4
5
6
7
8
9
10
11
12
13
14
15
16
17
18
19
20
21
22
23
24
25
注意:
React.createRef在函数组件中依然可以使用!
createRef每次渲染都会返回一个新的引用- 而
useRef每次都会返回相同的引用
let prev1;
let prev2;
const ChildDemo2 = function ChildDemo2() {
  let [num, setNum] = useState(0);
  let x1 = useRef(null);
  let x2 = React.createRef();

  if(!prev1) {
    // 第一次DEMO执行,把第一次创建的REF对象赋值给变量
    prev1 = x1;
    prev2 = x2;
  } else {
    console.log('prev1 === x1', prev1 === x1); // useRef再每一次组件更新的时候(函数重新执行),再次执行useRef方法的时候,不会创建新的REF对象了,获取到的还是第一次创建的那个REF对象!!
    console.log('prev2 === x2', prev2 === x2); // false createRef在每一次组件更新的时候,都会创建一个全新的REF对象出来,比较浪费性能!!
    // 总结:在类组件中,创建REF对象,我们基于 React.createRef 处理;但是在函数组件中,为了保证性能,我们应该使用专属的 useRef 处理!!
  }

  return (<>
    <div>测试useRef和React.createRef区别</div>
    <span>num: {num}</span>
    <button onClick={
      () => {
        setNum(num + 1)
      }
    }>新增</button>
  </>)
}
2
3
4
5
6
7
8
9
10
11
12
13
14
15
16
17
18
19
20
21
22
23
24
25
26
27
# useImperativeHandle
useImperativeHandle 可以让你在使用 ref 时自定义暴露给父组件的实例值,应当与 forwardRef 一起使用,实现ref转发!
import React, { useImperativeHandle, useRef, useState } from "react";

class ClassChild extends React.Component {
   state = {
    num: 1
   }

  submit = () => {
    console.log('调用了子类的方法')
  }
  add = () => {
    this.setState({
      num: this.state.num + 1
    })
  }
  render() {
    let { num } = this.state
    return <>
      <h2>类组件</h2>
      <p>num: {num} </p>
      <button onClick={this.add}>子组件自调用点击加加</button>
    </>
  }
}

const FunDemo = React.forwardRef(function FunDemo(props, ref) {
  let [num, setNum] = useState(0)
  useImperativeHandle(ref, () => {
    // 在这里返回的内容,都可以被父组件的REF对象获取到
    return {
      num,
      add
    }
  })

  const add = () => {
    console.log('函数子组件add方法执行')
    setNum(num + 1)
  }
  return <>
    <h2>函数子组件</h2>
    <p>num: {num} </p>
    <button onClick={add}>子组件自调用点击加加</button>
  </>
})

const Demo = function Demo() {
  let child1 = useRef(null);
  let child2 = useRef(null);
  return <>
    <h1>函数式父组件</h1>
    <button onClick={() => {
      child1.current.add()
    }}>调用类组件中的方法</button>
    <button onClick={() => {
      child2.current.add()
    }}>调用函数组件中的方法</button>
    <div style={{width: 300, height: 300, border: '1px solid #ccc'}}>
      <ClassChild ref={child1}></ClassChild>
    </div>
    <div style={{width: 300, height: 300, border: '1px solid #ccc'}}>
      <FunDemo ref={child2}></FunDemo>
    </div>

  </>
}


export default Demo;
2
3
4
5
6
7
8
9
10
11
12
13
14
15
16
17
18
19
20
21
22
23
24
25
26
27
28
29
30
31
32
33
34
35
36
37
38
39
40
41
42
43
44
45
46
47
48
49
50
51
52
53
54
55
56
57
58
59
60
61
62
63
64
65
66
67
68
69
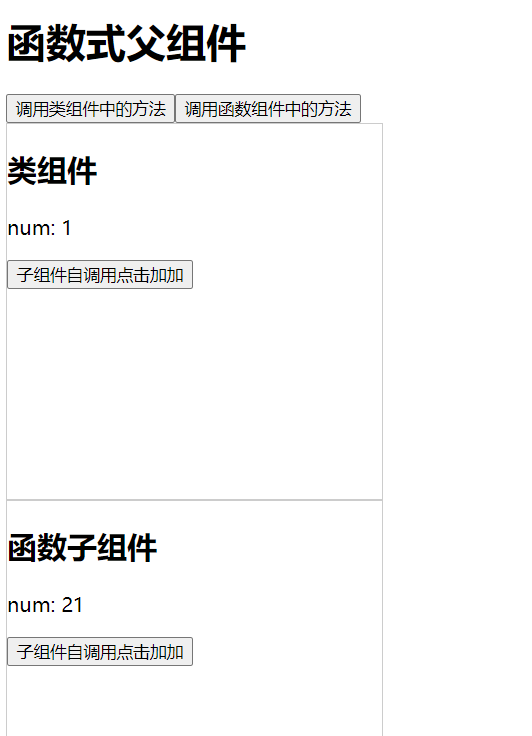
# useMemo
在前端开发的过程中,我们需要缓存一些内容,以避免在需渲染过程中因大量不必要的耗时计算而导致的性能问题。为此 React 提供了一些方法可以帮助我们去实现数据的缓存,useMemo 就是其中之一!
let xxx = useMemo(callback,[dependencies])
- 第一次渲染组件的时候,callback会执行
- 后期只有依赖的状态值发生改变,callback才会再执行
- 每一次会把callback执行的返回结果赋值给xxx
- useMemo具备“计算缓存”,在依赖的状态值没有发生改变,callback没有触发执行的时候,xxx获取的是上一次计算出来的结果 和Vue中的计算属性非常的类似!!

import React, { useEffect, useMemo, useState } from "react";

export default function Demo() {
  let [supNum, setSupNum] = useState(0);
  let [oppNum, setOppNum] = useState(0);
  let [x, setX] = useState(0);


  // // 计算支持比率
  // let total = supNum + oppNum, ratio = '--';
  // if(total > 0) {
  //   console.log('当x++的时候,我也会执行')
  //   ratio = (supNum / (total)).toFixed(2);
  // }

  let ratio = useMemo(() => {
    let ratio = '--';
    let total = supNum + oppNum;
    if(total > 0) {
      ratio = (supNum / (total)).toFixed(2);
    }
    console.log('我只有在supNum和oppNum改变的时候,才会触发')
    return ratio;
  }, [supNum, oppNum])

  // let ratio = '--';
  // let [ratio, setRatio] = useState('--');
  // useEffect(() => {
  //   let total = supNum + oppNum;
  //   if(total > 0) {
  //     ratio = (supNum / (total)).toFixed(2);
  //   }
  //   setRatio(ratio) // 需要添加这个才会重新渲染
  //   console.log('支持率将重新计算,但是ratio是不会重新渲染的')
  // }, [supNum, oppNum])


  return <>
    <div className="main">
      <p>支持人数:{supNum}人</p>
      <p>反对人数:{oppNum}人</p>
      <p>支持比率:{ratio}</p>
      <p>x: {x}</p>
    </div>
    <div className="footer">
      <button onClick={() => {
        setSupNum(supNum + 1);
      }}>支持</button>
      <button onClick={() => {
        setOppNum(oppNum + 1);
      }}>反对</button>
      <button onClick={() => {
        setX(x + 1);
      }}>x++</button>
    </div>
  </>
}
2
3
4
5
6
7
8
9
10
11
12
13
14
15
16
17
18
19
20
21
22
23
24
25
26
27
28
29
30
31
32
33
34
35
36
37
38
39
40
41
42
43
44
45
46
47
48
49
50
51
52
53
54
55
56
57
58

比较两种方法的主要区别是,
useMemo适用于记忆函数的计算结果,而useEffect用于处理副作用。在某些情况下,useMemo更适合计算值的情景,因为它是专门为此而设计的。而useEffect则更适用于处理那些不直接影响渲染结果但需要在数据变化时执行的任务。
# useCallback
useCallback 用于得到一个固定引用值的函数,通常用它进行性能优化!
const xxx = useCallback(callback,[dependencies])
- 组件第一次渲染,useCallback执行,创建一个函数“callback”,赋值给xxx
- 组件后续每一次更新,判断依赖的状态值是否改变,如果改变,则重新创建新的函数堆,赋值给xxx;但是如果,依赖的状态没有更新「或者没有设置依赖“[]”」则xxx获取的一直是第一次创建的函数堆,不会创建新的函数出来!!
- 或者说,基于useCallback,可以始终获取第一次创建函数的堆内存地址(或者说函数的引用)
 诉求:当父组件更新的时候,因为传递给子组件的属性仅仅是一个函数「特点:基本应该算是不变的」,所以不想再让子组件也跟着更新了!
- 第一条:传递给子组件的属性(函数),每一次需要是相同的堆内存地址(是一致的)。基于useCallback处理!!
- 第二条:在子组件内部也要做一个处理,验证父组件传递的属性是否发生改变,如果没有变化,则让子组件不能更新,有变化才需要更新。继承
React.PureComponent即可「在shouldComponentUpdate中对新老属性做了浅比较」!! 函数组件是基于React.memo函数,对新老传递的属性做比较,如果不一致,才会把函数组件执行,如果一致,则不让子组件更新!!
  // const handler = () => {} //第一次:0x001  第二次:0x101  第三次:0x201 ...
  const handler = useCallback(() => {}, []) //第一次:0x001  第二次:0x001  第三次:0x
  if(!prev) {
    prev = handler;
  } else {
    console.log(prev === handler) // 每次都会创建新的函数
  }
2
3
4
5
6
7

class Child extends React.PureComponent {
  render() {
    console.log('类子组件渲染');
    return <div>类子组件</div>;
  }
}

const Child2 = React.memo(function Child2() {
  console.log('函数子组件渲染')
  return <>
    <div>函数子组件</div>
  </>
})


let prev;
export default function Demo() {
  let [x, setX] = useState(0);

  // const handler = () => {} //第一次:0x001  第二次:0x101  第三次:0x201 ...
  const handler = useCallback(() => {}, []) //第一次:0x001  第二次:0x001  第三次:0x
  if(!prev) {
    prev = handler;
  } else {
    console.log(prev === handler) // 每次都会创建新的函数
  }
  const add = () => {
    setX(x++);
  }
  return <>
    <p>x: {x}</p>
    <Child handler={handler}></Child>
    <Child2 handler={handler}></Child2>
    <button onClick={add}>x++</button>
  </>
}
2
3
4
5
6
7
8
9
10
11
12
13
14
15
16
17
18
19
20
21
22
23
24
25
26
27
28
29
30
31
32
33
34
35
36

# 自定义Hook
使用自定义hook可以将某些组件逻辑提取到可重用的函数中
import React, { useEffect, useState } from 'react'

/*
自定义Hook
  作用:提取封装一些公共的处理逻辑
  玩法:创建一个函数,名字需要是 useXxx ,后期就可以在组件中调用这个方法!
*/
const usePartialState = function usePartialState(initialValue) {
  let [state, setState] = useState(initialValue);
  // setState:不支持部分状态更改的
  // setPartial:我们期望这个方法可以支持部分状态的更改
  const setPartial = function setPartial(partialState) {
    setState((state) => ({ ...state, ...partialState }));
  }
  return [state, setPartial];
}

// 自定义Hook,在组件第一次渲染完毕后,统一干点啥事
const useDidMount = function useDidMount(title) {
  if(!title) title = '哈哈哈'
  // 基于React内置的Hook函数,实现需求即可
  useEffect(() => {
    document.title = title;
  }, [])
}


export default function Demo() {
  // let [state, setState] = useState({
  //   supNum: 10,
  //   oppNum: 5
  // })
  // 如果是对象形式,修改其中的一个值,必须把原来的值赋值一份,否则会其他值会丢失
  // const handle = (type) => {
  //   if(type === 'sup') {
  //     setState({
  //       ...state,
  //       supNum: state.supNum + 1
  //     })
  //   } else {
  //     setState({
  //       ...state,
  //       oppNum: state.oppNum + 1
  //     })
  //   }
  // }
  let [state, setPartial] = usePartialState({
      supNum: 10,
      oppNum: 5
  });

  const handle = (type) => {
      if (type === 'sup') {
          setPartial({
              supNum: state.supNum + 1
          });
          return;
      }
      setPartial({
          oppNum: state.oppNum + 1
      });
  };

  useDidMount('哈哈哈哈哈');
  return <div className="vote-box">
  <div className="main">
      <p>支持人数:{state.supNum}人</p>
      <p>反对人数:{state.oppNum}人</p>
  </div>
  <div className="footer">
      <button type="primary" onClick={handle.bind(null, 'sup')}>支持</button>
      <button type="primary" danger onClick={handle.bind(null, 'opp')}>反对</button>
  </div>
</div>;
}
2
3
4
5
6
7
8
9
10
11
12
13
14
15
16
17
18
19
20
21
22
23
24
25
26
27
28
29
30
31
32
33
34
35
36
37
38
39
40
41
42
43
44
45
46
47
48
49
50
51
52
53
54
55
56
57
58
59
60
61
62
63
64
65
66
67
68
69
70
71
72
73
74
75
76
# useReducer
useReducer是对useState的升级处理
- 普通需求处理的时候,基本都是useState直接处理,不会使用useReducer
- 但是如果一个组件的逻辑很复杂,需要大量的状态/大量修改状态的逻辑,此时使用useReducer管理这些状态会更好一些
- 不需要再基于useState一个个的去创建状态了
- 所有状态修改的逻辑,全部统一化处理了

import React, { useReducer, useState } from "react";

const initialState = {
    num: 0
};
const reducer = function reducer(state, action) {
    state = { ...state };
    switch (action.type) {
        case 'plus':
            state.num++;
            break;
        case 'minus':
            state.num--;
            break;
        default:
    }
    return state;
};

const A1 = function A1() {
    let [state, dispatch] = useReducer(reducer, initialState);

    return <div className="box">
        <span>{state.num}</span>
        <br />
        <button onClick={() => {
            dispatch({ type: 'plus' });
        }}>增加</button>
        <button onClick={() => {
            dispatch({ type: 'minus' });
        }}>减少</button>
    </div>;
};
export default A1;
2
3
4
5
6
7
8
9
10
11
12
13
14
15
16
17
18
19
20
21
22
23
24
25
26
27
28
29
30
31
32
33
34
# React 复合组件通信方案
# 基于props属性,实现父子(或兄弟)组件间的通信
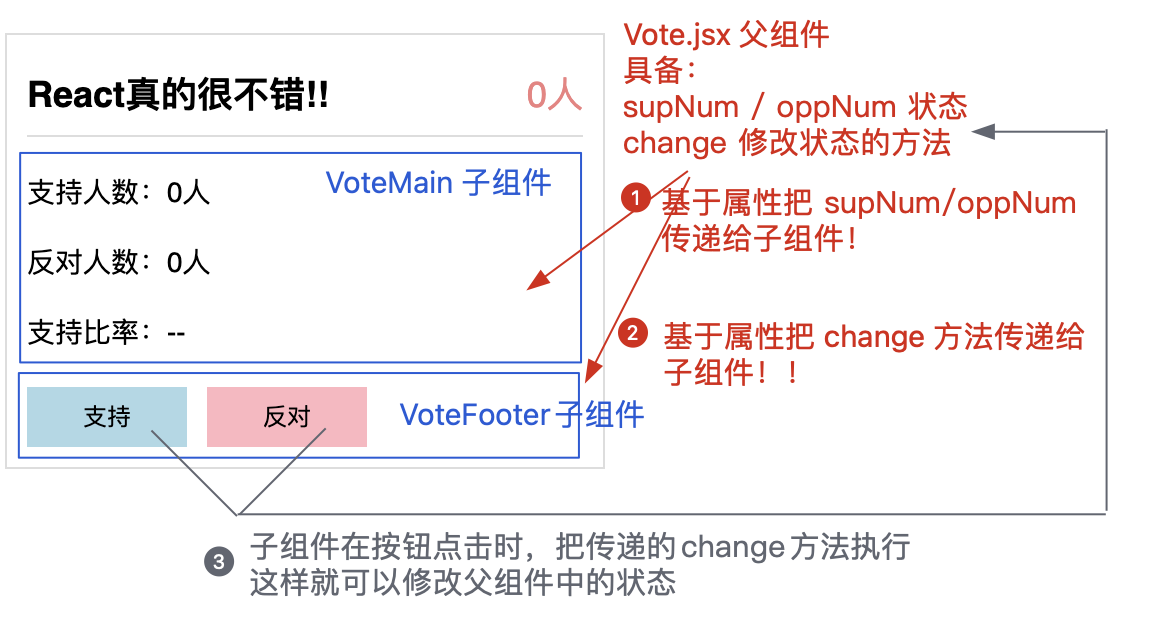
基本结构
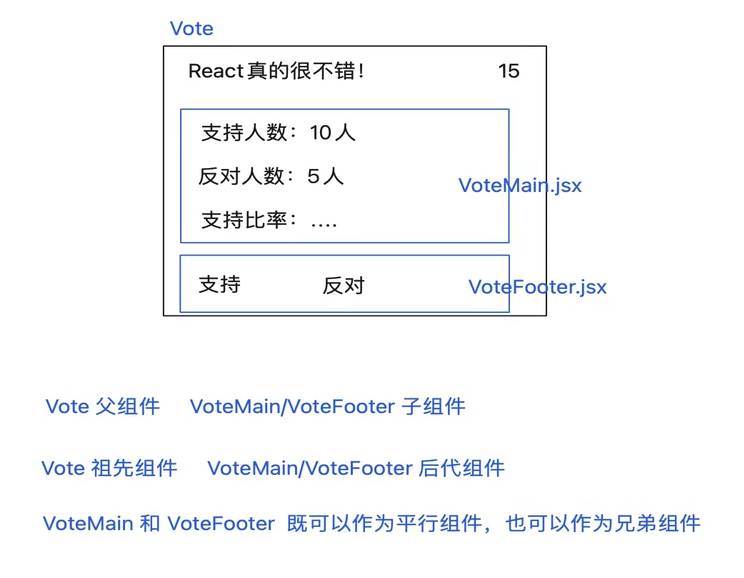
# 类组件
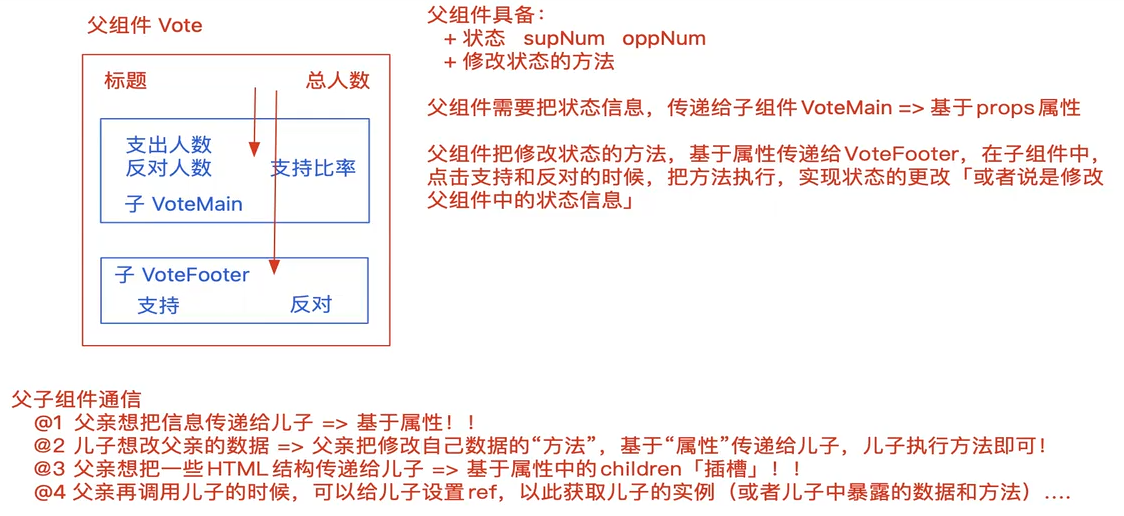
Vote.jsx
import React from "react";
import './Vote.less';
import VoteMain from './VoteMain';
import VoteFooter from './VoteFooter';

class Vote extends React.Component {
    state = {
        supNum: 10,
        oppNum: 0
    }
    // 设置为箭头函数:不论方法在哪执行的,方法中的this永远都是Vote父组件的实例
    change = (type) => {
        let { supNum, oppNum} = this.state
        if(type === 'sup') {
            this.setState({
                supNum: supNum + 1
            })
            return;
        }
        this.setState({oppNum: oppNum + 1})
    }
    render() {
        let {supNum, oppNum} = this.state;
        return <div className="vote-box">
            <div className="header">
                <h2 className="title">React是很棒的前端框架</h2>
                <span className="num">{supNum + oppNum}</span>
            </div>
            <VoteMain supNum={supNum} oppNum={oppNum} />
            <VoteFooter change={this.change} />
        </div>;
    }
}

export default Vote;
2
3
4
5
6
7
8
9
10
11
12
13
14
15
16
17
18
19
20
21
22
23
24
25
26
27
28
29
30
31
32
33
34
35
VoteMain.jsx
import React from "react";
import PropTypes  from 'prop-types'


class VoteMain extends React.Component {
    /* 属性规则校验 */
    static defaultProps = {
        supNum: 0,
        oppNum: 0
    };
    static propTypes = {
        supNum: PropTypes.number.isRequired,
        oppNum: PropTypes.number.isRequired
    };

    render() {
        let { supNum, oppNum } = this.props;
        console.log(supNum, oppNum);
        let ratio = '--',
        total = supNum + oppNum;
        if (total > 0) ratio = (supNum / total * 100).toFixed(2) + '%';
        return <div className="main">
            <p>支持人数:{supNum}人</p>
            <p>反对人数:{oppNum}人</p>
            <p>支持比率:{ratio}</p>
        </div>;
    }
}

export default VoteMain;
2
3
4
5
6
7
8
9
10
11
12
13
14
15
16
17
18
19
20
21
22
23
24
25
26
27
28
29
30
VoteFooter.jsx
import React from "react";
import { Button } from 'antd';

class VoteFooter extends React.Component {
    render() {
        let {change} = this.props;
        return <div className="footer">
            <Button type="primary" onClick={change.bind(null, 'sup')}>支持</Button>
            <Button type="primary" onClick={change.bind(null, 'opp')} danger>反对</Button>
        </div>;
    }
}

export default VoteFooter;
2
3
4
5
6
7
8
9
10
11
12
13
14


理解一:属性的传递方向是单向的
- 父组件可基于属性把信息传给子组件
- 子组件无法基于属性给父组件传信息;但可以把父组件传递的方法执行,从而实现子改父!
理解二:关于生命周期函数的延续
- 组件第一次渲染
- 父 willMount -> 父 render
- 子 willMount -> 子 render -> 子 didMount
- 父 didMount
- 组件更新
- 父 shouldUpdate -> 父 willUpdate -> 父 render
- 子 willReciveProps -> 子 shouldUpdate -> 子 willUpdate -> 子 render -> 子 didUpdate
- 父 didUpdate
# 函数组件
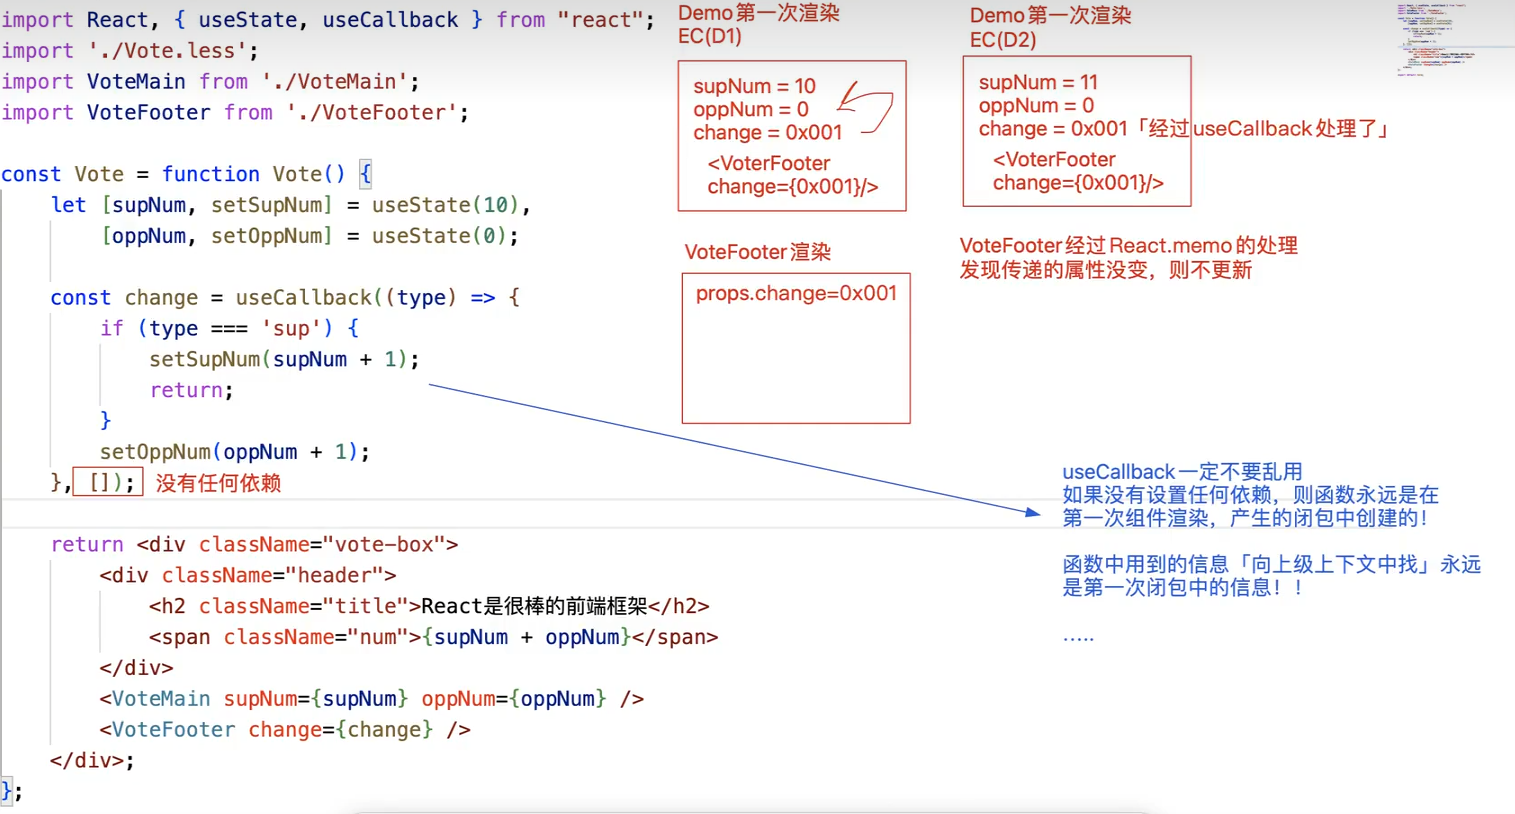
Vote.jsx
import React, { useCallback, useState } from "react";
import './Vote.less';
import VoteMain from './VoteMain';
import VoteFooter from './VoteFooter';

const Vote = function Vote() {
    let [supNum, setSupNum] = useState(10);
    let [oppNum, setOppNum] = useState(0);
    const change = useCallback((type)=> {
        if(type === 'sup') {
            setSupNum(supNum + 1);
        }else {
            setOppNum(oppNum + 1);
        }
    }, [supNum, oppNum])
    return <div className="vote-box">
        <div className="header">
            <h2 className="title">React是很棒的前端框架</h2>
            <span className="num">{supNum + oppNum}</span>
        </div>
        <VoteMain supNum={supNum} oppNum = {oppNum} />
        <VoteFooter change={change} />
    </div>;
};

export default Vote;
2
3
4
5
6
7
8
9
10
11
12
13
14
15
16
17
18
19
20
21
22
23
24
25
26
VoteMain.jsx
import React, { useMemo } from "react";
import {PropTypes} from 'prop-types'

const VoteMain = function VoteMain(props) {
    let {supNum, oppNum} = props;
    let ratio = '--'
    ratio = useMemo(() => {
        let ratio = '--',
        total = supNum + oppNum;
        if (total > 0) ratio = (supNum / total * 100).toFixed(2) + '%';
        return ratio;
    }, [supNum, oppNum])
    return <div className="main">
        <p>支持人数:{supNum}人</p>
        <p>反对人数:{oppNum}人</p>
        <p>支持比率:{ratio}</p>
    </div>;
};
// 规则属性校验
VoteMain.defaultProps = {
    supNum: 0,
    oppNum: 0
}
VoteMain.propTypes = {
    supNum: PropTypes.number,
    oppNum: PropTypes.number
}
export default VoteMain;
2
3
4
5
6
7
8
9
10
11
12
13
14
15
16
17
18
19
20
21
22
23
24
25
26
27
28
VoteFooter.jsx
import React from "react";
import { Button } from 'antd';
import PropTypes from 'prop-types';

const VoteFooter = function VoteFooter(props) {
    let {change} = props
    return <div className="footer">
        <Button type="primary" onClick={change.bind(null, 'sup')}>支持</Button>
        <Button type="primary" onClick={change.bind(null, 'opp')} danger>反对</Button>
    </div>;
};
// 规则属性校验
VoteFooter.defaultProps = {}
VoteFooter.propTypes = {
    change: PropTypes.func.isRequired
}

export default VoteFooter;
2
3
4
5
6
7
8
9
10
11
12
13
14
15
16
17
18
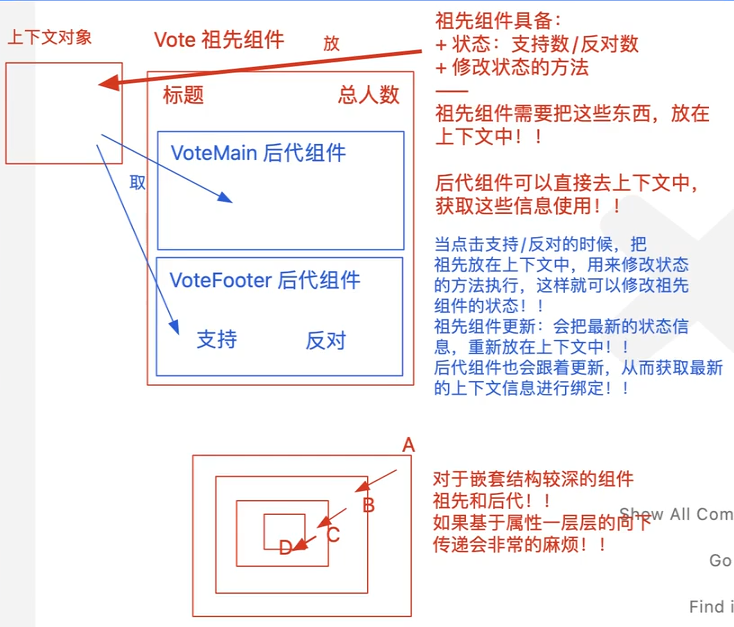
# 基于context上下文,实现祖先/后代(或平行)组件间的通信

1.创建上下文对象
ThemeContext.js
import React from "react";
const ThemeContext = React.createContext();
export default ThemeContext;
2
3
# 类组件
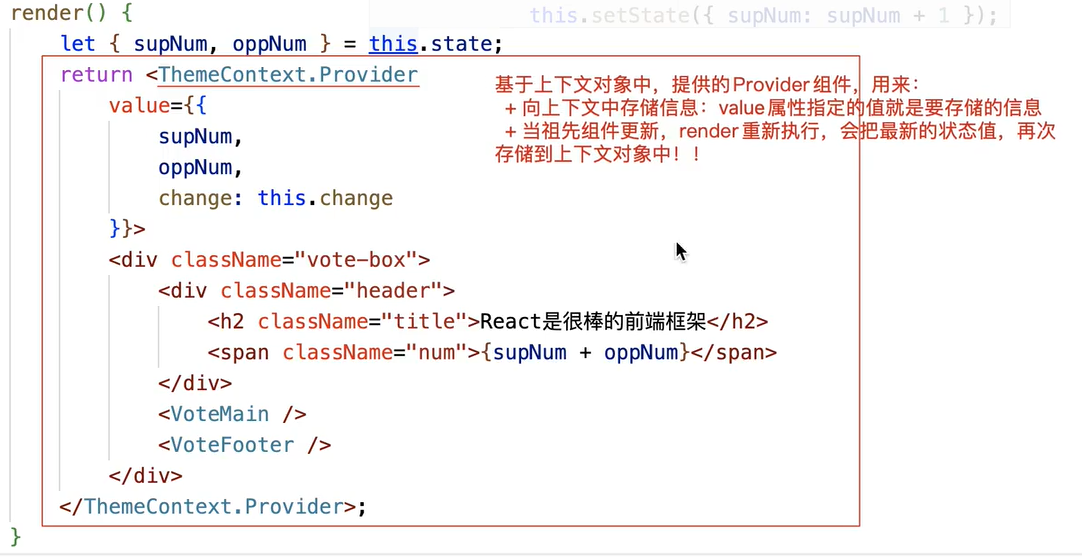


Vote.jsx
import React from "react";
import './Vote.less';
import VoteMain from './VoteMain';
import VoteFooter from './VoteFooter';
import ThemeContext from "../../ThemeContext";

class Vote extends React.Component {
    state = {
        supNum: 10,
        oppNum: 0
    }
    // 设置为箭头函数:不论方法在哪执行的,方法中的this永远都是Vote父组件的实例
    change = (type) => {
        let { supNum, oppNum} = this.state
        if(type === 'sup') {
            this.setState({
                supNum: supNum + 1
            })
            return;
        }
        this.setState({oppNum: oppNum + 1})
    }
    render() {
        let {supNum, oppNum} = this.state;
        return <ThemeContext.Provider value={{
            supNum,
            oppNum,
            change: this.change
        }}>
            <div className="vote-box">
                <div className="header">
                    <h2 className="title">React是很棒的前端框架</h2>
                    <span className="num">{supNum + oppNum}</span>
                </div>
                <VoteMain/>
                <VoteFooter/>
            </div>
        </ThemeContext.Provider>;
    }
}

export default Vote;
2
3
4
5
6
7
8
9
10
11
12
13
14
15
16
17
18
19
20
21
22
23
24
25
26
27
28
29
30
31
32
33
34
35
36
37
38
39
40
41
42
VoteMain.jsx
import React from "react";
import ThemeContext from "../../ThemeContext";

class VoteMain extends React.Component {
    render() {
        return <ThemeContext.Consumer>
            {
                context => {
                    let {supNum, oppNum} = context
                    return <div className="main">
                        <p>支持人数:{supNum}人</p>
                        <p>反对人数:{oppNum}人</p>
                        <p>支持比率:--</p>
                    </div>
                }
            }
        </ThemeContext.Consumer>
    }
}

export default VoteMain;
2
3
4
5
6
7
8
9
10
11
12
13
14
15
16
17
18
19
20
21
VoteFooter.jsx
import React from "react";
import { Button } from 'antd';
import ThemeContext from "../../ThemeContext";

// class VoteFooter extends React.Component {
//     render() {
//         return <ThemeContext.Consumer>
//             {
//                 context => {
//                     let {change} = context
//                     return <div className="footer">
//                         <Button type="primary" onClick={change.bind(null, 'sup')}>支持</Button>
//                         <Button type="primary" onClick={change.bind(null, 'opp')} danger>反对</Button>
//                     </div>;
//                 }
//             }
//         </ThemeContext.Consumer>
//     }
// }

// 方案二
class VoteFooter extends React.Component {
    static contextType = ThemeContext;
    render() {
        let {change} = this.context
        return <div className="footer">
            <Button type="primary" onClick={change.bind(null, 'sup')}>支持</Button>
            <Button type="primary" onClick={change.bind(null, 'opp')} danger>反对</Button>
        </div>;
    }
}

export default VoteFooter;
2
3
4
5
6
7
8
9
10
11
12
13
14
15
16
17
18
19
20
21
22
23
24
25
26
27
28
29
30
31
32
33
# 函数组件
Vote.jsx
import React, { useCallback, useState } from "react";
import './Vote.less';
import VoteMain from './VoteMain';
import VoteFooter from './VoteFooter';
import ThemeContext from "../../ThemeContext";

const Vote = function Vote() {
    let [supNum, setSupNum] = useState(10);
    let [oppNum, setOppNum] = useState(0);
    const change = useCallback((type)=> {
        if(type === 'sup') {
            setSupNum(supNum + 1);
        }else {
            setOppNum(oppNum + 1);
        }
    }, [supNum, oppNum])
    return (
        <ThemeContext.Provider value={{
            supNum,
            oppNum,
            change
        }}>
            <div className="vote-box">
                <div className="header">
                    <h2 className="title">React是很棒的前端框架</h2>
                    <span className="num">{supNum + oppNum}</span>
                </div>
                <VoteMain supNum={supNum} oppNum = {oppNum} />
                <VoteFooter change={change} />
            </div>
        </ThemeContext.Provider>
    )
};

export default Vote;
2
3
4
5
6
7
8
9
10
11
12
13
14
15
16
17
18
19
20
21
22
23
24
25
26
27
28
29
30
31
32
33
34
35
VoteMain.jsx
import React, { useContext, useMemo } from "react";
import ThemeContext from "../../ThemeContext";

const VoteMain = function VoteMain() {
    // 获取上下文中的信息
    let {supNum, oppNum} = useContext(ThemeContext);
    let ratio = useMemo(() => {
        let total = supNum + oppNum;
        return total > 0 ? (supNum / total * 100).toFixed(2) + '%' : '--';
    }, [supNum, oppNum]);
    return <div className="main">
        <p>支持人数:{supNum}人</p>
        <p>反对人数:{oppNum}人</p>
        <p>支持比率:{ratio}</p>
    </div>;
};
export default VoteMain;
2
3
4
5
6
7
8
9
10
11
12
13
14
15
16
17
VoteFooter.jsx
import React, { useContext } from "react";
import { Button } from 'antd';
import ThemeContext from "../../ThemeContext";

const VoteFooter = function VoteFooter() {
    let {change} = useContext(ThemeContext);
    return <div className="footer">
        <Button type="primary" onClick={change.bind(null, 'sup')}>支持</Button>
        <Button type="primary" onClick={change.bind(null, 'opp')} danger>反对</Button>
    </div>;
};
export default VoteFooter;
2
3
4
5
6
7
8
9
10
11
12
真实项目中
- 父子通信(或具备相同父亲的兄弟组件):我们一般都是基于props属性实现
- 其他组件之间的通信:我们都是基于 redux / react-redux 或者 mobx 去实现
# React样式的处理方案
在vue开发中,我们可以基于scoped为组件设置样式私有化!
<style lang="less" scoped>
.banner-box {
  box-sizing: border-box;
  height: 375px;
  background: #eee;
  overflow: hidden;
}
:deep(.van-swipe__indicators) {
    left: auto;
    right: 20px;
    transform: none;
}
</style>
2
3
4
5
6
7
8
9
10
11
12
13
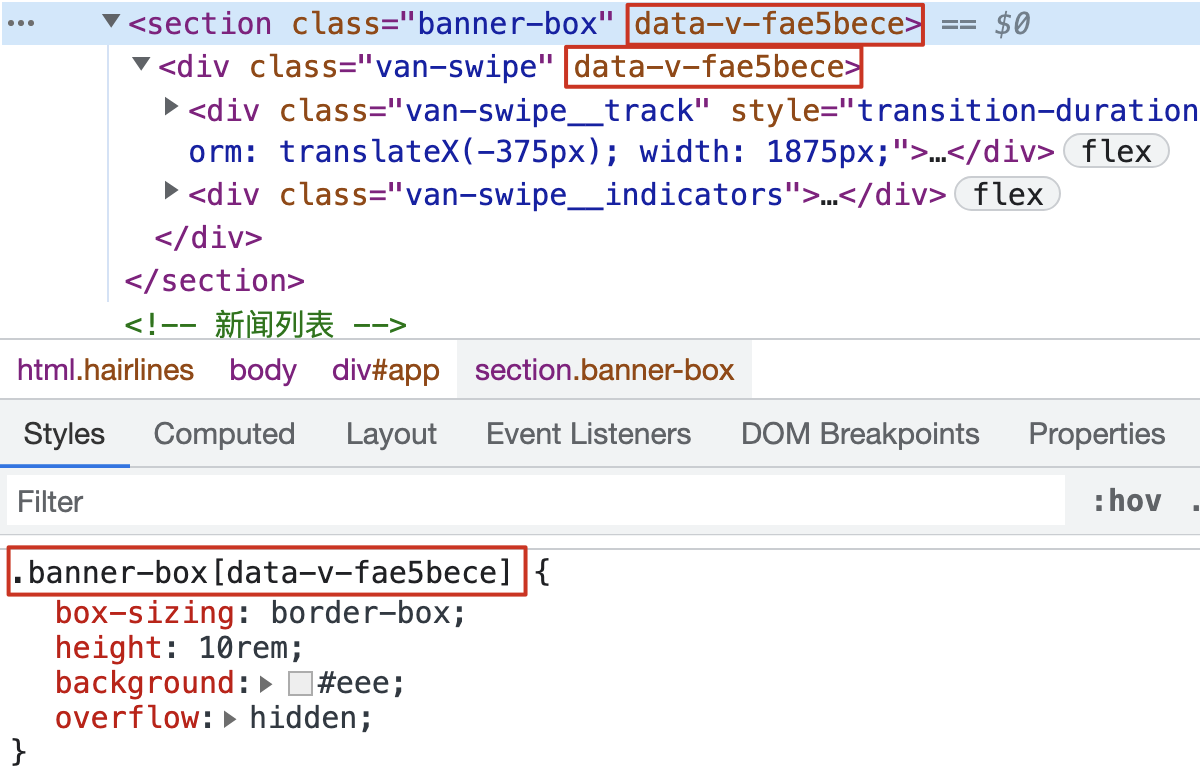
但是react项目中并没有类似于这样的机制!如果我们想保证“团队协作开发”中,各组件间的样式不冲突,我们则需要基于特定的方案进行处理!
# 内联样式
内联样式就是在JSX元素中,直接定义行内的样式
// 调用组件的时候 <Demo color="red" />
import React from 'react';
const Demo = function Demo(props) {
    const titleSty = {
        color: props.color,
        fontSize: '16px'
    };
    const boxSty = {
        width: '300px',
        height: '200px'
    };
    return <div style={boxSty}>
        <h1 style={titleSty}>1111</h1>
        <h2 style={{ ...titleSty, fontSize: '14px' }}>2222</h2>
    </div>;
};
export default Demo;
2
3
4
5
6
7
8
9
10
11
12
13
14
15
16
17
编译后的内容
<div style="width: 300px; height: 200px;">
    <h1 style="color: red; font-size: 16px;">珠峰培训</h1>
    <h2 style="color: red; font-size: 14px;">珠峰培训</h2>
</div>
2
3
4
内联样式的优点:
- 使用简单: 简单的以组件为中心来实现样式的添加
- 扩展方便: 通过使用对象进行样式设置,可以方便的扩展对象来扩展样式
- 避免冲突: 最终都编译为元素的行内样式,不存在样式冲突的问题
在大型项目中,内联样式可能并不是一个很好的选择,因为内联样式还是有局限性的:
- 不能使用伪类: 这意味着 :hover、:focus、:actived、:visited 等都将无法使用
- 不能使用媒体查询: 媒体查询相关的属性不能使用
- 减低代码可读性: 如果使用很多的样式,代码的可读性将大大降低
- 没有代码提示: 当使用对象来定义样式时,是没有代码提示的
# 使用CSS样式表
CSS样式表应该是我们最常用的定义样式的方式!但多人协作开发中,很容易导致组件间的样式类名冲突,从而导致样式冲突;所以此时需要我们 人为有意识的 避免冲突!
- 保证组件最外层样式类名的唯一性,例如:
路径名称 + 组件名称作为样式类名 - 基于 less、sass、stylus 等css预编译语言的
嵌套功能,保证组件后代元素的样式,都嵌入在外层样式类中!!
Demo.less
.personal-box {
    width: 300px;
    height: 200px;
    .title {
        color: red;
        font-size: 16px;
    }
    .sub-title {
        .title;
        font-size: 14px;
    }
}
2
3
4
5
6
7
8
9
10
11
12
Demo.jsx
import React from 'react';
import './Demo.less';
const Demo = function Demo(props) {
    return <div className='personal-box'>
        <h1 className='title'>111</h1>
        <h2 className='sub-title'>222</h2>
    </div>;
};
export default Demo;
2
3
4
5
6
7
8
9
CSS样式表的优点:
- 结构样式分离: 实现了样式和JavaScript的分离
- 使用CSS所有功能: 此方法允许我们使用CSS的任何语法,包括伪类、媒体查询等
- 使用缓存: 可对样式文件进行强缓存或协商缓存
- 易编写:CSS样式表在书写时会有代码提示
当然,CSS样式表也是有缺点的:
- 产生冲突: CSS选择器都具有相同的全局作用域,很容易造成样式冲突
- 性能低: 预编译语言的嵌套,可能带来的就是超长的
选择器前缀,性能低! - 没有真正的动态样式: 在CSS表中难以实现动态设置样式
# CSS Modules
CSS的规则都是全局的,任何一个组件的样式规则,都对整个页面有效;产生局部作用域的唯一方法,就是使用一个独一无二的class名字;这就是 CSS Modules 的做法!
第一步:创建 xxx.module.css
.personal {
  width: 300px;
  height: 200px;
}
.personal span {
  color: green;
}
.title {
  color: red;
  font-size: 16px;
}
.subTitle {
  color: red;
  font-size: 14px;
}
2
3
4
5
6
7
8
9
10
11
12
13
14
15
第二步:导入样式文件 & 调用
import React from 'react';
import sty from './css/demo.module.css';
const Demo = function Demo() {
    return <div className={sty.personal}>
        <h1 className={sty.title}>111</h1>
        <h2 className={sty.subTitle}>222</h2>
        <span>文字</span>
    </div>;
};
export default Demo;
2
3
4
5
6
7
8
9
10
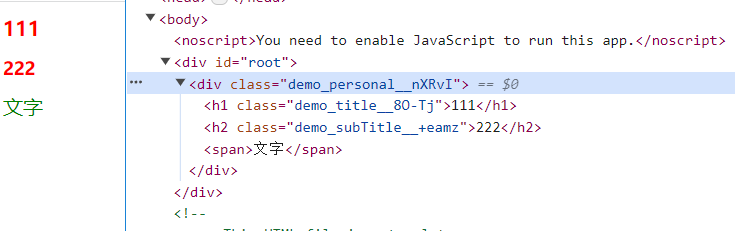
编译后的效果
// 结构
<div class="demo_personal__dlx2V">
    <h1 class="demo_title__tN+WF">111</h1>
    <h2 class="demo_subTitle__rR4WF">222</h2>
    <span>文字</span>
</div>

// 样式
.demo_personal__dlx2V {
    height: 200px;
    width: 300px
}
.demo_personal__dlx2V span {
    color: green
}
.demo_title__tN\+WF {
    color: red;
    font-size: 16px
}
.demo_subTitle__rR4WF {
    color: red;
    font-size: 14px
}
2
3
4
5
6
7
8
9
10
11
12
13
14
15
16
17
18
19
20
21
22
23
react 脚手架中对 CSS Modules 的配置
// react-dev-utils/getCSSModuleLocalIdent.js
const loaderUtils = require('loader-utils');
const path = require('path');
module.exports = function getLocalIdent(
  context,
  localIdentName,
  localName,
  options
) {
  // Use the filename or folder name, based on some uses the index.js / index.module.(css|scss|sass) project style
  const fileNameOrFolder = context.resourcePath.match(
    /index\.module\.(css|scss|sass)$/
  )
    ? '[folder]'
    : '[name]';
  // Create a hash based on a the file location and class name. Will be unique across a project, and close to globally unique.
  const hash = loaderUtils.getHashDigest(
    path.posix.relative(context.rootContext, context.resourcePath) + localName,
    'md5',
    'base64',
    5
  );
  // Use loaderUtils to find the file or folder name
  const className = loaderUtils.interpolateName(
    context,
    fileNameOrFolder + '_' + localName + '__' + hash,
    options
  );
  // Remove the .module that appears in every classname when based on the file and replace all "." with "_".
  return className.replace('.module_', '_').replace(/\./g, '_');
};
2
3
4
5
6
7
8
9
10
11
12
13
14
15
16
17
18
19
20
21
22
23
24
25
26
27
28
29
30
31
# 全局作用域
CSS Modules 允许使用 :global(.className) 的语法,声明一个全局规则。凡是这样声明的class,都不会被编译成哈希字符串。
// xxx.module.css
:global(.personal) {
    width: 300px;
    height: 200px;
}

// xxx.jsx
const Demo = function Demo() {
    return <div className='personal'>
        ...
    </div>;
};
2
3
4
5
6
7
8
9
10
11
12
# class继承/组合
在 CSS Modules 中,一个选择器可以继承另一个选择器的规则,这称为”组合”
// xxx.module.css
.title {
    color: red;
    font-size: 16px;
}
.subTitle {
    composes: title;
    font-size: 14px;
}

<h1 class="demo_title__tN+WF">111</h1>
<h2 class="demo_subTitle__rR4WF">222</h2>


// 组件还是正常的调用,但是编译后的结果
<h1 class="demo_title__tN+WF">111</h1>
<h2 class="demo_subTitle__rR4WF demo_title__tN+WF">222</h2>
2
3
4
5
6
7
8
9
10
11
12
13
14
15
16
17

# React-JSS
JSS是一个CSS创作工具,它允许我们使用JavaScript以生命式、无冲突和可重用的方式来描述样式。JSS 是一种新的样式策略! React-JSS 是一个框架集成,可以在 React 应用程序中使用 JSS。它是一个单独的包,所以不需要安装 JSS 核心,只需要 React-JSS 包即可。React-JSS 使用新的 Hooks API 将 JSS 与 React 结合使用。
npm install react-jss
基于createUseStyles方法,构建组件需要的样式; 返回结果是一个自定义Hook函数
- 对象中的每个成员就是创建的样式类名
- 可以类似于less等预编译语言中的“嵌套语法",给其后代/伪类等设置样式
自定义Hook执行,返回一个对象,对象中包含:
- 我们创建的样式类名,作为属性名
- 编译后的样式类名「唯—的」,作为属性值
{box: 'box-0-2-1', title: 'title-0-2-2', list: 'list-O-2-3'} 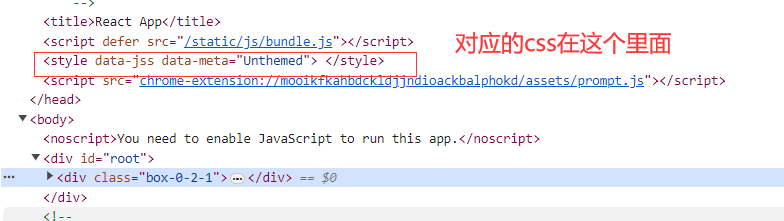
函数组件
import React from 'react';
import { createUseStyles } from 'react-jss';
const useStyles = createUseStyles({
  box: {
    backgroundColor: 'lightblue',
    width: '400px',
  },
  // 使用动态值
  link: props => {
    return {
      color: props.color,
      fontSize: props.size + 'px',
      '&:hover': {
        color: 'blue'
      }
    }
  },
  list: {
    listStyle: 'none',
    padding: '0',
    // 使用动态值
    fontSize: props => {
      console.log(props)
      return props.size + 'px'
    },
    '& li': {
      color: 'red'
    },
    '& li:hover': {
      color: 'blue',
      backgroundColor: 'yellow'
    }
  }
})
const Menu = function () {
  let {box, list, link} = useStyles({
    size: 22,
    color: 'orange'
  });
  return (<div className={box}>
          <a href='#' className={link}>1111111</a>
          <ul className={list}>
              <li>手机</li>
              <li>电脑</li>
              <li>家电</li>
          </ul>
        </div>)
}
export default Menu;
2
3
4
5
6
7
8
9
10
11
12
13
14
15
16
17
18
19
20
21
22
23
24
25
26
27
28
29
30
31
32
33
34
35
36
37
38
39
40
41
42
43
44
45
46
47
48
49
类组件
类组件中使用要创建代理组件(函数组件)
import React from 'react';
import { createUseStyles } from 'react-jss';
const useStyles = createUseStyles({
  box: {
    backgroundColor: 'lightblue',
    width: '400px',
  },
  // 使用动态值
  link: props => {
    return {
      color: props.color,
      fontSize: props.size + 'px',
      '&:hover': {
        color: 'blue'
      }
    }
  },
  list: {
    listStyle: 'none',
    padding: '0',
    // 使用动态值
    fontSize: props => {
      console.log(props)
      return props.size + 'px'
    },
    '& li': {
      color: 'red'
    },
    '& li:hover': {
      color: 'blue',
      backgroundColor: 'yellow'
    }
  }
})

// 在类组件中是无法使用hook函数的
class Menu extends React.Component {
  render() {
    let {box, list, link} = this.props;
    return (<div className={box}>
            <a href='#' className={link}>1111111</a>
            <ul className={list}>
                <li>手机</li>
                <li>电脑</li>
                <li>家电</li>
            </ul>
          </div>)
    }
}

// 创建一个代理组件(函数组件):获取基于ReactJSS编写的样式,把获取的样式基于属性传递给类组件
const ProxyComponent = function ProxyComponent(Component) {
    // Component:真实要渲染的组件「例如 Menu」
    // 方法执行要返回的一个函数组件:我们基于export default导出的是这个组件,在App调用的也是这个组件(HOC)
    return function HOC(props) {
      let sty = useStyles(props);
      return <Component {...props} {...sty}/>
    }
}

export default ProxyComponent(Menu);
2
3
4
5
6
7
8
9
10
11
12
13
14
15
16
17
18
19
20
21
22
23
24
25
26
27
28
29
30
31
32
33
34
35
36
37
38
39
40
41
42
43
44
45
46
47
48
49
50
51
52
53
54
55
56
57
58
59
60
61
# HOC高阶组件
React高阶组件:利用JS中的闭包「柯理化函数」实现的组件代理
我们可以在代理组件中,经过业务逻辑的处理,获取一些信息,最后基于属性等方案,传递给我们最终要渲染的组件
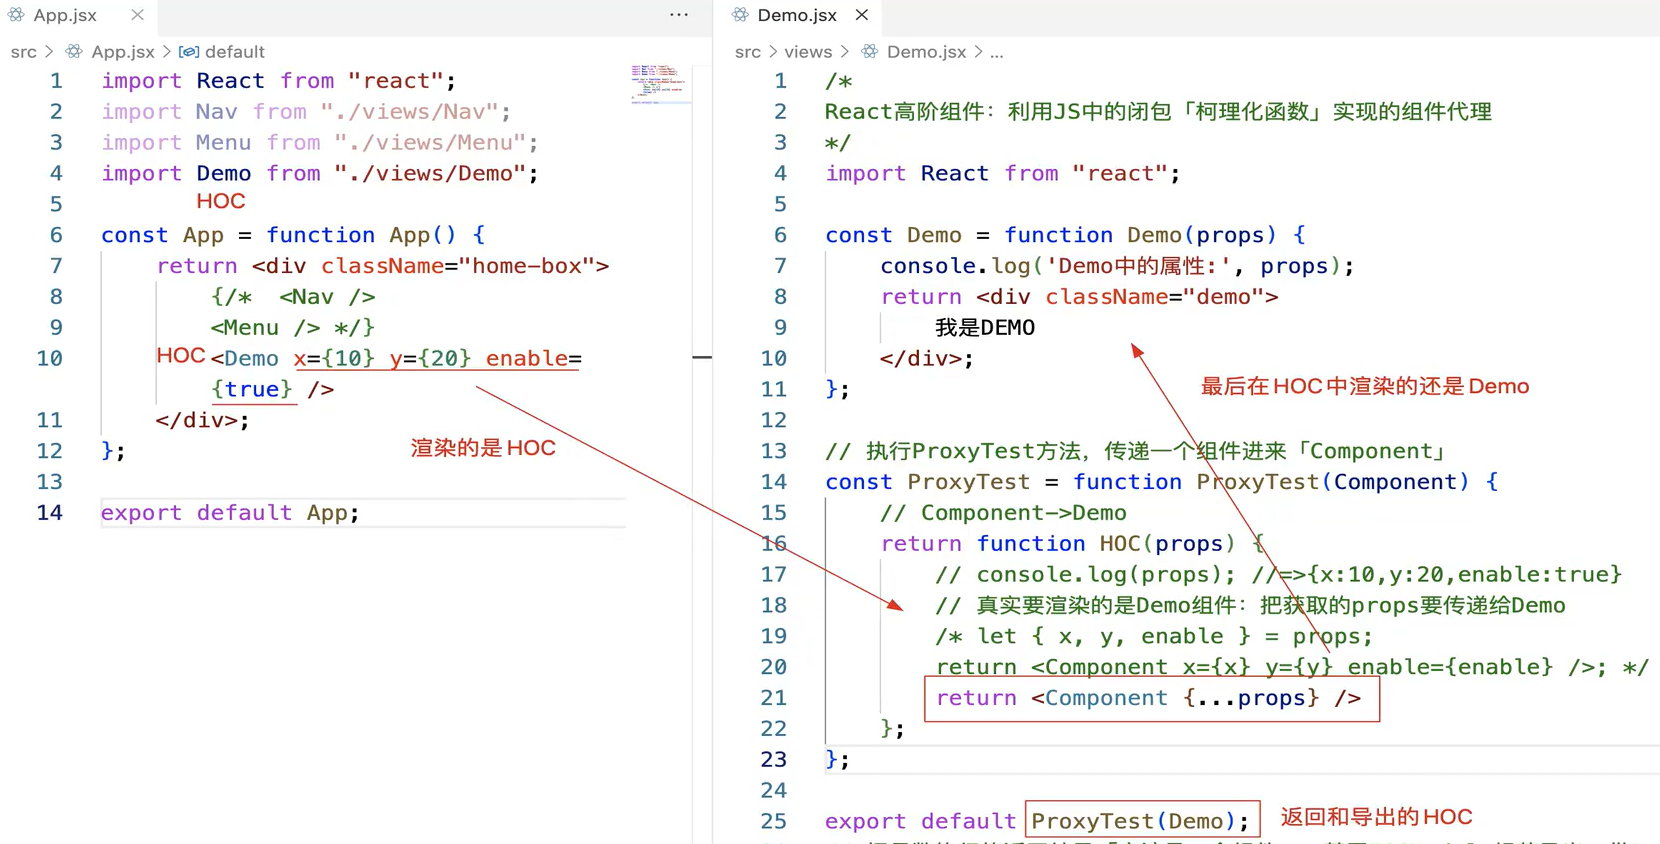
# styled-components
目前在React中,还流行 CSS-IN-JS 的模式:也就是把CSS像JS一样进行编写;其中比较常用的插件就是 styled-components
npm install styled-components
想要有语法提示,可以安装vscode插件:vscode-styled-components
基于 “styled.标签名” 这种方式编写需要的样式
- 样式要写在“ES6模板字符串”中
- 返回并且导出的结果是一个自定义组件
style.js
import styled from 'styled-components'

// 创建公共的样式变量
const colorBlue = "#1677ff",
    colorRed = "#ff4d4f";

// 创建一个 styled.div 组件
export const Container = styled.div`
    color: ${colorBlue}; // 设置字体颜色为蓝色
    border: 1px solid ${colorRed}; // 设置边框颜色为红色
    padding: 10px;
    width: 400px;
    height: 200px;
    &:hover {
      background-color: lightblue;
    }
    p {
      color: #ccc;
    }
`

// 使用传递的属性,动态设置样式  &&  给属性设置默认值!!
export const MenuBox = styled.ul.attrs(props => {
  return {
    style: {
      // 未传值就使用默认值
      backgroundColor: props.bgColor || '#fff',
      color: props.color || '#000'
    }
  }
})`
  list-style: none;
  padding: 0;
  margin: 0;
  li {
    padding: 10px;
    border: 1px solid ${colorRed};
    margin: 10px;
    background-color: ${props => props.style.backgroundColor};
    color: ${props => props.style.color};
  }
`
2
3
4
5
6
7
8
9
10
11
12
13
14
15
16
17
18
19
20
21
22
23
24
25
26
27
28
29
30
31
32
33
34
35
36
37
38
39
40
41
42
StyledComponents.jsx
import { Container, MenuBox } from './style'
const StyledComponents = () => {
  return (
    <Container>
      <h1>Styled Components</h1>
      <p>This is a styled component.</p>
      <MenuBox color='yellow'>
        <li>1</li>
        <li>2</li>
        <li>3</li>
      </MenuBox>
    </Container>
  );
}

export default StyledComponents;
2
3
4
5
6
7
8
9
10
11
12
13
14
15
16
编译后的效果
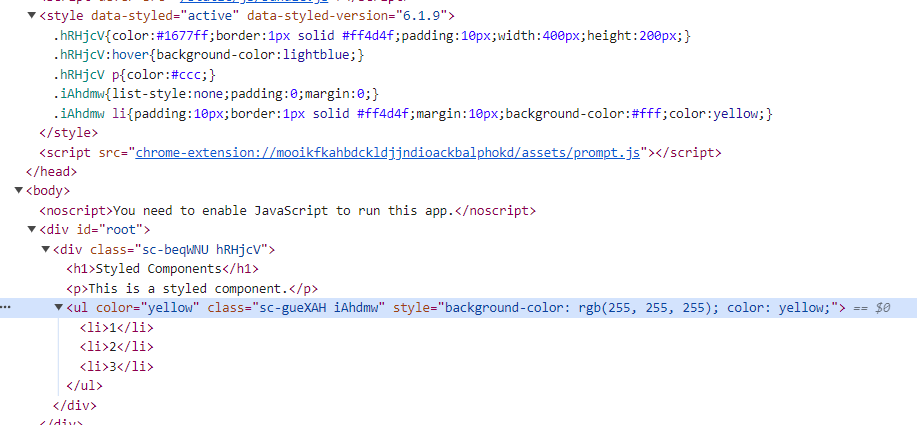
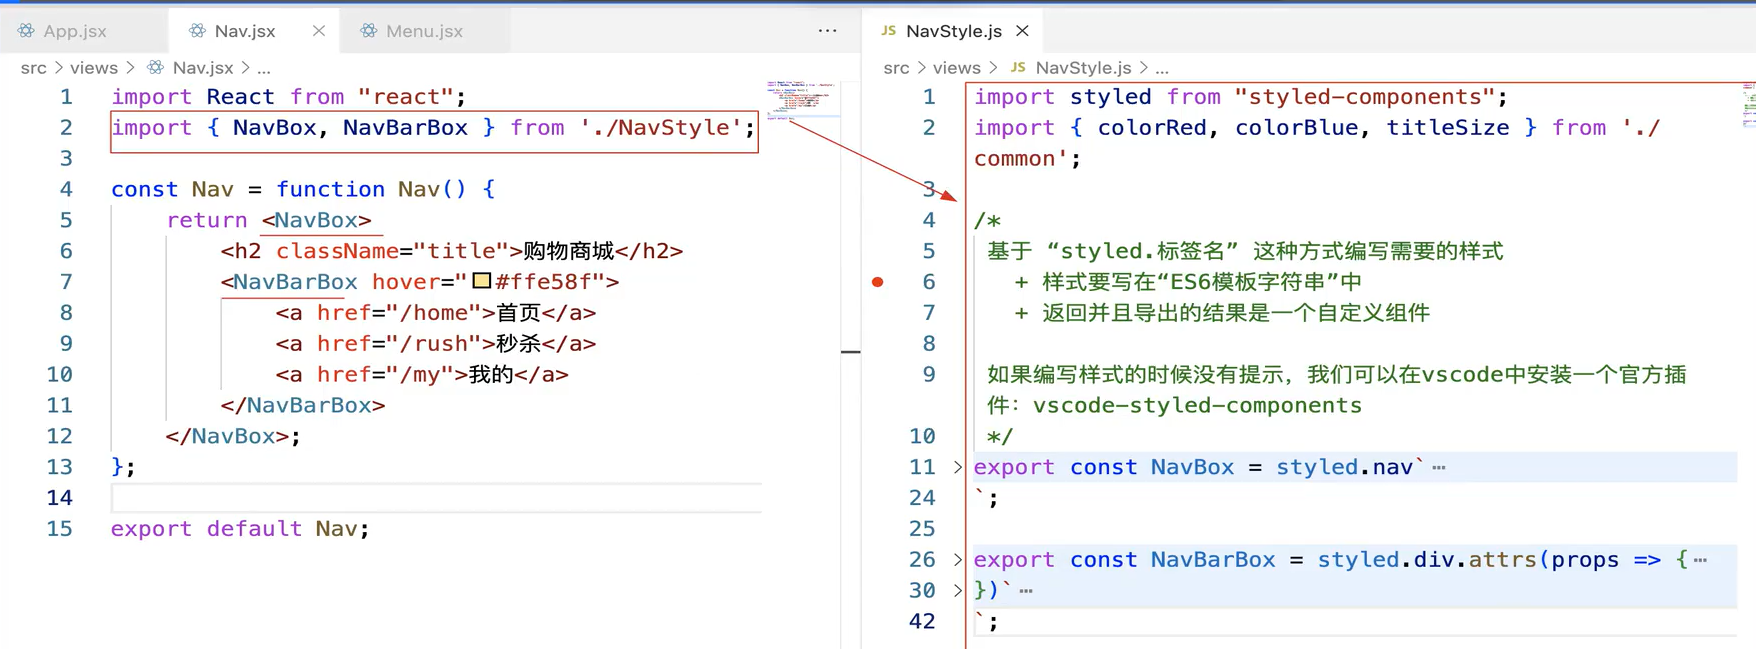
# 总结
React样式私有化处理方案
行内样式
style={{...}}1- 不适用于普通样式/主流样式的编写
- 特殊的需求可以基于其处理∶样式需要基于逻辑动态计算、想基于行内样式提高样式权重
CSS样式表。人为有意识、有规范的保证组件最外层样式类名的唯一性,组件内部的元素,都嵌入到这个样式样式类中进行编写
- 依赖于人「不能100%保证样式类的唯一性
- 可能还会有部分样式,因为选择器权重问题,发生一些冲突
原理:基于技术方法,让组件和元素的样式类名唯一
CSS Modules本质还是写样式表「所以编写的样式都是静态的」
- 用起来不是那么的方便「不能再使用嵌套等操作了」
- CSS-IN-JS思想:把CSS写在JS中,这样可以基于JS逻辑实现样式的动态管理、实现通用样式的封装
- React-Jss
- styled-components「更简单」
# React公共状态管理
- 基于
props属性实现父子组件通信(或具备相同父亲的兄弟组件) - 基于
context上下文实现祖先和后代组件间的通信(或具备相同祖先的平行组件) - 还可以基于公共状态管理实现组件间的通信
在Vue框架中,我们可以基于vuex实现公共状态管理!

在React框架中,我们也有公共状态管理的解决方案:
- redux + react-redux
- dva「redux-saga 」或 umi
- MobX
# Redux基础知识
https://cn.redux.js.org/
# 什么是 Redux ?
Redux 是 JavaScript 应用的状态容器,提供可预测的状态管理!
Redux 除了和 React 一起用外,还支持其它框架;它体小精悍(只有2kB,包括依赖),却有很强大的插件扩展生态!
Redux 提供的模式和工具使您更容易理解应用程序中的状态何时、何地、为什么以及如何更新,以及当这些更改发生时,您的应用程序逻辑将如何表现
# 我什么时候应该用 Redux ?
Redux 在以下情况下更有用:
- 在应用的大量地方,都存在大量的状态
- 应用状态会随着时间的推移而频繁更新
- 更新该状态的逻辑可能很复杂
- 中型和大型代码量的应用,很多人协同开发
# Redux 库和工具
Redux 是一个小型的独立 JS 库, 但是它通常与其他几个包一起使用:
React-ReduxReact-Redux是我们的官方库,它让 React 组件与 Redux 有了交互,可以从 store 读取一些 state,可以通过 dispatch actions 来更新 store!Redux ToolkitRedux Toolkit 是我们推荐的编写 Redux 逻辑的方法。 它包含我们认为对于构建 Redux 应用程序必不可少的包和函数。 Redux Toolkit 构建在我们建议的最佳实践中,简化了大多数 Redux 任务,防止了常见错误,并使编写 Redux 应用程序变得更加容易。Redux DevTools 拓展Redux DevTools Extension 可以显示 Redux 存储中状态随时间变化的历史记录,这允许您有效地调试应用程序。
# redux基础工作流程
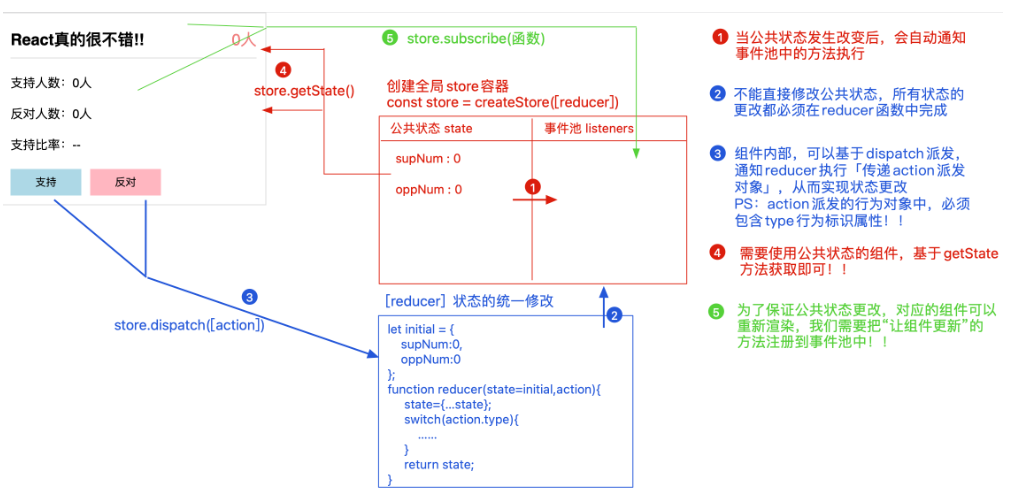
# redux实践
npm install redux
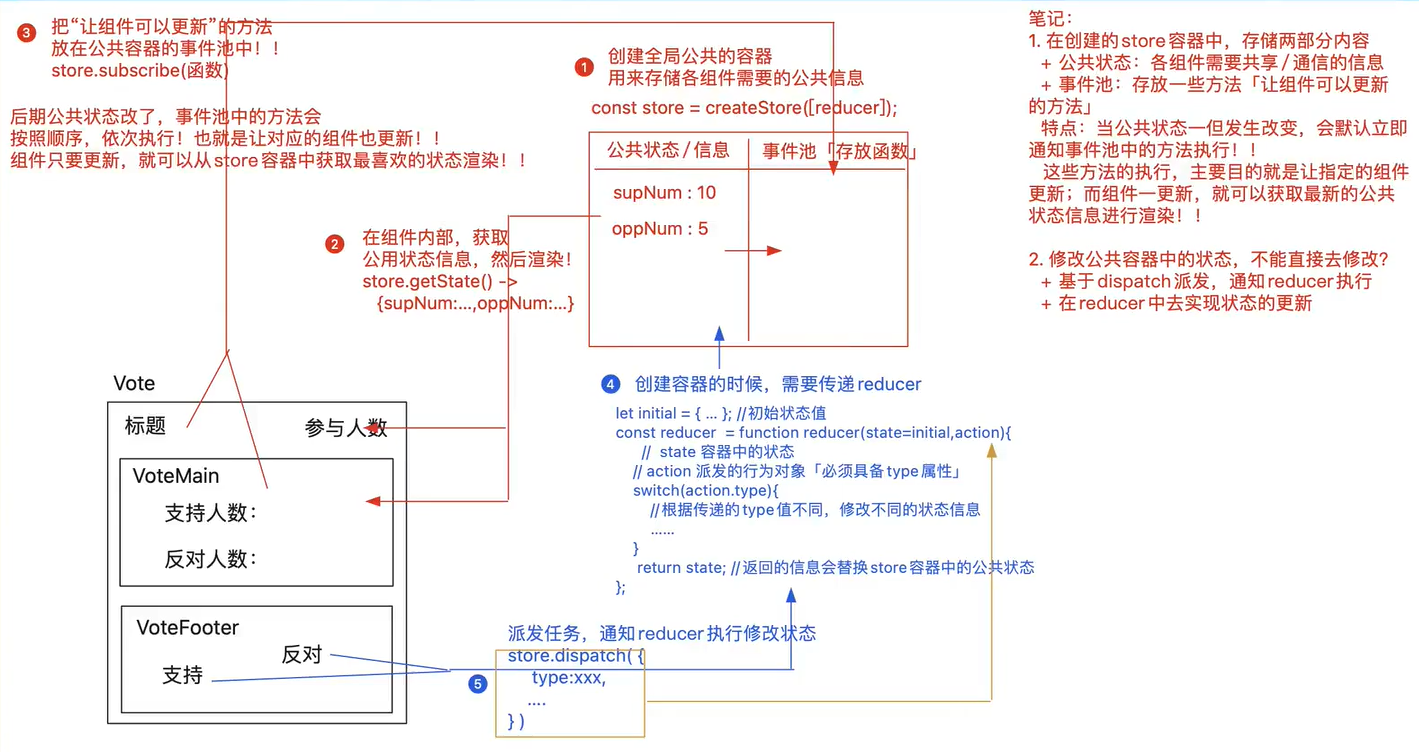
store/index.js
import { createStore } from 'redux';
import _ from '../../../utils/index'

// REDUCER
let initial = {
  supNum: 0,
  oppNum: 0
}

const reducer = function reducer(state = initial, action) {
  // 防止直接操作原始状态,先对state进行深拷贝
  state = _.clone(state);
  let {type, payload} = action;
  switch (type) {
    case 'SUPPORT':
      state.supNum += payload;
      break;
    case 'OPPOSE':
      state.oppNum += payload;
      break;
    default:
  }
  return state;
}

// 创建容器
const store = createStore(reducer);
export default store;
2
3
4
5
6
7
8
9
10
11
12
13
14
15
16
17
18
19
20
21
22
23
24
25
26
27
28
ThemeContext.js
import React from "react";
const ThemeContext = React.createContext();
export default ThemeContext;
2
3
# 函数组件
index.jsx
import ThemeContext from "../../ThemeContext";
import store from "./store";
import Vote from "./Vote";

export default function Context() {
  return (
    <ThemeContext.Provider value={{store}}>
        <Vote />
    </ThemeContext.Provider>
  );
2
3
4
5
6
7
8
9
10
Vote.jsx
import React, { useContext, useEffect, useState } from "react";
import './Vote.scss';
import VoteMain from './VoteMain';
import VoteFooter from './VoteFooter';
import ThemeContext from "../../ThemeContext";

const Vote = function Vote() {
    const { store } = useContext(ThemeContext);
    let { supNum, oppNum } = store.getState();

    // 控制视图更新的办法加入到redux事件池中
    let [_, setRandom] = useState(0);
    useEffect(() => {
      const unsubscribe = store.subscribe(() => {
        setRandom(Math.random());
      })
    })
    return <div className="vote-box">
        <div className="header">
            <h2 className="title">React是很棒的前端框架</h2>
            <span className="num">{supNum + oppNum}</span>
        </div>
        <VoteMain supNum={supNum} oppNum={oppNum}/>
        <VoteFooter />
    </div>;
};

export default Vote;
2
3
4
5
6
7
8
9
10
11
12
13
14
15
16
17
18
19
20
21
22
23
24
25
26
27
28
VoteMain.jsx
import React, { useContext, useEffect, useState } from "react";
import ThemeContext from "../../ThemeContext";

// class VoteMain extends React.Component {
//     render() {
//         let { supNum, oppNum } = this.props;
//         return <div className="main">
//             <p>支持人数:{supNum}人</p>
//             <p>反对人数:{oppNum}人</p>
//         </div>;
//     }
// }

const VoteMain = function() {
    const { store } = useContext(ThemeContext);
    let { supNum, oppNum } = store.getState();

    // 控制视图更新的办法加入到redux事件池中
    let [_, setRandom] = useState(0);
    useEffect(() => {
      const unsubscribe = store.subscribe(() => {
        setRandom(Math.random());
      })
    })
    return <div className="main">
        <p>支持人数:{supNum}人</p>
        <p>反对人数:{oppNum}人</p>
    </div>;
}
export default VoteMain;
2
3
4
5
6
7
8
9
10
11
12
13
14
15
16
17
18
19
20
21
22
23
24
25
26
27
28
29
30
VoteFooter.jsx
import React, { useContext } from "react";
import { Button } from 'antd';
import ThemeContext from "../../ThemeContext";

const VoteFooter = function VoteFooter() {
    let { store } = useContext(ThemeContext);
    const support = function() {
      store.dispatch({
        type: 'SUPPORT',
        payload: 1
      })
    }
    const oppose = function() {
      store.dispatch({
        type: 'OPPOSE',
        payload: 1
      })
    }
    return <div className="footer">
        <Button type="primary" onClick={support}>支持</Button>
        <Button type="primary" danger onClick={oppose}>反对</Button>
    </div >;
};

export default VoteFooter;
2
3
4
5
6
7
8
9
10
11
12
13
14
15
16
17
18
19
20
21
22
23
24
25
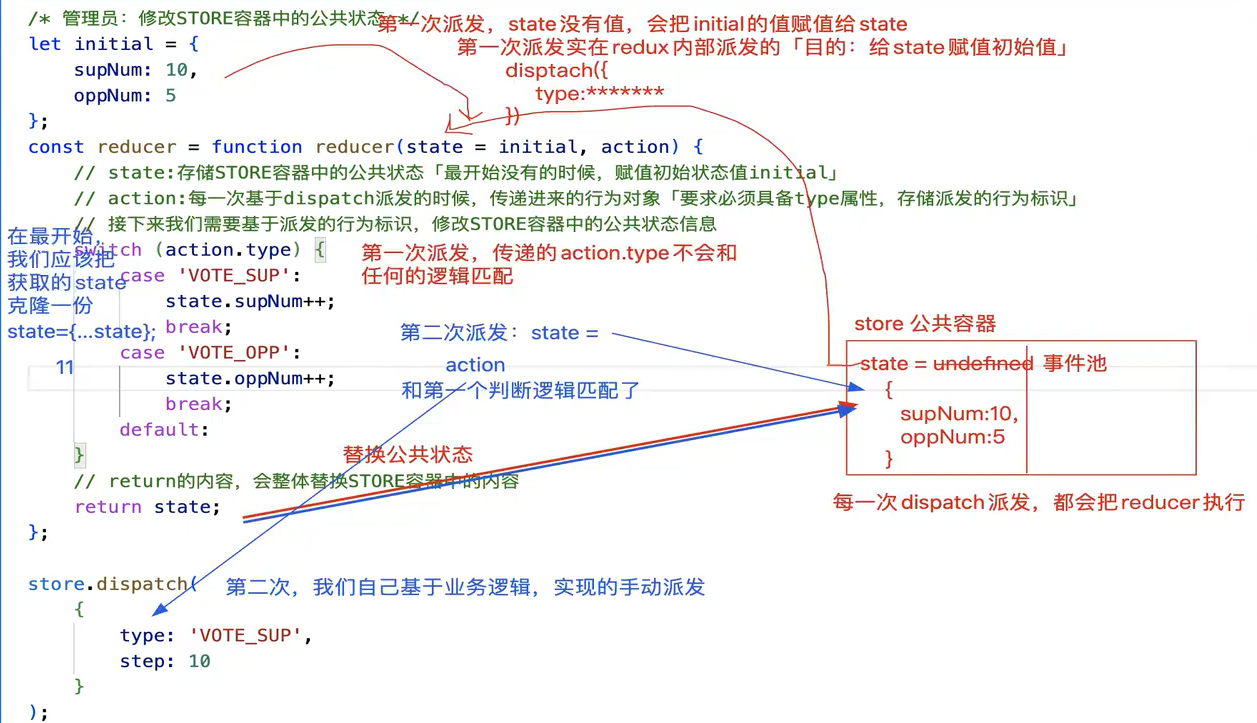
# 类组件
函数组件让视图更新,直接使用this.forceUpdate即可


# 总结
redux具体的代码编写顺序
- 创建
store,规划出reducer「当中的业务处理逻辑可以后续不断完善,但是最开始reducer的这个架子需要先搭建取来」 - 在入口中,基于上下文对象,把store放入到上下文中; 需要用到store的组件,从上下文中获取
- 组件中基于store,完成公共状态的获取、和任务的派发
- 使用到公共状态的组件,必须向store的事件池中加入让组件更新的办法; 只有这样,才可以确保,公共状态改变,可以让组件更新,才可以获取最新的状态进行绑定
# redux工程化
redux工程化其实就是“按模块划分”
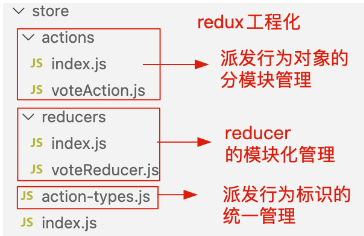
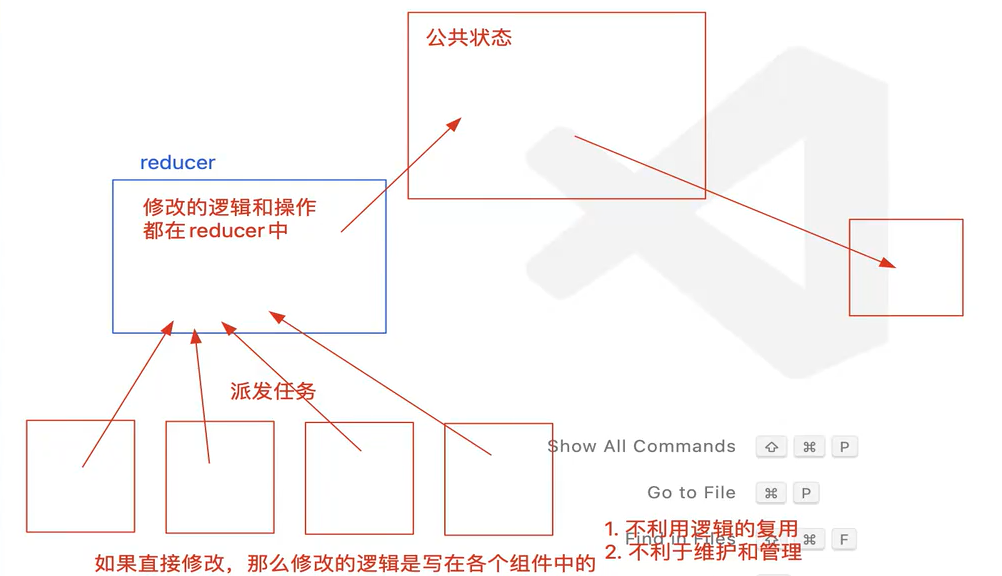
store/action-type.js
// type集中到这里就能减少命名冲突了
/* 投票 */
export const VOTE_SUP = 'VOTE_SUP';
export const VOTE_OPP = 'VOTE_OPP';
2
3
4
store/reducers/voteReducer.js
import { VOTE_SUP, VOTE_OPP } from '../action-types';
import _ from '../../../../utils/index';

let initialState = {
  supNum: 10,
  oppNum: 5
};
export default function voteReducer(state = initialState, action) {
  state = _.clone(true, state);
  let { type, payload = 1 } = action;
  switch (type) {
      case VOTE_SUP:
          state.supNum += payload;
          break;
      case VOTE_OPP:
          state.oppNum += payload;
          break;
      default:
  }
  return state;
};
2
3
4
5
6
7
8
9
10
11
12
13
14
15
16
17
18
19
20
21
store/reducers/index.js
import { combineReducers } from 'redux';
import voteReducer from './voteReducer';
/*
合并各个模块的reducer,最后创建出一个总的reducer
    const reducer = combineReducers({
        vote: voteReducer,
        personal: personalReducer
    });
  + reducer:是最后合并的总的reducer
  + 此时容器中的公共状态,会按照我们设置的成员名字,分模块进来管理
    state = {
       vote:{
          supNum: 10,
          oppNum: 5,
          num: 0
       },
       personal:{
          num: 100,
          info: null
       }
    }
*/
const reducer = combineReducers({
    vote: voteReducer,
    // other reducers
})

export default reducer;
2
3
4
5
6
7
8
9
10
11
12
13
14
15
16
17
18
19
20
21
22
23
24
25
26
27
28
store/actions/voteAction.js
import { VOTE_SUP, VOTE_OPP } from '../action-types';
const voteAction = {
    support(payload) {
        return {
            type: VOTE_SUP,
            payload
        };
    },
    oppose() {
        return {
            type: VOTE_OPP
        };
    }
};
export default voteAction;
2
3
4
5
6
7
8
9
10
11
12
13
14
15
store/actions/index.js
// index.js
import voteAction from "./voteAction";
const actions = {
    vote: voteAction
};
export default actions;
2
3
4
5
6
store/index.js
import { createStore } from 'redux';
import reducer from './reducres';

// 创建容器
const store = createStore(reducer);
export default store;
2
3
4
5
6
在组件中使用
actions里面的文件并没有在store里引用,而是我们调用dispatch方法的时候使用
// 获取指定模块的状态
let { supNum, oppNum } = store.getState().vote;

// 派发任务的时候
import actions from '@/store/actions';
...
store.dispatch(actions.vote.support(10));
store.dispatch(actions.vote.oppose());
2
3
4
5
6
7
8

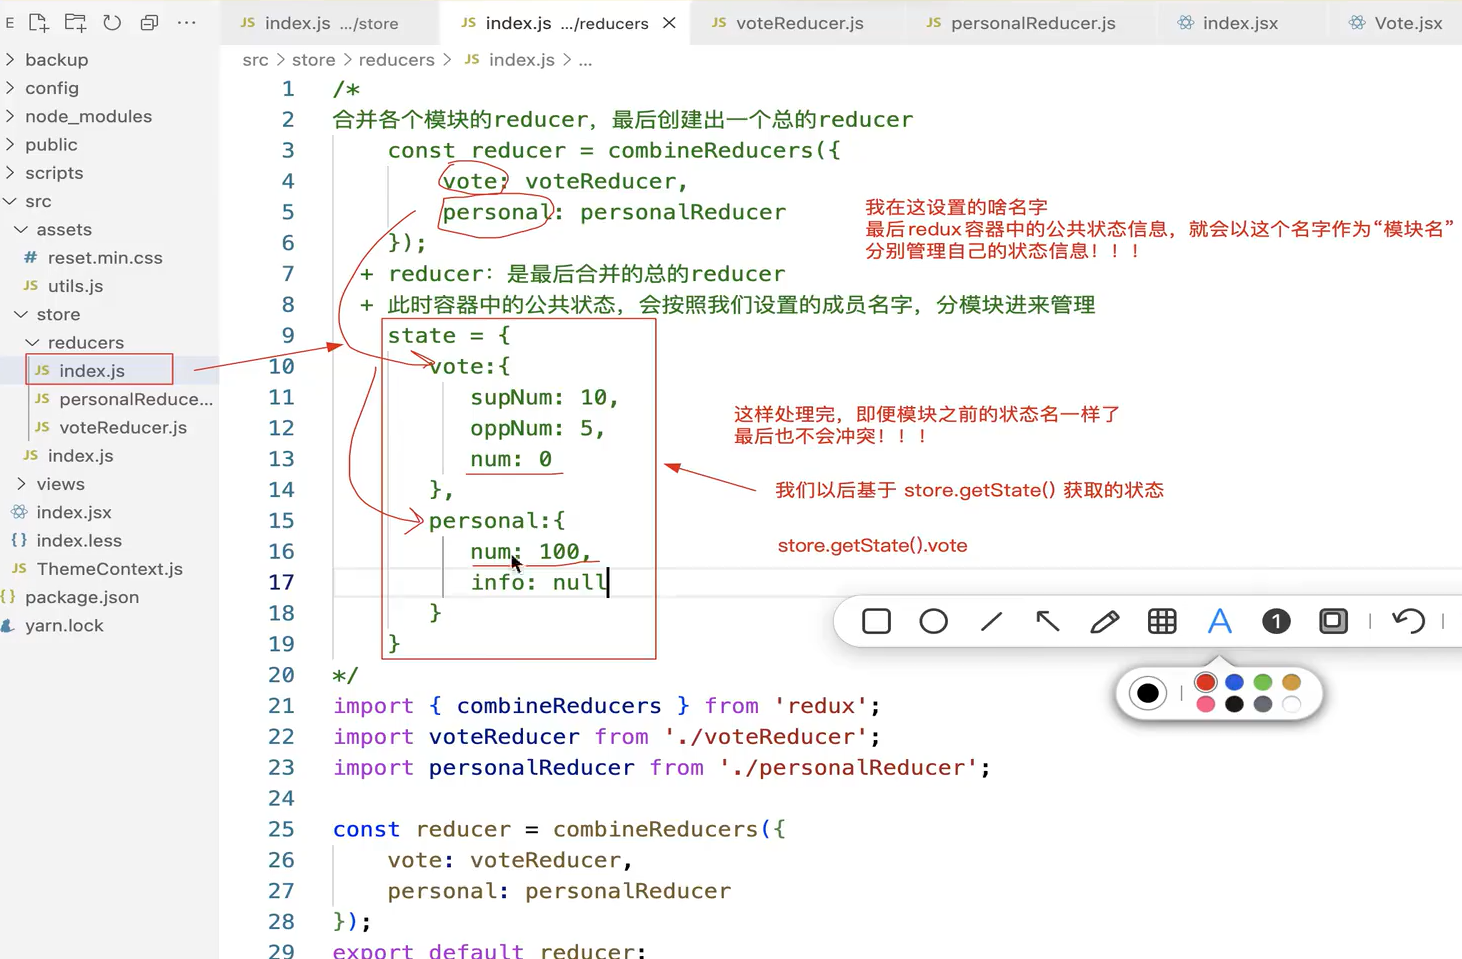
combineReducers源码
const combineReducers = function combineReducers(reducers) {
    // reducers是一个对象,以键值对存储了:模块名 & 每个模块的reducer
    let reducerskeys = Reflect.ownKeys(reducers);
    // reducerskeys:['vote','personal']
    /*
    返回一个合并的reducer
      + 每一次dispatch派发,都是把这个reducer执行
      + state就是redux容器中的公共状态
      + action就是派发时候传递进来的行为对象
    */
    return function reducer(state = {}, action) {
        // 把reducers中的每一个小的reducer(每个模块的reducer)执行;把对应模块的状态/action行为对象传递进来;返回的值替换当前模块下的状态!!
        let nextState = {};
        reducerskeys.forEach(key => {
            // key:'vote'/'personal'模块名
            // reducer:每个模块的reducer
            let reducer = reducers[key];
            nextState[key] = reducer(state[key], action);
        });
        return nextState;
    };
};
export default combineReducers;

/* store.dispatch({
    type: TYPES.VOTE_SUP
}); */
2
3
4
5
6
7
8
9
10
11
12
13
14
15
16
17
18
19
20
21
22
23
24
25
26
27

# redux源码
import _ from './assets/utils';

/* 实现redux的部分源码 */
export const createStore = function createStore(reducer) {
    if (typeof reducer !== 'function') throw new Error("Expected the root reducer to be a function");

    let state, //存放公共状态
        listeners = []; //事件池

    /* 获取公共状态 */
    const getState = function getState() {
        // 返回公共状态信息即可
        return state;
    };

    /* 向事件池中加入让组件更新的方法 */
    const subscribe = function subscribe(listener) {
        // 规则校验
        if (typeof listener !== "function") throw new TypeError("Expected the listener to be a function");
        // 把传入的方法(让组件更新的办法)加入到事件池中「需要做去重处理」
        if (!listeners.includes(listener)) {
            listeners.push(listener);
        }
        // 返回一个从事件池中移除方法的函数
        return function unsubscribe() {
            let index = listeners.indexOf(listener);
            listeners.splice(index, 1);
        };
    };

    /* 派发任务通知REDUCER执行 */
    const dispatch = function dispatch(action) {
        // 规则校验
        if (!_.isPlainObject(action)) throw new TypeError("Actions must be plain objects");
        if (typeof action.type === "undefined") throw new TypeError("Actions may not have an undefined 'type' property");

        // 把reducer执行,传递:公共状态、行为对象;接收执行的返回值,替换公共状态;
        state = reducer(state, action);

        // 当状态更改,我们还需要把事件池中的方法执行
        listeners.forEach(listener => {
            listener();
        });

        return action;
    };

    /* redux内部会默认进行一次dispatch派发,目的:给公共容器中的状态赋值初始值 */
    const randomString = () => Math.random().toString(36).substring(7).split('').join('.');
    dispatch({
        // type: Symbol()
        type: "@@redux/INIT" + randomString()
    });

    // 返回创建的STORE对象
    return {
        getState,
        subscribe,
        dispatch
    };
};
2
3
4
5
6
7
8
9
10
11
12
13
14
15
16
17
18
19
20
21
22
23
24
25
26
27
28
29
30
31
32
33
34
35
36
37
38
39
40
41
42
43
44
45
46
47
48
49
50
51
52
53
54
55
56
57
58
59
60
61
# react-redux
# react-redux介绍
react-redux最大的特点就是: 让redux的操作,在react项目中更简单一些
- react-redux内部自己创建了上下文对象,并且我们可以把store放在上下文中,在组件中使用的时候,无需我们自己再获取上下文中的store了,它可以帮我们获取到,我们直接玩即可。
- 在组件中,我们想获取公共状态信息进行绑定等,无需自己基于上下文对象获取store,也无需自己再基于getState获取公共状态。直接基于react-redux提供的
connect函数处理即可。而且,也不需要我们手动把让组件更新的方法,放在事件池中了,react-redux内部帮我们处理了
# redux回顾
redux工程化流程
- 把reducer状态按照模块进行划分和管理;把所有模块的reducer合并为一个即可。
- 每一次任务派发,都会把所有模块的reducer,依次去执行,派发时候传递的行为对象(行为标识)是统一的。所以我们要保证:各个模块之间,派发的行为标识它的唯一性→派发行为标识的统一管理。
- 创建actionCreator对象,按模块管理我们需要派发的行为对象
在组件中使用的时候,如果使用的是redux :
- 我们需要创建上下文对象,基于其Provider把创建的store放在根组件的上下文信息中;后代组件需要基于上下文对象,获取到上下文中的store。
- 需要用到公共状态的组件
store.getState()获取公共状态store.subscribe()让组件更新的函数)放在事件池中store.dispatch(actionCreator)需要派发的组件
# react-redux实践
react-redux就是帮助我们简化redux在组件中的应用
提供的Provider组件,可以自己在内部创建上下文对象,把store放在根组件的上下文中。
提供的connect函数,在函数内部,可以获取到上下文中的store,然后快速的把公共状态,以及需要派发的操作,基于属性传递给组件。
connect(mapStateToProps,mapDispatchToProps)(渲染的组件)
Provider:把store注册到上下文中
import store from "./store";
import Vote from "./Vote";
import {Provider}  from "react-redux";

export default function Context() {
  return (
    <Provider store={store}>
        <Vote />
    </Provider>
  );
}
2
3
4
5
6
7
8
9
10
11
connect:把公共状态和派发任务当做属性传递给属性
- 自动获取上下文中的store
- 自动把“让组件更新的方法”注册到store事件池中
- mapStateToProps
- mapDispatchToProps
Vote.jsx
import React from "react";
import './Vote.scss';
import VoteMain from './VoteMain';
import VoteFooter from './VoteFooter';
import { connect } from "react-redux";

const Vote = function Vote(props) {
  console.log("props", props);
    let { supNum, oppNum } = props;

    return <div className="vote-box">
        <div className="header">
            <h2 className="title">React是很棒的前端框架</h2>
            <span className="num">{supNum + oppNum}</span>
        </div>
        <VoteMain supNum={supNum} oppNum={oppNum}/>
        <VoteFooter />
    </div>;
};

export default connect(state => state.vote)(Vote);
/* export default connect(state => {
    return {
        supNum: state.vote.supNum,
        oppNum: state.vote.oppNum,
        num: state.vote.num
    }
})(Vote); */
/*
 connect(mapStateToProps,mapDispatchToProps)(我们要渲染的组件)
   1. mapStateToProps:可以获取到redux中的公共状态,把需要的信息作为属性,传递组件即可
    connect(state=>{
        // state:存储redux容器中,所有模块的公共状态信息
        // 返回对象中的信息,就是要作为属性,传递给组件的信息
        return {
            supNum:state.vote.supNum,
            info:state.personal.info
        };
    })(Vote);
 */
2
3
4
5
6
7
8
9
10
11
12
13
14
15
16
17
18
19
20
21
22
23
24
25
26
27
28
29
30
31
32
33
34
35
36
37
38
39
40
VoteFooter.jsx
import React from "react";
import { Button } from 'antd';
import actions from "./store/actions";
import { connect } from "react-redux";

const VoteFooter = function VoteFooter(props) {
    let { support, oppose } = props;
    return <div className="footer">
        <Button type="primary" onClick={support.bind(null, 10)}>支持</Button>
        <Button type="primary" danger onClick={oppose}>反对</Button>
    </div >;
};

export default connect(
  null,
  actions.vote
)(VoteFooter);
/* export default connect(
    null,
    dispatch => {
        return {
            support() {
                dispatch(action.vote.support());
            },
            oppose() {
                dispatch(action.vote.oppose());
            }
        };
    }
)(VoteFooter); */

/*
 connect(mapStateToProps,mapDispatchToProps)(我们要渲染的组件)
   2. mapDispatchToProps:把需要派发的任务,当做属性传递给组件
    connect(
        null,
        dispatch=>{
            // dispatch:store.dispatch 派发任务的方法

            // 返回对象中的信息,会作为属性传递给组件
            return {
                ...
            };
        }
    )(Vote);
 */
2
3
4
5
6
7
8
9
10
11
12
13
14
15
16
17
18
19
20
21
22
23
24
25
26
27
28
29
30
31
32
33
34
35
36
37
38
39
40
41
42
43
44
45
46

# react-redux源码
import React, { createContext, useContext, useEffect, useState, useMemo } from "react";
import { bindActionCreators } from 'redux';
const ThemeContext = createContext();

/* Provider:把传递进来的store放在根组件的上下文中 */
export function Provider(props) {
    let { store, children } = props;
    return <ThemeContext.Provider
        value={{
            store
        }}>
        {children}
    </ThemeContext.Provider>;
};

/* connect:获取上下文中的store,然后把公共状态、要派发的方法等,都基于属性传递给需要渲染的组件;把让组件更新的方法放在redux事件池中! */
export function connect(mapStateToProps, mapDispatchToProps) {
    // 处理默认值
    if (!mapStateToProps) {
        mapStateToProps = () => {
            // 不写则:什么都不给组件传递
            return {};
        };
    }
    if (!mapDispatchToProps) {
        mapDispatchToProps = (dispatch) => {
            // 不写则:把dispatch方法传递给组件
            return {
                dispatch
            };
        };
    }
    return function currying(Component) {
        // Component:最终要渲染的组件「Vote」
        // HOC:我们最后基于export default导出的组件
        return function HOC(props) {
            // 我们需要获取上下文中的store
            let { store } = useContext(ThemeContext),
                { getState, dispatch, subscribe } = store;

            // 向事件池中加入让组件更新的办法
            let [, forceUpdate] = useState(0);
            useEffect(() => {
                let unsubscribe = subscribe(() => {
                    forceUpdate(+new Date());
                });
                return () => {
                    // 组件释放的时候执行:把放在事件池中的函数移除掉
                    unsubscribe();
                };
            }, []);

            // 把mapStateToProps/mapDispatchToProps,把执行的返回值,作为属性传递给组件!!
            let state = getState(),
                nextState = useMemo(() => {
                    return mapStateToProps(state);
                }, [state]);

            let dispatchProps = {};
            if (typeof mapDispatchToProps === "function") {
                // 是函数直接执行即可
                dispatchProps = mapDispatchToProps(dispatch);
            } else {
                // 是actionCreator对象,需要经过bindActionCreators处理
                dispatchProps = bindActionCreators(mapDispatchToProps, dispatch);
            }

            return <Component
                {...props}
                {...nextState}
                {...dispatchProps}
            />;
        };
    };
};
2
3
4
5
6
7
8
9
10
11
12
13
14
15
16
17
18
19
20
21
22
23
24
25
26
27
28
29
30
31
32
33
34
35
36
37
38
39
40
41
42
43
44
45
46
47
48
49
50
51
52
53
54
55
56
57
58
59
60
61
62
63
64
65
66
67
68
69
70
71
72
73
74
75
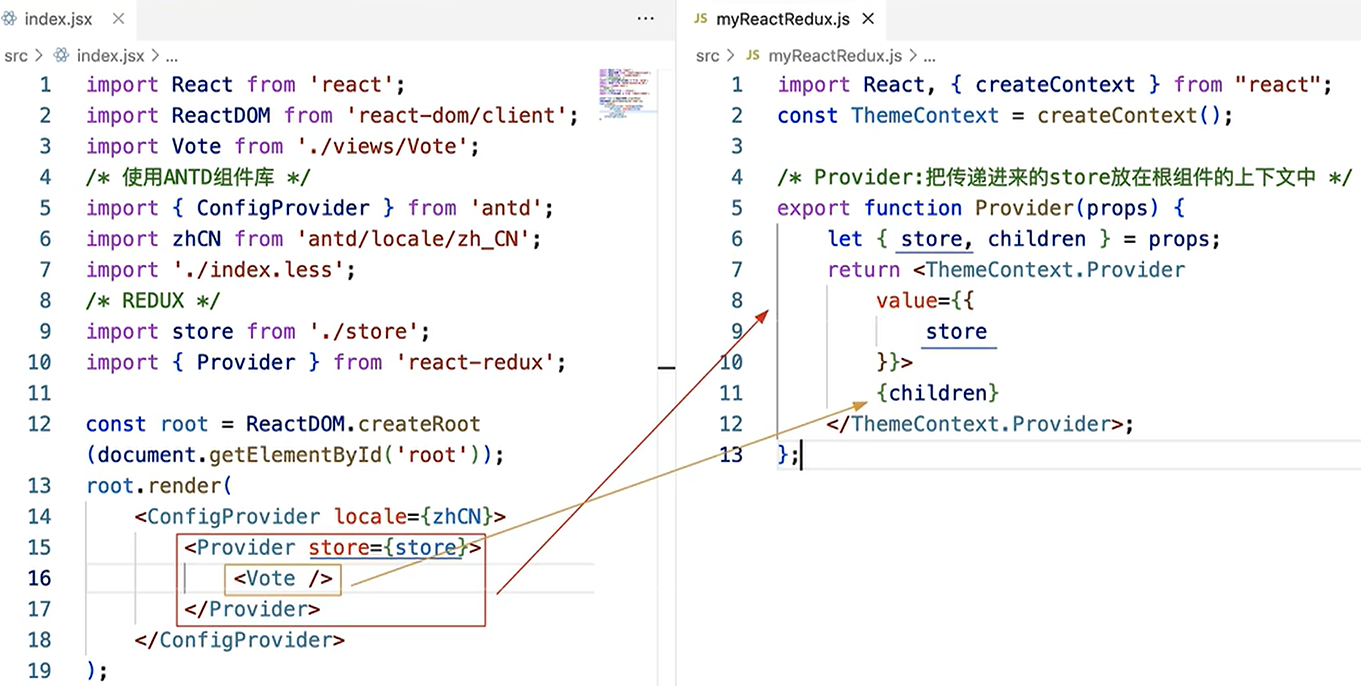


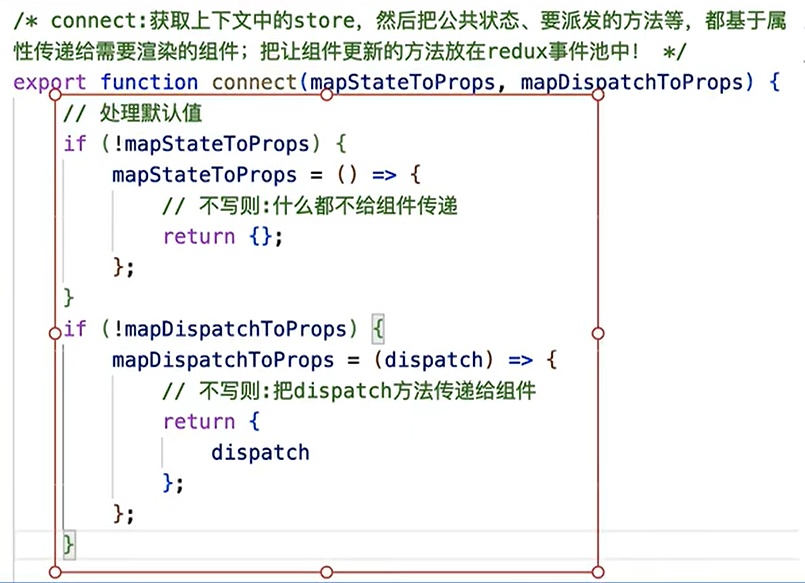

# redux不足
redux在设计上,是存在一些不好的地方的
我们基于getState获取的公共状态,是直接和redux中的公共状态,共用相同的堆地址,这样导致,是可以直接修改公共状态信息的。
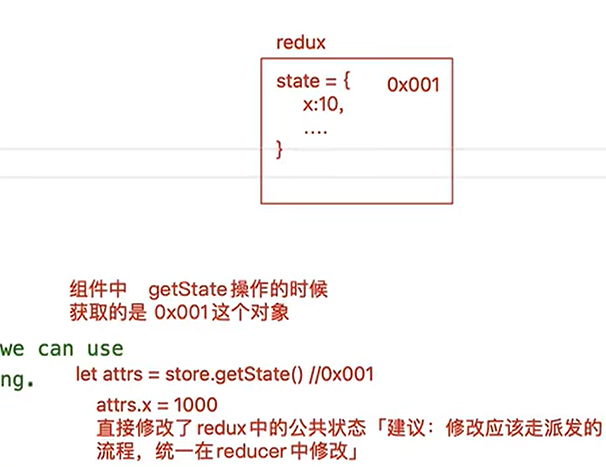

我们会把让组件更新的办法,放在事件池中,当公共状态改变,会通知事件池中的所有方法执行。此操作:放置方法的时候,没有办法设置状态的依赖,这样,后期不论哪个状态被修改,事件池中所有的方法都要执行(相关的组件都要进行更新)。

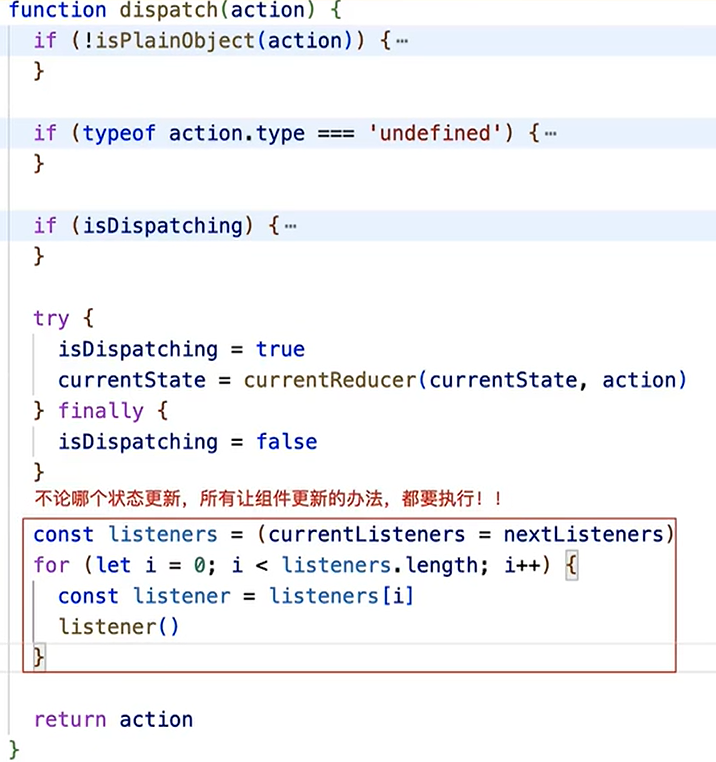
如果要优化,我们在向事件池中加入方法的时候,把依赖的信息也设置了。
在每一次执行reducer修改状态之前,把之前的状态存储一份「 prev」 ,修改后的最新状态也获取到「next」。通知事件池中方法执行的时候,拿出来的某个方法是否会执行,就可以prev和next中,此方法依赖的状态是否改变。 真实项目中,如果都这样去优化这个操作,每一次事件池中方法执行,也会有一套计算的逻辑(多多少少消耗一点点性能);而往往,我们配合react-router操作的时候,虽然按照原有的操作逻辑,不论啥状态改变,事件池中的方法都会触发执行,但是react-router会让很多组件释放掉,只展示当前模块的组件TSPA」,这样即便组件更新的方法执行,但是因为组件都释放了,所以也不会产生太大的影响。「而且我们还可以在组件释放的时候,把对应更新的方法,从事件池中移除掉」。
所有reducer的合并,其实不是代码的合并,而是创建一个总的reducer出来,每一次派发,都是让总的reducer执行,而在这里,会把每个模块的reducer都完完整整执行一遍「即便中间已经发现匹配的逻辑了,也会继续把其它模块中的reducer执行」。
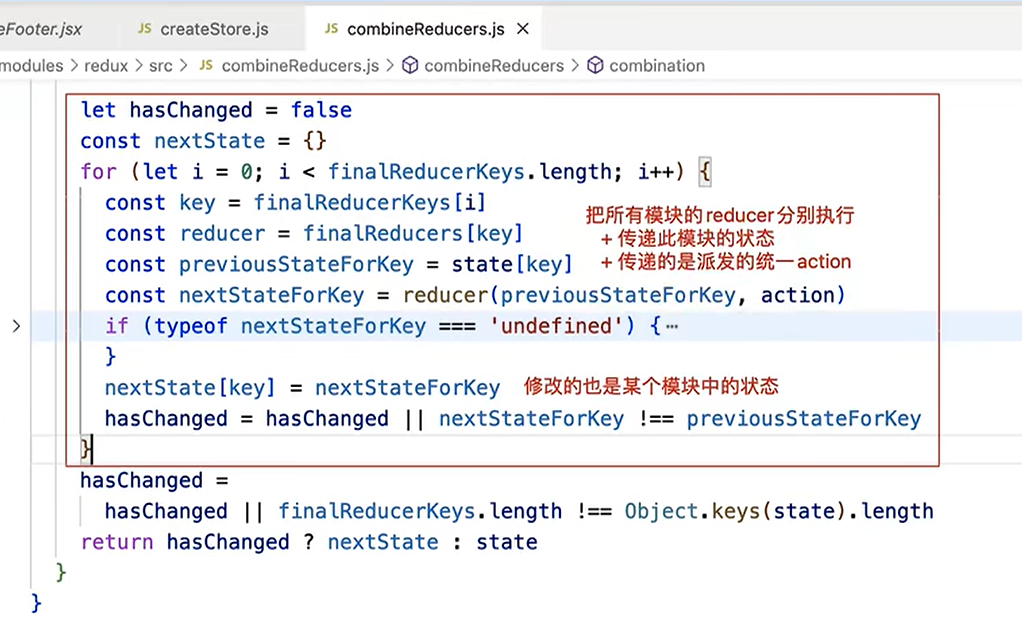
优化思路:在某个模块的reducer中,如果派发的行为标识有匹配了「因为行为标识是统一管理的,所以遇到匹配的,说明后面不可能再匹配了」,则停止执行后面的reducer。
# redux中间件
# redux-logger
Redux Logger 是一个 Redux 的中间件,用于在开发环境中记录 Redux 的 action 和状态变化,方便开发者调试和监视 Redux 应用的行为。它可以捕获每次 dispatch 的 action 和更新后的 state,并以可读的方式输出到控制台,帮助开发者跟踪应用状态的变化。
npm install redux-logger
import { createStore, applyMiddleware } from 'redux';
import reducer from './reducres';
import reduxLogger  from 'redux-logger'
import reduxThunk  from 'redux-thunk';

// 创建容器
const store = createStore(reducer, applyMiddleware(reduxLogger, reduxThunk));
export default store;
2
3
4
5
6
7
8

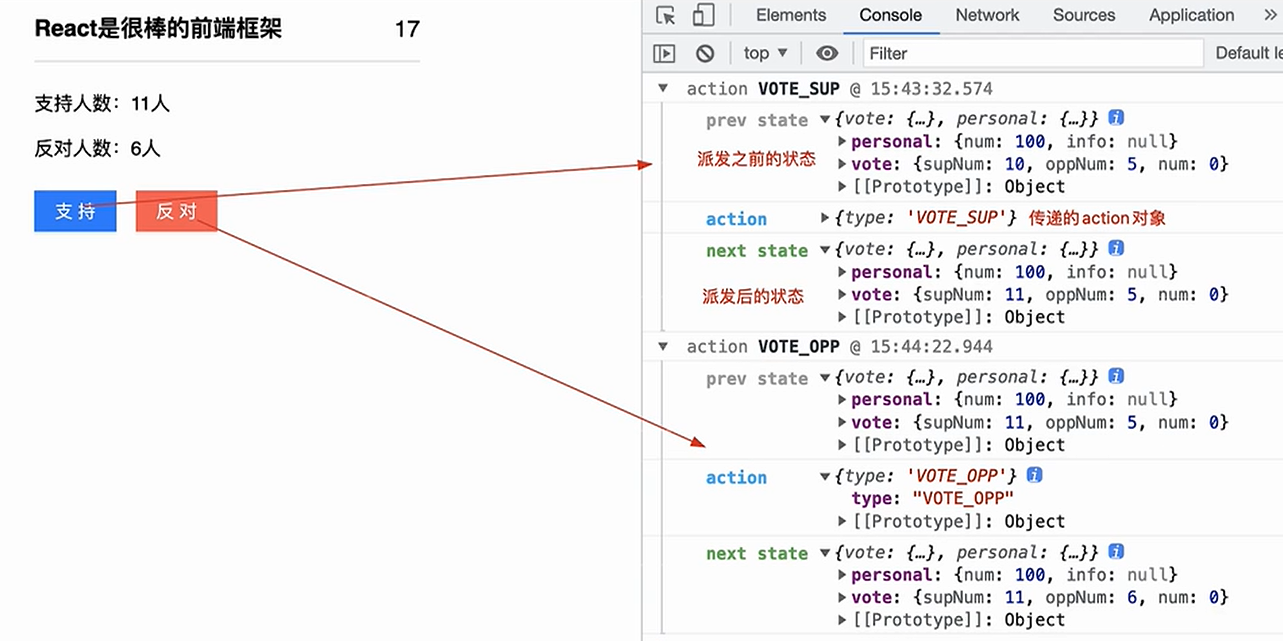
# redux-thunk
在不使用任何中间件的情况下,actionCreator对象中,是不支持异步操作的;我们要保证方法执行,要必须立即返回标准的action对象。真实项目中,往往我们是真的需要异步操作的,例如:在派发的时候,我们需要先向服务器发送请求,把数据拿到后,再进行派发。此时我们需要依托于一些中间件来进行处理。
- redux-thunk
- redux-promise
Redux Thunk 是 Redux 的一个中间件,它允许 action 创建函数返回一个函数而不是一个普通的 action 对象。这种返回函数可以在稍后的时间异步执行,可以用于处理异步逻辑,例如发起网络请求、处理定时器等等。使用 Redux Thunk,可以在 action 创建函数中执行异步操作,然后在异步操作完成后再派发真正的 action,从而实现异步流程控制。
npm install redux-thunk
import { createStore, applyMiddleware } from 'redux';
import reducer from './reducres';
import reduxLogger  from 'redux-logger'
import reduxThunk  from 'redux-thunk';

// 创建容器
const store = createStore(reducer, applyMiddleware(reduxLogger, reduxThunk));
export default store;
2
3
4
5
6
7
8


不使用中间件的情况下,会报错
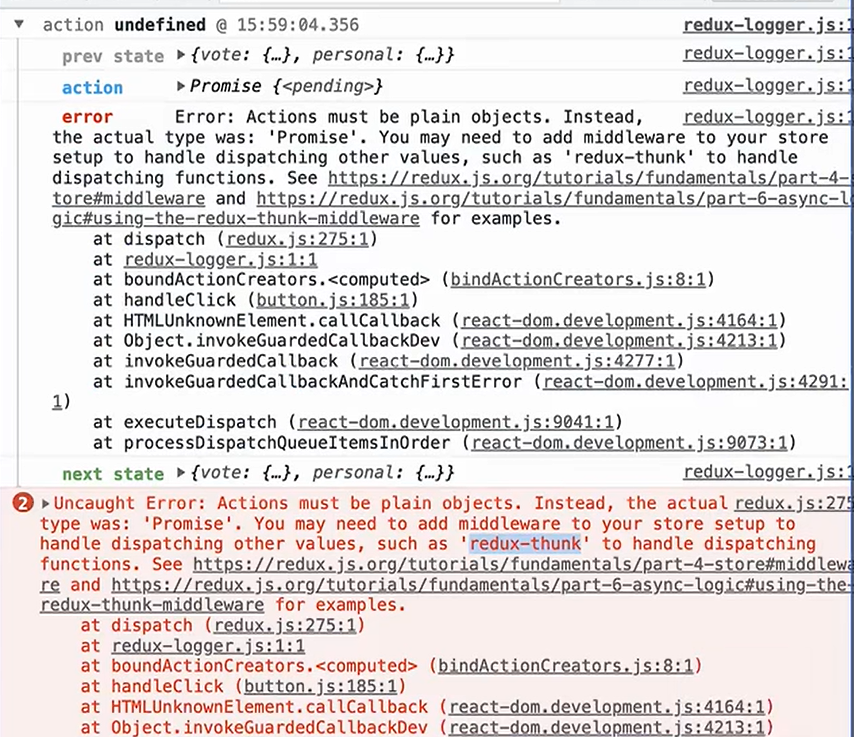
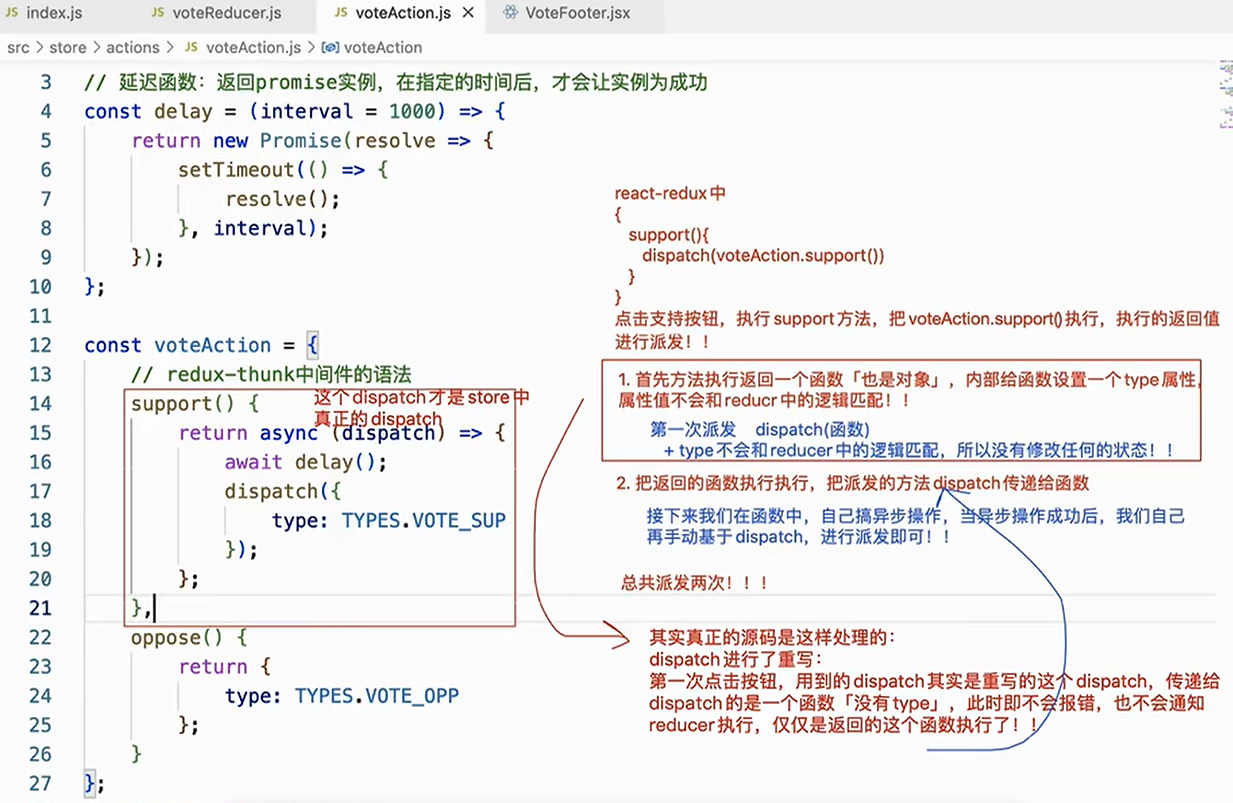
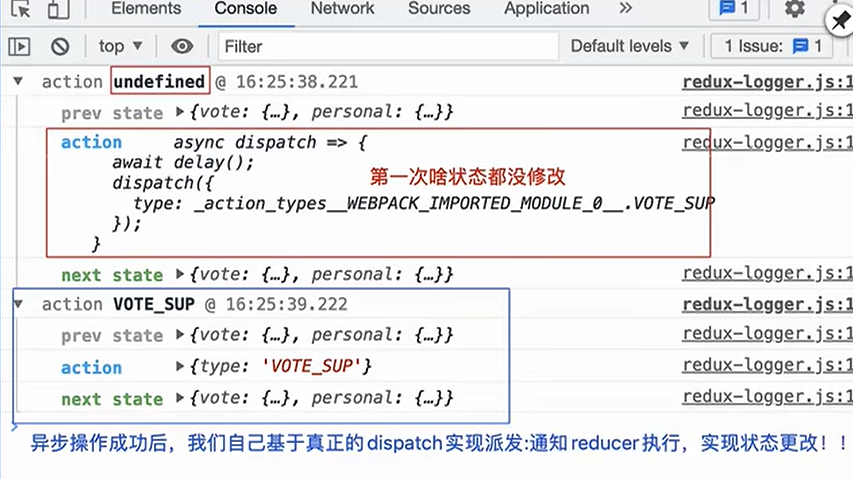
# redux-promise
Redux Promise 是 Redux 的另一个中间件,它允许 action 创建函数返回一个 Promise 对象,而不仅仅是一个普通的 action 对象或一个函数。这样的 Promise 对象可以在异步操作完成后 resolve,然后 Redux Promise 会自动派发一个 action,将异步操作的结果作为 payload 放入这个 action 中。
npm install redux-promise
import { VOTE_SUP, VOTE_OPP } from '../action-types';

// 延迟函数:返回promise实例,在指定的时间后,才会让实例为成功
const delay = (interval = 1000) => {
    return new Promise(resolve => {
        setTimeout(() => {
            resolve();
        }, interval);
    });
};
const voteAction = {
    // redux-thunk中间件的语法
    support(payload) {
        return async dispatch => {
            await delay();
            dispatch({
                type: VOTE_SUP,
                payload
            });
        }
    },
    // redux-promise中间件
    async oppose() {
        await delay();
        return {
            type: VOTE_OPP
        };
    }
};
export default voteAction;
2
3
4
5
6
7
8
9
10
11
12
13
14
15
16
17
18
19
20
21
22
23
24
25
26
27
28
29
30

# redux-promise和redux-thunk总结
redux-promise和redux-thunk中间件,都是处理异步派发的,他们相同的地方都是派发两次
- 第一次派发用的是,重写后的dispatch;这个方法不会去校验对象是否有type属性;也不会在乎传递的对象是否为标准普通对象。
- 此次派发,仅仅是为了第二次派发做准备
- redux-thunk:把返回的函数执行,把真正的dispath传递给函数
- redux-promise:监听返回的promise实例,在实例为成功后,需要基于真正的disptch,把成功的结果,再进行派发。
区别: redux-thunk的第二次派发是手动处理的redux-promise是自动处理了

# 改造TODO项目
npm install redux react-redux redux-logger redux-thunk redux-promise

创建store目录
store/actions-types.js
export const TASK_LIST = "TASK_LIST";
export const TASK_REMOVE = "TASK_REMOVE";
export const TASK_UPDATE = "TASK_UPDATE";
2
3
store/reducer/taskReducer.js
import * as TYPES from '../actions-types.js';
import _ from '../../assets/utils/util.js';
const initialState = {
  // 任务列表
  taskList: [],
  total: 0
}
export default function taskReducer(state = initialState, action){
  state = _.clone(true, state);
  let { taskList } = state;
  switch(action.type) {
    // 获取所有的任务
    case TYPES.TASK_LIST:
      state.taskList = action.list;
      state.total = action.total;
      break;
    // 删除任务
    case TYPES.TASK_REMOVE:
      if(Array.isArray(taskList)){
        state.taskList = taskList.filter(item => +item.id !== +action.id);
      }
      break;
    // 更新任务
    case TYPES.TASK_UPDATE:
      if(Array.isArray(taskList)){
        state.taskList = taskList.map(item => {
          if(+item.id === +action.id){
            item.state = 2;
            item.complete = new Date().toLocaleString('zh-CN', { hour12: false });
          }
          return item;
        })
      }
      break;
    default:
  }
  return state;
}
2
3
4
5
6
7
8
9
10
11
12
13
14
15
16
17
18
19
20
21
22
23
24
25
26
27
28
29
30
31
32
33
34
35
36
37
38
store/reducer/index.js
import { combineReducers } from 'redux';
import taskReducer from './teskReducer';

// 合并reducer
const reducer = combineReducers({
  // 添加reducer
  task: taskReducer
})
export default reducer;
2
3
4
5
6
7
8
9
store/actions/index.js
import taskAction from "./taskActions";
const action = {
  task: taskAction, // 任务相关action
}
export default action;
2
3
4
5
store/actions/taskAction.js
import * as TYPES from '../actions-types.js';
import { getTaskList } from '../../api/index.js';
// 添加任务
const taskAction = {
  // 异步派发: 从服务器获取全局任务,同步到redux容器中
  // 使用的是redux-promise中间件
  async queryAllList(selectIndex, current, pageSize) {
    let list = [];
    let total = 0;
    try {
      let result = await getTaskList(selectIndex, current, pageSize);
      console.log('taskAction发送请求返回的数据', result);
      if(+result.code === 0) {
        list = result.list;
        total = result.total;
      }
    }catch(_) {
      console.log(_);
    }
    return {
      type: TYPES.TASK_LIST,
      list,
      total
    }
  },
  // 同步派发任务
  deleteTaskById(id) {
    return {
      type: TYPES.TASK_REMOVE,
      id
    }
  },
  // 同步派发:修改任务
  updateTaskById(id) {
    return {
      type: TYPES.TASK_UPDATE,
      id
    }
  }
}
export default taskAction;
2
3
4
5
6
7
8
9
10
11
12
13
14
15
16
17
18
19
20
21
22
23
24
25
26
27
28
29
30
31
32
33
34
35
36
37
38
39
40
41
store/index.js
import { applyMiddleware, createStore } from "redux";
import reducer from "./reducers";
import reduxLogger from "redux-logger";
import { thunk as reduxThunk } from 'redux-thunk';
import reduxPromise from "redux-promise";

const store = createStore(
  reducer,
  applyMiddleware(reduxLogger, reduxThunk, reduxPromise)
)
export default store;
2
3
4
5
6
7
8
9
10
11
其他需要在全局上下文中引入store
import Task from './views/Task';
import store from './store'
import { Provider } from 'react-redux'


const root = ReactDOM.createRoot(document.getElementById('root'));
root.render(
  <ConfigProvider locale={zhCN}>
    <Provider store={store}>
      <Task></Task>
    </Provider>
  </ConfigProvider>
);
2
3
4
5
6
7
8
9
10
11
12
13
Task.jsx 改造
const Task = function Task(props) {
  let { taskList,total, queryAllList, deleteTaskById, updateTaskById } = props;
	......
}
export default connect(state => state.task, action.task)(Task);
2
3
4
5
# redux toolkit
最大的特点:基于切片机制,把reducer和actionCreator混合在一起了。 Redux Toolkit 是一个官方提供的用于简化 Redux 开发流程的工具集合。它的主要作用是:
- 简化 Redux 的使用:Redux Toolkit 提供了一组工具和实用函数,可以减少 Redux 的样板代码,简化 Redux 应用的开发过程。
- 提供统一的标准:Redux Toolkit 定义了一种标准的代码结构和最佳实践,有助于开发者编写一致、易于理解的 Redux 代码。
- 默认集成常用的中间件:Redux Toolkit 预先集成了 Redux DevTools Extension 和 Redux Thunk 中间件,使得开发者可以更轻松地进行调试和处理异步操作。
- 内置了 immutable 更新逻辑:Redux Toolkit 内置了
createReducer和createSlice等工具函数,可以简化状态更新的逻辑,并自动处理不可变性。 - 提供了更简洁的 API:Redux Toolkit 提供了一组更简洁、易于使用的 API,例如
configureStore和createSlice,使得创建 store 和定义 reducer 更加容易。
npm install @reduxjs/toolkit@latest
store/index.js
import { configureStore } from '@reduxjs/toolkit';
import reduxLogger from 'redux-logger';
import taskSliceReducer from './features/taskSlice';


const store = configureStore({
  reducer: {
    // 按模块管理各个切片导出的reducer
    task: taskSliceReducer
  },
  // 使用中间件「如果我们不指定任何中间件,则默认集成了reduxThunk;
  // 但是一但设置,会整体替换默认值,需要手动指定thunk中间件!」
  middleware: (getDefaultMiddleware) => getDefaultMiddleware().concat(reduxLogger),
})

export default store;
2
3
4
5
6
7
8
9
10
11
12
13
14
15
16
store/features/taskSlice.js
/* TASK版块的切片,包含:REDUCER & ACTION-CREATOR */
import { createSlice } from '@reduxjs/toolkit';
import { getTaskList } from '../../api/index.js';
const taskSlice = createSlice({
  // 切片的名字
  name: 'task',
  // 切片对应reducer中的初始状态
  initialState: {
    taskList: null,
    total: 0
  },
  // 编写不同业务逻辑下,对公共状态的更改
  reducers: {
    getAllTaskList(state, action) {
      // state:redux中的公共状态信息「基于immer库管理,无需自己再克隆了」
      // action:派发的行为对象,我们无需考虑行为标识的问题了;传递的其他信息,都是以action.payload传递进来的值!!
      state.taskList = action.payload.list;
      state.total = action.payload.total;
    },
    removeTask(state, { payload }) {
      let taskList = state.taskList;
      if (!Array.isArray(taskList)) {
        return;
      }
      // payload:接收传递进来的,要删除那一项的ID
      state.taskList = taskList.filter(item => item.id !== payload);
    },
    updateTask(state, { payload }) {
      let taskList = state.taskList;
      if (!Array.isArray(taskList)) {
        return;
      }
      // payload:接收传递进来的,要删除的那一项的ID
      state.taskList = taskList.map(item => {
        if (+item.id === +payload) {
            item.state = 2;
            item.complete = new Date().toLocaleString('zh-CN');
        }
        return item;
      })
    }
  }
});

// 从切片中获取actionCreator:此处解构的方法和上面reducers中的方法,仅仅是函数名相同;方法执行,返回需要派发的行为对象;后期我们可以基于dispatch进行任务派发即可!!
export let { getAllTaskList, removeTask, updateTask } = taskSlice.actions;
// console.log(getAllTaskList([])); //=>{type: 'task/getAllTaskList', payload: []}
// 加下面是因为这连个函数名与其他函数中的函数名重复了;所以需要修改一下函数名;
export const removeTaskAction = removeTask;
export const updateTaskAction = updateTask;

// 实现异步派发「redux-thunk」
export const getAllTaskListAsync = (selectIndex, current, pageSize) => {
  return async dispatch => {
    let list = [];
    let total = 0;
    try {
      let result = await getTaskList(selectIndex, current, pageSize);
      console.log('taskAction发送请求返回的数据', result);
      if(+result.code === 0) {
        list = result.list;
        total = result.total;
      }
    } catch (_) { }
    dispatch(getAllTaskList({list, total}));
  }
}

// 从切片中获取reducer
export default taskSlice.actions;
2
3
4
5
6
7
8
9
10
11
12
13
14
15
16
17
18
19
20
21
22
23
24
25
26
27
28
29
30
31
32
33
34
35
36
37
38
39
40
41
42
43
44
45
46
47
48
49
50
51
52
53
54
55
56
57
58
59
60
61
62
63
64
65
66
67
68
69
70
一般情况下,需要导出taskSlice.reducer和taskSlice.actions
index.js
同样需要在上下文中导入store
// import store from './store'
import store from './store-toolkit';
import { Provider } from 'react-redux'


const root = ReactDOM.createRoot(document.getElementById('root'));
root.render(
  <ConfigProvider locale={zhCN}>
    <Provider store={store}>
      <Task></Task>
    </Provider>
  </ConfigProvider>
);
2
3
4
5
6
7
8
9
10
11
12
13
Task.jsx
import { useSelector, useDispatch } from 'react-redux';
import { getAllTaskListAsync, removeTaskAction, updateTaskAction } from '../store-toolkit/features/taskSlice'
const Task = function Task() {
  /* 获取公共状态和派发的方法 */
  let { taskList, total } = useSelector(state => state.task);
  let dispatch = useDispatch();
    ....

  // 调用方法
    dispatch(getAllTaskListAsync(selectIndex, pageInfo.current, pageInfo.pageSize));
    dispatch(removeTaskAction(id));
    dispatch(updateTaskAction(id));
    ....
}
export default Task;
2
3
4
5
6
7
8
9
10
11
12
13
14
15

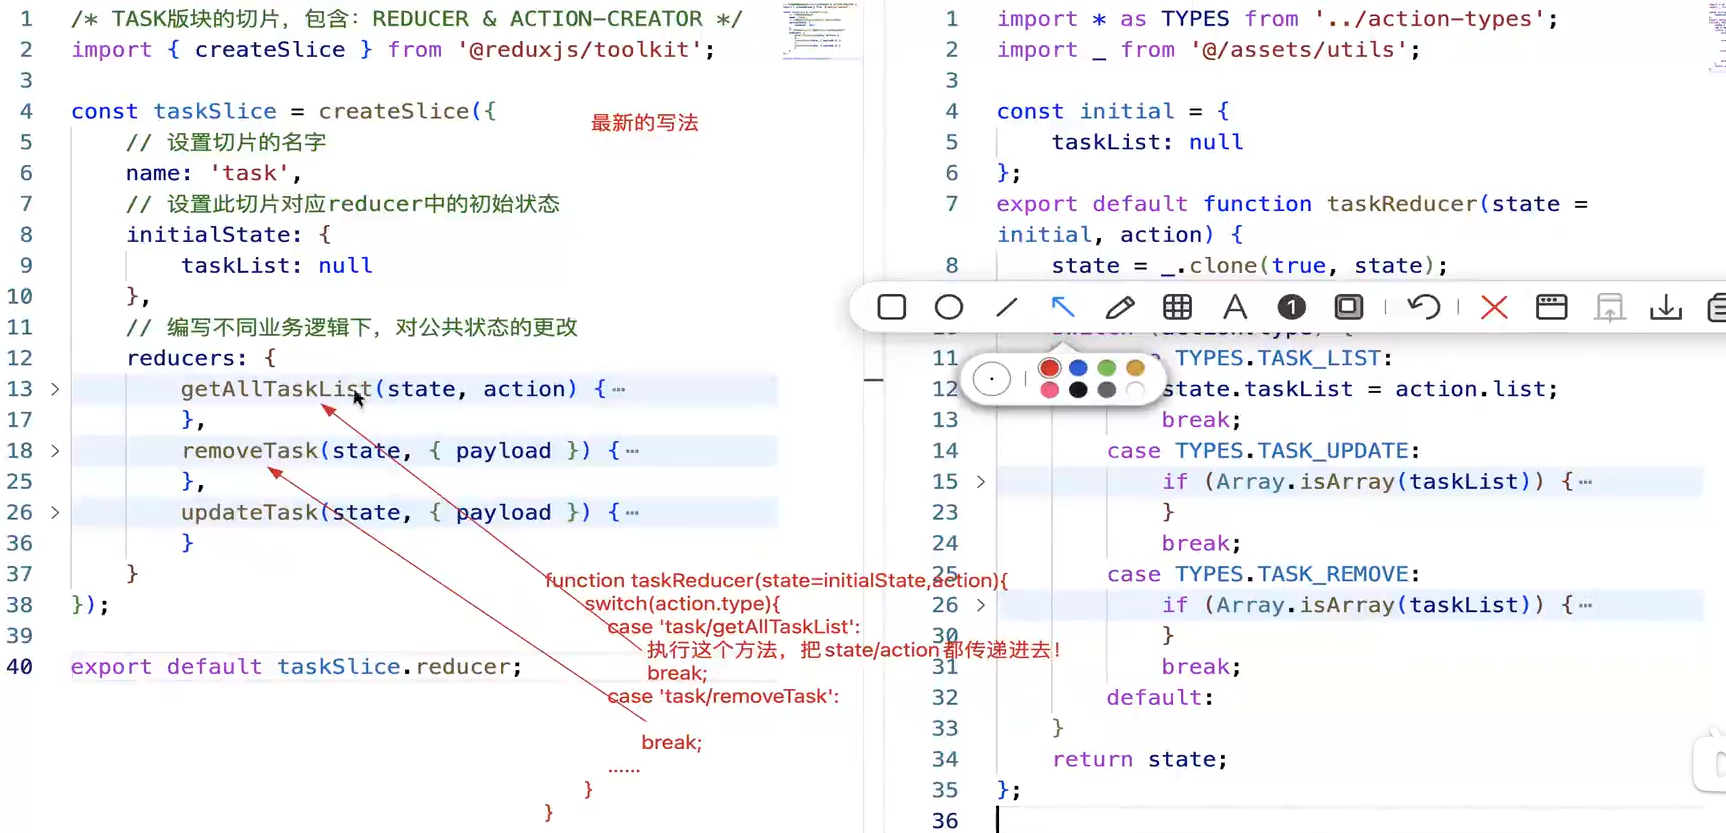
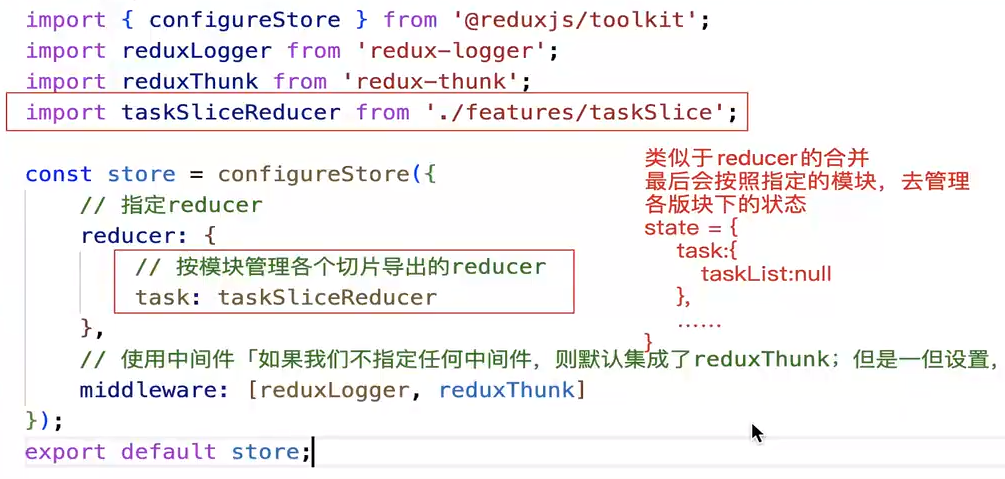
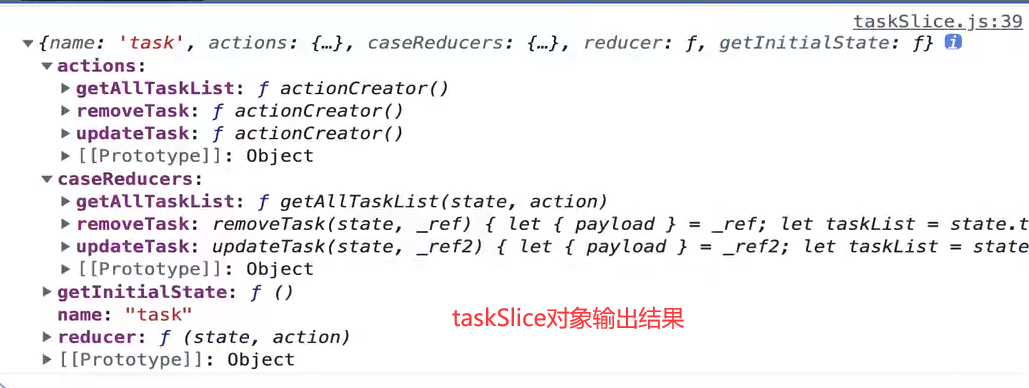
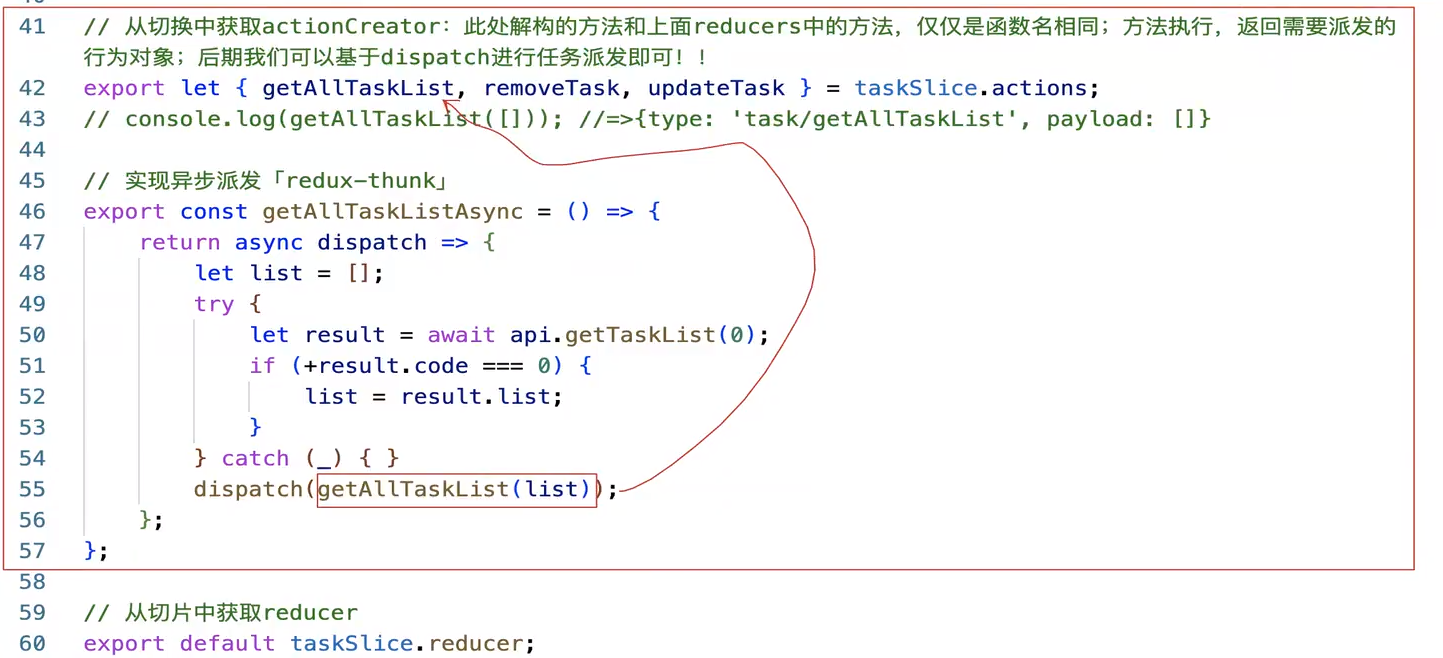


# 基于mobx的公共状态管理方案
# mobx基本介绍
mobx是一个简单可扩展的状态管理库,相比较于redux,它:
- 开发难度低
- 开发代码量少
- 渲染性能好

浏览器兼容性
- MobX >=5 版本运行在任何支持 ES6 proxy 的浏览器。
- MobX 4 可以运行在任何支持 ES5 的浏览器上,而且也将进行持续地维护。MobX 4 和 5 的 API 是相同的,并且语义上也能达到相同的效果。
- MobX 6 「最新版本」移除了装饰器的操作(因为装饰器不是JS标准规范)!
想要使用mobx,首先需要让项目支持JS装饰器语法!
npm install @babel/plugin-proposal-decorators @babel/plugin-proposal-class-properties
package.json
"babel": {
  "presets": [ "react-app" ],
  "plugins": [
    [
      "@babel/plugin-proposal-decorators",
      {
        /* legacy /ˈleɡəsi/:使用历史遗留(Stage-1)的装饰器中的语法和行为。它为提案从 Stage-1 到当前阶段 Stage-2 平稳过渡作铺垫*/
        "legacy": true
      }
    ],
    [
       "@babel/plugin-proposal-class-properties",
       {
         /* loose=false时,是使用Object.defineProperty定义属性,loose=ture,则使用赋值法直接定义 */
         "loose": true
       }
     ]
  ]
}
2
3
4
5
6
7
8
9
10
11
12
13
14
15
16
17
18
19
# mobx 第五代版本的运用
安装
npm install mobx@5 mobx-react@6
初窥mobx 实现一个简单的计数器累加效果
import { observable, action } from 'mobx';
import { observer } from 'mobx-react';
import React from 'react';

// 公共状态管理
class Store {
  @observable count = 0;

  @action
  increment() {
    this.count++;
  }
}
const store = new Store();

// 组件监听
// @observer
// class Demo extends React.Component {
//   render() {
//     return (
//       <div>
//         <p>{store.count}</p>
//         <button onClick={() => store.increment()}>+1</button>
//       </div>
//     );
//   }
// }

// 函数组件不支持装饰器,我们则基于observer把其执行即可
const Demo = observer(() => {
  return (
    <div>
      <p>{store.count}</p>
      <button onClick={() => store.increment()}>+1</button>
    </div>
  );
})

export default Demo;
2
3
4
5
6
7
8
9
10
11
12
13
14
15
16
17
18
19
20
21
22
23
24
25
26
27
28
29
30
31
32
33
34
35
36
37
38
39
在 React 中,函数组件不直接支持装饰器的主要原因是函数组件的语法本身不支持装饰器语法。装饰器是一种用于修改类和类成员的语法,它们通常与类一起使用,可以在类声明之前使用
@decorator的语法来修饰类或类的方法。但是,在 React 中,函数组件不是类,因此无法使用装饰器语法。
observable
一个实现“监听值变化”的函数或者装饰器
import { observable, autorun } from 'mobx'

class Store {
  @observable count = 0
}

const store = new Store()

// autorun 是一个函数,它接受一个函数作为参数,该函数会在依赖发生变化时自动执行【最开始立即执行一次】
autorun(() => {
  console.log('Count is:', store.count)
})

// 一秒钟后改变内容
setTimeout(() => {
  store.count++
}, 1000)
2
3
4
5
6
7
8
9
10
11
12
13
14
15
16
17
探索 observable 的原理
import { observable, observe } from 'mobx';
let obj = observable({
    x: 10,
    y: 20
});
// console.log(obj); //对象是经过ES6 Proxy做了劫持处理的
// observe:当监听的对象做出变化时,触发callback
observe(obj, change => {
    console.log('内容改变了:', change);
});
obj.x = 100;

//----
// observable不能直接对原始值类型进行监听,需要基于.box处理
let x = observable.box(10);
observe(x, change => {
    console.log('内容改变了:', change);
});
console.log(x, x.get());
x.set(1000);
2
3
4
5
6
7
8
9
10
11
12
13
14
15
16
17
18
19
20
computed计算属性
import { observable, autorun, computed, reaction } from "mobx";

class Store {
  @observable x = 10;
  @observable count = 20;
  @observable price = 30;
  // 设置具备计算缓存的计算属性:依赖的状态值没有变化,方法不会重新执行,使用之前计算缓存的结果
  @computed get total() {
    console.log('计算属性执行');
    return this.x + this.count + this.price;
  }
}
let store = new Store();

autorun(() => {
  console.log('autorun执行', store.total, store.x);
})

// 相比较于autorun,提供更精细的管控「第一次不会触发」
reaction(
  () => [store.total, store.x],
  ([total, x], [prevTotal, prevX]) => {
    console.log('reaction执行', total, x, prevTotal, prevX);
  }
)

setTimeout(() => {
  store.x = 100;
  store.count = 200;
}, 1000

)
2
3
4
5
6
7
8
9
10
11
12
13
14
15
16
17
18
19
20
21
22
23
24
25
26
27
28
29
30
31
32
action修改公共状态的方法
import { observable, autorun, action, configure } from 'mobx';

// 设定只能基于action方法修改状态值
configure({
    enforceActions: "observed"
});

class Store {
    @observable x = 10;
    @action changeX(val) {
        this.x = val;
    }
}
let store = new Store;

autorun(() => {
    console.log('autorun:', store.x);
});
setTimeout(() => {
    store.changeX(1000);
    // store.x = 2000; //Uncaught Error: [mobx] Since strict-mode is enabled, changing observed observable values outside actions is not allowed.
}, 1000);
2
3
4
5
6
7
8
9
10
11
12
13
14
15
16
17
18
19
20
21
22
class Store {
    @observable x = 10;
    // .bound确保this永远是实例
    @action.bound changeX(val) {
        this.x = val;
    }
}
let store = new Store;
...
setTimeout(() => {
    let changeX = store.changeX;
    changeX(1000);
}, 1000);
2
3
4
5
6
7
8
9
10
11
12
13
class Store {
    @observable x = 10;
}
let store = new Store;

autorun(() => {
    console.log('autorun:', store.x);
});
setTimeout(() => {
    // 基于runInAction代替action修饰器「即便设置enforceActions配置项,它也是被允许的」,和action修饰器具备相同的效果!!
    runInAction(() => {
        store.x = 1000;
    });
}, 1000);
2
3
4
5
6
7
8
9
10
11
12
13
14
实现异步派发
// 模拟从服务器获取数据
const query = () => {
    return new Promise(resolve => {
        setTimeout(() => {
            resolve(1000);
        }, 1000);
    });
};

class Store {
    @observable x = 10
    @action.bound async changeX() {
        let res = 0;
        try {
            res = await query();
        } catch (_) { }
        this.x = res;
    }
}
let store = new Store;
autorun(() => {
    console.log('autorun:', store.x);
});
store.changeX();
2
3
4
5
6
7
8
9
10
11
12
13
14
15
16
17
18
19
20
21
22
23
24
# 基于mobx重构TASKOA案例
结构目录
|- store
    |- TaskStore.js
    |- PersonalStore.js
    |- index.js

/*PersonalStore.js*/
class PersonalStore {
    constructor(root) {
        this.root = root;
    }
}
export default PersonalStore;

/*TaskStore.js*/
import { observable, action, runInAction } from 'mobx';
import { getTaskList } from '../api';
class TaskStore {
    constructor(root) {
        this.root = root;
    }
    @observable taskList = null;
    // 异步获取全部任务
    @action.bound async queryTaskListAction() {
        let list = [];
        try {
            let result = await getTaskList(0);
            if (+result.code === 0) {
                list = result.list;
            }
        } catch (_) { }
        runInAction(() => {
            this.taskList = list;
        });
    }
    // 同步删除某个任务
    @action.bound removeTaskAction(id) {
        if (!Array.isArray(this.taskList)) return;
        this.taskList = this.taskList.filter(item => {
            return +item.id !== +id;
        });
    }
    // 同步修改某个任务
    @action.bound updateTaskAction(id) {
        if (!Array.isArray(this.taskList)) return;
        this.taskList = this.taskList.map(item => {
            if (+item.id === +id) {
                item.state = 2;
                item.complete = new Date().toLocaleString('zh-CN');
            }
            return item;
        });
    }
}
export default TaskStore;

/*index.js*/
import TaskStore from "./TaskStore";
import PersonalStore from "./PersonalStore";
import { configure } from 'mobx';
configure({
    enforceActions: 'observed'
});
class Store {
    constructor() {
        this.task = new TaskStore(this);
        this.personal = new PersonalStore(this);
    }
}
export default new Store();
2
3
4
5
6
7
8
9
10
11
12
13
14
15
16
17
18
19
20
21
22
23
24
25
26
27
28
29
30
31
32
33
34
35
36
37
38
39
40
41
42
43
44
45
46
47
48
49
50
51
52
53
54
55
56
57
58
59
60
61
62
63
64
65
66
67
68
69
70
在组件中的使用
/* index.jsx */
import store from './store';
import { Provider } from 'mobx-react';
...
root.render(
    <ConfigProvider locale={zhCN}>
        <Provider {...store}>
            <Task />
        </Provider>
    </ConfigProvider>
);

/* Task.jsx */
import { observer, inject } from 'mobx-react';
const Task = function Task(props) {
    /* 获取TASK模块的Store实例 */
    let { task } = props;

    /* 关于TABLE和数据的处理 */
    useEffect(() => {
        (async () => {
            if (!task.taskList) {
                setTableLoading(true);
                await task.queryTaskListAction();
                setTableLoading(false);
            }
        })();
    }, []);
    useEffect(() => {
        let { taskList } = task;
        if (!taskList) taskList = [];
        if (selectedIndex !== 0) {
            taskList = taskList.filter(item => {
                return +item.state === selectedIndex;
            });
        }
        setTableData(taskList);
    }, [selectedIndex, task.taskList]);

    ......
};
export default inject('task')(observer(Task));
2
3
4
5
6
7
8
9
10
11
12
13
14
15
16
17
18
19
20
21
22
23
24
25
26
27
28
29
30
31
32
33
34
35
36
37
38
39
40
41
42
# mobx6的应用
和mobx5的语法类似,只是去掉所有的装饰器,基于makeObservable、makeAutoObservable进行修饰处理即可!!
/*TaskStore.js*/
import { observable, action, runInAction, makeObservable, makeAutoObservable } from 'mobx';
import { getTaskList } from '../api';

class TaskStore {
    constructor(root) {
        this.root = root;
        /* // makeObservable函数可以捕获已经存在的对象属性并且使得它们可观察
        makeObservable(this, {
            taskList: observable,
            queryTaskListAction: action.bound,
            removeTaskAction: action.bound,
            updateTaskAction: action.bound
        }); */

        /*
         makeAutoObservable 就像是加强版的 makeObservable,在默认情况下它将推断所有的属性
         推断规则:
            所有自有属性都成为 observable
            所有getters都成为 computed
            所有setters都成为 action
            所有prototype中的 functions 都成为 autoAction
            所有prototype中的 generator functions 都成为 flow
         */
        makeAutoObservable(this);
    }
    taskList = null;
    async queryTaskListAction() {
       ...
    }
    removeTaskAction(id) {
        ...
    }
    updateTaskAction(id) {
        ...
    }
}
export default TaskStore;
2
3
4
5
6
7
8
9
10
11
12
13
14
15
16
17
18
19
20
21
22
23
24
25
26
27
28
29
30
31
32
33
34
35
36
37
38
# 装饰器补充
JavaScript中的装饰器:就是对类、类属性、类方法之类的一种装饰,可以理解为在原有代码外层又包装了一层处理逻辑。这样就可以做到不直接修改代码,就实现某些功能。
在vscode中支持装饰器
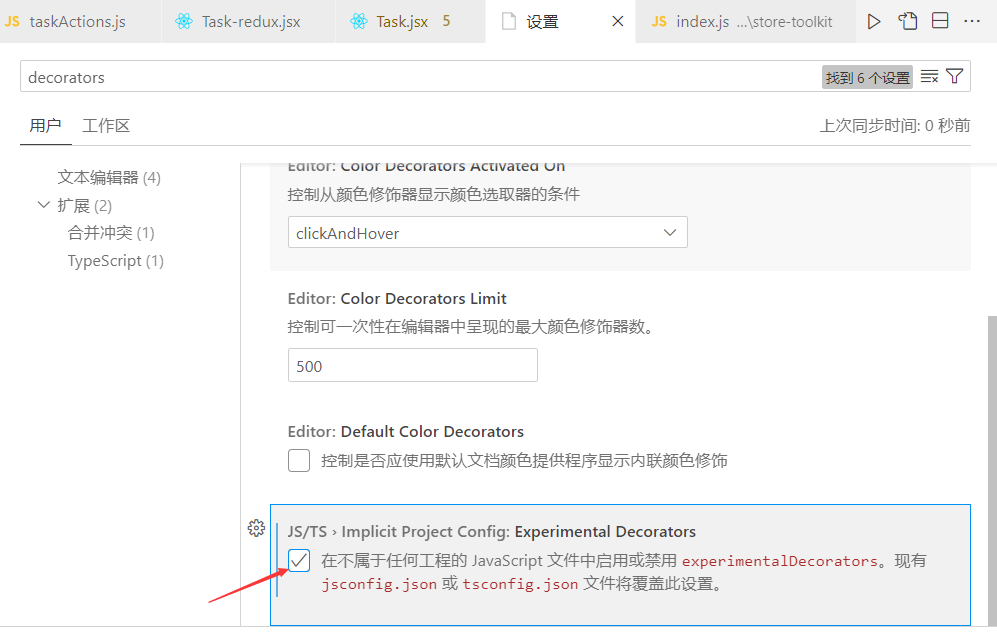
在create-react-app中支持装饰器
npm install @babel/plugin-proposal-class-properties @babel/plugin-proposal-decorators
npm install roadhog@2.5.0-beta.1 # 处理版本兼容问题(解决babel语法包和插件之间版本兼容的问题)
2
package.json
"babel": {
  "presets": [ "react-app" ],
  "plugins": [
    [
      "@babel/plugin-proposal-decorators",
      {
        /* legacy /ˈleɡəsi/:使用历史遗留(Stage-1)的装饰器中的语法和行为。它为提案从 Stage-1 到当前阶段 Stage-2 平稳过渡作铺垫*/
        "legacy": true
      }
    ],
    [
       "@babel/plugin-proposal-class-properties",
       {
         /* loose=false时,是使用Object.defineProperty定义属性,loose=ture,则使用赋值法直接定义 */
         "loose": true
       }
     ]
  ]
}
2
3
4
5
6
7
8
9
10
11
12
13
14
15
16
17
18
19
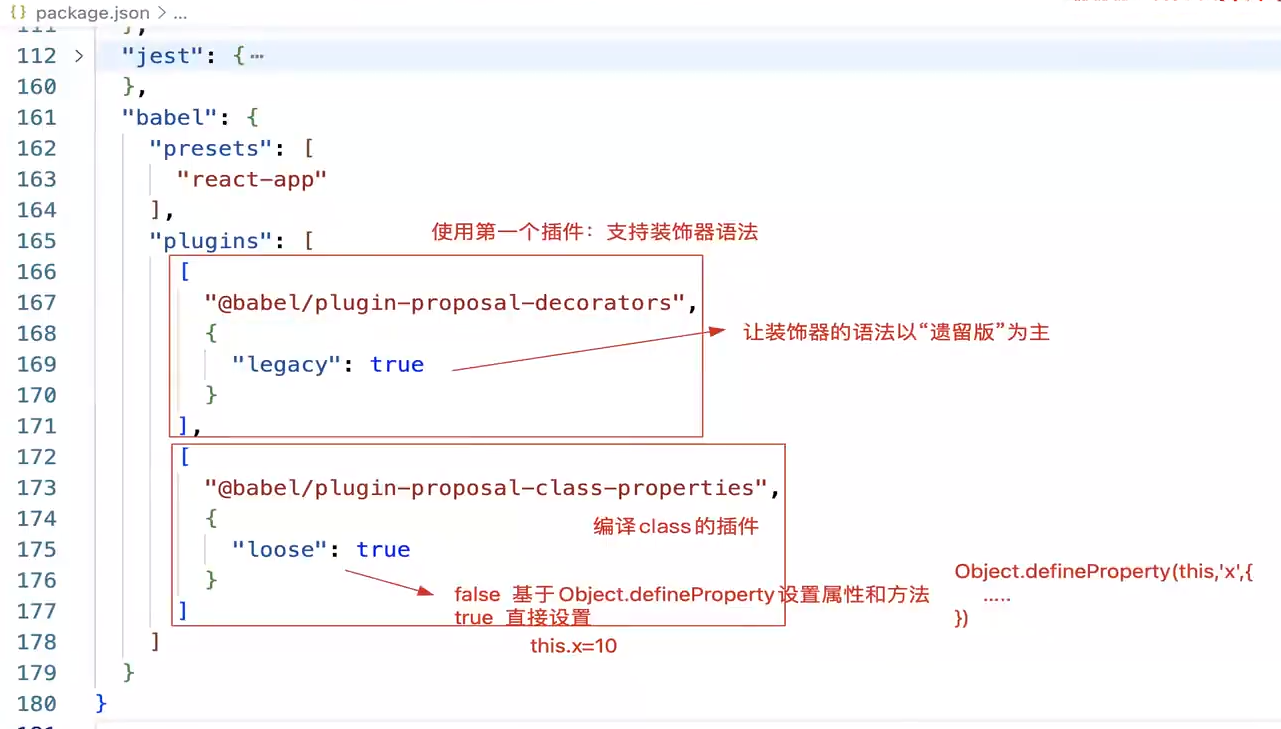
# 类的装饰器
类装饰器在类声明之前被声明,可以用来监视,修改或替换类的定义。
const classDecorator = (target) => {
  // target:被修饰的类「Demo」
  target.num = 100; //给类设置静态私有属性
  // return function () { } //返回的值将替换现有Demo的值
}

@classDecorator
class Demo { }

// 编译结果
// var _class;
// const classDecorator = target => {
//   // target:被修饰的类「Demo」
//   target.num = 100; //给类设置静态私有属性
//   // return function () { } //返回的值将替换现有Demo的值
// };
// let Demo = classDecorator(_class = class Demo {}) || _class;
2
3
4
5
6
7
8
9
10
11
12
13
14
15
16
17
const classDecorator1 = (target) => {
  console.log('classDecorator1'); // 后被执行
  target.num = 100;
};
const classDecorator2 = (target) => {
  console.log('classDecorator2'); // 这个先被执行
  // 给类的原型上设置公共属性/方法
  target.prototype.say = function say() { };
};

@classDecorator1 //第一个装饰器
@classDecorator2 //第二个装饰器
class Demo2 {

}
// const classDecorator1 = target => {
//   console.log('classDecorator1'); // 后被执行
//   target.num = 100;
// };
// const classDecorator2 = target => {
//   console.log('classDecorator2'); // 这个先被执行
//   // 给类的原型上设置公共属性/方法
//   target.prototype.say = function say() {};
// };
// let Demo2 = classDecorator1(_class2 = classDecorator2(_class2 = class Demo2 {}) || _class2) || _class2;
2
3
4
5
6
7
8
9
10
11
12
13
14
15
16
17
18
19
20
21
22
23
24
25
还可以让装饰器接受参数,这就等于可以修改装饰器的行为了,这也叫做装饰器工厂。装饰器工厂是通过在装饰器外面再封装一层函数来实现。
const classDecorator = (x, y) => {
    return (target) => {
        target.total = x + y;
    };
};

@classDecorator(100, 200)
class Demo { }

/*
编译后的结果:
var _dec, _class;
const classDecorator = (x, y) => {
  return target => {
    target.total = x + y;
  };
};
let Demo = (_dec = classDecorator(100, 200), _dec(_class = class Demo {}) || _class);
*/
2
3
4
5
6
7
8
9
10
11
12
13
14
15
16
17
18
19
# 类属性/方法装饰器
类属性装饰器可以用在类的单个成员上,无论是类的属性、方法….该装饰器函数有3个参数:
- target:成员所在的类
- name:类成员的名字
- descriptor:属性描述符
使用类属性装饰器可以做很多有意思的事情,最经典的例子就是@readonly
const readonly = (target, name, descriptor) => {
    // target:Demo
    // name:'x'
    // descriptor:{configurable: true, enumerable: true, writable: true, initializer: ƒ}
    descriptor.writable = false;
};

class Demo {
    @readonly x = 100;
}

let d = new Demo;
d.x = 200; //Uncaught TypeError: Cannot assign to read only property 'x' of object
2
3
4
5
6
7
8
9
10
11
12
13
还可以装饰函数成员
const recordTime = (target, name, descriptor) => {
    let func = descriptor.value;
    if (typeof func === "function") {
        // 重构函数,做计时统计
        descriptor.value = function proxy(...params) {
            console.time(name);
            let result = func.call(this, ...params);
            console.timeEnd(name);
            return result;
        };
    }
};

class Demo {
    @recordTime
    init() {
        return 100;
    }
}
let d = new Demo;
console.log(d.init());
2
3
4
5
6
7
8
9
10
11
12
13
14
15
16
17
18
19
20
21
有关多个装饰器的处理顺序: 写了工厂函数,从上到下依次求值,目的是获取装饰器函数。 装饰器函数的执行顺序是由下至上依次执行。
const A = () => {
    console.log(1);
    return () => {
        console.log(2);
    };
};
const B = () => {
    console.log(3);
    return () => {
        console.log(4);
    };
};

class Demo {
    @A()
    @B()
    init() { }
}
// 1 3 4 2
2
3
4
5
6
7
8
9
10
11
12
13
14
15
16
17
18
19
# React路由管理方案:react-router-dom
当代前端开发,大部分都以SPA单页面应用开发为主
- 管理系统
- 移动端WebApp「或App」
- 其他情况
而前端路由机制,就是构建SPA单页面应用的利器 https://reactrouter.com/en/main

# 路由设计模式
1. 哈希(hash)路由
原理:每一次路由跳转,都是改变页面的hash值;并且监听hashchange事件,渲染不同的内容!!
  <div class="router-box">
    <a href="#/">首页</a>
    <a href="#/product">产品中心</a>
    <a href="#/personal">个人中心</a>
  </div>
  <div class="view-box"></div>
  <script>
    const viewBox = document.getElementsByClassName('view-box')[0];
    // 路由表
    const routes = [{
        path: '/',
        component: '首页内容'
    }, {
        path: '/product',
        component: '产品中心内容'
    }, {
        path: '/personal',
        component: '个人中心内容'
    }];
    // 页面第一次加载
    location.hash = '#/';
    // 监听路由变化
    const matchRouter = function() {
      let hash = location.hash.slice(1);
      viewBox.innerHTML = routes.find(item => item.path === hash).component;
    }
    matchRouter();
    window.addEventListener('hashchange', matchRouter)
  </script>
2
3
4
5
6
7
8
9
10
11
12
13
14
15
16
17
18
19
20
21
22
23
24
25
26
27
28
29
2. 浏览器(history)路由
原理:利用H5的HistoryAPI完成路由的切换和组件的渲染! https://developer.mozilla.org/zh-CN/docs/Web/API/History_API
History路由{浏览器路由}
- 利用了H5中的HistoryAPI来实现页面地址的切换「可以不刷新页面」
- 根据不同的地址,到路由表中进行匹配,让容器中渲染不同的内容「组件」
问题:我们切换的地址,在页面不刷新的情况下是没有问题的,但是如果页面刷新,这个地址是不存在的,会报404错误!!此时我们需要服务器的配合:在地址不存在的情况下,也可以把主页面内容返回!!
<nav class="nav-box">
<a href="/">首页</a>
<a href="/product">产品中心</a>
<a href="/personal">个人中心</a>
</nav>
<div class="view-box"></div>
<script>
/*
History路由{浏览器路由}
+ 利用了H5中的HistoryAPI来实现页面地址的切换「可以不刷新页面」
+ 根据不同的地址,到路由表中进行匹配,让容器中渲染不同的内容「组件」
问题:我们切换的地址,在页面不刷新的情况下是没有问题的,但是如果页面刷新,这个地址是不存在的,会报404错误!!此时我们需要服务器的配合:在地址不存在的情况下,也可以把主页面内容返回!!
*/
const navBox = document.querySelector('.nav-box');
const viewBox = document.querySelector('.view-box');
// 路由表
const routes = [{
path: '/',
component: '首页内容'
}, {
path: '/product',
component: '产品中心内容'
}, {
path: '/personal',
component: '个人中心内容'
}];
// 路由匹配
const routerMatch = () => {
let path = location.pathname;
const route = routes.find(item => item.path === path);
if (route) {
viewBox.innerHTML = route.component;
} else {
viewBox.innerHTML = '404';
}
}
history.pushState({}, "", '/');
routerMatch();
navBox.addEventListener('click', (e) => {
const ele = e.target;
if (ele.tagName === 'A') {
e.preventDefault();
history.pushState({}, "", ele.href);
routerMatch();
}
})
/*
popstate事件触发时机:
1)点击浏览器的前进、后退按钮
2)调用history.go/forward/back等方法
注意:history.pushState/replaceState不会触发此事件
*/
window.addEventListener('popstate', routerMatch);
</script>
2
3
4
5
6
7
8
9
10
11
12
13
14
15
16
17
18
19
20
21
22
23
24
25
26
27
28
29
30
31
32
33
34
35
36
37
38
39
40
41
42
43
44
45
46
47
48
49
50
51
52
53
54
55
# react-router-dom V5版本
yarn add react-router-dom@5.3.4
# 基本运用
1、<Link>等组件,需要放在Router(BrowserRouter/HashRouter)的内部!
2、每当页面加载或者路由切换的时候,都会去和每一个<Route>进行匹配
- 和其中一个匹配成功后,还会继续向下匹配,所以需要基于
<Switch>处理 - 默认是“非精准”匹配的,所以我们需要基于
exact处理
import React from "react";
import { HashRouter, Router, Route, Switch, Redirect, Link } from "react-router-dom";
/* 导入组件 */
import A from './views/A';
import B from './views/B';
import C from './views/C';
/* 导航区域的样式 */
import styled from "styled-components";
const NavBox = styled.nav`
a{
margin-right: 10px;
color: #000;
}
`;
const Demo = () => {
/*
基于<HashRouter>把所有要渲染的内容包起来,开启HASH路由
+ 后续用到的<Route>、<Link>等,都需要在HashRouter/BrowserRouter中使用
+ 开启后,整个页面地址,默认会设置一个 #/ 哈希值
Link实现路由切换/跳转的组件
+ 最后渲染完毕的结果依然是A标签
+ 它可以根据路由模式,自动设定点击A切换的方式
*/
return <HashRouter>
{/* 导航部分 */}
<NavBox>
<Link to="/a">A</Link>
<Link to="/b">B</Link>
<Link to="/c">C</Link>
</NavBox>
{/* 路由容器:每一次页面加载或者路由切换完毕,都会根据当前的哈希值,到这里和每一个Route进行匹配,把匹配到的组件,放在容器中渲染!! */}
<div className="content">
{/*
Switch:确保路由中,只要有一项匹配,则不再继续向下匹配
exact:设置匹配模式为精准匹配
*/}
<Switch>
<Route path="/" component={A} exact />
<Route path="/b" component={B} />
<Route path="/c" render = {
() => {
// 当路由地址匹配后,先把render函数执行,返回的返回值就是我们需要渲染的内容
// 在此函数中,可以处理一些事情,例如:登录态检验....
let isLogin = true;
if (isLogin) {
return <C />;
}
return <Redirect to="/login" />
}
} />
{/*
// 放在最后一项,path设置※或者不写,意思是:以上都不匹配,则执行这个规则
<Route path="*" component={404组件} />
// 当然也可以不设置404组件,而是重定向到默认 / 地址:
<Redirect from="" to="" exact/>
+ from:从哪个地址来
+ to:重定向的地址
+ exact是对from地址的修饰,开启精准匹配
*/}
<Redirect to="/"/>
</Switch>
</div>
</HashRouter>
}
export default Demo;
/*
路径地址匹配的规则
路由地址:Route中path字段指定的地址
页面地址:浏览器URL后面的哈希值
页面地址 路由地址 非精准匹配 精准匹配
/ / true true
/ /login false false
/login / true false
/a/b /a true false
/a/b/ /a/b true true
/a2/b /a false false
....
/ 和 /xxx 算是地址中的一个整体!!
非精准匹配:
@1 页面地址和路由地址一样,返回true
@2 页面地址中,包含一套完整的路由地址,返回true
@3 剩下返回的都是false
精准匹配:
@1 两个地址只有一模一样才匹配「最后一个/可以忽略」
*/
2
3
4
5
6
7
8
9
10
11
12
13
14
15
16
17
18
19
20
21
22
23
24
25
26
27
28
29
30
31
32
33
34
35
36
37
38
39
40
41
42
43
44
45
46
47
48
49
50
51
52
53
54
55
56
57
58
59
60
61
62
63
64
65
66
67
68
69
70
71
72
73
74
75
76
77
78
79
80
81
82
83
84
85
86
87
88
89
90
91
92
# 二级路由
App.jsx
/* App.jsx */
const App = function App() {
return <HashRouter>
{/* 导航区域 */}
<nav className="nav-box">
<Link to="/a">A</Link>
...
</nav>
{/* 内容区域 */}
<div className="content">
<Switch>
<Redirect exact from="/" to="/a" />
<Route path="/a" component={A} />
...
</Switch>
</div>
</HashRouter>;
}
2
3
4
5
6
7
8
9
10
11
12
13
14
15
16
17
18
19
A.jsx
import React from "react";
import { Link, Route, Redirect, Switch } from 'react-router-dom'
import A1 from './a/A1';
import A2 from './a/A2';
import A3 from './a/A3';
// 处理样式
import styled from "styled-components";
const DemoBox = styled.div`
display: flex;
.menu{
a{
display:block;
}
}
`;
const A = function A() {
return <DemoBox>
{/* 这里不需要写HashRouter,因为父组件已经写过了 */}
<div className="menu">
<Link to="/a/a1">A1</Link>
<Link to="/a/a2">A2</Link>
<Link to="/a/a3">A3</Link>
</div>
<div className="content">
{/* 二级嵌套路由 */}
<Switch>
<Redirect from="/a" to="/a/a1" exact/>
<Route path="/a/a1" component={A1}/>
<Route path="/a/a2" component={A2}/>
<Route path="/a/a3" component={A3}/>
</Switch>
</div>
</DemoBox>
};
export default A;
2
3
4
5
6
7
8
9
10
11
12
13
14
15
16
17
18
19
20
21
22
23
24
25
26
27
28
29
30
31
32
33
34
35
36
37
# 路由表
router/index.jsx
import React from "react";
import { Switch, Route, Redirect } from "react-router-dom";
const RouterView = function RouterView(props) {
let { routes } = props;
return <Switch>
{
routes.map((route, index) => {
let { redirect, from, to, exact, path, name, component: Component, meta } = route, props = {};
if (redirect) {
props = {to};
if(from) props.from = from;
if(exact) props.exact = true;
return <Redirect key={index} {...props}></Redirect>
}
props = {path};
if(exact) props.exact = true;
return <Route key={index} {...props} render={() => {
// 做一些特殊的处理,例如:登录态校验,导航守卫等
return <Component></Component>
}}></Route>
})
}
</Switch>
}
export default RouterView;
2
3
4
5
6
7
8
9
10
11
12
13
14
15
16
17
18
19
20
21
22
23
24
25
26
27
路由表
router/route.js
import A from './views/A';
import B from './views/B';
import C from './views/C';
/*
一级路由
重定向选项
+ redirect:true
+ from:从哪来
+ to:定向的地址
+ exact:精准匹配
正常选项
+ path:匹配路径
+ name:路由名称
+ component:需要渲染的组件
+ meta:路由元信息
+ exact:精准匹配
*/
const routes = [{
redirect: true,
from: '/',
to: '/a',
exact: true
}, {
path: '/a',
name: 'a',
component: A,
meta: {}
}, {
path: '/b',
name: 'b',
component: B,
meta: {}
}, {
path: '/c',
name: 'c',
component: C,
meta: {}
}, {
redirect: true,
to: '/a'
}];
export default routes;
2
3
4
5
6
7
8
9
10
11
12
13
14
15
16
17
18
19
20
21
22
23
24
25
26
27
28
29
30
31
32
33
34
35
36
37
38
39
40
41
42
43
router/aRoutes.js 二级路由表
/* A组件的二级路由 */
import A1 from '../views/a/A1';
import A2 from '../views/a/A2';
import A3 from '../views/a/A3';
const aRoutes = [{
redirect: true,
from: '/a',
to: '/a/a1',
exact: true
}, {
path: '/a/a1',
name: 'a-a1',
component: A1,
meta: {}
}, {
path: '/a/a2',
name: 'a-a2',
component: A2,
meta: {}
}, {
path: '/a/a3',
name: 'a-a3',
component: A3,
meta: {}
}];
export default aRoutes;
2
3
4
5
6
7
8
9
10
11
12
13
14
15
16
17
18
19
20
21
22
23
24
25
26
27
# 路由懒加载
RouterView.jsx
const RouterView = function RouterView(props) {
...
return <Switch>
{routes.map((route, index) => {
...
return <Route key={index} {...props} render={() => {
return <Suspense fallback={<>加载中...</>}>
<Component />
</Suspense>;
}} />;
})}
</Switch>;
};
export default RouterView;
2
3
4
5
6
7
8
9
10
11
12
13
14
路由表中
import A from './views/A';
import { lazy } from 'react';
/*
一级路由
重定向选项
+ redirect:true
+ from:从哪来
+ to:定向的地址
+ exact:精准匹配
正常选项
+ path:匹配路径
+ name:路由名称
+ component:需要渲染的组件
+ meta:路由元信息
+ exact:精准匹配
*/
const routes = [{
redirect: true,
from: '/',
to: '/a',
exact: true
}, {
path: '/a',
name: 'a',
component: A,
meta: {}
}, {
path: '/b',
name: 'b',
component: lazy(() => import('./views/B')),
meta: {}
}, {
path: '/c',
name: 'c',
component: lazy(() => import('./views/C')),
meta: {}
}, {
redirect: true,
to: '/a'
}];
export default routes;
2
3
4
5
6
7
8
9
10
11
12
13
14
15
16
17
18
19
20
21
22
23
24
25
26
27
28
29
30
31
32
33
34
35
36
37
38
39
40
41
42
# 受控组件和withRouter
在react-router-dom v5中,基于Route路由匹配渲染的组件,路由会默认给每个组件传递三个属性
<Route path='/a' component={A}></Route>
给A组件传递三个属性;
- history
- location
- match
后期我们基于props/this.props获取传递的属性值!!
<Route path='/a' render={(props) =>{
// 在render中可以获取传递的属性
// 但是组件中没有这些属性,此时我们需要自己传递给组件
return <A {...props}/>;
}}
</Route>
2
3
4
5
6
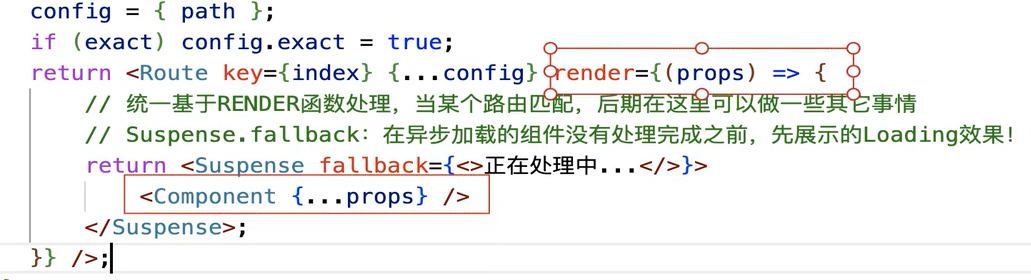
受控组件:基于Route路由渲染的组件
- history -> useHistory
- location -> useLocation
- match -> useRouteMatch
withRouter高阶函数的作用:让非受控组件具备受控组件的特征
import React from "react";
import { Link, withRouter } from 'react-router-dom';
// 样式
import styled from "styled-components";
const HomeHeadBox = styled.nav`
a{
margin-right: 10px;
}
`;
const HomeHead = function HomeHead(props) {
console.log(props);
return <HomeHeadBox>
<Link to="/a">A</Link>
<Link to="/b">B</Link>
<Link to="/c">C</Link>
</HomeHeadBox>;
};
export default withRouter(HomeHead);
2
3
4
5
6
7
8
9
10
11
12
13
14
15
16
17
18
19
20

# 路由跳转方案
方案一:Link跳转
<Link to="/xxx">导航</Link>
<Link to={{
pathname:'/xxx',
search:'',
state:{}
}}>导航</Link>
<Link to="/xxx" replace>导航</Link>
2
3
4
5
6
7
方案二:编程式导航
import { useHistory } from 'react-router-dom';
let history = useHistory();
history.push('/c');
history.push({
pathname: '/c',
search: '',
state: {}
});
history.replace('/c');
2
3
4
5
6
7
8
9
# 路由传参方案
方案一:问号传参 特点:最常用的方案之一;传递信息暴露到URL地址中,不安全而且有点丑,也有长度限制。
// 传递
history.push({
pathname: '/c',
search: 'id=0&name=zhangsan'
});
// 接收
import { useLocation } from 'react-router-dom';
let { search } = useLocation();
2
3
4
5
6
7
8
9
方案二:路径参数 特点:目前主流方案之一;
// 路由表
{
// :xxx 动态匹配规则
// ? 可有可无
path: '/c/:id?/:name?',
....
}
// 传递
history.push(`/c/0/zhangsan`);
//接收
import { useRouteMatch } from 'react-router-dom';
let { params } = useRouteMatch();
2
3
4
5
6
7
8
9
10
11
12
13
14
方案三:隐式传参 特点:传递信息是隐式传递,不暴露在外面;页面刷新,传递的信息就消失了!!
// 传递
history.push({
pathname: '/c',
state: {
id: 0,
name: 'zhangsan'
}
})
// 接收
import { useLocation } from 'react-router-dom';
let { state } = useLocation();
2
3
4
5
6
7
8
9
10
11
12
完整使用案例
传递参数
import React from "react";
import { useHistory } from "react-router-dom";
const B = function B() {
const history = useHistory();
// 传参方案一:问号传参
// 传递的信息出现在URL地址上:丑、不安全、长度限制
// 信息是显式的,即便在目标路由内刷新,传递的信息也在
// const onClick = () => {
// history.push('/c?id=100&name=zhangsan');
// }
// 传参方案二:路径参数「把需要传递的值,作为路由路径中的一部分」
// + 传递的信息也在URL地址中:比问号传参看起来漂亮一些、但是也存在安全和长度的限制
// + 因为信息都在地址中,即便在目标组件刷新,传递的信息也在
// const onClick = () => {
// history.push(`/c/100/zhufeng`);
// }
// 方案三:隐式传参
// + 传递的信息不会出现在URL地址中:安全、美观,也没有限制
// + 在目标组件内刷新,传递的信息就丢失了
const onClick = () => {
history.push({
pathname: "/c",
state: {
id: 100,
name: "zhangsan",
},
});
};
return (
<div className="box">
B组件-路由传递参数
<button onClick={onClick}>点击跳转</button>
</div>
);
};
export default B;
2
3
4
5
6
7
8
9
10
11
12
13
14
15
16
17
18
19
20
21
22
23
24
25
26
27
28
29
30
31
32
33
34
35
36
37
38
39
40
41
接收路由参数
import React from "react";
import { useLocation, useRouteMatch, useParams } from "react-router-dom";
import qs from "qs";
const C = function C() {
const location = useLocation();
console.log(location.search); //"?id=100&name=zhangsan"
// 获取传递的问号参数信息
let { id, name } = qs.parse(location.search.substring(1));
console.log(id, name);
// 也可以基于URLSearchParams来处理
let usp = new URLSearchParams(location.search);
console.log(usp.get('id'), usp);
// path: '/c/:id?/:name?',
const match = useRouteMatch();
console.log(match.params); //=>{id:100,name:'张三'}
let params = useParams();
console.log(params); //=>{id:100,name:'zhufeng'} */
// 获取隐式参数
const location2 = useLocation();
console.log('隐式参数', location2.state);
return <div className="box">
C组件的内容
</div>;
};
export default C;
2
3
4
5
6
7
8
9
10
11
12
13
14
15
16
17
18
19
20
21
22
23
24
25
26
27
28
29
30
# Link和NavLink
NavLink和Link都可以实现路由跳转,只不过NavLink有自动匹配,并且设置选中样式active的特点!!
- 每一次路由切换完毕后「或者页面加载完」,都会拿当前路由地址,和NavLink中的to「或者to中的pathname进行比较」,给匹配的这一项A,设置active样式类!!
- NavLink可与设置 exact 精准匹配属性
- 可以基于 activeClassName 属性设置选中的样式类名
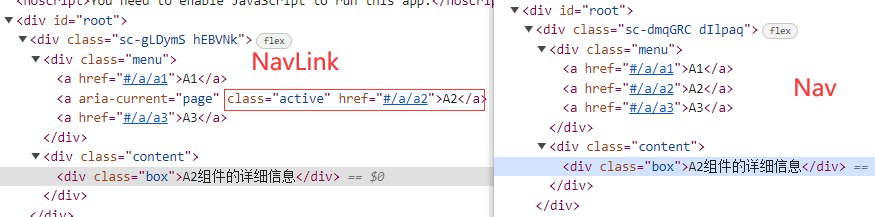
# react-router-dom V6版本
yarn add react-router-dom

基于这种方式,在router5中,目标组件只要刷新,传递的信息就消失了;但是在router6中,这个隐式传递的信息,却被保留下来了。
在react-router-dom v6中,常用的路由Hook
- useNavigate ->代替5中的useHistory︰实现编程式导航
- useLocation 「5中也有」︰获取location对象信息 pathname/search/state.....
- useSearchParams 「新增的」︰获取问号传参信息,取到的结果是一个URLSearchParams对象
- useParams 「5中也有」︰获取路径参数匹配的信息
- useMatch(pathname)->代替5中的useRouteMatch 「5中的这个Hook有用,可以基于params获取路径参数匹配的信息」;但是在6中,这个Hook需要我们自己传递地址,而且params中也没有获取匹配的信息,用的就比较少了。
# 基本使用
所有的路由匹配规则,放在Routes中;
每一条规则的匹配,还是基于
Route;路由匹配成功,不再基于component/render控制渲染的组件,而是基于element,语法格式是
<Component/>不再需要Switch,默认就是一个匹配成功,就不在匹配下面的了
- 不再需要exact,默认每一项匹配都是精准匹配
原有的
<Redirect>操作,被Navigate to="/" />代替遇到
<Navigate/>组件,路由就会跳转,跳转到to指定的路由地址设置replace 属性,则不会新增立即记录,而是替换现有记录
<Navigate to={{...}}/>1to的值可以是一个对象:pathname需要跳转的地址、search问号传参信息
import React from "react";
import { HashRouter, Routes, Route, Navigate } from 'react-router-dom';
import HomeHead from './components/HomeHead';
/* 导入需要的组件 */
import A from './views/A';
import B from './views/B';
import C from './views/C';
import A1 from './views/a/A1.jsx';
import A2 from './views/a/A2.jsx';
import A3 from './views/a/A3.jsx';
const App = function App() {
return <HashRouter>
<HomeHead />
<div className="content">
<Routes>
{/* 一级路由 「特殊属性 index」*/}
<Route path="/" element={<Navigate to="/a" />} />
<Route path="/a" element={<A />} >
{/* 二级路由 */}
{/* v6版本中,要求所有的路由(二级或者多级路由),不在分散到各个组件中编写,而是统一都写在一起进行处理!! */}
<Route path="/a" element={<Navigate to="/a/a1" />} />
<Route path="/a/a1" element={<A1 />} />
<Route path="/a/a2" element={<A2 />} />
<Route path="/a/a3" element={<A3 />} />
</Route>
<Route path="/b" element={<B />} />
<Route path="/c" element={<C />} />
{/* 如果以上都不匹配,我们可以渲染404组件,也可以重定向到A组件「传递不同的问号参数信息」 */}
<Route path="*" element={<Navigate to={{
pathname: '/a',
search: '?from=404'
}} />} />
</Routes>
</div>
</HashRouter>;
};
export default App;
2
3
4
5
6
7
8
9
10
11
12
13
14
15
16
17
18
19
20
21
22
23
24
25
26
27
28
29
30
31
32
33
34
35
36
37
38
39
A.jsx
import { Link, Outlet } from 'react-router-dom';
...
const A = function A() {
return <DemoBox>
...
<div className="view">
{/* Outlet:路由容器,用来渲染二级(多级)路由匹配的内容 */}
<Outlet />
</div>
</DemoBox>;
};
export default A;
2
3
4
5
6
7
8
9
10
11
12
# 跳转及传参
在react-router-dom v6中 ,实现路由跳转的方式:
<Link/NavLink to="/a" >点击跳转路由<Navigate to="/a" />遇到这个组件就会跳转编程式导航:取消了history对象,基于navigate函数实现路由跳转
import { useNavigate } from 'react-router-dom'; const navigate = useNavigate(); navigate('/c'); navigate('/c', { replace: true }); navigate({ pathname: '/c' }); navigate({ pathname: '/c', search: '?id=100&name=zhangsan'1
2
3
4
5
6
7
8
9
10
}); ... ```
// C组件的路由地址
<Route path="/c/:id?/:name?" element={<C />} />
/* 跳转及传参 */
import { useNavigate } from 'react-router-dom';
const B = function B() {
const navigate = useNavigate();
return <div className="box">
B组件的内容
<button onClick={() => {
navigate('/c');
navigate('/c', { replace: true });
navigate(-1);
navigate({
pathname: '/c/100/zxt',
search: 'id=10&name=zhangsan'
});
/*
// 问号传参
navigate({
pathname: '/c',
search: qs.stringify({
id: 100,
name: 'zhangsan'
})
});
*/
navigate('/c', { state: { x: 10, y: 20 } });
}}>按钮</button>
</div>;
};
export default B;
/* 接收信息 */
import { useParams, useSearchParams, useLocation, useMatch } from 'react-router-dom';
const C = function C() {
//获取路径参数信息
let params = useParams();
console.log('useParams:', params);
//获取问号传参信息
let [search] = useSearchParams();
search = search.toString();
console.log('useSearchParams:', search);
//获取location信息「pathname/serach/state...」
let location = useLocation();
console.log('useLocation:', location);
//获取match信息
console.log('useMatch:', useMatch(location.pathname));
return <div className="box">
C组件的内容
</div>;
};
export default C;
2
3
4
5
6
7
8
9
10
11
12
13
14
15
16
17
18
19
20
21
22
23
24
25
26
27
28
29
30
31
32
33
34
35
36
37
38
39
40
41
42
43
44
45
46
47
48
49
50
51
52
53
54
55
56
57
在react-router-dom v6中 ,即便当前组件是基于<Route>匹配渲染的,也不会基于属性,把history/location/match传递给组件!!想获取相关的信息,我们只能基于Hook函数处理!!
- 首先要确保,需要使用“路由Hook”的组件,是在Router「HashRouter或BrowserRouter」内部包着的,否则使用这些Hook会报错!!
- 只要在
<Router>内部包裹的组件,不论是否是基于<Route>匹配渲染的- 默认都不可能再基于props获取相关的对象信息了
- 只能基于“路由Hook”去获取!!
为了在类组件中也可以获取路由的相关信息:
- 稍后我们构建路由表的时候,我们会想办法:继续让基于
<Route>匹配渲染的组件,可以基于属性获取需要的信息 - 不是基于
<Route>匹配渲染的组件,我们需要自己重写withRouter「v6中干掉了这个API」,让其和基于<Route>匹配渲染的组件,具备相同的属性!!
# 路由表及懒加载
router/index.js
import { Suspense } from 'react';
import routes from "./routes";
import { Routes, Route, useNavigate, useLocation, useParams, useSearchParams } from 'react-router-dom';
/* 统一渲染的组件:在这里可以做一些事情「例如:权限/登录态校验,传递路由信息的属性...」 */
const Element = function Element(props) {
let { component: Component } = props;
// 把路由信息先获取到,最后基于属性传递给组件:只要是基于<Route>匹配渲染的组件,都可以基于属性获取路由信息
const navigate = useNavigate(),
location = useLocation(),
params = useParams(),
[usp] = useSearchParams();
// 最后要把Component进行渲染
return <Component navigate={navigate} location={location} params={params} usp={usp} />;
};
/* 递归创建Route */
const createRoute = function createRoute(routes) {
return <>
{routes.map((item, index) => {
let { path, children } = item;
// 每一次路由匹配成功,不直接渲染我们设定的组件,而是渲染Element;在Element做一些特殊处理后,再去渲染我们真实要渲染的组件!!
return <Route key={index} path={path} element={<Element {...item} />}>
{/* 基于递归方式,绑定子集路由 */}
{Array.isArray(children) ? createRoute(children) : null}
</Route>;
})}
</>;
};
/* 路由容器 */
export default function RouterView() {
return <Suspense fallback={<>正在处理中...</>}>
<Routes>
{createRoute(routes)}
</Routes>
</Suspense>;
};
/* 创建withRouter */
export const withRouter = function withRouter(Component) {
// Component:真实要渲染的组件
return function HOC(props) {
// 提前获取路由信息,作为属性传递给Component
const navigate = useNavigate(),
location = useLocation(),
params = useParams(),
[usp] = useSearchParams();
return <Component {...props} navigate={navigate} location={location} params={params} usp={usp} />;
};
};
2
3
4
5
6
7
8
9
10
11
12
13
14
15
16
17
18
19
20
21
22
23
24
25
26
27
28
29
30
31
32
33
34
35
36
37
38
39
40
41
42
43
44
45
46
47
48
49
50
51
52
53
router/routes.js
import { lazy } from 'react';
import { Navigate } from 'react-router-dom';
import A from '../views/A';
import aRoutes from './aRoutes';
const routes = [{
path: '/',
component: () => <Navigate to="/a" />
}, {
path: '/a',
name: 'a',
component: A,
meta: {},
children: aRoutes
}, {
path: '/b',
name: 'b',
component: lazy(() => import('../views/B')),
meta: {}
}, {
path: '/c',
name: 'c',
component: lazy(() => import('../views/C')),
meta: {}
}, {
path: '*',
component: () => <Navigate to="/a" />
}];
export default routes;
2
3
4
5
6
7
8
9
10
11
12
13
14
15
16
17
18
19
20
21
22
23
24
25
26
27
28
29
router/aRoutes.js
import { lazy } from 'react';
import { Navigate } from 'react-router-dom';
const aRoutes = [{
path: '/a',
component: () => <Navigate to="/a/a1" />
}, {
path: '/a/a1',
name: 'a-a1',
component: lazy(() => import('../views/a/A1')),
meta: {}
}, {
path: '/a/a2',
name: 'a-a2',
component: lazy(() => import('../views/a/A2')),
meta: {}
}, {
path: '/a/a3',
name: 'a-a3',
component: lazy(() => import('../views/a/A3')),
meta: {}
}];
export default aRoutes;
2
3
4
5
6
7
8
9
10
11
12
13
14
15
16
17
18
19
20
21
22
App.jsx
import React from "react";
import { HashRouter } from 'react-router-dom';
import HomeHead from './components/HomeHead';
import RouterView from "./router";
const App = function App() {
return <HashRouter>
<HomeHead />
<div className="content">
<RouterView />
</div>
</HashRouter>;
};
export default App;
2
3
4
5
6
7
8
9
10
11
12
13
14
15
16
# fetch知识点补充
向服务器发送数据请求的方案:
- 第一类:XMLHttpRequest
- ajax:自己编写请求的逻辑和步骤
- axios:第三方库,对XMLHttpRequest进行封装「基于promise进行封装」
第二类:fetch 。ES6内置的API,本身即使基于promise,用全新的方案实现客户端和服务器端的数据请求
- 不兼容IE
- 机制的完善度上,还是不如XMLHttpRequest的「例如:无法设置超时时间、没有内置的请求中断的处理...」
第三类:其它方案,主要是跨域为主
- jsonp
- postMessage
- 利用img的src发送请求,实现数据埋点和上报!! ...
# fetch基础知识
let promise实例(p) = fetch(请求地址,配置项);
- 当请求成功,p的状态是fulfilled,值是请求回来的内容;如果请求失败,p的状态是rejected,值是失败原因!
- fetch和axios有一个不一样的地方:
- 在fetch中,只要服务器有反馈信息(不论HTTP状态码是多少),都说明网络请求成功,最后的实例p都是fulfilled,只有服务器没有任何反馈(例如:请求中断、请求超时、断网等),实例p才是rejected。
- 在axios中,只有返回的状态码是以2开始的,才会让实例是成功态。
配置项:
method 请求的方式,默认是GET「GET、HEAD、DELETE、OPTIONS;POST、PUT、PATCH;」
cache 缓存模式「*default, no-cache, reload, force-cache, only-if-cached」
credentials 资源凭证(例如cookie)「include, *same-origin, omit」
fetch默认情况下,跨域请求中,是不允许携带资源凭证的,只有同源下才允许!!
include:同源和跨域下都可以
same-origin:只有同源才可以
omit:都不可以
headers:普通对象{}/Headers实例
- 自定义请求头信息
body:设置请求主体信息
- 只适用于POST系列请求,在GET系列请求中设置body会报错{让返回的实例变为失败态}
- body内容的格式是有要求的,并且需要指定 Content-Type 请求头信息
- JSON字符串
application/json'{"name":"xxx","age":14,...}' - URLENCODED字符串
application/x-www-form-urlencoded'xxx=xxx&xxx=xxx' - 普通字符串 text/plain
- FormData对象 multipart/form-data
主要运用在文件上传(或者表单提交)的操作中!
let fm=new FormData(); fm.append('file',文件); - 二进制或者Buffer等格式
- JSON字符串
我们发现,相比较于axios来讲,fetch没有对GET系列请求,问号传参的信息做特殊的处理(axios中基于params设置问号参数信息),需要自己手动拼接到URL的末尾才可以。
Headers类:头处理类「请求头或者响应头」 Headers.prototype
- append 新增头信息
- delete 删除头信息
- forEach 迭代获取所有头信息
- get 获取某一项的信息
- has 验证是否包含某一项
let head = new Headers;
head.append('Content-Type', 'application/json');
head.append('name', 'zhufeng');
2
3
服务器返回的response对象「Response类的实例」 私有属性:
- body 响应主体信息「它是一个ReadableStream可读流」
- headers 响应头信息「它是Headers类的实例」
- status/statusText 返回的HTTP状态码及描述
Response.prototype
- arrayBuffer
- blob
- formData
- json
- text
这些方法就是用来处理body可读流信息的,把可读流信息转换为我们自己需要的格式。
返回值是一个promise实例,这样可以避免,服务器返回的信息在转换中出现问题(例如:服务器返回的是一个流信息,我们转换为json对象肯定是不对的,此时可以让其返回失败的实例即可)
let p = fetch('/api/getTaskList?state=2', {
headers: head
});
p.then(response => {
// 进入THEN中的时候,不一定是请求成功「因为状态码可能是各种情况」
let { headers, status, statusText } = response;
if (/^(2|3)\d{2}$/.test(status)) {
// console.log('成功:', response);
// console.log('服务器时间:', headers.get('Date'));
return response.json();
}
// 获取数据失败的「状态码不对」
return Promise.reject({
code: -100,
status,
statusText
});
}).then(value => {
console.log('最终处理后的结果:', value);
}).catch(reason => {
// 会有不同的失败情况
// 1.服务器没有返回任何的信息
// 2.状态码不对
// 3.数据转换失败
// ....
console.log('失败:', reason);
});
document.body.addEventListener('click', function () {
fetch('/api/addTask', {
method: 'POST',
// 设置请求头
headers: {
'Content-Type': 'application/x-www-form-urlencoded'
},
// 自己手动把请求主体格式变为服务器需要的
body: qs.stringify({
task: '我学会了Fetch操作',
time: '2022-12-15 12:00:00'
})
}).then(response => {
let { status, statusText } = response;
if (/^(2|3)\d{2}$/.test(status)) {
return response.json();
}
return Promise.reject({
code: -100,
status,
statusText
});
}).then(value => {
console.log('最终处理后的结果:', value);
}).catch(reason => {
message.error('请求失败,请稍后再试~~');
});
});
/* fetch中的请求中断 */
let ctrol = new AbortController();
fetch('/api/getTaskList', {
// 请求中断的信号
signal: ctrol.signal
}).then(response => {
let { status, statusText } = response;
if (/^(2|3)\d{2}$/.test(status)) return response.json();
return Promise.reject({
code: -100,
status,
statusText
});
}).then(value => {
console.log('最终处理后的结果:', value);
}).catch(reason => {
// {code: 20,message: "The user aborted a request.", name: "AbortError"}
console.dir(reason);
});
// 立即中断请求
// ctrol.abort();
let ctrol = new AbortController();
http.get('/api/getTaskList', {
params: {
state: 2
},
signal: ctrol.signal
}).then(value => {
console.log('成功:', value);
});
ctrol.abort();
document.body.addEventListener('click', function () {
http.post('/api/addTask', {
task: '我学会了Fetch操作『包括封装』',
time: '2022-12-15 12:00:00'
}).then(value => {
console.log('最终处理后的结果:', value);
});
});
2
3
4
5
6
7
8
9
10
11
12
13
14
15
16
17
18
19
20
21
22
23
24
25
26
27
28
29
30
31
32
33
34
35
36
37
38
39
40
41
42
43
44
45
46
47
48
49
50
51
52
53
54
55
56
57
58
59
60
61
62
63
64
65
66
67
68
69
70
71
72
73
74
75
76
77
78
79
80
81
82
83
84
85
86
87
88
89
90
91
92
93
94
95
96
97
98
99
100
101
102
# 封装请求
/*
http([config])
+ url 请求地址
+ method 请求方式 *GET/DELETE/HEAD/OPTIONS/POST/PUT/PATCH
+ credentials 携带资源凭证 *include/same-origin/omit
+ headers:null 自定义的请求头信息「格式必须是纯粹对象」
+ body:null 请求主体信息「只针对于POST系列请求,根据当前服务器要求,如果用户传递的是一个纯粹对象,我们需要把其变为urlencoded格式字符串(设定请求头中的Content-Type)...」
+ params:null 设定问号传参信息「格式必须是纯粹对象,我们在内部把其拼接到url的末尾」
+ responseType 预设服务器返回结果的读取方式 *json/text/arrayBuffer/blob
+ signal 中断请求的信号
-----
http.get/head/delete/options([url],[config]) 预先指定了配置项中的url/method
http.post/put/patch([url],[body],[config]) 预先指定了配置项中的url/method/body
*/
import _ from '../assets/utils';
import qs from 'qs';
import { message } from 'antd';
/* 核心方法 */
const http = function http(config) {
// initial config & validate 「扩展:回去后,可以尝试对每一个配置项都做校验?」
if (!_.isPlainObject(config)) config = {};
config = Object.assign({
url: '',
method: 'GET',
credentials: 'include',
headers: null,
body: null,
params: null,
responseType: 'json',
signal: null
}, config);
if (!config.url) throw new TypeError('url must be required');
if (!_.isPlainObject(config.headers)) config.headers = {};
if (config.params !== null && !_.isPlainObject(config.params)) config.params = null;
let { url, method, credentials, headers, body, params, responseType, signal } = config;
// 处理问号传参
if (params) {
url += `${url.includes('?') ? '&' : '?'}${qs.stringify(params)}`;
}
// 处理请求主体信息:按照我们后台要求,如果传递的是一个普通对象,我们要把其设置为urlencoded格式「设置请求头」?
if (_.isPlainObject(body)) {
body = qs.stringify(body);
headers['Content-Type'] = 'application/x-www-form-urlencoded';
}
// 类似于axios中的请求拦截器:每一个请求,递给服务器相同的内容可以在这里处理「例如:token」
let token = localStorage.getItem('tk');
if (token) headers['authorization'] = token;
// 发送请求
method = method.toUpperCase();
config = {
method,
credentials,
headers,
cache: 'no-cache',
signal
};
if (/^(POST|PUT|PATCH)$/i.test(method) && body) config.body = body;
return fetch(url, config)
.then(response => {
let { status, statusText } = response;
if (/^(2|3)\d{2}$/.test(status)) {
// 请求成功:根据预设的方式,获取需要的值
let result;
switch (responseType.toLowerCase()) {
case 'text':
result = response.text();
break;
case 'arraybuffer':
result = response.arrayBuffer();
break;
case 'blob':
result = response.blob();
break;
default:
result = response.json();
}
return result;
}
// 请求失败:HTTP状态码失败
return Promise.reject({
code: -100,
status,
statusText
});
})
.catch(reason => {
// 失败的统一提示
message.error('当前网络繁忙,请您稍后再试~');
return Promise.reject(reason); //统一处理完提示后,在组件中获取到的依然还是失败
});
};
/* 快捷方法 */
["GET", "HEAD", "DELETE", "OPTIONS"].forEach(item => {
http[item.toLowerCase()] = function (url, config) {
if (!_.isPlainObject(config)) config = {};
config['url'] = url;
config['method'] = item;
return http(config);
};
});
["POST", "PUT", "PATCH"].forEach(item => {
http[item.toLowerCase()] = function (url, body, config) {
if (!_.isPlainObject(config)) config = {};
config['url'] = url;
config['method'] = item;
config['body'] = body;
return http(config);
};
});
export default http;
2
3
4
5
6
7
8
9
10
11
12
13
14
15
16
17
18
19
20
21
22
23
24
25
26
27
28
29
30
31
32
33
34
35
36
37
38
39
40
41
42
43
44
45
46
47
48
49
50
51
52
53
54
55
56
57
58
59
60
61
62
63
64
65
66
67
68
69
70
71
72
73
74
75
76
77
78
79
80
81
82
83
84
85
86
87
88
89
90
91
92
93
94
95
96
97
98
99
100
101
102
103
104
105
106
107
108
109
110
111
112
113
114
115
116
117
118